Table of Contents
Advertisement
Available languages
Available languages
Quick Links
Installation instructions for part GMOS-LAN-04
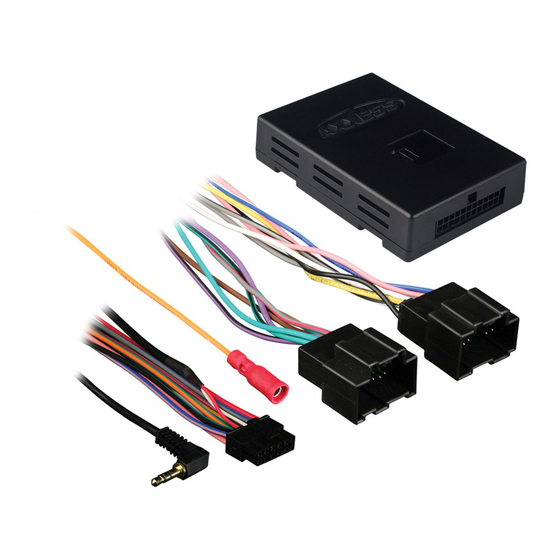
GMOS-LAN-04
GM Data Interface
• Provides accessory power (12-volt 10-amp)
• Retains R.A.P. (retained accessory power)
• Provides NAV outputs (parking brake,
reverse, speed sense)
• Retains chimes
• Pre-wired ASWC-1 harness (ASWC-1 sold
separately)
CHEVROLET
Cobalt
2007-2010
HHR
2006-2011
Malibu
2008-2012
®
Axxess Integrate
®
2006-2012
INTERFACE FEATURES
• Retains OnStar / OE Bluetooth
• Adjustable OnStar level
• Designed for amplified models
• Retains balance and fade
• USB-CAB (sold separately) updatable
APPLICATIONS
PONTIAC
SATURN
G6
2010
Aura
G6 (5th digit of VIN must
Sky
be a J, K, or L)
2009
G5
2007-2009
Solstice
2006-2009
axxessinterfaces.com
Connections To Be Made .........................................2
Installing The Gmos-Lan-04 ..................................3
Initializing The Gmos-Lan-04 ................................3
Adjusting The Gmos-Lan-04 ..................................3
INTERFACE COMPONENTS
• GMOS-LAN-04 interface • GMOS-LAN-04 harness
• 16-pin harness with stripped leads
TOOLS REQUIRED
• Wire cutter • Crimp tool • Solder gun • Tape
• Connectors (example: butt-connectors, bell caps, etc.)
• Small flat-blade screwdriver
2007-2009
2007-2009
CAUTION!
especially air bag indicator lights must be connected before cycling
the ignition. Also, do not remove the factory radio with the key in the
on position, or while the vehicle is running.
•
metraonline.com
Table of Contents
All accessories, switches, climate controls panels, and
© COPYRIGHT 2017 METRA ELECTRONICS CORPORATION
Advertisement
Table of Contents

Related Manuals for Axxess GMOS-LAN-04


Summary of Contents for Axxess GMOS-LAN-04
- Page 1 • Retains OnStar / OE Bluetooth INTERFACE COMPONENTS • Retains R.A.P. (retained accessory power) • Adjustable OnStar level • GMOS-LAN-04 interface • GMOS-LAN-04 harness • Provides NAV outputs (parking brake, • Designed for amplified models • 16-pin harness with stripped leads reverse, speed sense) •...
- Page 2 Adjustment section for further instructions. connected to hear sound from the factory amplifier. Note: The relay attached to the GMOS-LAN-04 harness is only for audible turn signal • If the aftermarket radio has an illumination wire, connect the Orange/White wire to it.
- Page 3 • With a small flat-blade screwdriver, adjust the potentiometer clockwise to raise the audio level; counterclockwise to lower the audio level. • Connect the GMOS-LAN-04 harness to the wiring harness in the vehicle. • Once at a desired level, audio level adjustment is complete.
- Page 4 ® Installation instructions for part GMOS-LAN-04 IMPORTANT If you are having difficulties with the installation of this product, please call our Tech Support line at 1-800-253-TECH. Before doing so, look over the instructions a second time, and make sure the installation was performed exactly as the instructions are stated.
- Page 5 COMPONENTES DE LA INTERFASE • Retiene R.A.P. (corriente de accesorio retenida) • Diseñado para modelos amplificados • Interfase GMOS-LAN-04 • Arnés GMOS-LAN-04 • Proporciona salidas de NAV (freno de mano, • Retiene el balance y la intensidad • Arnés de 16 pins con conectores pelados reversa y sensor de velocidad) •...
- Page 6 Nota: El relé sujetado al arnés del GMOS-LAN-04 es solo para chasquido de • Si el radio de mercado secundario tiene un cable de iluminación, conecte el señal de direccional audible.
- Page 7 • Con el vehículo y el radio encendidos, aumente el volumen hasta 3/4 de su totalidad . • Conecte el arnés de 16 pins con conectores pelados, y el arnés GMOS-LAN-04, • Con un pequeño destornillador de cabeza plana, ajuste el potenciómetro hacia a la interfase.
- Page 8 ® Instrucciones de instalación para la pieza GMOS-LAN-04 IMPORTANTE Si tiene dificultades con la instalación de este producto, llame a nuestra línea de soporte técnico al 1-800-253-TECH. Antes de hacerlo, revise las instrucciones por segunda vez y asegúrese de que la instalación se haya realizado exactamente...
Need help?
Do you have a question about the GMOS-LAN-04 and is the answer not in the manual?
Questions and answers