
Related Manuals for Pyxis SP-380


Summary of Contents for Pyxis SP-380
- Page 1 SP-380 Handheld Dual Fluorometer - PTSA and Fluorescein Operation Manual Rev. A Firmware version 1.xx...
- Page 2 Pyxis Lab, Inc PO Box 802 Hopkinton, MA 01748 www.pyxis-lab.com service@pyxis-lab.com...
-
Page 3: Table Of Contents
1 Contents General Description ................. 1 Specification..................1 Pyxis SP-380 Major Features ............1 Unpackaging the Instrument ............2 Standard Accessories ................ 2 Optional Accessories ................. 2 Light Shield Cover ................2 Start Pyxis SP-380 ..................3 Battery Installation ................3 Description of the Navigational Control Keys ........ - Page 4 Warranty Term The Pyxis warranty term is thirteen (13) months ex-works. In no event shall the standard limited warranty coverage extend beyond thirteen (13) months from original shipment date.
-
Page 5: General Description
320x240 TFT-LCD, visible under direct sunlight Dimension L160 W74 H33 (mm) Weight 310g (without battery) 40 to 106 ℉ (4 to 41 ℃) Temperature Range 85% at 106 ℉ (41 ℃) Humidity Environmental IP67, dustproof and waterproof 1.2 Pyxis SP-380 Major Features... -
Page 6: Unpackaging The Instrument
0 to 300 ppb. The fluorescence PTSA measurement is automatically compensated for sample color and turbidity interference. Pyxis SP-380 is pre-calibrated for measuring fluorescein in the range of 0 to 20 ppb. Large color graphic screen that can be read on direct sunlight. -
Page 7: Start Pyxis Sp-380
After new battery installation, Pyxis SP-380 will be automatically turned on to the measurement mode. The Pyxis SP-380 battery compartment, shown in Figure 2, is on the back side of the instrument. Install batteries as followings: 1. Remove the battery compartment cover by loosening four screws. -
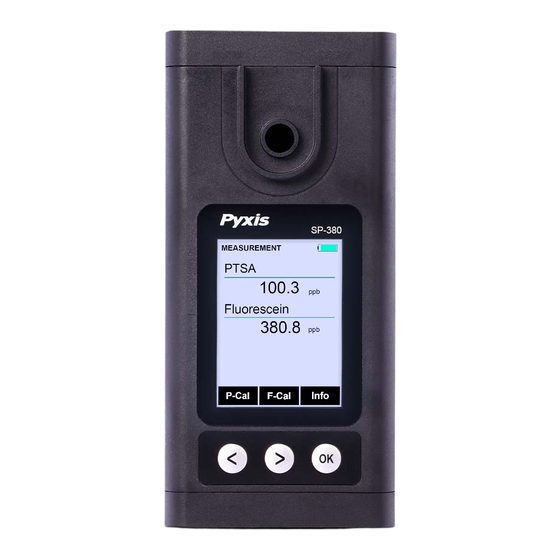
Page 8: Description Of The Navigational Control Keys
2.2 Description of the Navigational Control Keys The Pyxis SP-380 has three keys as shown in Figure 3. The left (<), right (>) and OK keys are used to launch an action indicated on the screen right above the keys. The action associated with each key could be different in different operation modes. -
Page 9: Turning On/Off Pyxis Sp-380
2.3 Turning On/Off Pyxis SP-380 To turn on SP-380, press and hold on the OK key for 3 seconds, and release the OK key when the LCD is lit. To turn off SP-380, press and hold on the OK key for 3 seconds, and release the OK key when the LCD is off. - Page 10 3) A Screen similar to Figure 4 appears. The unit is actively reading and displaying both PTSA and fluorescein. The values will be very low if DI water is used; PTSA and fluorescein should be near zero. A low non-zero value (e.g. 0.2 or 0.4, etc.) is not problematic.
- Page 11 6) Press Zero labeled key (<) to set the zero point. 7) After successful zero set, a checkmark symbol will appear next to “Press Zero Button” to confirm success. The screen will also update to show the Slope steps, as in Figure 6. The Cycle command replaces Zero on the black bar and the possible PTSA selection is displayed in red.
- Page 12 MEASUREMENT CHLOROPHYLLE CALIBRATION Insert DI Solution √ Press Zero Button Insert 100 ppb Solution √ Press Slope Button Calibration Succeed Cycle Slope Exit Figure 7 12) Press the Exit labeled key (OK) to return to the basic read screen. The screen will be similar to Fig.
-
Page 13: Fluorescence Calibration Process
on OK or the other keys will keep the timer going, giving you time to add the next one. To ensure accurate results and avoid sample carry-over/contamination, rinse at least twice with the next sample before closing light shield (it’s smart to include rinsing the inside surface of the light shield.) 4) Always rinse the unit with clean water after use and dry by clean tissue or paper towel. - Page 14 MEASUREMENT FLUORESCEIN CALIBRATION Insert DI Solution √ Click Zero Button Insert ppb Solution Click Slope Button Press cycle to choose solution Cycle Slope Exit Figure 9 6) Rinse the sample cell out thoroughly (twice) with the 50 ppb fluorescein standard and with the measurement cell near full, close the light shield.
- Page 15 9) Press the Continue labeled key (>) to continue middle range fluorescein calibration, the screen will also update to show the second Slope step, as in Figure 11. The possible fluorescein selection is displayed in red. The default is 250 ppb. If middle range and high range fluorescein calibration are not required, press the Exit labeled key (OK) any keys to exit.
- Page 16 MEASUREMENT FLUORESCEIN CALIBRATION Insert 50 Solution √ Click Slope Button Insert ppb Solution √ Click Slope Button Calibration Succeed Press Continue to Proceed Cycle Slope Exit Figure 12 13) Press the Continue labeled key (>) to continue high range fluorescein calibration, the screen will also update to show the third Slope step, as in Figure 13.
- Page 17 14) Rinse the sample cell out thoroughly (twice) with the 500 ppb fluorescein standard and with the measurement cell near full, close the light shield. (If the screen darkens, promptly press any key to re-set the timer for auto shutdown. The key pressed does not perform its activity, only re-sets timer.
-
Page 18: Device Information And Diagnosis
Press the diagnosis labeled key to switch to the diagnosis screen where raw measurement data are displayed (Figure 16). The information has no use for normal operation. Please provide an image of both the device information screen and the diagnosis screen when you contact Pyxis (service@pyxis-lab.com) for troubleshooting your device. -
Page 19: Wireless Connection
Figure 16 6 Wireless Connection Pyxis SP-380 can be connected to a smart phone or a computer via WIFI or Bluetooth for upgrading the device software. SP-380 can be wirelessly paired with other Pyxis devices for exchanging data. In the normal operation modes, the wireless function is turned off.
Need help?
Do you have a question about the SP-380 and is the answer not in the manual?
Questions and answers