Table of Contents
Advertisement
Quick Links
Advertisement
Table of Contents

Related Manuals for Lacunza Vulcano 7T E3 E/E


Summary of Contents for Lacunza Vulcano 7T E3 E/E
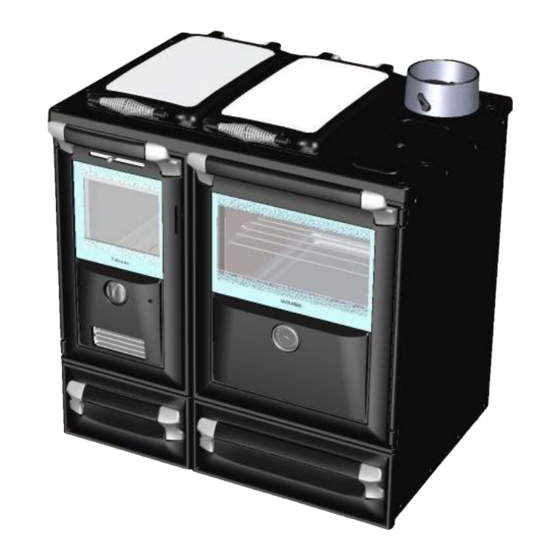
- Page 1 INSTRUCTIONS BOOK Vulcano 7T E3 E/E Cookers...
-
Page 2: Table Of Contents
Confident of its experience, LACUNZA makes use of advanced technology in design and manufacture in all its range of heaters. This document will help you install and use your cooker, under the best conditions, for your comfort and safety. -
Page 3: Presentation Of The Appliance
This appliance is designed to burn wood and solid fuel in absolutely safe conditions WARNING A faulty installation can have serious consequences which may lead to injuries or death. We recommend that the installation and all maintenance work are carried out only by a qualified, registered heating engineer 1.- PRESENTATION OF THE APPLIANCE 1.1. - Page 4 (*) Maximum power: Approximate heating capacity assigned to the device in terms of depression and burden greater than those mandated by the regulations (performance values, emissions, not limited radiation temperatures) over the parameter set by the regulations. FLOW RETURN Adjustable in height from 860 to 900 mm Flue outlet 150mm Figure No.1 –...
-
Page 5: Description
1.3. Description 1.4. Operation Wood-burning cooker per UNE-EN 12815 The spread of heat is made by the hot water system as well as by radiation and convection Intermittently operational, • from the top, sides and front of the cooker. atmospheric heating appliance. Normal operation of the cooker means that the •... -
Page 6: Instructions For The Installer
2.2. Site for installation: Distance Distance Distance C Ventilation: In order for the appliance to operate correctly, Vulcano 7T E3 E/E 200 mm 200 mm 200 mm it is important to ensure that there is sufficient air supply to the room... -
Page 7: Smoke Vent
2.3. Smoke vent: • The cooker must be connected to the chimney flue using special piping to The flue must be installed in line with current withstand the products of combustion Building Regulations. (e.g. stainless steel, enamelled steel). This piping is available from specialised Flue: traders. -
Page 8: Connection To The Heating Circuit
Connections on Vulcano 7T E3 E/E cookers entire system at a pressure of more than 3.5 bar. Lacunza cannot be held liable for the consequences of doing so. -
Page 9: Examples Of Plumbing Diagrams
2.8 Examples of plumbing diagrams The following hydraulics diagrams illustrate the different types of central heating systems to which this appliance can be connected, but are not to be used as working drawings. Example 1: open plumbing system with cylinder for hot water... - Page 10 Example 2: Sealed plumbing system with cylinder for hot water Example 3: open plumbing system with double boiler. Notes: In a circuit where a Hot water cylinder is used it is recommended, depending on domestic requirements that an indirect cylinder with a capacity of 135-180 litres be used with 1” flow and return pipes not exceeding 7.8m each in length.
-
Page 11: Directions For Use
3.- DIRECTIONS FOR USE The manufacturer accepts no liability with regards to the deterioration of parts caused by the use of incorrect fuels or unauthorised modifications made to the appliance Only use original replacement parts All national and local building regulations All types of plastic, spray cans, etc. - Page 12 With the fire stabilised, use the log loads The first time the cooker is lit, the fire • • and primary draught regulator "E", and should be gentle to allow the parts of the draught regulator “F” on the Vulcano appliance to dilate and dry.
-
Page 13: Operation
3.3. Operation: 3.5. Ash removal. Only operate the appliance with the firebox Open the loading door and move the embers door shut. Normal appliance operation is with around with the aid of a scraper so that they the doors fully closed and the direct draught fall through the grate. -
Page 14: Characteristics Of The Oven
Flue socket this period is over, the thermometer will The gas flue socket can be fitted either at give and accurate temperature reading. the back or on top of the cooker. The simple gas flue socket is fitted on the back (without flapper... -
Page 15: Height Adjustment (Legs)
3.11. Lifting grate mechanism insulation has been placed in contact with On the Vulcano 7T E3 E/E model, the the furniture next to the range. height of the firebox grate can be set using... -
Page 16: Drawer Modules
3.12. Drawer modules 3.13.2. Hob: Enamelled cast-iron top surface There are also drawer modules which Enamelled area match the cooker that can be used to • Clean these parts with a slightly damp organise your kitchen. There are modules cloth. Do not use abrasive, corrosive, chlorine-based acid-based in 4 different dimensions:... -
Page 17: Maintenance Of The Chimney And Sweeping
3.15. Important advice: Lacunza recommends that only authorised replacement parts be used. Lacunza accepts no responsibility for any Figure 18 modification to the product which it has • Upper gas flue socket. The flue is not authorised. -
Page 18: Troubleshooting
3.16. Troubleshooting This sign recommends a qualified professional to perform this operation Problem Possible cause Action The fire does not burn well Green or wet wood Use hard wood, with at least 2 years of cut and The fire does not last stored in a ventilated and sheltered place. -
Page 19: Vulcano Drawer Modules
4.- VULCANO DRAWER MODULES (OPTIONAL) 4.1. Packaging The complete drawer module is supplied in a single package. 4.2. General dimensions MODULE 3 MODULE 4 Height-adjustable legs, 810 minimum Height-adjustable legs, 810 minimum Figure No.1 – Dimensions of Vulcano Figure No.2-Dimensions of Vulcano drawer drawer module 3 in mm module 4 in mm. -
Page 20: Instructions For The Installer
4.5. Instructions for the installer 4 Fit the brackets with which you are going 4.5.1 Assembly Instructions. to secure the module to the floor. Screw 1 WARNING! Be careful when opening the them onto the module with a grover washer drawers before the drawer module is secured and a normal M6 washer. - Page 21 7 Then put the drawer module back in 11 Then fit the drawer slides inside the place and line up the holes. drawer module slides. 8 Use a hammer to start to insert the screws into the floor. 12 When the slides are inserted, push the drawer in fully.
-
Page 22: Instructions To Fix Together The Cooker, The Insulation Side Model And
5.-INSTRUCTIONS TO FIX TOGETHER THE COOKER, THE INSULATION SIDE MODEL AND THE DRAWERS MODULE -1 Place the cooker in position. The cast-iron top surface must never stand out beyond the top surface next to it. We recommend that the cooker should stand out 1 cm in front of the top surface. -
Page 23: Exploded Diagram
6.-EXPLODED DIAGRAM VULCANO 7 E3 E-E GENERAL EXPLODED DIAGRAM... - Page 24 A- VULCANO 7 E3 E-E COOKER FRAME SUB COMPONENTS EXPLODED DIAGRAM...
- Page 25 B- VULCANO 7 E3 E-E FIREBOX DOOR SUBCOMPONENTS C-VULCANO 7 E3 E-E OVEN DOOR SUB COMPONENTS EXPLODED DIAGRAM...
- Page 26 D-VULCANO 7 E3 E-E FLUE SPIGOT SUB COMPONENTS EXPLODED DIAGRAM E- VULCANO 7 E3 CAST IRON TOP FOR TOP FLUE CONNECTION SUB COMPONENTS EXPLODED DIAGRAM...
- Page 27 F-VULCANO 7 E3 E-E INSULATED COVER FOR TOP FLUE OUTLET SUB COMPONENTS EXPLODED DIAGRAM G-VULCANO 7 E3 E-E LEFT HAND SIDE DRAWER SUB COMPONENTS EXPLODED DIAGRAM...
- Page 28 H-VULCANO 7 E3 E-E UNDERNEATH OVEN DRAWER SUB COMPONENTS EXPLODED DIAGRAM...
- Page 29 VULCANO 7 E3 E/E EXPLODED DIAGRAM VULCANO 7 E3 E-E GENERAL EXPLODED NUMERO Nº Plano DENOMINACION CANTIDAD UNIDADES Vulcano 7 E3 E-E Cooker frame assembly Unid. Vulcano 7 E3 E-E Firebox door assembly Unid. Vulcano 7 E3 E-E oven door assembly Unid.
- Page 30 B- VULCANO 7 E3 E-E FIREBOX DOOR SUBCOMPONENTS EXPLODED DIAGRAM VU-734 Vulcano 7 E3 External firebox door Unid. VU-736 Vulcano Nº7 E3-E5 Internal firebox door Unid. VU-725 Vulcano 7E5 Firebox lower grate Unid. VU-635 Vulcano Nº7 E-E5 Secondary air grate Unid.
- Page 31 E- VULCANO 7 E3 CAST IRON TOP FOR TOP FLUE CONNECTION SUB COMPONENTS EXPLODED DIAGRAM VU-390 Vulcano Nº7 Top flue outlet CI top Unid. VU-411 Vulcano Nº7 Cooking hob Unid. VU-413 Vulcano Cleaning access plate Unid. VU-519 Insolated cover Unid. VU-410 Vulcano screw enamelled cover Unid.
- Page 32 RHS handle bracket Unid. VU-083 Vulcano Nº5-7 Manilla Pta.Cajon/Horno Drawer/ Firebox handle Unid. CE-046 Century Conjunto Guia Cajon set of drawer guides LACUNZA KALOR GROUP, S.A.L Pol. Ind. Ibarrea s/n 31800 Alsasua (Navarra) SPAIN Tel. ++948/56 35 11 Fax. ++948/56 35 05 comercial@lacunza.net...
Need help?
Do you have a question about the Vulcano 7T E3 E/E and is the answer not in the manual?
Questions and answers