Table of Contents
Advertisement
Quick Links
Advertisement
Table of Contents

Related Manuals for Sparco F300i


Summary of Contents for Sparco F300i
- Page 1 0+ Sparco F300i ISOFIX for Group INSTRUCTION MANUAL 0-13...
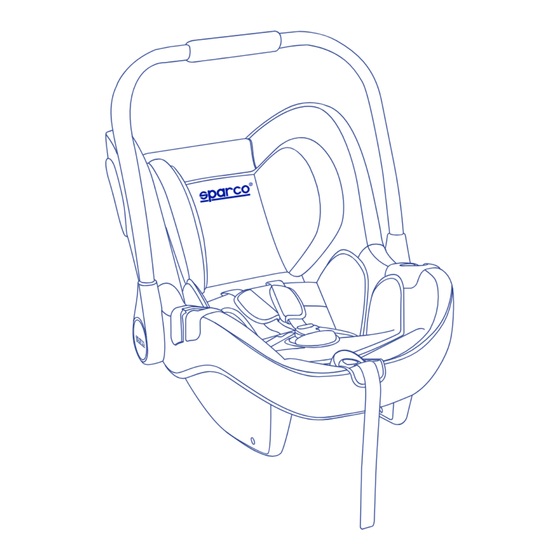
- Page 2 Know Your Child Seat 1. Headrest 2. Shoulder pad 3. Shoulder strap 4. Harness buckle 5. Harness release button 6. Harness strap 7. Handle 8. Lap belt guide 9. Seat shell 10. Handle adjustor 11. Harness yoke 12. Headrest adjuster 13.
- Page 3 Suitability ...as a child safety seat installed in a vehicle. EU Standard ECE R44 04 Group Weight Orientation Fixing of child Group Child seat belt Backward 0-18 0-13kg (5 points) months facing *ECE = European Standard for Safety Equipment The child safety seat has been designed, tested and certified according to the requirements of the European Standard for Child Safety Equipment (ECE R44/04).
-
Page 4: Use In The Vehicle
Use in The Vehicle DO NOT use on a passenger seat with a front airbag! Danger! An airbag hitting the infant carrier can cause serious injuries to your child, possibly resulting in death. Please observe the instructions in your vehicle manual for the use of child seats. -
Page 5: With The Vehicle's 3-Point Seatbelt
With the vehicle's 3-point seatbelt You can use your child car seat as follows: In the direction of travel Against the direction of travel With 2-point belt NO 1 With 3-point belt YES 2 On front passenger seat YES 3 On outer rear seat On centre rear seat NO 4... -
Page 6: Securing Your Baby
Securing Your Baby 1. Securing your baby using the baby insert For the protection of your baby. The baby insert gives your baby the necessary support while he or she is still small. The baby insert is used to provide extra comfort for very small babies. - Page 7 2. Adjusting The Handle You can engage the adjustor in three positions: Simultaneously press both buttons on the handle. Then whilst holding the adjustor pressed turn the handle backwards until it engages in the desired position. For carrying and for transport in the car. Caution! Ensure that the handle is securely engaged before you pick up the infant carrier.
- Page 8 3. Adjusting the headrest A correctly adjusted headrest ensures your baby’s optimal posture in the infant carrier. The headrest must be adjusted so that the shoulder straps are at the same level as your baby's shoulders or slightly above. To adjust the height of the headrest to fit your baby: Tilt the headrest adjuster until it disengages.
- Page 9 5. Securing your baby using the harness Loosening the shoulder straps. Open the harness buckle (press the red release button). Place your baby into the infant carrier. Put the shoulder straps over the shoulders of your baby, then put the buckle tongues together and engage in the harness buckle with an audible "click".
- Page 10 6. Tightening the harness Pull the strap end Caution! Pull the strap end straight towards you, not upwards or downwards. Please pay attention to the strap end. Whilst traveling (especially outside the car) it should always be attached to the cover.
-
Page 11: Installation In The Vehicle
Installation In The Vehicle Please do not leave your child unattend- ed in the child safety seat in the vehicle. For the protection of all vehicle occupants. In the case of an emergency stop or an accident unsecured persons or objects may cause injury to other vehicle occupants. - Page 12 1. Securing the infant carrier in your vehicle To securing the infant carrier using the 3-point belt of your vehicle proceed as follows: Place the infant carrier rearward-facing on the vehicle seat (baby is facing backwards). Tip! In certain cases it is possible that the infant carrier dose not rest securely or is inclined too steeply on the vehicle seat.
- Page 13 2. Checklist for the correct installation of the infant carrier in your car For the safety of your baby, please check that... The infant carrier is installed rearward-facing. The infant carrier is only installed on the front passenger seat if no front airbag can strike the infant carrier.
-
Page 14: Fitting The Sunshade
Fitting the sunshade Hook the elastic loops of the sunshade from underneath into the hooks on the handle. Pull the elastic seam over the upper edge of the infant carrier. Hang the elastic loops in the hooks under the edge of the infant carrier. -
Page 15: Care Instructions
Care instructions To retain the protective e ect In an accident at a collision speed above 10 km/h the child safety seat could su er damage which is not necessarily obvious. In such cases it is extremely important that you replace the child seat. - Page 16 Remedy Wash out the harness buckle so that it functions properly once again: Removing the harness buckle Open the harness buckle (press the red release button). Loosen the harness straps. Tilt the infant carrier backwards and open the user instructions compartment. Push the metal plate, with which the harness buckle is fixed to the seat shell, on its side upwards through the belt slot.
- Page 17 2. Cleaning Please be sure to use only original Diadem replacement seat covers, the seat cover is important to the proper functioning of the system. Replacement seat covers are available from your retailer and or at branches. The child seat must not be used without the seat cover.
- Page 18 3. Removing the harness Open the harness buckle (press the red release button). Unhook the shoulder straps from the harness yoke. Pull the shoulder straps out of the belt slots of the baby shell, and unthread the shoulder pads. Pull out the metal part which is used to fasten the strap to the bottom of the baby shell.
- Page 19 4. Removing the cover Take the harness away and remove the cover of the headrest. Take the elastic loops o the hooks under the edge of the baby shell. Unhooking all the elastic loops from its hook stands, so you can remove the seat cover from the seat. 5.
- Page 20 NOTICE 1. This is a 'Universal’ child restraint. It is approved to regulation No. 44.04 series of amendments, for general use in vehicles and it will fit most, but not all, car seats. 2. A correct fit is likely if the vehicle manufacturer has declared in the vehicle handbook that the vehicle is capable of accepting a 'Universal' child restraint for this age group.
Need help?
Do you have a question about the F300i and is the answer not in the manual?
Questions and answers