Tait TM9100 User Manual
Hide thumbs
Also See for TM9100:
- Service manual (485 pages) ,
- User manual (91 pages) ,
- Tune up and inspection (39 pages)
Table of Contents
Advertisement
Quick Links
Advertisement
Table of Contents
Troubleshooting

Related Manuals for Tait TM9100


Summary of Contents for Tait TM9100
-
Page 3: Directive 1999/5/Ce Declaration Of Conformity
Veja também: http://eudocs.taitradio.com/ Español Svensk Por medio de la presente Tait Electronics Limi- Härmed intygar Tait Electronics Limited att ted declara que las radios TMAB1E & denna TMAB1E & TMAH5E står I överens- TMAH5E cumplen con los requisitos esencia- stämmelse med de väsentliga egenskapskrav... -
Page 4: Updates Of Manual And Equipment
Copyright and trademarks All information contained in this document is the property of Tait Electronics Limited. All rights reserved. This document may not, in whole or in part, be copied, photocopied, reproduced, translated, stored, or reduced to any electronic medium or machine-readable form, without prior written permission from Tait Electronics Limited. - Page 5 (WEEE) Directive requires that this product be disposed of separately from the general waste stream when its service life is over. For more information about how to dispose of your unwanted Tait product, visit the Tait Electronics WEEE website at www.taitradio.com/weee. Please be environmentally responsible and dispose through the original supplier, or contact Tait Electronics Limited.
-
Page 6: For Your Safety
For your safety Before using your radio, please read the following important safety and compliance information. Radio frequency exposure information For your own safety and to ensure you comply with the Federal Communication Commission’s (FCC) radio frequency (RF) exposure guidelines, please read the following information before using this radio. -
Page 7: Compliance With Rf Energy Exposure Standards
110 W mobiles, the minimum safe distance is 44 inches (1.1 m). ■ Use the radio only with Tait-approved antennas and attachments, and make only authorized modifica- tions to the antenna otherwise you could damage the radio and violate FCC regulations. - Page 8 Radio frequency emissions limits in the USA Part 15 of the FCC Rules imposes RF emission limits on receivers. This radio complies with Part 15 of the FCC Rules. Operation is subject to the condition that this device does not cause harmful interference. USA public safety bands (764 –776 MHz and 794 –...
-
Page 9: Declaration Of Conformity
Brief Declarations of Conformity appear on page 2 of this booklet. To download the formal declaration of conformity, go to http://eudocs.taitradio.com/. A signed and dated paper copy of the declaration of conformity can be obtained from Tait Electronics Limited. For your safety... -
Page 10: Interference With Electronic Devices
Interference with electronic devices Some electronic devices may be prone to malfunction due to the lack of protection from RF energy that is present when your radio is transmitting. Examples of electronic devices that may be affected by RF energy are: ■... - Page 11 Radio installation and operation in vehicles Warning: Keep the radio away from airbags and airbag deployment areas. Do not install, charge, or place a radio near such areas. An activated airbag can propel a portable radio with sufficient force to cause serious injury to vehicle occupants.
-
Page 12: High Radio Surface Temperatures
The radio is designed to satisfy the applicable compliance regulations. Do not make modifications or changes to the radio that are not expressly approved by Tait Electronics Limited. Failure to do so could invalidate compliance requirements and void the user’s authority to operate the radio. -
Page 13: Menu Map
Menu map... -
Page 14: Radio Controls
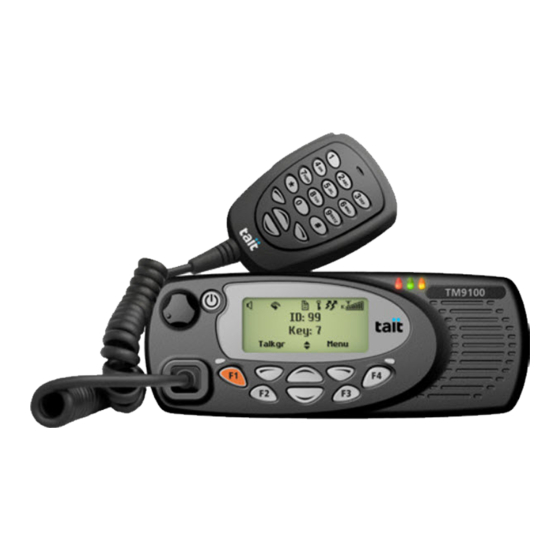
Radio controls For more information about the radio controls, see “About the radio controls” on page PTT key (press-to-talk) radio status microphone LEDs green amber speaker display on/off key volume Channel 12 control Zone 11 Talkgr Menu microphone socket function keys 1 scroll to 4 keys... -
Page 15: Table Of Contents
Contents Directive 1999/5/CE Declaration of Conformity ....3 For your safety ............... 6 Menu map ..............13 Radio controls .............. 14 About this guide ........18 Safety warnings used in this guide......18 Related documentation ..........18 Getting started........... 19 About your digital radio .......... - Page 16 Viewing GPS information ......... 36 Operating in conventional mode ..... 38 Making calls ..............39 Making an individual call.......... 39 Understanding talkgroups ........40 Making an emergency call........41 Receiving calls ............. 42 Identifying a caller (talking party ID) ......42 Receiving a two-tone call .........
- Page 17 Identifying the radio’s audible tones ......86 Checking the version of your radio ......87 Removing the microphone ........87 General care ..............88 Cleaning the radio............ 88 Glossary ............89 Index ............92 Tait Software Licence Agreement .... 97 Contents...
-
Page 18: About This Guide
There is a risk of equipment damage or malfunction. Related documentation The following documentation is also available for your Tait radio, which you can access from the Tait Technical Support website (http://support.taitradio.com): ■ Safety and Compliance Information—supplied with each radio. (The same information is included in this user’s guide.) -
Page 19: Getting Started
Getting started This section describes your radio’s controls and indicators. This section covers: ■ About your digital radio ■ About the radio controls ■ Understanding the radio display ■ Understanding the radio indicators Getting started... -
Page 20: About Your Digital Radio
About your digital radio Your digital radio may have some channels programmed as either analog or dual mode. Dual mode channels are able to receive both digital and analog calls. You may notice differences between your radio’s analog and digital channels in terms of: ■... -
Page 21: About The Radio Controls
About the radio controls The radio controls are the PTT key, volume control, on / off key, scroll keys, selection keys and function keys. Some keys have functions assigned to both short and long key presses: ■ a short key press is less than one second, and ■... -
Page 22: About The Keypad Microphone
About the keypad microphone Your radio may have a keypad microphone installed. The keypad microphone has a PTT key as well as alphanumeric keys, two scroll keys, and left and right selection keys. The PTT key, the scroll keys and the selection keys all work in the same way as those on the radio control head (see “About the radio controls”... -
Page 23: About The Hand-Held Control Head
About the hand-held control head Your radio may have a hand-held control head installed, to enable you to operate the radio at a distance from the radio body. The keys and controls work in the same way as those on the standard control head, with the exception of the PTT and volume up and down keys. -
Page 24: Understanding The Radio Display
Understanding the radio display The messages and symbols you see on your radio display depend on the mode in which your radio is operating and the way it is programmed. Radio display symbols These are some of the symbols you may see on your radio display: Symbol Meaning Signal strength indicator: the more bars, the stronger the... -
Page 25: Understanding The Radio Indicators
Understanding the radio indicators The status LED indicators and the radio’s audible tones—together with the radio display—all combine to give you information about the state of your radio. The most common way the indicators work is described in the following sections. Note: The way these indicators behave may be affected by the way your radio is programmed. -
Page 26: Audible Tones
Audible tones The radio uses audible tones to alert you to its status: ■ Radio controls and keypress tones—the tones and beeps you hear when you press your radio’s keys or use the controls. (You can turn these tones off—see “Turning off radio controls and keypress tones”... -
Page 27: Basic Operation
Basic operation This section describes the basic operation of your radio. This section covers: ■ Turning the radio on and off ■ Adjusting the speaker volume ■ Locking and unlocking the keypad ■ Navigating the radio’s menus ■ Using function keys to access frequently used features ■... -
Page 28: Turning The Radio On And Off
Turning the radio on and off Note: If your radio has a security lock, you must enter your unlock sequence before you can use your radio. If the message Enter PIN appears, enter your assigned PIN (personal identification number). See “Unlocking the radio”... -
Page 29: Adjusting The Speaker Volume
Adjusting the speaker volume Rotate the power/volume control clockwise to increase the speaker volume and counterclockwise to decrease the volume. The raised dot indicates the current volume setting. Note: The volume control also changes the volume level of the radio’s audible indicators. Adjusting the volume using a hand-held control head Press... -
Page 30: Navigating The Radio's Menus
Navigating the radio’s menus Your radio has a number of menus available, each containing lists or submenus. The menus available depend on the way your radio is programmed. Using the Main menu To access the Main menu, press the right selection key whenever Menu appears above it. - Page 31 Using the scroll key Quick Access menu There are two ways to use this Quick Access menu: ■ Press to begin scrolling through a list of zones or channels. ■ Press and the Quick Access menu appears. In this example, the Individual Call menu is the Quick Access menu.
-
Page 32: Using Function Keys To Access Frequently Used Features
Using function keys to access frequently used features The function keys provide access to some of the features you use most often. These features are assigned to the function keys when the radio is programmed. Some keys may have a feature associated with both a short key press and a long key press. -
Page 33: Selecting A Zone
Selecting a zone A zone is a collection of channels. Zones are a way of grouping channels, for example, by public safety agency type (fire, police, ambulance, etc.) or by geographical region (Dallas, Houston, etc.). To select a zone: 1 Press Menu and select Zones. 2 Scroll to the zone you want. -
Page 34: Selecting A Channel
Selecting a channel Using the Main menu 1 Press Menu and select Channels. 2 Scroll to the channel you want and press Select. Other ways of selecting a channel You may also be able to use the following controls to select a channel: ■... -
Page 35: Checking Recent Calls
Checking recent calls Note: This feature is available for digital channels only and applies to individual calls and call alert pages only. Your radio may be able to store a list of the last 20 calls. These calls may be calls that you have received, calls that you have made, or calls that you have missed. -
Page 36: About Gps Information
About GPS information If your radio is connected to a global positioning system (GPS) receiver, you can view GPS information such as latitude and longitude, true course, speed, and coordinated universal time. Your radio may also be able to display universal transverse mercator (UTM) information such as the UTM zone, and northing and easting coordinates. - Page 37 Using the Main menu 1 Select Menu > GPS info. Main menu GPS info Talkgroups Back Select 2 Use the scroll keys to view more GPS information. Zone: 50 765773 Easting: 7179810 Northing: Exit 3 Press Exit to exit the GPS display. GPS info S 25°28'30"...
-
Page 38: Operating In Conventional Mode
Operating in conventional mode This section explains how to operate your radio in conventional mode. This includes how to make and receive calls, use your radio in different repeater areas and scan a group of channels for activity. This section covers: ■... -
Page 39: Making Calls
Making calls To make a call: 1 Select the required zone (see “Selecting a zone” on page 33). 2 Select the required channel (see “Selecting a channel” on page 34). 3 Lift the microphone off the microphone clip. 4 Hold the microphone about 2 inches (5 cm) from your mouth and press the PTT key to transmit. -
Page 40: Understanding Talkgroups
2 Scroll to the person you want to call and press the PTT key to make the call immediately. 3 Alternatively, scroll to the person you want to call and press Select. Individual call Car 2 Car 1 Cancel Select The message Call...? briefly appears in the display. -
Page 41: Making An Emergency Call
Making a talkgroup call To make a call to the currently selected talkgroup ■ Press the PTT key. Changing a talkgroup 1 Press Menu and select Talkgroups. (Depending on how your radio is programmed, you may be able to use a Quick Access menu to go to the Talkgroup menu.) 2 Scroll through the list of talkgroups to the one you want and press Select. -
Page 42: Receiving Calls
Receiving calls When a call is received with valid signaling, the radio unmutes and you can hear the call. Identifying a caller (talking party ID) Note: This feature is available for digital channels only. You can use talking party ID to identify the radio user calling you. -
Page 43: Receiving A Two-Tone Call
Receiving a two-tone call Note: This feature is available for analog channels only. Two-tone signaling is used to call either individual or groups of radios. When your radio receives a two-tone call that it can decode, it beeps, indicating which type of two-tone call has been received. -
Page 44: Communicating Directly With Other Radios
Communicating directly with other radios You can bypass the radio repeater and communicate directly with another radio using the radio talkaround feature. You can do this when you are out of range of the repeater, or if the repeater is busy. While repeater talkaround is active, all calls are made on your current channel’s receive frequency. -
Page 45: Checking That The Channel Is Clear
Checking that the channel is clear Monitor allows you to override some or all of the radio’s mutes, allowing you to hear if there is any traffic (including talkgroup and individual calls) on a channel. For analog channels, this is so that you can check that the channel is clear before you make a call. -
Page 46: Using The Radio In Different Repeater Areas
Using the radio in different repeater areas Your radio may have a group of channels programmed as a voting group. The channels in the voting group all carry the same traffic, but from different repeaters. As your radio moves in and out of different repeater coverage areas, the best communication channel is automatically selected for you to use. -
Page 47: Suspending A Channel From A Voting Group
Suspending a channel from a voting group You may be able to use the function key programmed for ‘nuisance delete’ to temporarily remove one of the channels from the voting group. To remove a channel from a voting group: 1 Wait until the radio has stopped on the channel that you want to remove from the voting group. -
Page 48: Scanning A Group Of Channels
Scanning a group of channels The scan feature is used to monitor a group of channels for activity. When there is activity on a channel in the group, the radio stops on that channel. The radio then unmutes and you can hear the call. Scanning resumes when the channel is no longer busy. -
Page 49: Activating Standard Scanning
Activating standard scanning Standard scanning is activated when you select a standard scan group. To select a standard scan group: 1 Press Menu and select Channels. (Depending on how your radio is programmed, you may be able to press a function key or use your Quick Access menu to select channels.) 2 Scroll to the group you want and press Select. -
Page 50: Activating In-Zone Scanning
Activating in-zone scanning In-zone scan is turned on using a programmed function key. While in-zone scan is active, the radio scans all the channels programmed for the zone in which the radio is operating. When you change to another zone, in-zone scan starts with channels in the new zone. -
Page 51: Suspending A Channel From A Scan Group
Suspending a channel from a scan group If a member channel of a scan group is busy for a long time and you do not want to hear the conversation, you may be able to use the function key programmed for nuisance delete to temporarily delete it from the scan group. -
Page 52: Editing A Scan Group
Editing a scan group You can use the Edit Group menu to view group membership details and make permanent changes to your radio’s scan groups, if your radio is programmed in this way. Selecting a group to edit 1 Press Menu and select Radio settings > Functions >... -
Page 53: Viewing Group Membership
Symbols and messages The following symbols may appear when viewing group membership details, adding or deleting channels from a group, or changing a group’s transmit or priority channels. Symbol Meaning This channel is used to transmit on when there has been no recent activity. -
Page 54: Adding A Channel To A Group
3 The information that may appear is explained in the example below. Group members C:Channel 1 transmit C:Channel 2 channel zone Back Select priority 1 channel name channel Adding a channel to a group 1 In the Edit Group menu, select Add channel and press Select. -
Page 55: Changing A Group's Transmit Channel
Changing a group’s transmit channel 1 In the Edit Group menu, select Change tx and press Select. The current transmit channel is identified by the symbol beside the channel name. 2 Select the new transmit channel and press OK. Change tx C:Channel 1 C:Channel 2 Back... -
Page 56: Hearing Faint And Noisy Signals
Hearing faint and noisy signals Note: This feature is only applicable to analog channels. Usually the radio’s squelch mute (known as ‘squelch’) prevents you from hearing faint or noisy calls on a channel. Without squelch, the radio’s speaker would ‘chatter’ in low signal strength areas. On occasions when you want to hear everything that is being said on a channel, even if it is hard to understand, you can use the squelch override feature to force the... -
Page 57: Operating In P25 Trunking Mode
Operating in P25 trunking mode This section explains how your radio operates on a P25 trunking system. This includes how to make group calls, individual calls and phone calls. Note: The features described in this chapter are only available for radios configured for P25 trunking operation. -
Page 58: About P25 Trunking
About P25 trunking Your radio may be able to operate on a P25 trunking system as well as a conventional repeater-based system. On a conventional system, radio users compete for access to individual channels, and one channel can be overloaded with traffic while others are often unused. The trunking system allows several channels to be automatically shared by a number of radio users. -
Page 59: Failsoft Operation
Service is lost If access to the trunking system is lost, no longer appears, the bars in the RSSI symbol disappear the display shows No service. Talkgroup 1 No service Menu The radio sounds five beeps to indicate the loss of service, followed by a repeating double beep. -
Page 60: Making A Talkgroup Call
Making a talkgroup call A talkgroup is a collection of radios on a trunking system. Trunked talkgroups are found in the Channels menu, along with conventional channels that may also be available for the currently selected zone. Depending on how your radio is programmed, you may be able to press a function key or use your Quick Access menu to select a trunked talkgroup. - Page 61 2 Select the required talkgroup: ■ Press Menu and select Channels. ■ Scroll to the talkgroup you want, and press Select. Channels Talkgroup 2 Channel 1 Back Select (Depending on how your radio is programmed, you may be able to press a function key or use your Quick Access menu to select a talkgroup.) Your radio now indicates the currently selected talkgroup.
-
Page 62: Receiving A Talkgroup Call
Receiving a talkgroup call To hear calls from other members of a talkgroup, your radio must have that talkgroup selected, or the talkgroup must be part of an active scan group. For information about selecting a talkgroup, see “Making a talkgroup call” on page 60, and for information about scanning talkgroups, see “Scanning... -
Page 63: Scanning A Group Of Talkgroups
Scanning a group of talkgroups The scan feature is used to monitor a group of trunked talkgroups for activity. Each group of talkgroups is programmed as a single scan group. When there is a call from a member of the talkgroup scan group, the radio unmutes and you can hear the call. -
Page 64: Editing A Talkgroup Scan Group
To remove a channel from a talkgroup scan group: 1 Wait until the radio has stopped on the talkgroup that you want to remove from the talkgroup scan group. 2 Press the function key programmed for nuisance delete. If the talkgroup has been removed successfully, the message Channel nuisance deleted appears in the display. -
Page 65: Making An Individual Call
Making an individual call Note: In some situations, your call will not proceed. For an explanation of the radio behavior, see “Unconnected calls” on page To make a call to one radio on a trunking system: 1 Press Menu and select Individual call. (The person to whom you last made an individual call is highlighted.) Depending on your radio model and how it is... -
Page 66: Receiving An Individual Call
Receiving an individual call When you receive a call from an individual radio, your radio displays the caller’s name or identity. Call received Car 1 Cancel Menu The radio rings and the green LED flashes until the call is answered. Press the PTT key to accept the call, or Cancel to reject the call. -
Page 67: Making A Phone Call
Making a phone call Note: This feature is only available for radios with alphanumeric keys. You may be able to use your radio to connect to a telephone network and make a phone call. Note: In some situations, your call will not proceed. For an explanation of the radio behavior, see “Unconnected calls”... -
Page 68: Unconnected Calls
Unconnected calls If your call is not connected, the way your radio behaves is explained in the following table. Radio behavior Explanation The system is too busy to process System your talkgroup or individual call. queued The system is now available to Busy channel process your talkgroup or now free... -
Page 69: Failsoft Mode Operation
Failsoft mode operation If your radio is unable to access the trunking system, it may be programmed to enter failsoft mode. Failsoft mode operates in one of two ways: ‘radio-based’ failsoft and ‘infrastructure’ failsoft. Radio-based failsoft When you loose access to the trunking system, longer appears, the bars in the RSSI symbol disappear and the display shows No service. -
Page 70: Dynamic Regrouping
You may still be able to communicate with your dispatcher and other talkgroup members, depending on the type of system failure that has occurred, and how your radio is programmed. When the trunking system returns to normal operation, your radio is notified, and will attempt to register on the control channel it was previously using. -
Page 71: Safeguarding You And Your Radio
Safeguarding you and your radio This section describes how to prevent unauthorized use of your radio, how to make your communications completely private and how to get help when you need it most. This section covers: ■ About locking the radio ■... -
Page 72: About Locking The Radio
About locking the radio You can lock your radio to prevent unauthorized use, if this feature is programmed for your radio. When your radio is locked, you can only make emergency calls. Your radio can still receive calls and status requests, but you must unlock the radio to respond to them. -
Page 73: About Emergency Calls
About emergency calls In an emergency you can summon help by sending an emergency call. There are two types of emergency calls: Call type Explanation Priority call (Digital channels only.) An emergency alert is automatically sent to the current talkgroup. Calls made when the priority call feature is turned on are flagged as ‘emergency’... -
Page 74: Understanding Emergency Mode
Understanding emergency mode When you press the emergency key your radio enters ‘emergency mode’, if your radio is programmed in this way. When the radio enters emergency mode, it will automatically send alerts together with your radio unit ID to the dispatcher. These alerts are usually sent on a designated emergency channel. - Page 75 The main phases for both stealth and non-stealth emergency modes are summarized below. The length of each phase is determined when the radio is programmed. When the emergency key is pressed: Digital channels: the radio continually sends emergency alerts to the dispatcher until a response is received.
- Page 76 In non-stealth emergencies, ‘Emergency mode’ appears in the display. Emergency mode One or more emergency calls are sent to your dispatcher or another predetermined radio user. During emergency mode, the radio will behave as described in “What happens during an emergency call?”...
-
Page 77: Customizing Your Radio
Customizing your radio This section describes the ways in which you can customize your radio. This section covers: ■ About display and keypad backlighting ■ Reducing power consumption ■ Customizing the audible alert settings Customizing your radio... -
Page 78: About Display And Keypad Backlighting
About display and keypad backlighting Whenever a key is pressed or a call is received, the keypad and display light up automatically to make it easy to read in poor light conditions. Backlighting usually remains on for a few seconds, unless further radio activity is detected. -
Page 79: Turning Backlighting On Momentarily
Turning backlighting on momentarily You can turn backlighting on momentarily using a function key, if your radio is programmed in this way. Backlighting remains on for a few seconds and then turns off. Adjusting the backlighting level To change the level of your radio’s backlight to make the display or keypad easier to read in low lighting conditions: 1 Press Menu and select Radio settings >... -
Page 80: Reducing Power Consumption
Reducing power consumption You can reduce the power consumption of your radio (and thereby reduce the drain on your vehicle battery) in the following ways: ■ Transmit at low power (if your radio is not already configured to do this). ■... -
Page 81: Customizing The Audible Alert Settings
Customizing the audible alert settings The radio uses audible tones to alert you to its status: ■ Radio controls and keypress tones—the beeps you hear when you press your radio’s keys or use the controls. (You can turn these tones off—see “Turning off radio controls and keypress tones”... -
Page 82: Changing The Keypress Volume
Changing the keypress volume Whenever you press a key, you will hear a beep to indicate whether or not what you are trying to do is allowed: ■ Allowed: a short, medium-pitched beep. ■ Not allowed: a long, low-pitched beep. To change the volume of the keypress beeps between high, low, and off: 1 Press Menu and select Radio settings >... -
Page 83: Hearing Only Channel Traffic
2 Scroll to On or Off and press Select. (The current setting is highlighted.) Quiet operation Back Select The message Quiet operation activated (or deactivated) appears in the display. Hearing only channel traffic You can turn off all the audible tones that the radio makes so that the only sound you will hear from the speaker is channel traffic. -
Page 84: Troubleshooting
Troubleshooting This section describes troubleshooting procedures and basic maintenance. This section covers: ■ Troubleshooting ■ System error message ■ When your radio won’t turn on ■ Checking the version of your radio ■ Removing the microphone ■ General care ■ Cleaning the radio Troubleshooting... -
Page 85: Troubleshooting
Troubleshooting If you are experiencing difficulty operating your radio, you may find the following sections helpful. Consult your radio provider for assistance, if necessary. System error message If your radio displays a system error message, take a note of the number (X:XXXXXXXX), and consult your radio provider. -
Page 86: When Your Radio Won't Turn On
When your radio won’t turn on If the red, green and amber LEDs on the control head do not light up when the radio is turned on, it is probable that power is not reaching the radio. Check the following: ■... -
Page 87: Checking The Version Of Your Radio
Removing the microphone Note: For information on installing or removing your radio from a vehicle, refer to the TM9100 Installation Guide. 1 Using your thumb or forefinger, lift up one of the corners of the microphone grommet and firmly (but gently) pull that corner until the seal comes away from the cavity. -
Page 88: General Care
General care Your radio requires no regular maintenance other than ensuring that all the cables and connections are secure, and that no damage has occurred to the antenna or wiring. To prevent permanent damage to the radio cover, do not allow the radio to come into contact with detergents, alcohol, aerosol sprays or petroleum-based products. -
Page 89: Glossary
Glossary APCO The Association of Public Safety Communications Officials. The APCO Project 25 standards committee (http://www.apcointl.org/) defined a digital radio standard. The standard is often referred to as ‘APCO’ or ‘P25’. channel In a conventional system, a channel is a pair of frequencies used to transmit and receive radio signals. - Page 90 Light Emitting Diode, a device that is able to emit light. mute A mute controls the circumstances under which a received signal is passed to the radio’s speaker. For example, when a signal is received by the radio, the mute may remain ‘closed’...
- Page 91 traffic channel The traffic channel is the channel on a trunking system to which the parties participating in a call are directed to for the duration of the call. When the call ends, the traffic channel is returned to the pool of channels for use in a new call.
-
Page 92: Index
Index receiving 42 to talkgroup (conventional) two-tone 43 care, of radio 88 alert tones 26 channel see also audible tones checking that clear amber LED 25 (monitor) 45 antenna home channel 46 safe distance, from antenna removing from scan group audible tones scanning 48 changing volume of all 81... - Page 93 emergency call hand-held control head 23 ending 76 hardware version, identifying types of 73 using concealed microphone 76 what happens during 74 identifying caller 42 emergency mode incoming call tone. See audible false powerdown 74 tones keep alive 74 indicators, volume of 81 phases of 75 individual calls (conventional) radio is silent during 74...
- Page 94 lighting conditions on/off key 28 adjust display for 79 locking the radio 72 long key press 21 P25 trunking. See trunking operation. 58 phone calls (trunking) 67 Main menu power up radio 28 accessing 30 priority call, making 73 exiting quickly 30 priority channels, scanning 48 making calls 39 individual call 39...
- Page 95 radio-based failsoft 69 stealth emergency recent calls 35 about 74 red LED 25 what happens during 75 related documentation 18 repeater talkaround 44 radio display symbol for 24 talkaround. See repeater turning on and off 44 talkaround. RF, exposure to 6 talkgroup (conventional) RFSS controller.
- Page 96 talkgroup call 60 traffic channel 58 zone controller 59 trunking system about 58 service lost 59 two-tone overriding 43 two-tone signaling receiving two tone calls 43 unlocking the radio 72 Valid 26 version information, of radio volume of keypress beeps, changing 82 volume, changing 29 voting 46...
-
Page 97: Tait Software Licence Agreement
Agreement. “Person” means any individual, partnership, “Designated Products” means products corporation, association, joint stock provided by Tait to Licensee with which or for company, trust, joint venture, limited liability which the Software and Documentation is company, governmental authority, sole licensed for use. - Page 98 Components contained in Tait products and releases of the software provided by Tait; and the related Open Source licenses, see: http:// (iii) may contain one or more items of support.taitradio.com/go/opensource software owned by a third-party supplier.
- Page 99 5 OWNERSHIP AND TITLE ECTION Licensee substitute Software which will Tait, its licensors, and its suppliers retain all of accomplish the same objective, or terminate their Intellectual Property Rights in and to the the license and refund Licensee’s paid license Software and Documentation, in any form.
- Page 100 Agreement, Licensee must certify in carried portable radio products and Licensee writing to Tait that all copies of the Software transfers ownership of the Tait mobile or have been removed or deleted from the...
- Page 101 Agreement. and total liability for any such claim shall be 11.7. ORDER OF PRECEDENCE. In the event limited at the option of Tait to the repair or of inconsistencies between this Agreement replacement of the Software or the refund of and any other Agreement between the the purchase price of the Software.
- Page 102 Tait and Licensee to the contrary, this is the complete and exclusive statement of the Agreement between it and Tait in relation to the Software. This Agreement supersedes any proposal or prior agreement, oral or...
Need help?
Do you have a question about the TM9100 and is the answer not in the manual?
Questions and answers