Tait TM9100 User Manual
Hide thumbs
Also See for TM9100:
- Service manual (485 pages) ,
- User manual (104 pages) ,
- Tune up and inspection (39 pages)
Table of Contents
Advertisement
Quick Links
Advertisement
Table of Contents
Troubleshooting

Related Manuals for Tait TM9100


Summary of Contents for Tait TM9100
- Page 1 TM9100 mobiles User’s Guide www.taitworld.com...
-
Page 3: Updates Of Manual And Equipment
Intellectual property rights This product may be protected by one or more patents of Tait Electronics Limited together with their international equivalents, pending patent applications and registered trade marks: NZ508054,... - Page 4 5,630,011 5,581,656 5,517,511 5,491,772 5,247,579 5,226,084 and 5,195,166. To our European customers Tait Electronics Limited is an environmentally responsible company which supports waste minimization and material recovery. The European Union’s Waste Electrical and Electronic Equipment Directive requires that this product be disposed of separately from the general waste stream when its service life is over.
-
Page 5: For Your Safety
For your safety Before using your radio, please read the following important safety and compliance information. Radio frequency exposure information For your own safety and to ensure you comply with the Federal Communication Commission’s (FCC) radio frequency (RF) exposure guidelines, please read the following information before using this radio. -
Page 6: Compliance With Rf Energy Exposure Standards
the radio radiates more energy when it is transmit- ting than when it is receiving. While you are transmitting (talking or sending data) on the radio, you must ensure that there is always a distance of 35 inches (0.9m) between people and the antenna. -
Page 7: Radio Frequency Emissions Limits In The Usa
The radio is designed to satisfy the applicable compliance regulations. Do not make modifications or changes to the radio that are not expressly approved by Tait Electronics Limited. Failure to do so could invalidate compliance requirements and void the user’s authority to operate the radio. -
Page 8: Interference With Electronic Devices
Interference with electronic devices Some electronic devices may be prone to malfunction due to the lack of protection from RF energy that is present when your radio is transmitting. Examples of electronic devices that may be affected by RF energy are: vehicular electronic systems such as fuel injection, anti-skid brakes, and cruise control medical devices such as hearing aids... -
Page 9: Menu Map
Menu map... -
Page 10: Radio Controls
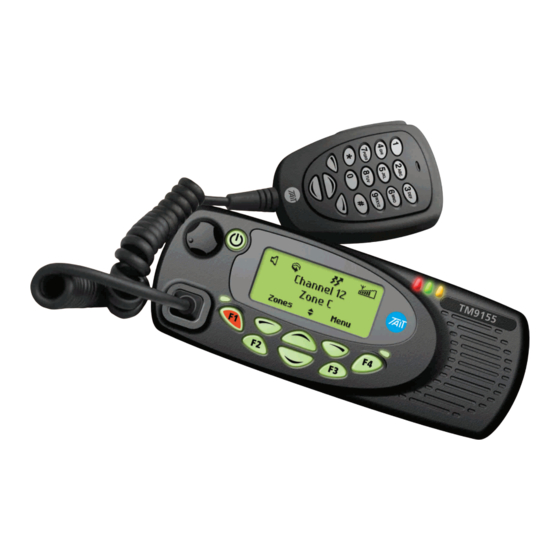
Radio controls For more information about the radio controls, see “About your radio” on page PTT key (press-to-talk) radio status microphone LEDs green amber speaker display on/off key volume Channel 12 control Zone 11 Talkgr Menu microphone socket function keys 1 scroll to 4 keys... -
Page 11: Table Of Contents
Contents For your safety ............... 5 Menu map ..............9 Radio controls .............. 10 About this guide ........14 Safety warnings used in this guide ....... 14 Related documentation ..........14 About your radio ........15 About your digital radio ..........16 Lack of static noise ........... - Page 12 Checking your recent calls ........... 37 Checking that the channel is clear (monitor) ....38 Turning monitor on and off........38 Call alert paging ............39 Checking whether a radio is available ......40 Listening to channel traffic ....... 41 Selecting a voting or scan group ........
- Page 13 Customizing your radio ......69 About display and keypad backlighting ......70 Turning backlighting on or off........70 Turning backlighting on momentarily ....... 71 Adjusting the backlighting level........ 71 Adjusting the display contrast........71 Reducing power consumption ........72 Turning low power transmit on or off....... 72 Customizing the audible alert settings ......
-
Page 14: About This Guide
There is a risk of equipment damage or malfunction. Related documentation The following documentation is also available for your Tait radio, which you can access from the Tait Technical Support website (http://support.taitworld.com/): TM9100 Installation Guide—covers installing the TM9100 mobile radios, microphones, antennas, emergency switches, and external alert devices. -
Page 15: About Your Radio
About your radio This section describes all the various buttons and keys on your radio. This section covers: About your digital radio Basic operation Radios with a hand-held control head Using function keys to access frequently used features Understanding the radio display Using the menus to access settings and features Understanding the radio indicators About your radio... -
Page 16: About Your Digital Radio
About your digital radio Your digital radio may have some channels programmed as either analog or dual mode. Dual mode channels are able to receive both digital and analog calls. You may notice differences between your radio’s analog and digital channels in terms of: static noise in low signal areas, and radio coverage in marginal reception areas. -
Page 17: Basic Operation
Basic operation The radio controls are the PTT key, volume control, on/off key, scroll keys, selection keys and function keys. Some keys have functions assigned to both short and long key presses: a short key press is less than one second, and a long key press is more than one second. -
Page 18: Turning Your Radio On And Off
Turning your radio on and off Note: If your radio has a security lock, you must enter your ‘unlock sequence’ before you can use the radio. “Unlocking your radio” on page A long press of the on/off key turns the radio on and off. volume control on/off key Channel 12... -
Page 19: About The Press-To-Talk (Ptt) Key
About the press-to-talk (PTT) key Press and hold the PTT key to talk. Release it to listen. PTT key (press-to-talk) microphone About the keypad microphone The keypad microphone has a PTT key as well as twelve alphanumeric keys, two scroll keys, and left and right selection keys. -
Page 20: Radios With A Hand-Held Control Head
Radios with a hand-held control head Your radio may have a hand-held control head installed, to enable you to operate the radio at a distance from the radio body. The keys and controls work in the same way as those on the standard control head, with the exception of the PTT and volume up and down keys. -
Page 21: Using Function Keys To Access Frequently Used Features
Using function keys to access frequently used features The function keys provide quick access to some of the features you use most often. These features are assigned to the function keys when the radio is programmed. Some keys may have a feature associated with both a short key press and a long key press. -
Page 22: Understanding The Radio Display
Understanding the radio display The messages and symbols you see on your radio display depend on the mode in which your radio is operating and the way it is programmed. These are the various symbols you may see on your radio display: Symbol Meaning... -
Page 23: Using The Menus To Access Settings And Features
Using the menus to access settings and features You can access settings and features for your radio using the menu. The selection and scroll keys enable you to make selections and move around the menus. Selection keys Zone 11 Talkgr Menu right left... -
Page 24: Accessing The Main Menu
Accessing the Main menu 1 To access the Main menu, press the right selection key whenever Menu appears above it. Channel 12 Zone 11 Menu 2 Use the scroll keys to move through the menu list. Main menu Zones Talkgroups Back Select 3 When the menu you want is highlighted, press... - Page 25 In this example, the Talkgroups menu is the Channel 12 Quick Access menu. Menu Press a scroll key to go directly to the Talkgroups menu. The Talkgroups menu, with a list of your available talkgroups, is now displayed: Talkgroups Talkgroup 01 Talkgroup 02 Cancel Select...
-
Page 26: Understanding The Radio Indicators
Understanding the radio indicators The status LED indicators and the radio’s audible tones—together with the radio display—all combine to give you information about the state of your radio. The most common way the indicators work is described in the following sections. Audible tones The radio uses audible tones to alert you to its status: Radio controls and keypress tones—the tones and... - Page 27 Tone Meaning One long, low- Invalid keypress: the action you have pitched beep attempted is not permitted, or Transmission inhibited: you have attempted to transmit, but for some rea- son you cannot make a call at this time One short, low- Function deactivated: a function has been pitched beep turned off (using either the Main menu or a...
-
Page 28: Status Indicators
Status indicators Note: The way these indicators behave may be affected by the way your radio is programmed. green status LEDs amber Channel 12 Zone 11 Talkgr Menu Color Meaning Red (transmit) Glowing: your radio is transmitting Flashing: your transmit timer is about to expire Green (receive) Glowing: the current channel is busy... -
Page 29: Making And Receiving Calls
Making and receiving calls This section describes how to make and receive calls. This section covers: Making calls Receiving calls Communicating directly with other radios Checking your recent calls Checking that the channel is clear (monitor) Call alert paging Checking whether a radio is available Making and receiving calls... -
Page 30: Making Calls
Making calls 1 Select the required zone (see “Selecting a zone” on page 31). 2 Select the required channel (see “Selecting a channel” on page 32). 3 Select the required talkgroup or individual radio unit ID (see “Making a talkgroup call” on page 33 “Making an individual call”... -
Page 31: Selecting A Zone
Selecting a zone A zone is a collection of channels. Zones are a way of grouping channels, for example, by public safety agency type (fire, police, ambulance, etc.) or by geographical region (Dallas, Houston, etc.). 1 Press Menu and select Zones. 2 Scroll to the zone you want. -
Page 32: Selecting A Channel
Selecting a channel It is important to distinguish between channels and talkgroups. A channel is frequency-related, whereas a talkgroup is a group of radio users. Talkgroups are only available for digital channels. For an explanation of talkgroups, see “Understanding talkgroups” on page Using the Main menu 1 Press Menu and select Channels. -
Page 33: Understanding Talkgroups
Understanding talkgroups Note: This feature is available for digital channels only. Talkgroups are a collection of people (radio unit IDs) with whom you want to have private conversations as a group. For example, a state's public safety agencies could have the following talkgroups: Local talkgroups—used by a specific agency to com- municate within their own local agency. -
Page 34: Making An Emergency Call
Making an emergency call For information about making and ending emergency calls together with a explanation of how your radio behaves in emergency mode, see “About emergency calls” on page 65 “Understanding emergency mode” on page Making an individual call Note: This feature is available for digital channels only. -
Page 35: Receiving Calls
Receiving calls When a call is received with valid signaling, the radio unmutes and you can hear the call. Identifying a caller (talking party ID) Note: This feature is available for digital channels only. You can use Talking Party ID to identify the radio user calling you. -
Page 36: Communicating Directly With Other Radios
Communicating directly with other radios You can bypass the radio repeater and communicate directly with another radio using the Radio Talkaround feature. You can do this when you are out of range of the repeater, or if the repeater is busy. While repeater talkaround is active, all calls are made on your current channel’s receive frequency. -
Page 37: Checking Your Recent Calls
Checking your recent calls Note: This feature is available for digital channels only and applies to individual calls and call alert pages only. Your radio may be able to store a list of the last 20 calls. These calls may be calls that you have received or calls that you have made. -
Page 38: Checking That The Channel Is Clear (Monitor)
Checking that the channel is clear (monitor) Monitor allows you to override some or all of the radio’s mutes, allowing you to hear if there is any traffic (including talkgroup and individual calls) on a channel. For analog channels, this is so that you can check that the channel is clear before you make a call. -
Page 39: Call Alert Paging
Call alert paging Note: This feature is available for digital channels only and applies to individual calls only. You can let another radio user know that you want to talk to them by sending them a call alert page. When the other radio user receives the call alert page, they can call you back when it is convenient. -
Page 40: Checking Whether A Radio Is Available
Checking whether a radio is available Note: This feature is available for digital channels only and for radios configured for dispatcher operation. If you want to find out whether a particular radio is available on the system, you can use the Radio Check feature. -
Page 41: Listening To Channel Traffic
Listening to channel traffic This section describes using your radio in different repeater areas, scanning a group of channels for activity, and using the squelch override function to hear faint and noisy signals on a channel. This section covers: Selecting a voting or scan group Using your radio in different repeater areas Scanning a group of channels Hearing faint and noisy signals... -
Page 42: Selecting A Voting Or Scan Group
Selecting a voting or scan group A group is a collection of channels that are grouped together for either voting or scanning. Voting or scanning groups can be made up of channels from different zones. You may be able to select groups either by using a function key or by using the Main menu. - Page 43 2 Scroll to the group you want and press Done. The amber LED glows and the scanning icon appears in the display: Selecting a voting or scan group...
-
Page 44: Using Your Radio In Different Repeater Areas
Using your radio in different repeater areas Your radio may have a group of channels programmed as a voting group. The channels in the voting group all carry the same traffic, but from different repeaters. As your radio moves in and out of different repeater coverage areas, the best communication channel is automatically selected for you to use. -
Page 45: Scanning A Group Of Channels
Scanning a group of channels The scanning feature is used to monitor a pre- programmed group of channels for activity. When a busy channel is detected in a group, the radio stops on (‘captures’) that channel, and you can now hear the call. Scanning resumes when the channel is no longer busy. -
Page 46: Suspending A Channel From A Scan Group
The possible options are: your radio calls a predetermined channel e.g. your dispatcher your radio calls the channel where activity was last detected your radio calls the last free channel. 3 When the called party responds, proceed with your conversation. Suspending a channel from a scan group If the radio is continuously stopping on an undesired channel (for example, if there is too much activity or... -
Page 47: Editing A Background Scan Group
Editing a background scan group You may be able to permanently change the membership of your background scan group by using the function key programmed for nuisance delete. When background scan is active, you can scroll through the channel list to see which channel is a member of your background scan group. - Page 48 The message Channel added appears in the display and the scanning symbol now includes a tick: Channel 8 Menu Removing a channel from your background scan group 1 Press the function key that activates background scan. The amber LED glows and the scanning icon appears in the display: Channel Menu...
-
Page 49: Hearing Faint And Noisy Signals
Hearing faint and noisy signals Note: This feature is only applicable to analog channels. Usually the radio’s squelch mute (known as ‘squelch’) prevents you from hearing faint or noisy calls on a channel. Without squelch, the radio’s speaker would ‘chatter’ in low signal strength areas. On occasions when you want to hear everything that is being said on a channel, even if it is hard to understand, you can use the Squelch Override feature to force the... -
Page 50: Sending And Receiving Messages
Sending and receiving messages This section describes sending messages as well as responding to requests for status information. This section covers: About messages Informing other radio users of your status Requesting a status update Sending and receiving messages... -
Page 51: About Messages
About messages Note: This feature is available for digital channels only. You may be able to send short messages to another radio user. These messages are defined at programming time and are also known as ‘pre-programmed messages’. The person to whom you are sending the message must have the same message programmed into their radio in order to read and display your message. - Page 52 The red LED glows and a message may be displayed to advise you whether the message has been sent successfully or not. Sending a message to a person of your choice 1 Press Menu and select Services > Messages. (Depending on how your radio is programmed, you may be able to press a function key or use your Quick Access menu to select messages.) 2 Select the message you want from the message list...
-
Page 53: Informing Other Radio Users Of Your Status
Informing other radio users of your status Note: This feature is available for digital channels only. You can inform other radio users of your current status by sending them a status update, for example, ‘At scene’. You may be able to send the status update to a predetermined person or talkgroup, or to a person of your choice. -
Page 54: Requesting A Status Update
Requesting a status update Note: This feature is available for digital channels only and for radios configured for dispatcher operation. You can find out what another radio user is currently doing by asking them to send you a status update. To send a status request: 1 Press Menu and select Services >... -
Page 55: Safeguarding You And Your Radio
Safeguarding you and your radio This section describes how to prevent unauthorized use of your radio, how to make your communications completely private and how to get help when you need it most. This section covers: About locking your radio Making a radio inoperable Radio monitor About encryption... -
Page 56: About Locking Your Radio
About locking your radio You can lock your radio to prevent unauthorized use, if this feature is programmed for your radio. When your radio is locked, you can only make emergency calls. Your radio can still receive calls and status requests, but you must unlock the radio to respond to them. -
Page 57: Making A Radio Inoperable
Making a radio inoperable Note: This feature is available for digital channels only and for radios configured for dispatcher operation. If you want to make another radio on the system inoperable, you can use the Radio Inhibit feature. This feature is also known as ‘stun’. To the user of the inhibited radio, it appears as though the radio has turned off. -
Page 58: Sending A Radio Uninhibit Request
Sending a Radio Uninhibit request 1 Press Menu and select Services > Radio uninhibit. 2 Scroll to the radio you wish to make operable. 3 Press Send to. Radio uninhibit Car 1 Car 2 Cancel Send to The red LED glows and a message appears in the display: Sending Uninhibit to... -
Page 59: Radio Monitor
Radio monitor Note: This feature is available for digital channels only and for radios configured for dispatcher operation. The Radio Monitor feature can be used when you are concerned about the safety of a radio user on your system. When you send a radio-monitor request to a radio, it calls you back without giving any indication that it is making a call. -
Page 60: About Encryption
About encryption Note: This feature is available for digital and dual-mode channels only. To make communications with other users on your system completely private, your radio may be able to encrypt outgoing calls, using a confidential encryption key. The radio receiving your call must have the same encryption key installed before it can hear your encrypted call. -
Page 61: Making An Encrypted Call
Making an encrypted call 1 Select the channel or group you wish to call. 2 Check that encryption is on (the encryption symbol is showing in the display). 3 Check that the channel is free (green LED is off). 4 Press and hold the PTT key to transmit. The name of the encryption key that your radio is using for the transmission may briefly appear in the display:... -
Page 62: Changing Your Radio's Encryption Key
Proper Key Detect feature Your radio may be programmed with ‘proper key detect’. This means that you can only hear an encrypted call if the key used to encrypt the incoming call matches the key used to encrypt your outgoing calls on that channel. -
Page 63: Removing Encryption Keys From Your Radio
Changing your transmit encryption key back to the default setting 1 Press Menu and select Security > Preset keys. The message Select Preset Keys? appears in the display. 2 Select OK and the message Preset Keys selected briefly appears in the display. Removing encryption keys from your radio It may be possible for you to delete encryption keys from your radio. - Page 64 Deleting all encryption keys 1 Press Menu and select Security > Advanced > Zeroize all. The message Zeroize All Keys? appears in the display. 2 Press OK and the message All Keys Zeroized briefly appears in the display and the encryption symbol no longer appears.
-
Page 65: About Emergency Calls
About emergency calls In an emergency you can summon help by sending an emergency call. There are two types of emergency calls: Call type Explanation Priority call (Digital channels only.) An emergency alert is automatically sent to the current talkgroup. Calls made when the priority call feature is turned on are flagged as ‘emergency’... -
Page 66: Understanding Emergency Mode
Understanding emergency mode When you press the emergency key your radio enters ‘emergency mode’, if your radio is programmed in this way. When the radio enters emergency mode, it will automatically send alerts together with your radio unit ID to the dispatcher. These alerts are usually sent on a designated emergency channel. - Page 67 What happens during an emergency call? The exact way your radio behaves when it enters emergency mode depends on how your radio is programmed. The main phases for both stealth and non-stealth emergency modes are summarized below. The length of each phase is determined when the radio is programmed.
- Page 68 Activating emergency mode You can activate emergency mode using the emergency function key or a hidden switch, if your radio is set up in this way. 1 Press the function key or hidden switch to activate emergency mode. In non-stealth emergencies, ‘Emergency mode’ appears in the display: Emergency mode One or more emergency calls are sent to your...
-
Page 69: Customizing Your Radio
Customizing your radio This section describes the ways in which you can customize your radio. This section covers: About display and keypad backlighting Reducing power consumption Customizing the audible alert settings Customizing your radio... -
Page 70: About Display And Keypad Backlighting
About display and keypad backlighting Whenever a key is pressed or a call is received, the keypad and display light up automatically to make it easy to read in poor light conditions. Backlighting usually remains on for a few seconds, unless further radio activity is detected. -
Page 71: Turning Backlighting On Momentarily
Turning backlighting on momentarily You can turn backlighting on momentarily using a function key, if your radio is programmed in this way. Backlighting remains on for a few seconds and then turns off. Adjusting the backlighting level To change the level of your radio’s backlight to make the display or keypad easier to read in low lighting conditions: 1 Press Menu and select Radio settings >... -
Page 72: Reducing Power Consumption
Reducing power consumption You can reduce the power consumption of your radio (and thereby reduce the drain on your vehicle battery) in the following ways: Transmit at low power (if your radio is not already configured to do this). Turn off backlighting when it is not required (see “About display and keypad backlighting”... -
Page 73: Customizing The Audible Alert Settings
Customizing the audible alert settings The radio uses audible tones to alert you to its status: Radio controls and keypress tones—the beeps you hear when you press your radio’s keys or use the controls. (You can turn these tones off—see “Turn- ing off radio controls and keypress tones”... -
Page 74: Changing The Keypress Volume
Changing the keypress volume Whenever you press a key on the control head, you will hear a beep to indicate whether or not what you are trying to do is allowed: Allowed: a short, medium-pitched beep. Not allowed: a long, low-pitched beep. To change the volume of the keypress beeps between high, low, and off: 1 Press Menu and select Radio settings >... -
Page 75: Hearing Only Channel Traffic
2 Scroll to On or Off and press Select. (The current setting is highlighted.) Quiet operation Back Select The message Quiet operation activated (or deactivated) appears in the display. Hearing only channel traffic You can turn off all the audible tones that the radio makes so that the only sound you will hear from the speaker is channel traffic. -
Page 76: Troubleshooting
Troubleshooting This section describes troubleshooting procedures and basic maintenance. This section covers: Troubleshooting Error messages When your radio won’t turn on Checking the version of your radio Removing the microphone General care Cleaning the radio Troubleshooting... -
Page 77: Troubleshooting
Troubleshooting If you are experiencing difficulty operating your radio, you may find the following sections helpful. Consult your radio provider for assistance, if necessary. Error messages If an error message appears in the radio display, refer to the table below. For any error messages not shown in the table below, it is recommended that you make a note of the error code (the letter ‘E’... -
Page 78: When Your Radio Won't Turn On
When your radio won’t turn on If the red, green and amber LEDs on the control head do not light up when the radio is turned on, it is probable that power is not reaching the radio. Check the following: Is the power connector firmly plugged into the rear of the radio? Are the in-line fuses in good condition? -
Page 79: Checking The Version Of Your Radio
Removing the microphone Note: For information on installing or removing your radio from a vehicle, refer to the TM9100 Installation Guide. 1 Using your thumb or forefinger, lift up one of the corners of the microphone grommet and firmly (but gently) pull that corner until the seal comes away from the cavity. -
Page 80: General Care
General care Your radio requires no regular maintenance other than ensuring that all the cables and connections are secure, and that no damage has occurred to the antenna or wiring. To prevent permanent damage to the radio cover, do not allow the radio to come into contact with detergents, alcohol, aerosol sprays or petroleum-based products. -
Page 81: Glossary
Glossary APCO The Association of Public Safety Communications Officials. The APCO Project 25 standards committee (http://www.apcointl.org/) defined a digital radio standard. The standard is often referred to as ‘APCO’ or ‘P25’. channel A channel is a pair of frequencies used to transmit and receive radio signals. - Page 82 Project 25. The Association of Public Safety Communications Officials (APCO) established Project 25 (P25). This project was led by United States Federal, state, and local government representatives to develop standards for interoperable digital radios and systems to meet the needs of public safety users.
-
Page 83: Licence Agreement
Licensee. opensource ICENCE ITLE TO OFTWARE TAIT GRANTS TO YOU AS LICENSEE THE NON THIS AGREEMENT DOES NOT CONSTITUTE A EXCLUSIVE RIGHT TO USE THE SOFTWARE OR CONTRACT OF SALE IN RELATION TO THE FIRMWARE ON A SINGLE MACHINE PROVIDED... - Page 84 STATEMENT OF THE AGREEMENT BETWEEN IT EXEMPLARY PUNITIVE DIRECT INDIRECT OR AND TAIT IN RELATION TO THE SOFTWARE OR CONSEQUENTIAL ARISING OUT OF OR IN FIRMWARE WHICH SUPERSEDES ANY CONNECTION WITH ANY USE OR INABILITY OF PROPOSAL OR PRIOR AGREEMENT...
-
Page 85: Index
Index priority call 65 receiving 35 alert tones 26 to individual radio unit 34 see also audible tones to talkgroup 33 amber LED 28 care, of radio 80 antenna channel safe distance, from antenna checking that clear (monitor) 38 audible tones home channel 44 changing volume of all 73 removing from scan group... - Page 86 emergency call green LED 28 ending 68 grommet types of 65 functions of 79 using concealed removing 79 microphone 68 group what happens during 67 scanning groups 45 emergency key 21 talkgroups 33 emergency mode voting groups 44 false powerdown 66 keep alive 66 phases of 67 hand-held control head 20...
- Page 87 invalid 27 radio display symbol for 22 tones. See audible tones. turning on and off 38 turning off audible beeps for valid 26 navigating menus 23 keypress beeps, changing non-stealth emergency volume 74 about 66 what happens during 67 nuisance delete LEDs, status 28 scan groups 46 left selection key 23...
- Page 88 radio controls, turning off radio display symbol for 22 audible tones for 74 standard scan 45 radio display scroll keys 23 error messages 77 scrolling indicator 22 radio frequency (RF) energy security lock 56 causing electronic devices to selection keys 23 malfunction 8 short key press 17 compliance with exposure...
- Page 89 unlocking the radio 56 up scroll key 23 valid keypress beep 26 vehicle battery protect radio before charging 8 version information, of radio volume of keypress beeps, changing 74 volume of speaker, changing voting 44 voting groups removing channels from 44 selecting 42 warning tones.
- Page 91 www.taitworld.com 08/06 MMA-00007-02...
Need help?
Do you have a question about the TM9100 and is the answer not in the manual?
Questions and answers