Table of Contents
Advertisement
Quick Links
Advertisement
Table of Contents

Subscribe to Our Youtube Channel
Related Manuals for Dahua VTNS1006A-2


Summary of Contents for Dahua VTNS1006A-2
- Page 1 2-Wire Switch User’s Manual V1.0.0...
-
Page 2: Table Of Contents
Table of Contents Product Overview ..........................1 Description ..........................1 Application Scene ........................1 Device Structure ............................ 2 Front ............................2 Rear ............................3 Installation ............................. 5 Installation via Screw ......................... 5 Installation via Slide Way ......................5 Notice ..............................8 Appendix 1 Technical Specifications ...................... - Page 3 Important Safeguards and Warnings Please read the following safeguards and warnings carefully before using the product in order to avoid damages and losses. Note: Do not expose the device to lampblack, steam or dust. Otherwise it may cause fire or electric shock.
-
Page 4: Product Overview
1 Product Overview 1.1 Description This product provides six pairs of 2-wire ports, supporting 30 levels of product cascading up to 180 devices. It solves apartment digitalization problem. When 2-wire VTH connects to the network via this product, it can achieve video talk, unlock, monitor and etc. 1.2 Application Scene 2-wire switch networking is in Figure 1-1. -
Page 5: Device Structure
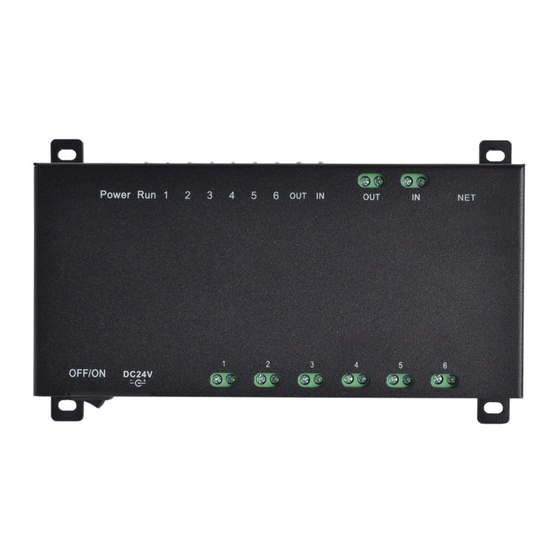
2 Device Structure 2.1 Front Device front structure is in Figure 2-1 and see Chart 2-1. Figure 2-1 Component Name Note... -
Page 6: Rear
Component Name Note From left to right: POWER indicator(1) Red light on, power normal. Light off, device power off. RUN indicator(1) Green light on, means switch operation normal. Light NO or OFF, means witch abnormal. Status indicator connecting VTH(6) ... - Page 7 Figure 2-2 Component Name Note Screw hole×4 Via 4_ST4×25-SUS screw install the switch, see Ch 3.1. Slide way Via slide way install the switch, see Ch 3.2. Chart 2-2...
-
Page 8: Installation
3 Installation Switch installation includes desktop, wall mount (wither via screw or slide way). 3.1 Installation via Screw Place the device on an appropriate place; install it on wall, fixed via screw. See Figure 3-1. Figure 3-1 3.2 Installation via Slide Way Warning: Slide way shall be prepared by user (standard 35mm-wide slide way), not included in device accessories. - Page 9 Figure 3-2 Figure 3-3 Step 2. Install slide way on wall at appropriate position. Step 3. Slide switch against the wall into slide way, and installation complete, see Figure 3-4.
-
Page 10: Figure
Figure 3-4... -
Page 11: Notice
4 Notice Please use our standard power supply, do not self-powered. Before wiring, please read carefully the device structure, understand interface, please see Ch 2. Before power is turned on, make sure that all connections comply with wiring instructions. ... -
Page 12: Appendix 1 Technical Specifications
Appendix 1 Technical Specifications Model VTNS1060A-2 Input 1-ch(Ethernet, 2-wire port alternative) Output 1-ch VTH Port 6-ch Power Power Consumption Rated 80W Work Temperature -10℃~+55℃ Without bracket: 178mm×84.5mm×30mm Dimensions(L×W×H) With bracket: 178mm×106mm×32mm Weight 230g Note: This manual is for reference only. Slight difference may be found in the user interface. ...
Need help?
Do you have a question about the VTNS1006A-2 and is the answer not in the manual?
Questions and answers