
Subscribe to Our Youtube Channel
Related Manuals for Olympus EPOCH 600


Summary of Contents for Olympus EPOCH 600
- Page 1 EPOCH 600 Basic Operation Manual DMTA‐10007‐01EN [U8778365] — Revision B June 2010...
- Page 2 Olympus NDT, 48 Woerd Avenue, Waltham, MA 02453, USA This manual and the product and the programs it describes are protected by the Copyright Act (R. S., 1985, chapter C‐42), by laws of other countries, and by international treaties, and therefore may not be reproduced in whole or in part, whether for sale or not, without the prior written consent from Olympus. Under copyright law, copying includes translation into another language or format. © 2010 by Olympus. All rights reserved. This document was prepared with particular attention to usage to ensure the accuracy of the information contained therein. It corresponds to the version of the product manufactured prior to the date appearing on the title page. There could, however, be some differences between the manual and the product if the product has been modified thereafter. The information contained in this document is subject to change without notice. Part number: DMTA‐10007‐01EN [U8778365] Revision B June 2010 Printed in United States of America All brands are trademarks or registered trademarks of their respective owners and third party entities.
-
Page 3: Table Of Contents
WEEE Directive ........................ 9 China RoHS .......................... 10 EMC Directive Compliance .................... 10 Warranty Information ...................... 11 Technical Support ........................ 11 1. Instrument Overview ................ 13 1.1 What’s In the Box ...................... 13 1.2 EPOCH 600 Instrument Configurations .............. 14 1.3 Connectors ......................... 15 1.4 Power Requirements .................... 18 1.4.1 Lithium‐Ion Battery .................. 18 1.4.2 AC Charger/Adaptor .................. 19 1.4.3 ... - Page 4 DMTA‐10007‐01EN [U8778365], Rev. B, June 2010 2. Basic Operation .................. 27 2.1 User Interface ...................... 27 2.1.1 Menus and Parameters .................. 28 2.1.2 Parameter Adjustment – Knob Configuration ........... 29 2.1.3 Parameter Adjustment – Navigation Pad Configuration ...... 30 2.1.4 Direct‐Access Keys .................. 30 2.1.5 Special Functions .................... 32 2.1.6 Submenus ...................... 33 2.2 Pulser and Receiver Settings ................... 33 2.2.1 Sensitivity ...................... 33 2.2.2 Reference Gain .................... 34 2.2.3 Pulser ...
-
Page 5: List Of Abbreviations
DMTA‐10007‐01EN [U8778365], Rev. B, June 2010 List of Abbreviations alternating current receive alternative current RoHS restriction of hazardous substan‐ beam index point direct current transmit/receive EFUP environmental friendly usage pe‐ WEEE waste electrical and electronic riod equipment electromagnetic compatibility List of Abbreviations v... - Page 6 DMTA‐10007‐01EN [U8778365], Rev. B, June 2010 vi List of Abbreviations...
-
Page 7: Labels And Symbols
DMTA‐10007‐01EN [U8778365], Rev. B, June 2010 Labels and Symbols A rating label with safety‐related symbols is attached to the instrument at the location shown in the following figure. The serial number label is located at the bottom of the instrument. If labels are missing or illegible, please contact Olympus. Location of rating label (see Table 1 on page 2) Labels and Symbols 1... -
Page 8: Table 1 Contents Of The Rating And The Serial Number Labels
DMTA‐10007‐01EN [U8778365], Rev. B, June 2010 Table 1 Contents of the rating and the serial number labels Rating plate label: Contains: The CE marking is a declaration that this product conforms to all the applicable directives of the European Community. See the Declaration of Conformity for details. The WEEE symbol indicates that the product must not be disposed of as unsorted municipal waste, but should be collected separately. The C‐Tick label indicates that the product complies with the applicable standard and establishes a traceable link between the equipment and the manufacturer, importer or their agent responsible for compliance and for placing it on the Australian market. The China RoHS mark indicates the product’s Environmental Friendly Usage Period (EFUP). The EFUP is defined as the number of years for which listed controlled substances will not leak or chemically deteriorate while in the product. The EFUP for the EPOCH 600 has been determined to be 15 years. Note: The Environmental Friendly Usage Period (EFUP) is not meant to be interpreted as the period assuring functionality and product performance. The direct current symbol 2 Labels and Symbols... - Page 9 DMTA‐10007‐01EN [U8778365], Rev. B, June 2010 Table 1 Contents of the rating and the serial number labels (continued) SERIAL The serial number is a 9‐digit number in the following format: yynnnnnmm where: Production year nnnnn Unit number manufactured that month. Production month For example, the 100000504 serial number indicates that the fifth unit (00005) was produced in April 2010. Labels and Symbols 3...
- Page 10 DMTA‐10007‐01EN [U8778365], Rev. B, June 2010 Do not touch the inner conductor of the BNC (or LEMO) connectors to avoid risks of an electric shock. Up to 400 V can be present on the inner conductor. The warning symbol between the Transmit/Receive ( ) and the Receive ( ) BNC connectors shown in the figure below indicates this electric shock risk. Warning symbol BNC connector inner conductor (LEMO 01 series also available) 4 Labels and Symbols...
-
Page 11: Important Information - Please Read Before Use
DMTA‐10007‐01EN [U8778365], Rev. B, June 2010 Important Information — Please Read Before Use Intended Use The EPOCH 600 instrument is designed to perform nondestructive inspections of industrial and commercial materials. Do not use the EPOCH 600 instrument for any purpose other than its intended use. Instruction Manual This instruction manual contains essential information on using this Olympus product safely and effectively. Before use, thoroughly review this instruction manual and use the product as instructed. Keep this instruction manual in a safe, accessible location. Instrument Compatibility Only use the EPOCH 600 instrument with the following ancillary equipment: • Rechargeable lithium‐ion (Li‐ion) battery pack (P/N: 600‐BAT‐L [U8760056]) Important Information — Please Read Before Use 5... -
Page 12: Repair And Modification
DMTA‐10007‐01EN [U8778365], Rev. B, June 2010 • Optional stand‐alone external battery charger (P/N: EPXT‐EC‐X) [varies by configuration; must select power cord] • Charger/adaptor (P/N: EP‐MCA‐X) [varies by configuration; must select power cord] Using incompatible equipment can result in a malfunction and/or in equipment damage. Repair and Modification The EPOCH 600 instrument does not contain any user‐serviceable parts. Do not disassemble, modify, or attempt to repair the instrument to prevent human injury and/or equipment damage. Safety Symbols The following safety symbols may appear on the instrument and in the instruction manual: General warning symbol: This symbol is used to alert you to potential hazards. All safety messages that follow this symbol shall be obeyed to avoid possible harm. 6 Important Information — Please Read Before Use... -
Page 13: Safety Signal Words
DMTA‐10007‐01EN [U8778365], Rev. B, June 2010 High voltage warning symbol: This symbol is used to alert you to potential electric shock hazards higher than 1,000 volts. All safety messages that follow this symbol shall be obeyed to avoid possible harm. Safety Signal Words The following safety symbols may appear in the documentation of the instrument: The DANGER signal word indicates an imminently hazardous situation. It calls attention to a procedure, practice, or the like, which, if not correctly performed or adhered to, could result in death or serious personal injury. Do not proceed beyond a signal word until the indicated conditions are fully understood and met. DANGER The WARNING signal word indicates a potentially hazardous situation. It calls attention to a procedure, practice, or the like, which, if not correctly performed or adhered to, could result in death or serious personal injury. Do not proceed beyond a signal word until the indicated conditions are fully understood and met. WARNING The CAUTION signal word indicates a potentially hazardous situation. It calls attention to an operating procedure, practice, or the like, which, if not correctly performed or adhered to, could result in minor or moderate personal injury, material damage, particularly to the product, destruction of part or all of the product, or loss of data. Do not proceed beyond a signal word until the indicated conditions are CAUTION fully understood and met. Important Information — Please Read Before Use 7... -
Page 14: Notes Signal Words
DMTA‐10007‐01EN [U8778365], Rev. B, June 2010 Notes Signal Words The following safety symbols may appear in the documentation of the instrument: The IMPORTANT signal word calls attention to a note that provides important information or information essential to the completion of a task. The NOTE signal word calls attention to an operating procedure, practice, or the like that requires special attention. A note also denotes related, parenthetical information that is useful but not imperative. The TIP signal word calls attention to a type of note that helps you apply the techniques and procedures described in the manual to your specific needs, or that provides hints on how to use effectively the capabilities of the product. Safety Before applying power to the EPOCH 600, verify that the correct safety precautions have been taken (see the following warnings). In addition, note the external markings on the instrument that are described in the “Important Information — Please Read Before Use” section. Warnings General Warnings • Carefully read the instructions contained in the user’s manual prior to powering on the instrument. • Keep the user’s manual in a safe place for further reference. • Follow the installation and operation procedures. 8 Important Information — Please Read Before Use... -
Page 15: Weee Directive
DMTA‐10007‐01EN [U8778365], Rev. B, June 2010 • It is imperative to respect the safety warnings on the instrument and in the user’s manual. • If the equipment is used in a manner not specified by the manufacturer, the protection provided by the equipment could be impaired. • Do not install substitute parts or perform any unauthorized modification to the instrument. • Service instructions, when applicable, are for trained service personnel. To avoid a dangerous electric shock, do not perform any service unless qualified to do so. For any problem or question regarding this apparatus, contact Olympus or an authorized Olympus representative. • Before turning on the instrument, you must connect the protective earth terminal of the charger/adaptor to the protective conductor of the (mains) power cord. The mains plug shall only be inserted in a socket outlet provided with a protective earth contact. Never negate the protective action by using an extension cord (power cable) without a protective conductor (grounding). • Whenever it is likely that the ground protection is impaired, you must turn off the instrument and secure it against any unintended operation. • The instrument must be connected only to a power source corresponding to the type indicated on the rating plate. WEEE Directive In accordance with European Directive 2002/96/EC on Waste Electrical and Electronic Equipment (WEEE), this symbol indicates that the product must not be disposed of as unsorted municipal waste, but should be collected separately. Refer to your local Olympus distributor for return and/or collection systems available in your country. Important Information — Please Read Before Use 9... -
Page 16: China Rohs
DMTA‐10007‐01EN [U8778365], Rev. B, June 2010 China RoHS China RoHS is the term used by industry generally to describe legislation implemented by the Ministry of Information Industry (MII) in the People’s Republic of China for the control of pollution by electronic information products (EIP). The China RoHS mark indicates the product’s Environmental Friendly Usage Period (EFUP). The EFUP is defined as the number of years for which listed controlled substances will not leak or chemically deteriorate while in the product. The EFUP for the EPOCH 600 has been determined to be 15 years. Note: The Environmental Friendly Usage Period (EFUP) is not meant to be interpreted as the period assuring functionality and product performance. EMC Directive Compliance FCC (USA) Compliance This equipment has been tested and found to comply with the limits for a Class A digital device, pursuant to Part 15 of the FCC Rules. These limits are designed to provide reasonable protection against harmful interference when the equipment is operated in a commercial environment. This equipment generates, uses, and can radiate radio frequency energy and, if not installed and used in accordance with the instruction manual, may cause harmful interference to radio communications. Operation of this equipment in a residential area is likely to cause harmful interference in which case you will be required to correct the interference at your own expense. ICES-003 (Canada) Compliance This Class A digital apparatus complies with Canadian ICES‐003. Cet appareil numérique de la classe A est conforme à la norme NMB‐003 du Canada. -
Page 17: Warranty Information
DMTA‐10007‐01EN [U8778365], Rev. B, June 2010 Warranty Information Olympus guarantees Olympus products to be free from defects in materials and workmanship for a period and conditions specified in the Olympus terms and conditions, available at http://www.olympus‐ims.com/en/terms/. The Olympus warranty only covers equipment that has been used in a proper manner as described in this instruction manual and has not been subjected to excessive abuse, attempted unauthorized repair, or modification. Inspect materials thoroughly on reception for evidence of external or internal damage that might have occurred during shipment. Notify the carrier making the delivery immediately of any damage, since the carrier is normally liable for damage in shipment. Preserve packing materials, waybills, and other shipping documentation in order to establish a damage claim. After notifying the carrier, contact Olympus for assistance with the damage claim and equipment replacement, if necessary. This instruction manual attempts to teach the proper operation of your Olympus product. The information contained herein is intended solely as a teaching aid and shall not be used in any particular application without independent testing and/or verification by the operator or the supervisor. Such independent verification of procedures becomes more important as the criticality of the application increases. For this reason, Olympus makes no warranty, expressed or implied, that the techniques, examples, or procedures described herein are consistent with industry standards nor that they meet the requirements of any particular application. Olympus reserves the right to modify all products without incurring the responsibility for modifying previously manufactured products. Technical Support Olympus is firmly committed to providing the highest level of customer service and product support. If you experience any difficulties when using our product, or if it fails to operate as described in the documentation, first consult the user’s manual, and then, if you are still in need of assistance, contact our after‐sales service. To locate the nearest service center, visit the Service Centers page at: www.olympus‐ims.com. Important Information — Please Read Before Use 11... - Page 18 DMTA‐10007‐01EN [U8778365], Rev. B, June 2010 12 Important Information — Please Read Before Use...
-
Page 19: 1. Instrument Overview
DMTA‐10007‐01EN [U8778365], Rev. B, June 2010 1. Instrument Overview This chapter provides a brief overview of all common operational requirements of the EPOCH 600 instrument. This chapter is organized in the following manner: • “What’s In the Box” on page 13 • “EPOCH 600 Instrument Configurations” on page 14 • “Connectors” on page 15 • “Power Requirements” on page 18 What’s In the Box The EPOCH 600 instrument comes standard with several key accessories (see Figure 1‐1 on page 14): • 2‐GB MicroSD removable memory card and adaptors (P/N: MICROSD‐ADP‐2GB [U8779307]) • AC charger/adaptor (P/N: EP‐MCA‐X). Varies by configuration; must select power cord. • Power cord • Alkaline battery holder (P/N: 600‐BAT‐AA [U8780295]) • Instrument transport case (P/N: 600‐TC [U8780294]) • Getting Started leaflet (P/N: DMTA‐10008‐01EN [U8778373]) •... -
Page 20: Epoch 600 Instrument Configurations
DMTA‐10007‐01EN [U8778365], Rev. B, June 2010 Basic Operation Manual Getting Started leaflet User’s Manual on CD-ROM Memory card and Power cord adaptors AC charger/adaptor Lock Alkaline battery holder EPOCH 600 unit Transport case Figure 1‐1 Transport case contents For a list of optional accessories, please refer to the Parts List on page 47. EPOCH 600 Instrument Configurations The EPOCH 600 instrument is configured according to the customer’s preferences in several ways. Available configurations include: 14 Chapter 1... -
Page 21: Connectors
• Adjustment knob or navigation pad • Keypad overlay (English, Japanese, Chinese, or Symbolic) • BNC or LEMO 01 series transducer connectors • Optional analog output port Configuration selections must be made when ordering the instrument. The EPOCH 600 also comes standard with a rechargeable lithium‐ion battery, an adjustable pipe stand, and a flexible display protector. Connectors Figure 1‐2 on page 15 illustrates the connections of the EPOCH 600 with the AC charger/adaptor, the MicroSD card, and a PCL5 USB printer. DC power plug EP-MCA-X MicroSD card charger/adaptor To PCL5 USB printer To power outlet AC power cord Figure 1‐2 The EPOCH 600 connections Use only the AC power cord supplied with the EPOCH 600. Do not use this AC ... -
Page 22: Figure 1-3 The Top End Connectors
DMTA‐10007‐01EN [U8778365], Rev. B, June 2010 The DC power, the Receive probe connector, and the Transmit/Receive probe connector are located on the top end of the EPOCH 600 (see Figure 1‐3 on page 16). Receive transducer connector Transmit/Receive transducer connector DC power connector Figure 1‐3 The top end connectors The USB On‐The‐Go port and the external MicroSD memory card slot are located on the right side of the instrument, hidden behind the side door (see Figure 1‐4 on page 17). 16 Chapter 1... -
Page 23: Figure 1-4 The Connectors Behind The Side Door
DMTA‐10007‐01EN [U8778365], Rev. B, June 2010 Side door MicroSD card slot USB port Figure 1‐4 The connectors behind the side door The RS232/Alarms and the VGA Out connectors are located at the back of the instrument, in the upper section (see Figure 1‐5 on page 17). A rubber cover protects each connector. The RS232/Alarms connector The VGA Out connector Figure 1‐5 The RS232/Alarms and VGA Out connectors Instrument Overview 17... -
Page 24: Power Requirements
DMTA‐10007‐01EN [U8778365], Rev. B, June 2010 Power Requirements Press the [ON/OFF] key to turn on the EPOCH 600 (see Figure 1‐6 on page 18). Pressing this key once causes an initial beep, followed by the instrument startup screen and a second beep approximately 5 seconds later. The EPOCH 600 is designed to operate using three power supply methods: • Internal lithium‐ion battery • Directly from the EPOCH charger/adaptor • Internal alkaline batteries [ON/OFF] power key AC charger/adaptor power indicator Figure 1‐6 Location of the EPOCH 600 power key and indicator 1.4.1 Lithium-Ion Battery The lithium‐ion (Li‐ion) battery is the primary method for powering the EPOCH 600. This battery comes installed in every instrument. When properly maintained, and when the instrument is operated under typical inspection conditions, the lithium‐ion battery should provide between 12 and 13 hours of continuous operation. To install or replace the lithium-ion battery Unfold the instrument pipe stand. -
Page 25: Ac Charger/Adaptor
DMTA‐10007‐01EN [U8778365], Rev. B, June 2010 Ensure that the gasket of the battery compartment cover is clean and in good condition. Install the battery compartment cover at the back of the instrument, and then tighten the two thumb screws to complete the installation (see Figure 1‐7 on page 19). Pipe stand Thumb screws Battery compartment Battery cover Figure 1‐7 Removing the lithium‐ion battery 1.4.2 AC Charger/Adaptor The EPOCH 600 AC charger/adaptor is provided with every instrument. This charger/adaptor allows you to power the EPOCH 600 with or without a battery installed, as well as to charge the lithium‐ion rechargeable battery when installed in the instrument. A power indicator on the front panel of the unit displays the current status of the AC charger/adaptor. To connect the AC charger/adaptor Connect the power cord to the charger/adaptor unit and to an appropriate power outlet. Instrument Overview 19... -
Page 26: Figure 1-8 Connecting The Charger/Adaptor
DMTA‐10007‐01EN [U8778365], Rev. B, June 2010 Use only the AC power cord supplied with the EPOCH 600. Do not use this AC power cord with other products. DC power plug EP-MCA-X AC power cord To power outlet Figure 1‐8 Connecting the charger/adaptor Lift the rubber seal that covers the AC adaptor connector on top of the EPOCH 600 instrument. Connect the DC output power cable from the AC charger/adaptor to the adaptor connector (see Figure 1‐9 on page 21). 20 Chapter 1... -
Page 27: Figure 1-9 Connecting The Dc Power Plug
DMTA‐10007‐01EN [U8778365], Rev. B, June 2010 DC power plug DC adaptor connector (rubber seal not shown) Figure 1‐9 Connecting the DC power plug The power status of the AC charger/adaptor and the battery charge condition are indicated both on the front panel of the EPOCH 600, as well as in the user interface (see Table 2 on page 21). Table 2 AC charger/adaptor power indicator status Power AC line power Battery indicator Indicator meaning connected indicator status Green Internal battery fully charged Internal battery is charging AC charger/adaptor not connected Instrument Overview 21... -
Page 28: Alkaline Batteries
Table 2 AC charger/adaptor power indicator status (continued) Power AC line power Battery indicator Indicator meaning connected indicator status Green AC charger/adaptor connected No battery installed 1.4.3 Alkaline Batteries The EPOCH 600 comes standard with an alkaline battery holder (P/N: 600‐BAT‐AA [U8780295]). This holder accommodates 8 AA size alkaline batteries in situations where an AC power source is not available and the internal Li‐ion battery is discharged. When operated under typical inspection conditions, the alkaline batteries will provide 3+ hours of continuous operation. To install the alkaline battery holder Unfold the instrument pipe stand. Loosen the two thumb screws securing the battery compartment cover at the back of the instrument, and then remove the battery compartment cover (see Figure 1‐10 on page 23). Remove the lithium‐ion battery (if installed) [see Figure 1‐10 on page 23]. 22 Chapter 1... -
Page 29: Figure 1-10 Removing The Battery Compartment Cover And The Lithium-Ion Battery
DMTA‐10007‐01EN [U8778365], Rev. B, June 2010 Thumb screws (2) Battery compartment Battery cover Figure 1‐10 Removing the battery compartment cover and the lithium‐ion battery Install 8 AA size alkaline batteries into the alkaline battery holder. Connect the alkaline battery holder connector into the instrument. Position the alkaline battery holder in the battery compartment (see Figure 1‐11 on page 23). Battery holder with alkaline batteries (8) Battery holder connector Figure 1‐11 The alkaline battery holder Instrument Overview 23... -
Page 30: Installing The Microsd Card
DMTA‐10007‐01EN [U8778365], Rev. B, June 2010 Install the battery compartment cover at the back of the instrument, and then tighten the two thumb screws. When alkaline batteries are installed in the instrument, the battery indicator in the user interface displays ALK. The AC charger/adaptor does not recharge the batteries installed in the alkaline battery holder. Installing the MicroSD Card The 2‐GB MicroSD card is included with every EPOCH 600 shipment. To install the MicroSD removable memory card Remove the card from its packaging. Loosen the two thumb screws, and then open the EPOCH 600 side door (see Figure 1‐12 on page 24). Thumb screws MicroSD card slot USB port Figure 1‐12 The side door 24 Chapter 1... - Page 31 DMTA‐10007‐01EN [U8778365], Rev. B, June 2010 Hold the card so that the MicroSD label faces toward the rear of the instrument. Carefully slide the card into the MicroSD slot until it clicks (see Figure 1‐12 on page 24). To remove the MicroSD card, carefully push the card into the instrument and release. A spring mechanism will partially eject the card, and then you can grasp and remove it from the instrument. Instrument Overview 25...
- Page 32 DMTA‐10007‐01EN [U8778365], Rev. B, June 2010 26 Chapter 1...
-
Page 33: 2. Basic Operation
DMTA‐10007‐01EN [U8778365], Rev. B, June 2010 2. Basic Operation This chapter is intended to quickly provide guidance for users who are familiar with ultrasonic flaw detection, but are new to the EPOCH 600. More detailed descriptions of these topics, along with a comprehensive guide to more advanced functions, are covered in the EPOCH 600 User’s Manual (P/N: DMTA‐10006‐01EN), included with every EPOCH 600 on a CD‐ROM. This chapter is organized in the following manner: • “Basic Operation” on page 27 • “Pulser and Receiver Settings” on page 33 • “Gates” on page 36 • “Calibration” on page 39 • “Data Logger” on page 43 User Interface The EPOCH 600 uses a blend of direct‐access keys and software menus to achieve full control over the instrument. The direct‐access keypad provides instant control over functions that are commonly used during inspections. The software menus provide access to the majority of instrument functions, such as pulser/receiver settings, automated calibration, measurement setups, software features, data logging capabilities, and more. Adjusting the value of a selected parameter is achieved using either the EPOCH 600 adjustment knob or the navigation keypad. The parameter adjustment method is determined by the configuration of the instrument selected at time of ordering. Both methods are outlined below. Basic Operation 27... -
Page 34: Menus And Parameters
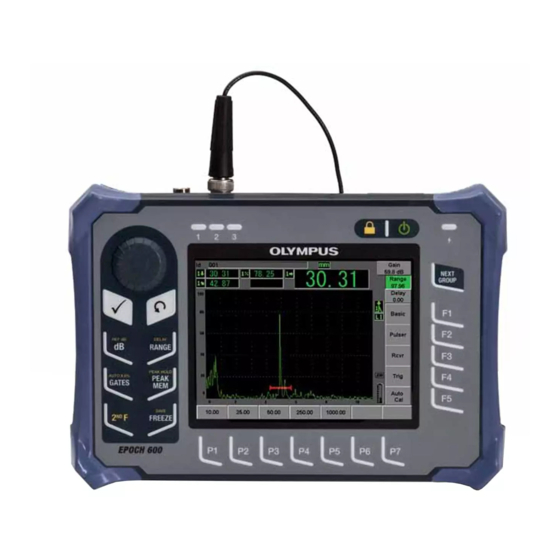
DMTA‐10007‐01EN [U8778365], Rev. B, June 2010 2.1.1 Menus and Parameters The majority of functions on the EPOCH 600 can be accessed and adjusted using the horizontal and vertical keys in the software user interface. The vertical keys, located on the right side of the display, are called menus, and the horizontal keys along the bottom of the display are called parameters, functions, or submenus (see Figure 2‐1 on page 28). Each menu or parameter can be selected for adjustment by pressing its corresponding [F<n>] or [P<n>] key on the instrument keypad (see Figure 2‐1 on page 28). Measurement reading boxes Basic parameters Flag Live A-scan view Menu Gate 2 (blue) Gate 1 (red) Menu group level Parameter buttons number Figure 2‐1 Software main display elements... -
Page 35: Parameter Adjustment - Knob Configuration
DMTA‐10007‐01EN [U8778365], Rev. B, June 2010 [NEXT GROUP] key Figure 2‐2 The menu groups and their level numbers 2.1.2 Parameter Adjustment – Knob Configuration Once a parameter is selected, you can modify it using the adjustment knob. You can adjust most parameters in either coarse or fine increments. To toggle between coarse and fine adjustment, press the [CHECK] key. Coarse adjustment selection is indicated by brackets around the parameter key (see Figure 2‐3 on page 29). Fine adjustment is selected when no brackets are displayed. Figure 2‐3 Coarse and fine adjustment selection Basic Operation 29... -
Page 36: Parameter Adjustment - Navigation Pad Configuration
DMTA‐10007‐01EN [U8778365], Rev. B, June 2010 2.1.3 Parameter Adjustment – Navigation Pad Configuration Once a parameter is selected, you can modify it using the arrow keys on the navigation pad (see Figure 2‐4 on page 30). You can adjust most parameters in either coarse or fine increments. The up and down arrows adjust in coarse increments, and the left and right arrows adjust in fine increments. Figure 2‐4 Arrow keys on the navigation pad 2.1.4 Direct-Access Keys To facilitate fast adjustment of common parameters, the EPOCH 600 features a set of direct‐access keys (see Figure 2‐5 on page 31). When pressed, the software interface jumps directly to the associated parameter or activates the correct function. 30 Chapter 2... -
Page 37: Figure 2-5 The Direct-Access Keys - Both Configurations (English)
DMTA‐10007‐01EN [U8778365], Rev. B, June 2010 Adjustment knob Navigation pad configuration configuration Direct-access Direct-access keys keys Figure 2‐5 The direct‐access keys — Both configurations (English) The EPOCH 600 is also offered in an international‐symbol version (see Figure 2‐6 on page 31). Adjustment knob Navigation pad configuration configuration Direct-access Direct-access keys keys Figure 2‐6 The direct‐access keys – Both configurations (international symbols) Basic Operation 31... -
Page 38: Special Functions
DMTA‐10007‐01EN [U8778365], Rev. B, June 2010 When the [RANGE], (DELAY), [dB], or (REF dB) direct‐access keys are pressed, common preset values appear above the [P<n>] parameter keys. To select a preset value, press the corresponding [P<n>] parameter key. 2.1.5 Special Functions There are several special functions to be aware of while using the EPOCH 600: • After adjusting a parameter using direct‐access keys, you can get back to the previous menu group using the [ESCAPE] key or the [NEXT GROUP] key. • Pressing the [ESCAPE] key from any menu group will return the user to the Basic menu, which is the default menu at start‐up. • The [LOCK] key (knob configuration only) automatically locks adjustment of all parameters to prevent any unwanted parameter modifications due to an accidental movement of the knob (see Figure 2‐7 on page 32). [LOCK] Figure 2‐7 Adjustment knob configuration — [LOCK] key • Pressing [2 F], (AUTO XX%) activates the AutoXX% feature, which automatically adjusts the gain in order to set the gated echo amplitude to XX% of full screen height (the default XX value is 80 %). (See Figure 2‐8 on page 33.) 32 Chapter 2... -
Page 39: Submenus
DMTA‐10007‐01EN [U8778365], Rev. B, June 2010 Figure 2‐8 The AutoXX% feature 2.1.6 Submenus When selecting some items, such as Display Setup, the [NEXT GROUP] key scrolls through rows within the submenu, the adjustment knob or navigation pad arrows are used to adjust the selected value, and the [ESCAPE] key returns to the live A‐scan view. Pulser and Receiver Settings The EPOCH 600 allows access to most of its pulser and receiver settings through the Pulser and the Rcvr menus. System sensitivity (gain) and reference gain are controlled exclusively using the direct‐access keys. 2.2.1 Sensitivity The system sensitivity (gain) is adjusted using the [dB] direct‐access key. To adjust the system sensitivity Press [dB]. Adjust the value: Using the navigation pad arrow keys or by rotating the adjustment knob in either coarse or fine increments Pressing one of the [P<n>] parameter keys to select the corresponding preset value Basic Operation 33... -
Page 40: Reference Gain
Scan dB: Toggles between current scanning gain and 0.0 dB scanning gain. • Off: Turns off reference gain feature (scanning gain is lost). • +6 dB: Increases the scanning gain by 6 dB. • –6 dB: Decreases the scanning gain by 6 dB. Reference gain Scanning gain Figure 2‐9 The reference and scanning gains 2.2.3 Pulser The EPOCH 600 main pulser functions are accessible by selecting the Pulser menu. Each individual pulser parameter is displayed above the parameter keys, and can be adjusted by pressing the corresponding [P<n>] parameter key. The following pulser functions are available for live adjustment in the Pulser menu: • PRF Mode: Selects either Auto or Manual PRF adjustment mode. Auto changes the PRF setting based on the screen range, and Manual allows manual adjustment of PRF in 10‐Hz increments. • PRF: Pulse Repetition Frequency (PRF) values range: from 10 Hz to 2000 Hz in 10‐Hz increments • Energy: Pulse voltage values available: 0 V, 100 V, 200 V, 300 V, or 400 V •... -
Page 41: Receiver
DMTA‐10007‐01EN [U8778365], Rev. B, June 2010 • Mode: pulse modes available: P/E (pulse‐echo), Dual, and Thru (through‐ transmission) • Pulser: Pulser waveforms available: Spike or Square (tunable square wave) • Freq: Pulse frequency (square wave pulse width) ranges from 0.1 MHz to 20.00 MHz The Spike pulse is equivalent to a 20‐MHz square wave pulse. 2.2.4 Receiver The EPOCH 600 standard receiver functions are accessible by selecting the Rcvr menu. Each individual receiver parameter is displayed above the parameter keys, and can be adjusted by pressing the corresponding [P<n>] parameter key. The following receiver parameters are available for live adjustments in the Rcvr menu: • Filter: Receiver filter setting • Rect: Waveform rectification (Full [fullwave], Half+ [halfwave positive], Half– [halfwave negative], RF [no rectification]) • Reject: Percent reject (from 0 % to 80 %) The eight filters available on the EPOCH 600 allow broadband or narrowband settings to match the requirements of a given application. Each is a fully digital filter set with the following low‐pass and high‐pass cutoffs: • 0.2 MHz–10 MHz • 2.0 MHz–21.5 MHz •... -
Page 42: Gates
DMTA‐10007‐01EN [U8778365], Rev. B, June 2010 Gates The EPOCH 600 features two standard, independent measurement gates: gate 1 and gate 2. Gate 1 is displayed as a red, solid horizontal line. Gate 2 is displayed as a blue, hollow horizontal line. These gates independently define digital measurements regions for amplitude, time‐of‐flight measurements, and other specialized readings. Each gate also features alarm and zoom functions. 2.3.1 Quickly Adjusting Basic Gate Parameters The [GATES] direct‐access key allows instant access to gate start, width, and level adjustments without requiring the user to enter any gate‐related menus. This is the most common method for gate adjustments. When the [GATES] key is pressed, the box above the first menu displays the gate 1 start position (see Figure 2‐10 on page 36). Once selected, the knob or arrows can increase or decrease this value, in coarse or fine increments. Gate 1 start position adjustment Figure 2‐10 The Gate 1 start position adjustment Pressing the [GATES] key repeatedly will scroll through the start, width, and level setting of every active gate. Pressing [ESCAPE] or [NEXT GROUP] returns the user to the menu group used prior to gate adjustment, allowing efficient adjustment of the gates with minimal interference for the operator. -
Page 43: Gate Setup
DMTA‐10007‐01EN [U8778365], Rev. B, June 2010 • Zoom: Sets the display range to begin at the start position of the selected gate, and to stop at the end position of the selected gate (gate start + gate width). Pressing the Zoom [P<n>] parameter key repeatedly toggles the zoom on and off. • Start: Adjusts the start position of the selected gate. • Width: Adjusts the width of the selected gate. • Level: Adjusts the screen height of the selected gate (from 3 % to 95 %). • Alarm: Sets the alarm condition of the selected gate (Off, Positive, Negative, Min Depth) • Min Depth: Visible only when the Alarm parameter is set to Min Depth. Adjusts the threshold in time‐of‐flight units that triggers a Min Depth alarm condition. • Status: Turns the gate on or off (effects measurements, alarms, and visibility of gate on screen). 2.3.3 Gate Setup The Gate Setup menu allows more advanced settings for each gate to be adjusted prior to inspection. These settings are visible above the [P<n>] parameter keys. The following gate settings are available in the Gate Setup menu: • G1 Mode: Sets the measurement trigger mode of gate 1 (Peak, 1stPeak, Edge) • G1 RF: Sets the polarity of the gate 1 when the instrument is operating in RF rectification (Dual, Positive, Negative) • G1 %Amp: Used only in Edge mode. Sets the measurement trigger for the % amplitude digital measurement of gate 1 when in Edge detection mode (High Peak, 1stPeak). -
Page 44: Alarm Indications
2‐11 on page 38]. • Edge: Acquires measurement readings based on the position of the first crossing point of a gated signal (see Figure 2‐11 on page 38). 1stPeak Edge Peak Figure 2‐11 Measurement trigger in Edge, Peak, and 1stPeak modes 2.3.4 Alarm Indications Whenever an alarm is triggered on either measurement gate, the operator is alerted in two different ways: • An audible tone is emitted from the EPOCH 600 • One of two alarm indicators (LEDs) is illuminated on the front panel of the EPOCH 600 (see Figure 2‐12 on page 38) Gate 2 alarm indicator Gate 1 alarm indicator Figure 2‐12 Gate 1 and gate 2 alarm indicator lights 38 Chapter 2... -
Page 45: Calibration
DMTA‐10007‐01EN [U8778365], Rev. B, June 2010 The EPOCH 600 is also capable of outputting alarm signals through the 9‐pin D‐sub connector on the back panel of the instrument. Calibration The EPOCH 600 can be easily calibrated for both zero offset and velocity in order to provide accurate thickness (soundpath) measurements from indications. The EPOCH 600 utilizes an auto‐calibration system for a simple, two‐step approach. The section below outlines the most standard and basic calibration example. More detailed information on calibration can be found in the EPOCH 600 User’s Manual (P/N: DMTA‐10006‐01EN). 2.4.1 Measurement calibration Calibration for accurate digital measurements is typically accomplished using two known thicknesses of a representative material. In this section, the terms THIN and THICK will be used to refer to either two thicknesses of a block or plate (straight beam calibrations) or two lengths of an angled soundpath (angle beam calibration). To begin calibration Couple the transducer to the thin step of the material. Position gate 1 around the resulting indication on screen. Bring the indication to 80 % full screen height using the (AUTO XX%) function. Select the Auto Cal menu (see Figure 2‐13 on page 40). Basic Operation 39... -
Page 46: Figure 2-13 The Auto Cal Menu
DMTA‐10007‐01EN [U8778365], Rev. B, June 2010 Figure 2‐13 The Auto Cal menu Use the Mode parameter to select the appropriate calibration mode (Thickness for straight beam or Soundpath for angle beam are the most common). Press Cal‐Zero (see Figure 2‐14 on page 40). Figure 2‐14 The Cal‐Zero value 40 Chapter 2... -
Page 47: Figure 2-15 The Gate 1 Start
DMTA‐10007‐01EN [U8778365], Rev. B, June 2010 Use the knob or arrow keys to adjust the displayed value to the appropriate thickness. For this example, the transducer is coupled to a 5 mm step. Press Continue to accept the adjusted value, and then move on to the second calibration step. Couple the transducer to the thick step of material. 10. Position gate 1 around the resulting indication on screen. 11. Bring the indication to 80 % full screen height using the (AUTO XX%) function (see Figure 2‐15 on page 41). 12. Press [ESCAPE] to return to the Auto Cal menu. Figure 2‐15 The gate 1 start 13. Press Cal‐Vel. 14. Use the knob or arrow keys to adjust the displayed value to the appropriate thickness. For this example, the transducer is coupled to a 12.5 mm step (see Figure 2‐16 on page 42). Basic Operation 41... -
Page 48: Figure 2-16 The Velocity Cal Value
DMTA‐10007‐01EN [U8778365], Rev. B, June 2010 Figure 2‐16 The Velocity Cal value 15. Press Done to accept the adjusted value and complete the calibration process. 16. Press [RANGE], and then adjust the screen range to the desired setting (see Figure 2‐17 on page 42). Figure 2‐17 The Range value 42 Chapter 2... -
Page 49: Angle Beam Calibration
DMTA‐10007‐01EN [U8778365], Rev. B, June 2010 2.4.2 Angle Beam Calibration Angle beam calibrations typically require four steps. Each step is outlined below: To perform angle beam calibration Verify the Beam Index Point (B.I.P.). Verify the refracted angle of wedge. Complete the distance calibration using steps of section 2.4.1 on page 39 (Calibration mode set to SoundPath or Depth depending on the reflector type). Set the sensitivity by capturing sensitivity hole or notch in gate 1, bringing the indication to 80 % screen height using (AUTO XX%), and then setting the reference gain by pressing [2 F], (REF dB) [see Figure 2‐18 on page 43]. Figure 2‐18 Reference gain setting Data Logger The EPOCH 600 features an onboard data logging system that allows standard storage of inspection files (Inc) and dedicated calibration files (Cal), as well as optional inspection files in corrosion style configurations (2D, 3D, Boiler, etc). Regardless of file type, each discrete data point saved on the EPOCH 600 stores all Basic Operation 43... -
Page 50: Calibration Files
DMTA‐10007‐01EN [U8778365], Rev. B, June 2010 active digital measurements, compressed A‐scans, calibration data, alarm conditions, and active software features. The onboard memory is stored on a 2‐GB MicroSD card, allowing storage of over 500,000 individual data points. The section below outlines the procedure for setup and storage of the most basic and common file type, the calibration file. For full details and procedures on standard and optional file types, see the EPOCH 600 User’s Manual (P/N: DMTA‐10006‐01EN). 2.5.1 Calibration Files To setup and save a calibration file on the EPOCH 600, first complete all ultrasonic and software setups that will be saved within the calibration. To complete all ultrasonic and software setups Select the File menu. Press the Create key to enter the file creation screen. The Create screen appears (see Figure 2‐19 on page 44). In the File Type box, use the knob or arrow keys to select Cal. Use the [NEXT GROUP] key to advance to the Filename box. In the Filename box, create a file name (cannot exceed 32 characters) by pressing the Edit parameter key. Figure 2‐19 The Create screen 44 Chapter 2... - Page 51 DMTA‐10007‐01EN [U8778365], Rev. B, June 2010 Use the knob or arrows to navigate through the virtual keypad (see Figure 2‐20 on page 45). Insert a character by pressing INS (see Figure 2‐20 on page 45). Figure 2‐20 The virtual keypad Use the [NEXT GROUP] key to complete the file naming process. For creation of an incremental (Inc) file, you must first create a Start Point. Press the [NEXT GROUP] key until the Create button is highlighted. 10. Press Save (see Figure 2‐21 on page 46). Basic Operation 45...
-
Page 52: Other Create Functions
DMTA‐10007‐01EN [U8778365], Rev. B, June 2010 Figure 2‐21 The Save dialog box 11. Press [P1] to accept the function. The user is then returned to the live screen. 2.5.2 Other Create Functions Two other file creation functions exist, and are described below: • Create: Creates the file in memory but does not open this file as the active storage location. Typically used when creating several files at once without saving data. • Open: Creates the file in memory, and then opens it as the active storage locations, but does not save any file parameters to the file until you press [2 F], (SAVE). Typically used for inspection files, where the file is created prior to the start of the inspection. 46 Chapter 2... -
Page 53: Appendix: Parts List
DMTA‐10007‐01EN [U8778365], Rev. B, June 2010 Appendix: Parts List Table 3 EPOCH 600 basic kit (spares can be purchased) Part Number U8 Number Description EP600‐BA‐UEE‐K U8051216 EPOCH 600 instrument NOTE: The part number vary according to the instrument configuration. The instrument can be adapted to have different keypads, manual languages, power cords, etc. Contact your Olympus representative for further information. EP‐MCA‐X See note AC charger/adaptor NOTE: The part number vary according to the instrument configuration. You must specify the power cord type. 600‐BAT‐L U8760056 EPOCH 600 lithium‐ion rechargeable battery 600‐TC U8780294 EPOCH 600 instrument transport case EP600‐MANUAL‐CD U8778381 EPOCH 600 User’s Manual (CD‐Rom) DMTA‐10007‐01EN U8778365 ... -
Page 54: Table 4 Epoch 600 Software Options
DMTA‐10007‐01EN [U8778365], Rev. B, June 2010 Table 4 EPOCH 600 software options Part Number U8 Number Description EP600‐DGS‐AVG U8140146 EPOCH 600 onboard DGS/AVG software option EP600‐AWS U8140147 EPOCH 600 AWS D1.1/D1.5 software option EP600‐TEMPLATE U8140148 EPOCH 600 template storage software option EP600‐API5UE U8140149 EPOCH 600 API 5UE software option EP600‐XDATA U8140150 EPOCH 600 expanded data logger software option EP600‐AVERAGE U8140151 EPOCH 600 waveform averaging software option GAGEVIEWPRO U8140075 GageView Pro PC interface software GAGEVIEWPRO‐... - Page 55 DMTA‐10007‐01EN [U8778365], Rev. B, June 2010 Table 5 EPOCH 600 optional accessories (continued) Part Number U8 Number Description EPLTC‐C‐USB‐A‐6 U8840031 EPOCH LTC USB communication cable (mini‐AB to TYPE‐A/HOST) EPLTC‐C‐USB‐B‐6 U8840033 EPOCH LTC USB communication cable (mini‐AB to TYPE‐B/CLIENT) 600‐C‐VGA‐5 U8780298 5‐feet EPOCH 600 VGA cable (1.5 meter) EP1000‐C‐9OUT‐6 U8779017 6‐feet standard 9‐pin communication cable (1.8 meter) 600‐C‐RS232‐5 U8780299 5‐feet EPOCH 600 RS232 cable (1.5 meter) EP600‐ U8780300 EPOCH 600 extended warranty WARRANTY (1 additional year)
- Page 56 DMTA‐10007‐01EN [U8778365], Rev. B, June 2010 50 Appendix ...
-
Page 57: List Of Figures
DMTA‐10007‐01EN [U8778365], Rev. B, June 2010 List of Figures Figure 1‐1 Transport case contents .................. 14 Figure 1‐2 The EPOCH 600 connections ................ 15 Figure 1‐3 The top end connectors .................. 16 Figure 1‐4 The connectors behind the side door .............. 17 Figure 1‐5 The RS232/Alarms and VGA Out connectors .......... 17 Figure 1‐6 Location of the EPOCH 600 power key and indicator ......... 18 Figure 1‐7 Removing the lithium‐ion battery .............. 19 Figure 1‐8 Connecting the charger/adaptor .............. - Page 58 DMTA‐10007‐01EN [U8778365], Rev. B, June 2010 Figure 2‐19 The Create screen .................... 44 Figure 2‐20 The virtual keypad .................... 45 Figure 2‐21 The Save dialog box ................... 46 52 List of Figures...
-
Page 59: List Of Tables
DMTA‐10007‐01EN [U8778365], Rev. B, June 2010 List of Tables Table 1 Contents of the rating and the serial number labels .......... 2 Table 2 AC charger/adaptor power indicator status ............. 21 Table 3 EPOCH 600 basic kit (spares can be purchased) .......... 47 Table 4 EPOCH 600 software options ................ 48 Table 5 EPOCH 600 optional accessories ................ 48 List of Tables 53... - Page 60 DMTA‐10007‐01EN [U8778365], Rev. B, June 2010 54 List of Tables...
-
Page 61: Index
DMTA‐10007‐01EN [U8778365], Rev. B, June 2010 Index calibration files 44 Canada, ICES‐003 compliance 10 AC charger/adaptor caution note connection 19 do not service instrument 6 power indicator status 21 signal word 7 accessories use compatible equipment 6 instrument 13 caution notes optional 48 AC power cord 15, 20 adjustment CE mark 2 coarse, knob configuration 29 charger/adaptor, AC, connection 19 coarse, navigation pad configuration 30 China RoHS 2, 10 fine, knob configuration 29 compatibility with instrument 5 fine, navigation pad configuration 30 compliance alarm C‐Tick 2 connector 17 EMC directive 10 alarm indications 38 FCC (USA) 10 alkaline batteries installation 22 ICES‐003 (Canada) 10 alkaline battery holder 22 configurations, instrument 14 angle beam calibration 43 connecting AC charger/adaptor 19 connections 15 basic gate parameters 36 connector basic kit 47... - Page 62 DMTA‐10007‐01EN [U8778365], Rev. B, June 2010 important note, signal word 8 indicator, power 18 danger note input/output electrical shock 4 connectors 17 instrument purpose 5 installing signal word 7 alkaline batteries 22 data logger 43 li‐ion battery 18 DC power connector 16 MicroSD card 24 direct current symbol 2 instruction manual 5 direct‐access keys 30 instrument document accessories 13 copyright ii angle beam calibration 43 part number ii basic kit 47 publishing date ii calibration 39 revision ii compatibility 5 door, side 16 configurations 14 data logger 43 electrical shock, danger note 4 direct‐access keys 30 EMC directive compliance 10 filters 35 gain adjustment 33 gates 36 FCC (USA) compliance 10 intended use 5 files, calibration 44 international symbol 31...
- Page 63 Gate 1 36 receiver settings 33 Gate 2 36 reference gain 34 Gate Setup 37 repair, do not 6 Pulser 34 replacing lithium‐ion battery 18 Rcvr 35 RoHS symbol 2, 10 menus, group of 28 RS232 connector 17 menus, instrument 28 MicroSD card safety connector 17, 24 precautions before use 8 installation 24 signal words 7 MicroSD memory card symbols 6 slot 16 sensitivity adjustment 33 serial number navigation pad, parameter adjustment 30 format 3 NEXT GROUP key 33 label 1 note, signal word 8 settings pulser 33 receiver 33 Olympus setups office address ii software 44 technical support 11 ultrasonic 44 ON/OFF key 18 Index 57...
- Page 64 DMTA‐10007‐01EN [U8778365], Rev. B, June 2010 side door 16 signal word T/R transducer connector 16 caution 7 technical support 11 danger note 7 tip signal word 8 important note 8 trademark disclaimer ii note 8 tip 8 warning note 7 ultrasonic setup 44 software setup 44 USA FCC compliance 10 special functions, instrument 32 USB connector 17, 24 status, AC charger/adaptor power indicator 21 USB On‐The‐Go port 16 submenus 33 user interface 27 support information 11 symbol, international 31 VGA out connector 17 symbols CE 2 C‐Tick 2 warning note direct current 2 electrical 9 high voltage warning note 7 general 8 international 31 high voltage symbol 7 RoHS 2, 10 signal word 7 safety 6 symbol 6 warning note 6 warranty information 11 WEEE 2...
Need help?
Do you have a question about the EPOCH 600 and is the answer not in the manual?
Questions and answers