Table of Contents
Advertisement
Available languages
Available languages
Advertisement
Table of Contents

Related Manuals for BE QUIET! dark base pro 900


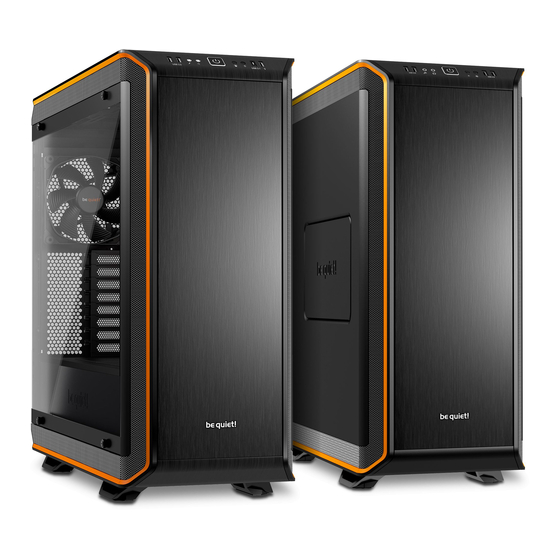
Summary of Contents for BE QUIET! dark base pro 900
-
Page 2: Table Of Contents
INDEX Glinde, April 2016 ENGLISH » 1. INTRODUCTION ............................2. SPECIFICATIONS ............................3. CONTENTS ..............................4. EXPLODED VIEW & PARTS .......................... 5. LAYOUTS..............................6. FAN COMPATIBILITY ........................... RADIATOR SUPPORT ..........................8. REMOVE EXTERNAL PARTS ........................9. INSTALLATION AND REMOVAL OF DRIVES AND FILTERS ................10. - Page 3 9. MONTAGE ET DÉMONTAGE DES DISQUES ET DES FILTRES ..............10. DÉMONTAGE CAGE DISQUE DUR/RÉGLAGE ..................... 11. CHANGEMENT DE CONFIGURATION DU SUPPORT DE CARTE MÈRE ............12. DÉPLACEMENT DE L’ALIMENTATION ......................13. RÉGLAGE DE LA PORTE ..........................14. INSTALLATION DES COMPOSANTS ......................LIMITED WARRANTY ............................
-
Page 4: Introduction
INTRODUCTION We are delighted you have chosen to buy our Dark Base PC case. Please read the information here and carefully follow all the instructions prior to installation. Should you have further questions, please contact our customer service. See contact information in the manufacturer’s details section. Warranty ∙... -
Page 5: Specifications
2 x USB 3.0, 2 x USB 2.0, HD audio jacks Fan Speed Controller Dark Base 900: 3x 4-pin, 3 x 3-pin, Controller: manual 5V-12V Dark Base Pro 900: 4x 4-pin, 4x 3-pin, Controller: manual 5V-12V / PWM hub Cooler Height (mm) Graphics Card Length (mm) -
Page 6: Contents
CONTENTS Images Part Name Amount Usage Mounting spot for water pumps or LCS Bracket the like Third fan on the front chassis Upper Fan Bracket mounting HDD 6#32 Screws HDD slots mounting M3 Screws SSD mounting Screws 6#32 MB mounting Stand off 14.4mm E-ATX mounting Thumb Screws M3... -
Page 7: Exploded View & Parts
EXPLODED VIEW & PARTS DARK BASE PRO 900 Glass Side Panel Bezel External Base Cover Mounting Screws SilentWings 3 Fan ® HDD Panel MB-Tray HDD Slots SSD-Tray PSU Bracket Fan Speed Controller Board Rear Panel Brackets External Front Panel Power Adapter Bracket... - Page 8 DARK BASE 900 Side Panel Bezel Base Air Filter Side Panel Filter External Base Cover Side Panel SilentWings 3 fan ® HDD Panel M/B Tray HDD slots SSD Bracket PSU Bracket Fan Speed Controller Board Rear Panel Brackets External Front Panel Power Adapter Bracket ODD Bezel ODD Cage...
- Page 9 4.1 FRONT I/O AND MEDIA PORTS DARK BASE PRO 900 DARK BASE 900 USB 3.0 USB 2.0 LED Switch (Pro only) Headphone Microphone QI Charger (Pro only) Power Button / Power LED Reset HDD LED Fan Speed Controller Switch 4.2 I/O PORTS The function panel has several wire connections that need to be installed.
- Page 10 4.3 PCB PANEL / PORTS DARK BASE 900 DARK BASE PRO 900 4-Pin PWM Connector to M/B 4-Pin PWM Connector 4-Pin PWM Connector 3-Pin Fan Connector 3-Pin Fan Connector Fan Speed Controller Switch Connector LED Strip Connector Power Connector (SATA)
- Page 11 Using switch “I” and switches the lamps on and off and permits the illumination color to be selected (red, green, blue, white, orange). 4.6 QI Charger use (only Pro-Version) The preinstalled Qi charger supplied with Dark Base Pro 900 allows cable-free charging of all external devices that are compatible with the Qi standard. If the device (e.g. smartphone) is equipped with such a feature it can be charged without cable connection by placing it on the plate marked “J”...
-
Page 12: Einleitung
EINLEITUNG Wir freuen uns, dass Sie sich für das be quiet! Gehäuse Dark Base entschieden haben. Bitte lesen Sie vor Inbetriebnahme die nachstehenden Informationen aufmerksam durch und beachten Sie die einzelnen Installationshinweise. Bei weiteren Fragen wenden Sie sich gern an unseren Kundenservice. Die Kontaktdaten finden Sie im Abschnitt „Herstellerangaben“. -
Page 13: Spezifikationen
2 x USB 3.0, 2 x USB 2.0, HD Audio Buchse Lüftersteuerung Dark Base 900: 3x 4-Pin, 3x 3-Pin, Steuerung: manuell 5V-12V Dark Base Pro 900: 4x 4-Pin, 4x 3-Pin, Steuerung: manuell 5V-12V / PWM hub Max. Höhe CPU-Kühler (mm) Max. Länge Grafikkarte (mm) 325 / 470 (w/o HDD-Halterung) Max. -
Page 14: Lieferumfang
LIEFERUMFANG Abbildung Bezeichnung Anzahl Verwendungszweck Befestigungspunkt für z.B. LCS Halterung Wasserpumpen o.ä. Befestigung des dritten Lüfters an der Halterung für den oberen Lüfter Front HDD 6#32 Schrauben Anbringung der HDD-Slots M3 Schrauben SSD-Befestigung Schrauben 6#32 Mainboard-Befestigung Stand Off Schraube 14.4mm E-ATX Befestigung Rändelschrauben M3 ODD-Befestigung Kabelbinder Kabelmanagement... -
Page 15: Explosionszeichnung & Teile
EXPLOSIONSZEICHNUNG & TEILE DARK BASE PRO 900 Seitenabdeckung aus Temperglas Äußere Bodenabdeckung Befestigungsschrauben SilentWings 3 Lüfter ® HDD-Panel MB-Tray HDD-Slots SSD-Halterung Netzteilhalterung Lüftersteuerungs-Platine Abdeckung Rückseite Äußere Frontabdeckung Halterung Power Adapter ODD-Blende ODD-Käfig Luftfilter vorne Gehäuse Frontpanel Äußere Abdeckung Oberseite Seitenteil Front I/O-Panel... - Page 16 DARK BASE 900 2-stufige Öffnung im Seitenteil Luftfilter Boden Filter im Seitenteil Äußere Bodenabdeckung Seitenteil SilentWings 3 Lüfter ® HDD-Panel M/B-Tray HDD-Slots SSD-Halterung Netzteilhalterung Lüftersteuerungs-Platine Abdeckung Rückseite Äußere Frontabdeckung Netzteilhalterung ODD-Blende ODD-Käfig Luftfilter vorne Gehäuse Frontseite Äußere Abdeckung Oberseite Front I/O-Panel...
- Page 17 4.1 FRONT I/O UND MEDIA ANSCHLÜSSE DARK BASE PRO 900 DARK BASE 900 USB 3.0 USB 2.0 LED-Schalter (Pro Version) Kopfhörer Mikrofon Qi Ladestation (Pro Version) An-/Aus-Schalter / LED Reset HDD LED Lüftersteuerungs-Schieberegler 4.2 I/O ANSCHLÜSSE Die vorhandenen Front I/O-Anschlüsse müssen mit Ihrem Mainboard verbunden werden.
- Page 18 4.3 PCB PANEL / ANSCHLÜSSE DARK BASE 900 DARK BASE PRO 900 4-Pin PWM Verbindungsstecker zum 4-Pin PWM Verbindungsstecker Mainboard 4-Pin PWM Verbindungsstecker 3-Pin Lüfter Verbindungsstecker 3-Pin Lüfter Verbindungsstecker Anschluss für Lüftersteuerungs- Schieberegler LED-Leiste Verbindungsstecker Power Connector (SATA) Power Connector (SATA) Anschluss für Lüftersteuerungs-Schieberegler...
- Page 19 Über den Schalter „I“ lässt sich die Beleuchtung in die gewünschte Farbe (rot, grün, blau, weiß, orange) wechseln und ein- oder ausschalten. 4.6 LADESTATION FÜR Qi-FÄHIGE ENDGERÄTE (NUR PRO-VERSION) Die im Dark Base Pro 900 vorinstallierte Qi-Ladestation dient zum kabellosen Laden aller dem Qi-Standard entsprechenden Fremdgeräte. Wenn Ihr Gerät (bspw. Smartphone) über eine solche Ausstattung verfügt, kann es mittels Auflegen auf den mit...
-
Page 20: Introduction
INTRODUCTION Nous vous remercions d’avoir choisi d’acquérir notre Dark Base. Nous vous invitons à lire attentivement le manuel et à suivre les instructions avec beaucoup d’attention. Si toutefois, vous aviez des questions, veuillez contacter notre service client, dont vous trouverez les coordonnées dans le paragraphe appelé ‘Informations constructeur ». -
Page 21: Caracteristiques
2 x USB 3.0, 2 x USB 2.0, 2x Jack 3,5 mm Rhéobus Dark Base 900: 3x 4-pin, 3 x 3-pin, Contrôleur: manuel 5V-12V Dark Base Pro 900: 4x 4-pin, 4x 3-pin, Contrôleur: manuel 5V-12V / Hub PWM Hauteur du ventirad CPU 185mm... -
Page 22: Accessoires
ACCESSOIRES Images Nom de la pièce Quantité Utilité Emplacement de montage pour Support LCS pompes à eau Pour un troisième ventilateur en Support du ventilateur supérieur façade Vis 6#32 HDD Pour montage des disques durs Vis M3 Pour montage des SSD Vis 6#32 Pour montage de la carte mère Entretoise 14.4mm Pour montage carte mère E-ATX Vis à... -
Page 23: Vue Eclatée Et Pièces
VUE ECLATÉE ET PIÈCES DARK BASE PRO 900 Panneau latéral vitré Panneau inférieur Vis de montage Ventilateur SilentWings ® Panneau HDD Plateau carte mère Emplacements HDD Emplacement SSD Support Alimentation Platine de commande de vitesse de rotation des ventilateurs Équerres PCI-E Façade Équerres alimentation... - Page 24 DARK BASE 900 Cache latéral Filtre à poussière bas Filtre à poussière latéral Panneau inférieur Panneau latéral Ventilateur SilentWings ® Façade support HDD Plateau carte mère Emplacements HDD Support SSD Support alimentation Platine de commande de vitesse de rotation des ventilateurs Équerres PCI-E Façade ÉquerresAlimentation Cache lecteur optique Cage lecteur optique Filtre à poussière façade Châssis...
- Page 25 4.1 CONNECTIQUE EN FAÇADE DARK BASE PRO 900 DARK BASE 900 USB 3.0 USB 2.0 Interrupteur LED (Pro uniquement) Casque Microphone Chargeur Qi (Pro uniquement) Bouton marche/arrêt + LED Bouton Reset/ Remise à zéro HDD LED Interrupteur Rhéobus 4.2 CONNECTIQUE INTERNE Le panneau supérieur dispose de plusieurs connectiques qui...
- Page 26 4.3 CONNECTIQUE RHÉOBUS DARK BASE 900 DARK BASE PRO 900 4-pin PWM Connecteur M/B Connecteur 4-pin PWM pour ventilateur 4-pin PWM connecteur Connecteur 3-pin pour ventilateur Connecteur 3-pin pour ventilateur Connecteur de commande de vitesse de rotation des ventilateurs Connecteur bande lumineuse LED...
- Page 27 Qi. Si votre appareil (smartphone) est équipé de cette technologie, vous pouvez le recharger sans fil en le posant sur la zone du Dark Base Pro 900 signalée par un « J ».Le démarrage du chargement est signalé par un signal sonore une fois l’appareil posé.
-
Page 28: Wprowadzenie
WPROWADZENIE Dziękujemy za zakup obudowy PC Dark Base. Przed przystąpieniem do instalacji prosimy zapoznać się ze szczegółowymi informacjami zawartymi w niniejszej instrukcji. W razie dodatkowych pytań, prosimy o kontakt z naszym działem obsługi klienta. Informacje kontaktowe znajdziesz w sekcji Dane producenta. Gwarancja ∙ 3 lat gwarancji producenta dla klienta końcowego (pierwszy zakup od autoryzowanego dystrybutora be quiet!) ∙ Wymagany jest oryginalny paragon zakupu, żeby skorzystać z usług gwarancyjnych. Przechowuj go starannie. ∙ Manipulacje i/lub modyfikacje techniczne wszelkiego typu lub uszkodzenia mechaniczne powodują utratę gwarancji. ∙ Pełne warunki i zasady gwarancji dostępne są na naszej stronie bequiet.com w zakładce Serwis/Gwarancja Ogólne warunki i zasady prowadzenia działalności dla sprzedawców detalicznych również mają zastosowanie. Szczegóły na bequiet.com. Dane Producenta Listan GmbH &... -
Page 29: Specyfikacja
SPECYFIKACJA DARK BASE PRO 900 DARK BASE 900 Wymiary (S x W x G w mm) 242.7 x 585.5 x 577.2 Typ obudowy Super Midi Tower Materiał 0.8mm – 1mm SECC, 0.8mm Aluminum, tworzywo ABS, Dark Base Pro 900: 4mm tempered glas... -
Page 30: Zawartość
ZAWARTOŚĆ Rysunek Nazwa części Ilość Zastosowanie Mocowanie chłodzenia wodnego lub Uchwyt LCS tym podobnych Mocowanie trzeciego wentylatora z Uchwyt górnego wentylatora przodu obudowy Śrubki HDD 6#32 Mocowanie koszyka HDD Śrubki M3 Montaż SSD Śrubki 6#32 Montaż MB Śruba dystansowa 14.4mm Mocowanie E-ATX Szybkośrubki M3 Mocowanie ODD Opaski zaciskowe Zarządzanie okablowaniem Przelotka gumowa do panelu HDD Zarządzanie okablowaniem Taśma LED (Tylko wersja Pro) Podświetlenie... -
Page 31: Widok Szczegółowy I Części
WIDOK SZCZEGÓŁOWY I CZĘŚCI DARK BASE PRO 900 Szklany panel boczny Zewnętrzna pokrywa dolna Śrubki mocujące Wentylator SilentWings ® Panel HDD Tacka M/B Koszyki HDD Uchwyt SSD Uchwyt PSU Płyta kontrolera prędkości obrotowej wentylatora Uchwyt panelu tylnego Zewnętrzny panel przedni Uchwyt zasilania Zaślepka ODD Koszyk ODD Przedni filtr przeciwkurzowy Rama obudowy Drzwiczki panelu przedniego Pokrywa górna zewnętrzna... - Page 32 DARK BASE 900 Zaślepka panelu bocznego Dolny filtr przeciwkurzowy Filtr panelu bocznego Zewnętrzna pokrywa dolna Panel boczny Wentylator SilentWings ® Panel HDD Tacka M/B Koszyk HDD Uchwyt dysku SSD Uchwyt zasilacza Płyta kontrolera prędkości obrotowej wentylatora Uchwyt panelu tylnego Zewnętrzny panel przedni Uchwyt zasilania Zaślepka ODD Koszyk ODD Przedni filtr przeciwkurzowy Rama obudowy Drzwiczki panelu przedniego Pokrywa górna zewnętrzna Uchwyt panelu przedniego I/O...
- Page 33 4.1 PANEL PRZEDNI I/O I WEJŚCIA MULTIMEDIÓW DARK BASE PRO 900 DARK BASE 900 USB 3.0 USB 2.0 Przełącznik podświetlenia LED (tylko wersja Pro) Słuchawki Mikrofon Ładowarka QI (tylko wersja Pro) Przycisk Power / Power LED Reset HDD LED Przełącznik kontrolera wentylatorów 4.2 ZŁĄCZA I/O Panel funkcyjny wyposażony jest w kilka wiązek przewodów które muszą...
- Page 34 4.3 UKŁAD WEJŚĆ/ PORTÓW NA PŁYCIE PCB DARK BASE 900 DARK BASE PRO 900 4-pinowe PWM złącze wentylatora do M/B 4-pinowe złącze PWM 4-pinowe złącze PWM 3-pinowe złącze wentylatora 3-pinowe złącze wentylatora Fan Speed Controller Switch Connector Podłączenie podświetlenia LED Power Connector (SATA) Power Connector (SATA) Fan Speed Controller Switch Connector Złącze ładowarki QI 4.4 KORZYSTANIE ZE STEROWNIKA WENTYLATORA Sterownik wentylatora ma dwa tryby pracy: 1.
- Page 35 (smartfon) jest wyposażone w tę funkcję, można je ładować bez łączenia kablem, kładąc je po prostu na płytce oznaczonej „J” na Dark Base Pro 900. Po położeniu urządzenia na ładowarce sygnał akustyczny powiadomi, że rozpoczęło się ładowanie. Należy przy tym dopilnować, by położyć urządzenie dokładnie pośrodku płytki oznaczonej „J”. Cewka ładująca ładowarki DARK...
-
Page 36: Introducción
INTRODUCCIÓN Gracias por elegir nuestro Dark Base. Le rogamos que lea la información de este manual y siga atentamente las instrucciones antes de la instalación. Si tiene cualquier pregunta póngase en contacto con nuestro servicio de atención al cliente. La información de contacto se indica en la sección «Información del fabricante». Garantía ∙... -
Page 37: Especificaciones
2 x USB 3.0, 2 x USB 2.0, clavijas para audio HD Controlador de velocidad del Dark Base 900: 3x4 pines, 3x3 pines, Controlador: manual de 5V-12V ventilador Dark Base Pro 900: 4x4 pines, 4x3 pines, Controlador: manual de 5V-12V / distribuidor PWM Altura del módulo refrigerador (mm) Longitud de la tarjeta gráfica... -
Page 38: Contenido
CONTENIDO Imagen Nombre del componente Cantidad Propósito Punto de montaje para bombas de Soporte LCS agua o similares Tercer ventilador en el soporte para Soporte para ventilador superior chasis frontal Tornillos de 6x32 para dispositivos Soporte para ranuras HDD Tornillos M3 Soporte para dispositivos de SSD Tornillos de 6x32 Para placa base... -
Page 39: Vista En Explosión Y Componentes
VISTA EN EXPLOSIÓN Y COMPONENTES DARK BASE PRO 900 Placa de vidrio del panel lateral Tapa externa de la base Tornillos de montaje Ventilador SilentWings ® Panel para dispositivos HDD Bandeja M/B Ranuras HDD Soporte para dispositivos SSD Soporte para módulo PSU... - Page 40 DARK BASE 900 Placa del panel lateral Filtro de aire de base Filtro del panel lateral Tapa externa de la base Panel lateral Ventilador SilentWings ® Panel para dispositivos HDD Bandeja M/B Ranuras para dispositivos HDD Soporte para dispositivos SSD Soporte para módulo PSU Placa del controlador de velocidad del ventilador...
- Page 41 4.1 PUERTOS FRONTALES DE E/S Y MULTIMEDIA DARK BASE PRO 900 DARK BASE 900 USB 3.0 USB 2.0 Interruptor LED (sólo en versión Pro) Auricular Micrófono Cargador QI (sólo en versión Pro) Botón de encendido / LED Reinicio de encendido...
- Page 42 4.3 PUERTOS / PANEL PCB DARK BASE 900 DARK BASE PRO 900 Conector de ventilador a placa base de 4 Conector PWM de 4 pines pines PWM to M/B Conector de ventilador de 4 pines PWM Conector de ventilador de 3 pines...
- Page 43 900 permite la carga sin cables de cualquier dispositivo externo compatible con el estándar Qi. Si el dispositivo (teléfono inteligente) está equipado con esta función, se puede cargar sin conectar ningún cable, simplemente colocándolo sobre la placa marcada con una "J" en el Dark Base Pro 900. Una señal acústica indicará el inicio del proceso de carga al colocar el dispositivo sobre el cargador. Al hacerlo, asegúrese de situar el dispositivo cuidadosamente en el centro de la placa de carga "J".
-
Page 44: Layouts
LAYOUTS | LAYOUTS | CONFIGURATIONS | UKŁAD | DISTRIBUCIONES DE INSTALACIÓN* MB TYPE: ATX (HDD slots facing interior, space MB TYPE: E-ATX (HDD slots facing front, space for radiator in front of HDD cage) for large motherboard) MB TYP: ATX (HDD-Slots, der Innenseite zuge- MB TYP: E-ATX (HDD Slot, der Vorderseite zuge- wandt, Platz für Radiator vor dem HDD Käfig) wandt, Platz für großes Mainboard) - Page 45 7x PCI Slots / Space above M/B: 62mm 7x PCI-Anschlüsse / Platz über M/B: 62mm 7x Emplacements PCI / Espace au-dessus de la carte mère : 62 mm 7x sloty PCI / Przestrzeń nad M/B: 62mm 7x ranuras PCI / Espacio por encima del módulo M/B: 62 mm 6x PCI Slots / Space above M/B: 84mm 6x PCI-Anschlüsse / Platz über M/B: 84mm 6x Emplacements PCI / Espace au-dessus de la carte mère : 84 mm 6x sloty PCI / Przestrzeń nad M/B: 84mm 6x ranuras PCI / Espacio por encima del módulo M/B: 84 mm...
- Page 46 7x PCI Slots / Space above M/B: 77mm 7x PCI-Anschlüsse / Platz über M/B: 77mm 7x Emplacements PCI / Espace au-dessus de la carte mère : 77 mm 7x sloty PCI / Przestrzeń nad M/B: 77mm 7x ranuras PCI / Espacio por encima del módulo M/B: 77 mm 6x PCI Slots / Space above M/B: 99mm 6x PCI-Anschlüsse / Platz über M/B: 99mm 6x Emplacements PCI / Espace au-dessus de la carte mère : 99 mm 6x gniazdo PCI / Przestrzeń nad M/B: 99mm 6x ranuras PCI / Espacio por encima del módulo M/B: 99 mm...
-
Page 47: Fan Compatibility
FAN COMPATIBILITY | LÜFTERKOMPATIBILITÄT | COMPATIBILITÉ VENTILATEURS | KOMPATYBILNOŚĆ Z WENTYLATORAMI | COMPATI- BILIDAD CON VENTILADORES Position Fan Size 4x 120mm, 3 x 140mm, 180mm (mounting points C/C (center to center 154mm) Bottom 2x 120mm, 2 x 140mm Front 3x 120mm, 3 x 140mm Rear 1x 120mm, 140mm Side... -
Page 48: Remove External Parts
DESMONTE DE COMPONENTES EXTERNOS 8.1 SIDE PANEL REMOVAL / ENTFERNEN DER SEITENABDECKUNG / DÉMONTAGE PANNEAU LATÉRAL / DEMONTAŻ PANELU BOCZNEGO / DESMONTE DEL PANEL LATERAL Dark Base Pro 900 Dark Base 900 Remove the thumb screw nuts to remove glass... - Page 49 8.2 TOP COVER REMOVAL / ENTFERNEN DER OBEREN ABDECKUNG / DÉMONTAGE DU PANNEAU SUPÉRIEUR / ZDEJMOWANIE POKRYWY GÓRNEJ / DESMONTE DE LA TAPA SUPERIOR Frist remove the front panel (8.3). Locate the 8 Lift the top cover to remove hooks under the top cover and push them outwards Heben Sie den Deckel an, um ihn zu entfernen to free the top cover Soulevez le panneau pour le retirer...
- Page 50 Open the front panel door and first remove the Release the hooks to free the front panel base air filter Lösen Sie die Häkchen, um die Vorderseite zu Öffnen Sie die Tür der Vorderseite und entfernen entfernen Sie als erstes den Luftfilter am Boden Actionnez les crochets pour libérer le panneau Ouvrez la porte et retirez le filtre à poussière du bas avant Otwórz drzwiczki panelu przedniego i najpierw Zwolnij zaczepy, by odblokować panel przedni wyjmij filtr przeciwkurzowy na dole obudowy Libere los ganchos para soltar el panel frontal Abra la puerta del panel frontal y retire primero el filtro de aire de la base Pull the front panel to release...
-
Page 51: Installation And Removal Of Drives And Filters
To detach the stand, release the hooks, and push out the stand from the lower cover Um die Standfüße zu entfernen, lösen Sie die Schrauben und drücken Sie die Standfüße nach un- ten heraus. Pour détacher le support, libérez les crochets et retirez le support Aby odłączyć nóżki, zwolnij zaczepy i wypchnij nóżki z dolnej pokrywy... - Page 52 9.2 ODD CAGE REMOVAL / ENTFERNEN EINES ODD-KÄFIGS / DÉMONTAGE CAGE LECTEUR OPTIQUE / DEMONTAŻ KOSZYKA ODD / DESMONTE DE LA CAJA DE DISPOSITIVOS ODD Remove the front I/O module and screws to Install the Upper Fan Bracket for an additional release the ODD cage front intake fan Entfernen Sie das vordere I/O Modul und die...
- Page 53 9.4 HDD RUBBER GROMMETS / HDD GUMMISCHEIBEN / PATINS EN CAOUCHOUC POUR DISQUE DUR / GUMOWE PRZELOTKI HDD / OJALES DE GOMA PARA DISPOSITIVOS HDD Rubber grommets can be fitted to use the HDD bay as a cable management opening Die mitgelieferten Gummidurchführungen eignen sich, um HDD-Slots als eine Öffnung für das Kabel- management zu nutzen Des patins en caoutchouc peuvent être installés afin de faciliter le rangement des câbles...
-
Page 54: Hdd Panel Removal / Adjustment
9.6 AIR FILTER REMOVAL / ENTFERNEN DES LUFTFILTERS / DÉMONTAGE DES FILTRES A POUSSIÈRE / DEMONTAŻ FILTRÓW PRZECIWKURZOWYCH / DESMONTE DE FILTROS DE AIRE Pull out the base air filter and front filters to Release the air filter from the side panel remove Entfernen Sie den Luftfilter vom Seitenteil Ziehen Sie den unteren und die vorderen Filtern Retrait du filtre à poussière latéral heraus Zdejmij filtr przeciwkurzowy z panelu bocznego... - Page 55 Release the HDD panel by undoing the screws Lösen Sie den HDD-Panel ab, indem Sie die Schrauben lösen Libérez le panneau HDD en dévissant les vis Zwolnij panel HDD poprzez odkręcenie śrubek Suele el panel para la unidad HDD aflojando los tornillos Rotate the HDD panel 180 degrees Drehen Sie den HDD-Panel um 180 Grad Retournez le panneau à...
-
Page 56: Mb-Tray Layout Adjustment
Install the HDD panel on the opposite side of the case Installieren Sie den HDD-Panel auf der ge- genüberliegenden Seite des Gehäuses Installez le panneau HDD de l’autre côté du boîtier Zainstaluj panel HDD po przeciwnej stronie obu- dowy Instale el panel de la unidad HDD en el lado opuesto de la caja Remove the rubber grommets from the rear panel brackets and re-install them on the opposite... - Page 57 Mounting points on the front side of the M/B tray Befestigungspunkte auf der Vorderseite des M/B-Trays Points de fixation à l’avant du plateau Punkty montażowe z przodu tacki płyty głównej Puntos de montaje en la cara delantera de la bandeja de la placa base Mounting points on chassis, three steps of ad- justment up and down Befestigungspunkte am Gehäuse;...
- Page 58 The M/B tray can act as a test bench Der M/B-Tray kann als Test-Bench genutzt werden Le plateau de la carte mère peut être utilisé comme table de bench Tacka płyty głównej może także służyć jako pod- stawka do testów systemu(test bench) La bandeja de la placa base se puede actuar como base para realizar pruebas de dispositivos Adjust the M/B position and re-secure the M/B tray...
-
Page 59: Psu Layout Adjustment
To swap the M/B to other side of the case both the HDD panel and power supply bracket need to be relocated. We recommend removal of the M/B tray, HDD panel, ODD cage, and PSU brackets if you want to change the layout Um das Mainboard auf der anderen Seite des Gehäuses zu installieren, müssen das HDD-Panel und auch die Halterung des Netzteils versetzt... - Page 60 Remove the PSU bracket and swap the step screws on the base as in diagrams P1 to P4 Entfernen Sie die PSU-Halterung und reposition- ieren Sie die Step-Schrauben am Boden wie in den Diagrammen P1 – P4 Retirez le support de l’alimentation et installez les dans les trous indiqués dans les diagrammes P1 à...
- Page 61 P2 for M/B layout A3, A4, A5, A6 Step screw mounting points Befestigungspunkte der Step-Schrauben Détail des points de fixation Wybierz następujące punkty montażowe śrubek Puntos de montaje de tornillos de paso P3 for M/B layout A1, A2, B1, B2 Step screw mounting points Befestigungspunkte der Step-Schrauben Détail des points de fixation Wybierz następujące punkty...
-
Page 62: Door Panel Adjustment
DOOR PANEL ADJUSTMENT | EINSTELLUNG FRONTSEITE RÉGLAGE DE LA PORTE | DOSTOSOWANIE POŁOŻENIA DRZWICZEK AJUSTE DEL PANEL DE LA PUERTA Remove the door panel from the front panel Remove all the hinges and magnet holders Entfernen Sie das Frontpanel vom Gehäuse Entfernen Sie alle Scharniere und Magnethalter Retirez la porte Retirez les charnières et les aimants... -
Page 63: Component Installation
Re-install the hinges and magnet holders to the Re-install the door panel in the front panel opposite side of the door panel Installieren Sie die Türverkleidung wieder an der Verschrauben Sie alle Scharniere und Mag- Front nethalter auf der gegenüberliegenden Seite Refixez la porte sur le châssis Réinstallez les charnières et les aimants de Zainstaluj drzwiczki w panel przednim... - Page 64 14.2 POWER SUPPLY (PSU) INSTALLATION / NETZTEIL (PSU) INSTALLATION / MONTAGE DE L’ALIMENTATION / INSTALACJA ZASILACZA (PSU) / INSTALACIÓN DE LA FUENTE DE ALIMENTACIÓN (PSU) Remove the screws to detach the PSU mount- ing bracket Lösen Sie die Schrauben um die PSU-Montage- halterung zu entfernen Retirez les vis pour détacher le support de mon- tage...
- Page 65 14.3 PCI/PCI-E ADD-ON CARD INSTALLATION / PCI/PCI-E ADD-ON CARD INSTALLATION / MONTAGE DES CARTES D’EXTENSION PCI/PCI-E / DODATKOWA INSTALACJA KART PCI / PCI-E / INSTALACIÓN DE TARJETAS PCI / PCI-E MODULARES Remove the PCI slot bracket before installing a PCI / PCI-E add-on card Entfernen Sie die PCI-Slot-Abdeckung bevor Sie mit der Installation einer PCI / PCI-E Add-on-Card beginnen...
- Page 66 Fit the pump to the WCS bracket with rubber grommets (screws and nuts are not included) Setzen Sie die Pumpe auf die WCS-Halterung. Zur Entkoppelung nutzen Sie die mitgelieferten Gummitüllen. (Schrauben und Muttern sind nicht enthalten) Placez la pompe sur le support, avec des patins en caoutchouc (vis et écrous non fournis) Umieść pompę chłodzenia wodnego w uchwy- cie WCS za pomocą gumowych uchwytów (śrubki i...
-
Page 67: Limited Warranty
Limited Warranty Per the terms and conditions of this limited warranty as given below, be quiet! warrants its new products to be free of defects resulting from faulty materials and faulty manufacturing for the length of the warranty period. I. APPLICABILITY This non-transferable warranty is applicable to newly purchased, previously unopened be quiet! products and is enforceable by only the original consumer purchaser. - Page 68 Notes IMPORTANT! Please secure the door before transportation!
Need help?
Do you have a question about the dark base pro 900 and is the answer not in the manual?
Questions and answers