
Subscribe to Our Youtube Channel
Related Manuals for Tadiran Telecom Coral IPx Office

Summary of Contents for Tadiran Telecom Coral IPx Office
- Page 1 Coral IPx Office Installation Procedure and Hardware Reference Manual (Edition 3) Creating a new world of IPportunities...
- Page 3 The information contained in this document is proprietary and is subject to all relevant copyright, patent and other laws protecting intellectual property, as well as any specific agreement protecting TADIRAN TELECOM LTD.'s (herein referred to as the “Manufacturer”) rights in the aforesaid information. Neither this document nor the information contained herein may be published, reproduced or disclosed to third parties, in whole or in part, without the express, prior, written permission of the Manufacturer.
- Page 5 Federal Communications Commission Rules Part 68 Compliance Statement This equipment complies with Part 68 of the FCC rules. On this equipment is a label that contains, among other information, the FCC registration number and ringer equivalence number (REN) for this equipment.
- Page 6 Canadian DOT Compliance Statement NOTICE: The Industry Canada label identifies certified equipment. This certification means that the equipment meets telecommunications network protective, operational and safety requirements as prescribed in the appropriate Terminal Equipment Technical Requirements document(s). The Department does not guarantee the equipment will operate to the user's satisfaction. Before installing this equipment, users should ensure that it is permissible to be connected to the facilities of the local telecommunications company.
- Page 7 UL Safety of Information Technology Equipment Compliance Equipment certified according to UL has been tested and complies with the following: USL Compliance USL indicates Listing to U.S. Standard for Information Technology Equipment Including Electrical Business Equipment, UL60950, Third Edition. CNL Compliance CNL indicates Certification to Canadian Standard for Information Technology Equipment Including Electrical Business Equipment, CSA C22.2 No.60950-00.
- Page 8 CE Compliance Statement (RTT&E) Equipment certified according to CE has been tested and complies with the following: EN60950-1 EN55022 EN55024 The Coral system may include a CLASS I laser product. All laser transmitters integrated within the Coral systems are approved CLASS I laser units. Coral systems that include such laser transmitters comply with EN60825-1.
- Page 9 Federal Communications Commission Part 15 The FCC Wants you to Know This equipment has been tested and found to comply with the limits for a Class B digital device, pursuant to Part 15 of the FCC rules. These limits are designed to provide reasonable protection against harmful interference in a residential installation.
- Page 10 Waste of Electrical and Electronic Equipment (WEEE) Directive 2002/96/EC of the European Parliament It is the responsibility of the Distributor to fully comply with Directive 2002/96/EC dated 27 January 2003 of the European Parliament and of the Council on Waste of Electrical and Electronic Equipment (WEEE) and with any applicable law and regulation promulgated in its respective Member State in connection with such Directive.
-
Page 11: Table Of Contents
Document Description ......................1-1 Related Documentation ......................1-3 Special Symbols Used in this Document ................1-5 List of Acronyms ........................1-6 1.2 About the Coral IPx Office ......................1-9 System Description ......................... 1-9 Recommended Tools ......................1-13 Chapter 2: Hardware Installation Procedure 2.1 Site Inspection .......................... - Page 12 3.3 Identifying the Coral Expansion Units..................3-11 Introduction ..........................3-11 Coral IPx Office Software Version 15..................3-11 Coral IPx Office Software Version 15.5 or higher ..............3-12 3.4 Peripheral Interface Card Initialization..................3-13 Introduction ..........................3-13 System Initialization ........................ 3-18 3.5 I/O Cable Installation ........................
- Page 13 5.6 I/O Card Connections ....................... 5-21 Peripheral Cards Index ......................5-21 Champ Connections ....................... 5-25 RJ-45 Connections ......................... 5-32 5.7 LAN, WAN, and Printer Connections..................5-39 Connecting to the LAN......................5-40 Connecting to the WAN ......................5-40 Connecting to a Printer ......................5-41 LAN/WAN Pinout ........................
- Page 14 Card Handling Procedures...................... 8-4 8.2 MCB Office Card ........................8-5 General Information ........................ 8-5 Card Components........................8-5 Main Control Processor ......................8-8 Universal Gateway........................8-9 Group Controller Circuit ......................8-10 Software Authorization Management..................8-16 Front Panel Features ......................8-18 IMC8 Flash Memory Card....................... 8-19 KB0 RS-232E Programming Port ...................
- Page 15 General Description ........................ 9-1 Shared Service Cards in the Main Unit................... 9-1 Card Handling Procedures...................... 9-1 MRC Cards ..........................9-1 U-RMI, U-MR, RMI and MR Office Cards ................9-2 Shared Service Features in the Main Unit ................9-2 Additional Shared Service Cards in the Expansion Cages ............. 9-3 9.2 MRC-8, 16, 32, 64 Modules......................
- Page 16 General Description ........................ 9-57 Available MFR Circuits......................9-57 Specifications.......................... 9-58 9.10 VoIP Media Gateway (MG)..................... 9-59 General Description ........................ 9-59 Additional Media Channel Circuits ..................9-59 9.11 Remote Maintenance (Modem) ....................9-61 General Description ........................ 9-61 Modem Jumpers - Enable/Disable..................9-61 Database Programming ......................
- Page 17 Introduction ..........................9-93 Circuit Description........................9-94 Configuring the Relay Contacts 1-2 Jumper to RLY3 ............. 9-95 Configuring the Relay Contacts 3-4 Jumper to RLY3 ............. 9-96 Database Programming ......................9-97 External Connections......................9-99 Relay Electrical Limitations ..................... 9-100 Additional RLY3 Contacts in the Optional IPx 800X Cage ............9-100 Specifications - RELAY ......................
- Page 18 Assembling the WiFi Card ...................... 11-13 Removing the WiFi Card......................11-16 Assembling the WiFi Antennas ....................11-18 Removing the WiFi Antennas ....................11-18 Configuring the Networking Software ..................11-19 Specifications.......................... 11-20...
- Page 19 Table 3-1: Minimum Software Version per Expansion Unit Type ............3-11 Table 3-2: Card Slot Status Messages ....................3-17 Table 5-1: External I/O Connectors for Coral IPx Office Peripheral Cards .......... 5-3 Table 5-2: Station Interface Wire Pair Requirements ................5-8 Table 5-3: Auxiliary Connectors ......................
- Page 20 Table 10-6: 4/8S Office Card Configurations ..................10-12 Table 10-7: ESIM and ESIX Office card LED Indicator Status ............10-25 Table 10-8: Coral IPx Office Unit Service and Peripheral Card Types ..........10-31 Table 10-9: Coral IPx Office Piggyback modules for Peripheral Cards ..........10-36 Table 10-10: U-RMI Office, U-MR Office, RMI Office and MR Office features ........
- Page 21 Figure 2-2: Coral IPx Office Expansion Unit Sizes and Weights ............2-4 Figure 2-3: Coral IPx Office Space Requirements (from Side Panels)..........2-4 Figure 2-4: Coral IPx Office Space Requirements (from Front and Rear Panels)....... 2-5 Figure 2-5: Table Mounting Bumpers ....................2-15 Figure 2-6: IPx Office Unit Mounted on Table ..................
- Page 22 Figure 6-1: Front View of the Table-Mounted IPx Office Unit.............. 6-2 Figure 6-2: Front View of the Rack-Mounted IPx Office Unit............... 6-2 Figure 6-3: Main Unit Front Panel ....................... 6-3 Figure 6-4: Expansion Unit Front Panel ....................6-3 Figure 6-5: Rear Side of the IPx Office Unit ..................6-6 Figure 6-6: Left Panel of the IPx Office Main Unit ................
- Page 23 Figure 8-1: MCB Office Card Layout ....................8-3 Figure 8-2: MCB Office Card Layout ....................8-7 Figure 8-3: Coral IPx Office Voice Switching..................8-11 Figure 8-4: Highways for IPx Office with IPx Expansion Units ............8-12 Figure 8-5: Highways for IPx Office with IPx 500X/800X Cages ............8-13 Figure 8-6: Highways for IPx Office with FlexiCom 200 CSLX Cabinets..........
- Page 24 Figure 9-37: Simplified Relay Diagram....................9-105 Figure 10-1: Coral IPx Office Peripheral Card Slot Location ............... 10-6 Figure 10-2: Coral IPx Office Peripheral Card Types ................10-6 Figure 10-3: Digital Trunk Cards Jumper Settings for Synchronization..........10-22 Figure 10-4: ESIM Office Card Jumper Settings for Synchronization ..........10-23 Figure 10-5: ESIX Office Card Jumper Settings for Synchronization ..........
- Page 25 Figure 11-10: WiFi Antenna Removal ....................11-18...
-
Page 27: Chapter 1: Introduction
Chapter Introduction 1.1 About this Manual................1-1 1.2 About the Coral IPx Office ............1-9 Coral IPx Office Installation Manual... -
Page 29: About This Manual
About this Manual Document Description ....................The Coral IPx Office Installation Guide and Hardware Reference Manual, is designed for field use by Coral system installation and service personnel. It describes the installation of the Coral IPx Office system. This manual is divided into two primary parts:... - Page 30 For reference material or if you are installing a peripheral interface card. Also, see the Coral Service and Peripheral Cards Installation Manual. System Chapter For reference material or if you are installing Networking and registering the NTU Office card Introduction Coral IPx Office Installation Manual...
-
Page 31: Related Documentation
Coral Service and Peripheral Cards Installation Procedure Installation Manual Shared Service cards MAP / CUGW Descriptions and Soft- Coral Control Cards applications ware Upgrade (for CDRS 200,500; IPx 500,800,3000 and FlexiCom 200,300,400,5000) Installation Manual Coral IPx Office Installation Manual Introduction... - Page 32 280, 280D, 280D-Z, 280S, 281S, APDL, PEX, APA and CPA) Digital Station Terminal Equipment Installation Manual DKT, DST, and VDM Digital Station Terminal Equipment Installation Manual FlexIP SoftPhone User Guide SeaBeam Installation and Administration Manual Introduction Coral IPx Office Installation Manual...
-
Page 33: Special Symbols Used In This Document
A page that is intentionally left blank, and may be used for reader information. This manual includes information for the Coral configurations in all geographic market areas. Much of the information is relevant for all hardware configurations and all market areas. Coral IPx Office Installation Manual Introduction... -
Page 34: List Of Acronyms
8S+8Fx Office ..Combination station card including: 8S and 8Fx on a 8S Single Line Telephone interface card 8S+16Fx Office .. Combination station card including: 8S and 16Fx on a 8S Single Line Telephone interface card ESIM Office..Expansion Shelf Interface card in the Main unit Introduction Coral IPx Office Installation Manual... - Page 35 URC....Universal Resources Card RMI Office..Remote Maintenance Interface Office Card U-MR Office..URC - Music Relay Office Card U-RMI Office...URC - Remote Maintenance Interface Office Card UDT Office..Universal Digital Trunk (T1 or PRI-23) interface card Coral IPx Office Installation Manual Introduction...
- Page 36 NOTES: Introduction Coral IPx Office Installation Manual...
-
Page 37: About The Coral Ipx Office
Chapter 10, Peripheral Cards. The Coral IPx Office can be expanded by adding up to two expansion units to one IPx Office unit. The IPx Office operates from a standard wide input 100-240VAC, 47-63Hz or from a -48VDC source. VoIP G.168 line echo-cancellation... - Page 38 Circuitry The Coral IPx Office includes digital communications switching based on Pulse Code Modulation (PCM) switching technology. The active circuitry of the system is embedded on the MCB Office card and removable cards. The active circuitry of the IPx Office system serves common control and peripheral functions.
- Page 39 Major Features The Coral IPx Office main unit houses all hardware components of the Coral IPx Office system, including the power supply unit, control cards, peripheral cards, service cards, and I/O connections. In addition, the main unit: Provides all the features, capabilities, interfaces, and terminals of the Coral...
-
Page 40: Table 1-2 Ipx Office System Specifications
†† Maximum power consumption and heat dissipation are worst-case projections based on fully populated cages. The figures do not include power consumption and heat dissipation caused by stationary batteries in a high rate of charge. 1-12 Introduction Coral IPx Office Installation Manual... -
Page 41: Recommended Tools
Recommended Tools ....................The following tools are required in order to install and maintain the Coral IPx Office system: Required Tools: 4 mm (max.) flat blade screwdriver for installation and removal of the door 3/16", 1/4", and 5/16" straight-blade screwdrivers... - Page 42 Alligator clip leads AMP™ Champ™ installation tool Soldering iron and high quality, rosin-core solder 3/16" and 1/2" cable staple gun Analog line transmission analyzer Portable DS1/E1 analyzer, Bit Error Rate tester, and channel demultiplexer 1-14 Introduction Coral IPx Office Installation Manual...
-
Page 43: Chapter 2: Hardware Installation Procedure
Chapter Hardware Installation Procedure Site Inspection ...................2-1 Equipment Installation ...............2-9 Program Interface Device Connection..........2-49 Coral IPx Office Installation Manual... -
Page 45: Site Inspection
Site Inspection Installation Environment ....................The Coral IPx Office system should be installed in restricted access areas (dedicated equipment rooms, equipment closets, etc.) in accordance with articles 110-16, 110-17, and 110-18 of the national electric code, ANSI/NFPA 70. Access to the system should be limited and controlled to prevent unauthorized access. -
Page 46: Space Requirements
Room construction should include solid, reinforced walls and a locking door. Space Requirements ....................This section describes the Coral IPx Office space requirements. 9. Verify that there is sufficient space for the Coral IPx Office system components. 10. The dimensions and weights of the various components are provided in Figure... -
Page 47: Table 2-1 Coral Ipx Office Dimensions
Table 2-3 Coral IPx Office Space Item Dimension Inches Centimeters (cm) Requirements Front IPx Office Unit Rear Sides 3.15 Space between 18.1 - 25.2 46 - 64 front and rear rails Coral IPx Office Installation Manual Hardware Installation Procedure... -
Page 48: Figure 2-1 Coral Ipx Office Main Unit Sizes
IPx Office Expansion Unit 3.5" (9cm) 17.7" (45cm) 19" (48cm) Figure 2-3 Coral IPx Office Space Other IPx Office Other Requirements (from Side min. 3.15" (8 cm.) min. 3.15" (8 cm.) Panels) Equipment Unit Equipment Hardware Installation Procedure Coral IPx Office Installation Manual... -
Page 49: Figure 2-4 Coral Ipx Office Space Requirements (From Front And Rear Panels)
IPx Office Space Requirements (from Front and Rear Panels) Rear 36" (100cm) Minimum required 18.1" - 25.2" clear floor space 46cm - 64cm Front Space between rails 36" (100cm) Minimum required clear floor space Coral IPx Office Installation Manual Hardware Installation Procedure... -
Page 50: Electrical Requirements
....................General Requirements The Coral IPx Office operates from a standard wide input of 100 to 240VAC, 47 to 63Hz source or from a –40 to –56VDC source. 1. Verify that electrical service is sufficient and located in close proximity to the system. -
Page 51: Table 2-4 Coral Ipx Office Maximum Power Requirements
Main + F.C. 200 CSLX + F.C. 200 CSLX — Maximum power requirement is a maximum case projection based on fully populated systems. The total number may be defined per actual system. Coral IPx Office Installation Manual Hardware Installation Procedure... - Page 52 NOTES: Hardware Installation Procedure Coral IPx Office Installation Manual...
-
Page 53: Equipment Installation
Equipment Installation Introduction ....................The Coral IPx Office cage description is covered in Chapter 6, General System Description. The cage mounting and installation procedure includes the following stages: Unpacking the Shipping Container Preparing the Unit for Installation Installing the Front Section Cards... -
Page 54: Unpacking The Shipping Container
8. Check the part list and verify that all the items are present. Table 2-5 lists the components that are supplied with the Coral IPx Office system. 9. Remove any other items from the shipping container, and move the container so that it does not interfere with the remaining installation procedures. -
Page 55: Figure 11-3: Ntu Office Card
For items included with IPx Office expansion unit, see Table 2-6. For items included with IPx 500 or IPx 800 expansion cages or the FlexiCom 200 expansion cabinets, see the relevant Installation Procedure and Hardware Reference Manual. 2-11 Coral IPx Office Installation Manual Hardware Installation Procedure... -
Page 56: Table 2-6: Part List (Items Per Ipx Office Expansion Unit)
For items included with IPx Office main unit, see Table 2-5. For items included with IPx 500 or IPx 800 expansion cages or the FlexiCom 200 cabinets, see the relevant Installation Proce- dure and Hardware Reference Manual. 2-12 Hardware Installation Procedure Coral IPx Office Installation Manual... -
Page 57: Preparing The Unit For Installation
Checking the Electrical Requirements Checking the Space and Positioning Requirements Verify that the Coral IPx Office system will be positioned in accordance with local and system space and positioning requirements. The spacing requirements as described in Space Requirements on page 2-2 ensure proper system operation and maintenance. -
Page 58: Installing The Front Section Cards
2. Install the compact flash disk. See Compact Flash Disk, page 8-41. 3. Install the Software Authorization Unit (SAU). See Software Authorization Management, page 8-16. 4. Install the WiFi antennas. See Assembling the WiFi Antennas, page 11-18. 2-14 Hardware Installation Procedure Coral IPx Office Installation Manual... -
Page 59: Mounting The Ipx Office Onto A Table
2. Turn ON the battery switch. See Figure 6-7 on page 6-7. Figure 2-5 Table Mounting Bumpers Attach rubber bumpers onto five marked positions on the bottom panel Figure 2-6 IPx Office Unit Mounted on Table 2-15 Coral IPx Office Installation Manual Hardware Installation Procedure... -
Page 60: Mounting The Office Onto A Rack
1. Fasten the left rear rack-mounting bracket to the rack. 2. Fasten the right rear rack-mounting bracket to the rack. The fasteners that are secured to the rack are not included. 2-16 Hardware Installation Procedure Coral IPx Office Installation Manual... -
Page 61: Figure 2-8 Ipx Office Unit Mounted Onto Rack
4. Turn ON the battery switch. See Figure 6-7 on page 6-7. Figure 2-8 IPx Office Unit Mounted onto Rack Fasten support brackets to rear side of rack Lift unit and fasten to rack 2-17 Coral IPx Office Installation Manual Hardware Installation Procedure... - Page 62 Use proper techniques to remove from the rack. 6. Remove the unit from the rack using proper lifting techniques. Do not turn off the battery switch. If the backup power is removed, the database memory will be lost. 2-18 Hardware Installation Procedure Coral IPx Office Installation Manual...
-
Page 63: Figure 2-9 Removing Ipx Office Unit From Rack
Figure 2-9 Removing IPx Office Unit from Rack Unfasten screws from front bracket Remove unit from rack 2-19 Coral IPx Office Installation Manual Hardware Installation Procedure... -
Page 64: Ground Wiring
The unit ground wire is connected to the unit on the rear panel. See Connecting the Ground Wire to the Unit, page 2-21. For instructions on how to ground the customer-supplied MDF unit, see Connecting the Ground Wires to the Master Ground, page 2-22. 2-20 Hardware Installation Procedure Coral IPx Office Installation Manual... -
Page 65: Figure 2-10 Coral Ipx Office Cage Ground Assembly
4. Insert the flat washer onto the ground wire ring terminal. 5. Fasten the hexagonal nut. Figure 2-10 Coral Ground nut IPx Office Cage Ground Assembly Flat washer Ground wire with ring terminal Serrated washer 2-21 Coral IPx Office Installation Manual Hardware Installation Procedure... -
Page 66: Figure 2-11 Master Ground Unit
3. Route the ground wire between the unit and the master ground. 4. Connect the ground wire to the unit as described on Connecting the Ground Wire to the Unit, page 2-21. 2-22 Hardware Installation Procedure Coral IPx Office Installation Manual... -
Page 67: Figure 2-12 Main System Ground Connection
7. Connect the MDF to the master ground according to the manufacturer’s recommendations. Figure 2-12 Main Master System Ground Ground Connection 10 AWG stranded wires with ring terminals Main Unit R=1.0 ohm max. Building Entrance Ground 2-23 Coral IPx Office Installation Manual Hardware Installation Procedure... -
Page 68: Figure 2-13 System Ground Connection With Main And Two Expansion Units
Ground connection with with ring terminals Main and Two Expansion Units Master Ground Customer Expansion supplied Cage 2 Customer Expansion supplied Cage 1 R=1.0 ohm max. Main Unit Building Customer Entrance supplied Ground 2-24 Hardware Installation Procedure Coral IPx Office Installation Manual... -
Page 69: Strapping The Configuration Jumpers
....................This section describes how to strap the shorting plugs of the various jumpers. In the Coral IPx Office system, some of the peripheral cards include jumpers that configure the shared service functions. For a detailed card description, see Chapter 9, Shared... -
Page 70: 10 Peripheral Card Installation
Do not force the circuit card into the slot. If more than slight resistance is encountered, remove the circuit card and examine the connectors for bent pins or interfering debris. Table 2-7 Never place a card in a slot other than the dedicated one. See 2-26 Hardware Installation Procedure Coral IPx Office Installation Manual... - Page 71 Inserting a Peripheral Card into the Main Unit lists the peripheral interface card types that may be inserted into each card Table 2-7 slot in the Coral IPx Office system. Peripheral Interface cards listed in Table 2-7 may require changes to jumpers on the card that determines the electrical characteristic or operation of each interface circuit.
- Page 72 Coral Synchronization via Digital Trunks section in the Coral Service and Peripheral Cards Installation Manual, for more information on synchronization. Insert peripheral cards into slots 2 through 12 of the expansion cages. 2-28 Hardware Installation Procedure Coral IPx Office Installation Manual...
- Page 73 Allow the cards to protrude from the card cage by approximately 1 inch (2.5 cm). 6. Skip to Interconnecting IPx Office Main and the Expansion Units, page 2-39. 2-29 Coral IPx Office Installation Manual Hardware Installation Procedure...
-
Page 74: Table 2-7 Coral Ipx Office Card Types
Peripheral Cards Installation Manual. Never insert “4/8/20S Office” and “4/8/16/24SA Office” cards in the same Coral unit. Table 10-5 Table 10-6 Never exceed the number of POTs and FlexSets stations listed in 2-30 Hardware Installation Procedure Coral IPx Office Installation Manual... -
Page 75: Figure 2-15 Coral Ipx Office Main Unit Card Placement
Shelf Number* 2nd EXPANSION UNIT Card Type:_____________ Card Type:_____________ slots #4 & 5 PS Office Type:________ Card Type:_____________ ESIX slots #6 & 7 Card Type:_____________ slots #10 & 11 Card Type:_____________ 2-31 Coral IPx Office Installation Manual Hardware Installation Procedure... -
Page 76: Figure 2-18 1St Expansion Cage Ipx 500X Card Placement
Card Type: ......Card Type: Card Type: ....Card Type: ....Card Type: ....Power Supply PS Type: ....PS500 AC / DC Battery Pack BATTipx Yes/No: ....for PS500 AC 2-32 Hardware Installation Procedure Coral IPx Office Installation Manual... -
Page 77: Figure 2-19 2Nd Expansion Cage Ipx 500X Card Placement
Card Type: ......Card Type: ....Card Type: Card Type: ....Card Type: ....Power Supply PS Type: ....PS500 AC / DC Battery Pack BATTipx Yes/No: ....for PS500 AC 2-33 Coral IPx Office Installation Manual Hardware Installation Procedure... -
Page 78: Figure 2-20 1St Expansion Cage Ipx 800X Card Placement
Card Type: ....Universal I/O Card Type: ....Power Supply PS Type: ....PS19 AC / DC Note: Requires a PX card in slot# 1 if a second expansion cage is installed. 2-34 Hardware Installation Procedure Coral IPx Office Installation Manual... -
Page 79: Figure 2-21 2Nd Expansion Cage Ipx 800X Card Placement
Universal I/O ....Card Type: ....Universal I/O Card Type: ....Universal I/O Universal I/O Card Type: ....Universal I/O Card Type: ....Power Supply PS Type: ....PS19 AC / DC 2-35 Coral IPx Office Installation Manual Hardware Installation Procedure... -
Page 80: Figure 2-22 System With One Flexicom 200 Expansion Unit
System with Primary synchronization slot One FlexiCom 200 Expansion Unit Secondary synchronization slot Shared Service CARD TYPE.......... Universal I/O CARD TYPE..........Universal I/O CARD TYPE..........1st expansion cabinet Power Supply APSsl 2-36 Hardware Installation Procedure Coral IPx Office Installation Manual... -
Page 81: Figure 2-23 1St Flexicom 200 Cabinet In A System With Two Expansion Cabinets
FlexiCom 200 Cabinet in a System with Two Expansion Cabinets Secondary synchronization slot Shared Service CARD TYPE.......... Universal I/O CARD TYPE..........Universal I/O CARD TYPE..........1st expansion cabinet Power Supply APSsl 2-37 Coral IPx Office Installation Manual Hardware Installation Procedure... -
Page 82: Figure 2-24 2Nd Flexicom 200 Cabinet In A System With Two Expansion Cabinets
Figure 2-24 FlexiCom 200 Cabinet in a System with Two Shared Service CARD TYPE.......... Expansion Cabinets Universal I/O CARD TYPE..........Universal I/O CARD TYPE..........2nd expansion cabinet Power Supply APSsl 2-38 Hardware Installation Procedure Coral IPx Office Installation Manual... -
Page 83: 11 Interconnecting Ipx Office Main And The Expansion Units
11 Interconnecting IPx Office Main and the Expansion Units ....................This section describes how to interconnect the units within the Coral IPx Office system. For a full description of the different system configurations, see IPx Office and IPx Expansion Unit Installation Configurations, page 6-35. - Page 84 FROM CONTROL UNIT OR FIRST EXPANSION UNIT on the first expansion cage. 4. Using a straight-blade screwdriver, tighten the screws on both sides of the cable connection to secure it to the card. 2-40 Hardware Installation Procedure Coral IPx Office Installation Manual...
- Page 85 Figure 6-40 on page 6-41 Figure 6-41 on page 6-42. FlexiCom 200 CSLX Expansion cages require Coral IPx Office Software Version 15.5 or higher. Connecting the Main Unit to the First Expansion Cage 1. Verify that the ESIM Office card is installed in slot 8-9 of the IPx Office unit.
- Page 86 IPx 500X, 800X cages, and FlexiCom 200 CSLX cabinets, see Figure 2-18 through Figure 2-21 and refer to Chapter 6 of the relevant Coral Installation Procedure and Hardware Reference Manual. 2-42 Hardware Installation Procedure Coral IPx Office Installation Manual...
-
Page 87: 12 Installing The Dc Power Supply
Electrical Hazard. If the power supply screws are not fastened to the unit, the power supply unit will not be grounded and could be subject to hazardous voltages. Do not proceed further until the screws have been fastened. 2-43 Coral IPx Office Installation Manual Hardware Installation Procedure... -
Page 88: Figure 2-25: Ps Office Dc Front Panel
Figure 2-25 PS Office DC Front Panel PS Office DC Cat. No. 77440950300 OUTPUT: +3.3V -48V Removable M3 screws 2-44 Hardware Installation Procedure Coral IPx Office Installation Manual... -
Page 89: 13 Connecting The Power Wires
13 Connecting the Power Wires ....................The Coral IPx Office can operate as an AC powered system or as a DC powered system. For DC powered systems, skip to DC Powered Systems, page 2-47. AC Powered Systems This section describes how to connect the power wires to the IPx Office unit for AC systems (when the PS Office AC power supply card is installed). -
Page 90: Figure 2-27 Ac Power Connection For Three Ipx Office Units
Figure 2-27 AC Power Master groud Connection for Three IPx Office Units To AC power source Building Entrance Ground 2-46 Hardware Installation Procedure Coral IPx Office Installation Manual... - Page 91 DC Powered Systems This section describes how to connect the power wires to the Coral IPx Office unit for DC powered systems (that is, when the PS Office DC power supply card is installed in the unit). shows one IPx Office unit installed within the system, and...
-
Page 92: Figure 2-28 Dc Power Wiring For One Ipx Office Unit
Expansion Cage manufacturer Black To Main Unit Yellow-Green To Second Expansion Cage Master Ground wires Ground To First supplied by Expansion Cage customer To IPx Office R=1.0 ohm max. Building Entrance Ground 2-48 Hardware Installation Procedure Coral IPx Office Installation Manual... -
Page 93: Program Interface Device Connection
5. For installations with a permanent PI device, route the serial data cable from the PI device to the front panel of the unit and connect it to the KB0 connector. 2-49 Coral IPx Office Installation Manual Hardware Installation Procedure... -
Page 94: Figure 2-30 9-Pin Program Interface Device Connections To Kb0
DATA TERMINAL READY - 4 TRANSMIT DATA - 3 RECEIVE DATA - 2 CARRIER DETECT - 1 PROGRAMMING PORT 9 PIN PC ASYNC. SERIAL PORT (USE FEMALE CABLE 9 PIN CONNECTOR) (USE FEMALE CABLE CONNECTOR) 2-50 Hardware Installation Procedure Coral IPx Office Installation Manual... - Page 95 Initial Power-up Tests 3.1 Power Supply Test ...............3-1 3.2 Common Control Test ..............3-5 3.3 Identifying the Coral Expansion Units........3-11 3.3 Peripheral Interface Card Initialization........3-13 3.5 I/O Cable Installation ..............3-21 3.6 Completing the Installation ............3-23 Coral IPx Office Installation Manual...
-
Page 97: Chapter 3: Initial Power-Up Tests
6. Turn ON the PS Office AC ON/OFF switch. 7. Verify that the LED indicators on the front panel light as described in Chapter 2, Hardware Installation Procedure. 8. Turn OFF the PS Office ON/OFF switch. Coral IPx Office Installation Manual Initial Power-up Tests... -
Page 98: Figure 3-1 Coral Ipx Office Unit Ac Power Connections
2 - 3 OUTPUT: +3.3V PS Office AC -48V slots 4 - 5 Cat. No. 77440950200 INPUT: 100-240V 2.2A 50/60Hz slots 6 - 7 slots 10 - 11 slots 8 - 9 Initial Power-up Tests Coral IPx Office Installation Manual... -
Page 99: Dc Powered Systems
4. Turn ON the facilities 48VDC Main Power Supply (MPS) and close any fuse or circuit breaker required to supply 48VDC to the Coral IPx Office unit. 5. Measure the DC voltage entering the power input connector. See figures on... -
Page 100: Figure 3-2 Ipx Office Unit Dc Power Connections
Ground Wires 48VDC (yellow-green) supplied by customer Black Circuit Breaker 30A 250V S.B. R=1.0 ohm max. DC 16AWG power wires with Molex connector supplied by the manufacturer 6.6ft (2.0m) Building Entrance Ground Initial Power-up Tests Coral IPx Office Installation Manual... -
Page 101: Common Control Test
Default settings for KB0 are 9600 bps, 8 data bit, no parity, and 1 stop bit. 7. Turn ON the power switch on the PS Office power supply on the rear panel of the IPx Office unit. Coral IPx Office Installation Manual Initial Power-up Tests... - Page 102 Chapter 4, Software Installation Procedure. 2. The following messages appear on the PI device during system first time start-up: For SERVICE/SOFTWARE installation menu HIT <CTRL I> NOW ************************* CHK RAM END CHK RAM Initial Power-up Tests Coral IPx Office Installation Manual...
- Page 103 Initializing CCS... Partial initialization phase starting 32/16GC BROADCAST RESET... System configuration identified..CCS is on the air..(ROOT) xx.xx.xx Copyright (c) 2001-yyyy....NAME - (site name) SAU # - Coral IPx Office Installation Manual Initial Power-up Tests...
- Page 104 CCS is on the air..Application Manager initialization completed (ROOT) CWG 02.13.00 Copyright (c) 2001-2005 Tadiran Telecom Ltd.("Tadiran") NAME - site_name SAU # - 1 NIC init completed The version number of the generic feature software is indicated where the x's appear in the line that reads CCS xx.xx.xx.
-
Page 105: Memory Lithium Battery Condition Test
There is a danger of explosion if the battery is replaced incorrectly. Replace the battery only with the same or equivalent type recommended by the manufacturer. Dispose of used batteries according to requirements specified by the battery manufacturer and/or local regulatory agencies. Coral IPx Office Installation Manual Initial Power-up Tests... - Page 106 NOTES: 3-10 Initial Power-up Tests Coral IPx Office Installation Manual...
-
Page 107: Identifying The Coral Expansion Units
IPx 500X IPx 800X FlexiCom 200 CSLX 15.5 Coral IPx Office Software Version 15 ....................When Coral software version 15 is installed, IPx 500X and 800X cages connected to the IPx Office main unit are automatically identified by the system. -
Page 108: Coral Ipx Office Software Version 15.5 Or Higher
A value of None will prevent the cards in the expansion unit from initializing. 3. After defining the expansion unit in the EXPANSION_TYPE parameter, the Coral IPx Office system must be re-initialized (soft reboot) in order to Activating and Initializing the Control... -
Page 109: Peripheral Interface Card Initialization
Introduction ....................This section describes how to initialize the peripheral cards. Perform this section only after the Coral IPx Office has been initialized properly and all expansion cages have System Initialization, page 3-18. If the peripheral cards been defined in the system. See are inserted before the IPx Office system has initialized and/or expansion units have been recognized, they will not initialize properly. - Page 110 Table 6-1 on page 6-4, or refer to authorizations, or the card may be faulty. See the Coral Service and Peripheral Cards Installation Manual for further details. 3-14 Initial Power-up Tests Coral IPx Office Installation Manual...
- Page 111 (where the I_Type field shows NO_CARD) or the current card slot assignment must be cleared throughout the PI. P_TYPE ....Shows the card type currently located in the slot. 3-15 Coral IPx Office Installation Manual Initial Power-up Tests...
- Page 112 8. Verify that the STATUS field indicates ACTIVE for each of the cards installed. If another message is displayed, see Table 3-2. For a complete list of card slot status messages, see Chapter 6 of the Program Interface & Database Reference Manual. 3-16 Initial Power-up Tests Coral IPx Office Installation Manual...
-
Page 113: Table 3-2: Card Slot Status Messages
Install an updated version of the UNAUTHORIZED therefore the card is not SAU with the appropriate amount authorized for use in this system. of ports added. Ask your dealer for an authorized upgrade. 3-17 Coral IPx Office Installation Manual Initial Power-up Tests... -
Page 114: System Initialization
Figure 2-15 Coral IPx Office Main Unit Card Placement on page 2-31 Figure 2-16 Coral IPx Office 1st Expansion Unit Card Placement on page 2-31 Figure 2-18 1st Expansion Cage IPx 500X Card Placement on page 2-32... - Page 115 2-26. Insert the cards fully, one by one, in sequential order (slot 2-3 through slot 10-11) in adjacent card slots, so that the installation corresponds with the uniform numbering plan. See Figure 2-16 for the location of each peripheral card slot. 3-19 Coral IPx Office Installation Manual Initial Power-up Tests...
- Page 116 Peripheral Card 3. Insert the peripheral cards completely into their card slots. See Installation, page 2-26. 3-20 Initial Power-up Tests Coral IPx Office Installation Manual...
-
Page 117: I/O Cable Installation
6. Connect the I/O connections to the MDF in accordance with the instructions provided by your MDF manufacturer. 7. For information on external connections for peripheral card connection information (pinouts), refer to: 3-21 Coral IPx Office Installation Manual Initial Power-up Tests... -
Page 118: Figure 3-4 Mdf Connector Configuration
Coral IPx 500 Installation Procedure and Hardware Reference Manual and/or Coral IPx 800 Installation Procedure and Hardware Reference Manual or Coral FlexiCom 200 Installation Procedure and Hardware Reference Manual (CSLX). Figure 3-4 Connector Configuration 3-22 Initial Power-up Tests Coral IPx Office Installation Manual... -
Page 119: Completing The Installation
Once the system is completely installed and operating, it is no longer necessary to keep the shipping containers. 4. Disconnect the KB0 cable from the front panel of the IPx Office unit. 3-23 Coral IPx Office Installation Manual Initial Power-up Tests... - Page 120 NOTES: 3-24 Initial Power-up Tests Coral IPx Office Installation Manual...
-
Page 121: Chapter 4: Software Installation Procedure
Chapter Software Installation Procedure 4.1 Generic Feature Software ............4-1 4.2 System Database Control............4-7 Coral IPx Office Installation Manual... -
Page 123: Generic Feature Software
Generic Feature Software Upgrade Introduction ....................The Coral IPx Office is delivered to the site with factory-loaded software on the IMC8 IMC8 Flash Memory Card, page card. The IMC8 card is an 8MB flash memory card. See 8-35 for details. The IMC8 card is installed on the front panel of the IPx Office system. -
Page 124: Upgrading Using The Fmprog-Utility
2. Press the Reset button on the front panel of the IPx unit. 3. Press the Release button on the front panel of the IPx Office unit to remove the IMC8 card. Software Installation Procedure Coral IPx Office Installation Manual... -
Page 125: Installing An Upgraded Imc8 Card
5. Turn the power supply switch ON. 6. Verify that the following two messages appear on the PI device: For SERVICE/SOFTWARE installation menu HIT <CTRL I> NOW ************************* CHK RAM END CHK RAM Custom Init Code... Coral IPx Office Installation Manual Software Installation Procedure... - Page 126 IMC8 card in another remote system, then installed at the proper system by replacing the existing IMC8 card from the other remote system containing the upgrade. Software Installation Procedure Coral IPx Office Installation Manual...
-
Page 127: Upgrading The Embedded Application Software
The Universal GateWay (UGW) software is embedded on the MCB Office card. To upgrade the embedded application software, see the Control Card Installation Manual, Chapter 6 (MAP). In the PI system, the designated location of the UGW is shelf #6, slot #5. Coral IPx Office Installation Manual Software Installation Procedure... - Page 128 NOTES: Software Installation Procedure Coral IPx Office Installation Manual...
-
Page 129: System Database Control
2. Select the Database Flash Menu (Route: ROOT,0,10,2,2) branch. The Database Flash menu appears, as follows: FLASH -MENU 0 - SAVE 1 - LOAD DBS 2 - SHOW FILE INFO 3 - AUTO BACKUP 4 - ERASE Coral IPx Office Installation Manual Software Installation Procedure... -
Page 130: Saving To Imc8
Background Music at a key set) are disabled until the database save process is completed. If the system is unable to save the database, one of several messages will be generated by the system. Software Installation Procedure Coral IPx Office Installation Manual... - Page 131 If the backup file is saved successfully, the following message appears: SAVE OK..If the backup file save operation fails, the following message appears: SAVE FAILED!! During the save operation, no database updating will occur. Coral IPx Office Installation Manual Software Installation Procedure...
-
Page 132: Loading (Restoring) From Imc8
IMC8 card. Database File Name PI Entry File Description Daily backup automatically at a preset time DB0.DEF Technician copy for manual backup DB1.DEF The following prompt appears: EXECUTE (Y/N) - [N] 4-10 Software Installation Procedure Coral IPx Office Installation Manual... - Page 133 5. Press Y to begin loading the database, or press N to return to the Database menu. Loading the database from a file generally takes several minutes. When the database has been loaded, the system performs a partial initialization and begins processing calls. 4-11 Coral IPx Office Installation Manual Software Installation Procedure...
-
Page 134: Show File Information
If only one file is present, DB0.DEF will appear Version File version Last Date Last backup date Last-Time Last backup time File-Status OK - the backed up file is valid Invalid - the backed up file is invalid 4-12 Software Installation Procedure Coral IPx Office Installation Manual... -
Page 135: Automatic Daily Backup
1:00 a.m. The default time is 01:30, or 1:30 a.m. 4. The system will return to the Database Backup menu. Press 0 to return to the Database menu. 4-13 Coral IPx Office Installation Manual Software Installation Procedure... -
Page 136: Erasing Flash Memory
After you specify 0, 1, or A, the following message appears: Erasing .. Upon completion, the following message appears: Erase Completed ..If the erasing operation was not successful the following message appears: Erase failed!! 4-14 Software Installation Procedure Coral IPx Office Installation Manual... - Page 137 5.1 Main Distribution Frame (MDF) ...........5-1 5.2 External Equipment ..............5-7 5.3 Protection Devices..............5-13 5.4 Power Fail (PF) Transfer Circuits ..........5-17 5.5 Data Communication Ports............5-19 5.6 I/O Card Connections ..............5-21 5.7 LAN, WAN, and Printer Connections.........5-39 Coral IPx Office Installation Manual...
-
Page 139: Chapter 5: External Connections
This chapter describes connections between the Coral IPx Office unit and the customer-supplied MDF. Some of these connections can be made directly from the Coral IPx Office unit and the facilities’ infrastructure, without the use of an MDF. It is the customer’s responsibility to decide when to do so. - Page 140 Music and/or audio sources External public address or paging equipment Recording devices Connections to most telecommunications interfaces of the Coral IPx Office unit are made via: Standard 25 pair Input/Output (I/O) Champ (telco) connectors located on the front panel of the full size peripheral cards. See...
-
Page 141: Table 5-1: External I/O Connectors For Coral Ipx Office Peripheral Cards
8T-CID Office (8T + 8CID) IPC (SFC/uCMC/WiCMC) Office Figure 10- MR Office 2 stereo 3.5 mm Main phone plugs RMI Office 2 relay wire U-MR Office pairs U-RMI Office Figure 9-8 ESIM Office Expansion cable Main Coral IPx Office Installation Manual External Connections... -
Page 142: Figure 5-1 Connecting Via An Mdf
30T Office (30T or 30TM) 8-9, 10-11 4TBR Office PRI-30 Office Office (T1 or PRI-23) 4T Office 10-11 4T-CID Office (4T + 4CID) Figure 5-1 Connecting via an MDF Champ Connections Terminal Equipment External Connections Coral IPx Office Installation Manual... -
Page 143: Figure 5-2: Twisted Pair Tip And Ring Wiring Detail
TIP and Ring Wiring I/O PUNCH BLOCK TRUNK NETWORK INTERFACE CORRECT CONNECTION Detail RING RING RING RING INCORRECT CONNECTION RING RING RING RING INCORRECT CONNECTION RING RING INCORRECT CONNECTION RING RING RING RING RING RING Coral IPx Office Installation Manual External Connections... - Page 144 NOTES: External Connections Coral IPx Office Installation Manual...
-
Page 145: External Equipment
External Equipment Station Equipment ....................This section discusses the station equipment used with the Coral IPx Office including both wired, wireless, and VoIP stations. Wired Stations Each station peripheral card provides an I/O Champ connector. Connections to Coral IPx Office system station equipment are established by cross-connecting the station circuit from the appropriate Coral IPx Office I/O cable punch block to the corresponding station wiring punch block. -
Page 146: Table 5-2 Station Interface Wire Pair Requirements
LAN type-A T200 series Never insert “4/8/20S Office” and “4/8/16/24SA Office” cards in the same Coral unit. Table 10-5 Table 10-6 Never exceed the number of POTs and FlexSets stations listed in External Connections Coral IPx Office Installation Manual... -
Page 147: Figure 5-3 Modular Wired Station Jack Wiring Diagram
[T] <UpA> DR (DRR), DR (DRR), Blu / Wht Blu / Wht AR (DRT), Wht / Grn Wht / Org AR (DRT), [R] <UpB> DT (DRT), <UpB> DT (DRT), TIA T568B (AT&T) TIA T568A Coral IPx Office Installation Manual External Connections... - Page 148 The FlexAir handset and the VoIP endpoints are not connected via the MDF Related Documentation For further information about Coral voice terminals not covered by this section, Related Documentation, page 1-3. consult the documentation as listed in 5-10 External Connections Coral IPx Office Installation Manual...
-
Page 149: Trunk Circuits
Generally, trunk circuits are connected to the Coral IPx Office system simply by connecting the trunk interface circuit of a Coral IPx Office trunk card to the point of demarcation where the trunk circuits from the Telephone utility Company (TELCO) appear. -
Page 150: Auxiliary Connections
ESIX Office Expansion One 50-pin female pin-type Installed in the IPx SCSI connector female and Office expansion unit, One 50-pin ribbon SCSI only connector 5-12 External Connections Coral IPx Office Installation Manual... -
Page 151: Protection Devices
....................This section describes the primary and secondary protection devices used with the Coral IPx Office system and how they are installed. Any circuit connected to the Coral system that is exposed to lightning or electrical hazards must be protected with approved lightning and surge protection devices to avoid potentially lethal hazards to all users. -
Page 152: Table 5-4: Telephone Circuit Primary Protection Device Specifications
10kV/ 800VDC Max. µ Vent Safe @ 100V/ 1600VDC Max. µ DC Impulse Current (8x20 S wave) 10KA Nom. AC Discharge Current (60Hz/1S) 10A Nom. DC Holdover (per IEEE 465.1) 160VDC Max. 5-14 External Connections Coral IPx Office Installation Manual... -
Page 153: Table 5-5 Telephone Circuit Secondary Protection Device Specifications
Acceptance UL Listed Voltage Rating 600VDC Min. Sneak Current Current Rating 350mA Max. Protector Fusing Time Characteristics 100% of Rating 4 Hr. Min. 150% of Rating 10 Sec. Nom., 210 Sec. Max. 5-15 Coral IPx Office Installation Manual External Connections... -
Page 154: Surge Arrestor Magazine
Surge Arrestor Magazine ....................To prevent serious damage to the Coral IPx Office system, the analog trunk and station circuits whose cables are laid outside the building, must be protected from the electrical peaks caused by lightning. Magazine 10 surge arrestors must be mounted on the MDF where telephone circuits are cross-connected. -
Page 155: Power Fail (Pf) Transfer Circuits
With the installation of trunk cards to support the PF (Power Fail) transfer option, four trunks per trunk card may be directed to station sets if power to the Coral IPx Office system is interrupted. This arrangement, referred to as power failure transfer, completely bypasses the system, allowing specific stations to originate outgoing calls and/or continue answering incoming calls. -
Page 156: Database Programming
PF option STTx 4T Office STRx 4T-CID Office Office SCTx 8T-CID Office SCRx 4SA Office 8SA Office 16SA Office 24SA Office 4S Office 8S Office Modular 20S Office Jack 2500 Single-Line Set 5-18 External Connections Coral IPx Office Installation Manual... -
Page 157: Data Communication Ports
Data Communication Ports RS-232E The Coral IPx Office switching system is capable of switching digital data information as well as voice signals. Coral IPx Office system data communication devices are available for packet switched data for low volume applications. The packet data communication devices are provided using the APA (Application Processor Adapter) or APDL (Applications Processor Data Link). -
Page 158: Figure 5-7: Flexset 80 / 280S / 281S / Apdl / Apa Or Pex+Apa Rs-232E (V.24) Pinout
RJ-45 plug (male) blue RJ-45 socket (female) clip at rear Data Carrier Detector (DCD) external view To GKT or FlexSet APA To PC Serial Port COM 1/2 RS-232 (9 pin female connector) 5-20 External Connections Coral IPx Office Installation Manual... -
Page 159: Peripheral Cards Index
....................The following tables list the pinout connection directly on the Champ/card connection for all currently available peripheral cards for the Coral IPx Office. To help identify the peripheral cards, they are listed below in alpha-numeric order. Never insert “4/8/20S Office” and “4/8/16/24SA Office” cards in the same Coral unit. - Page 160 Table 5-10 on page 5-28 Table 5-13 on 8S+8Fx Office 1 x Champ 2-3, 4-5 page 5-31 Table 5-8 on page 5-26 Table 5-11 on 8SA Office 1 x Champ 2-3, 4-5 page 5-29 5-22 External Connections Coral IPx Office Installation Manual...
- Page 161 Chapter 11, System Networking PRINTER Unit front panel Table 5-17 on page 5-36 1 x RJ-45 8-9, 10-11 (UDT Office) Chapter 11, System Networking UGW COMMON 1 x DB-9P Unit front panel 5-23 Coral IPx Office Installation Manual External Connections...
- Page 162 External I/O Connectors Pinout Card Name Connector Card Table/Page Slot Table 5-20 on page 5-42 1 x RJ-45 WAN (MCB Office) Unit front panel 5-24 External Connections Coral IPx Office Installation Manual...
-
Page 163: Champ Connections
Direct Pinout of the Block 66 Block 66 MDF These tables display the Block 66 MDF Connection, page 5-29 MDF connections. Figure 5-8 4S Office and 8S Office Jumper Ring Frequency Settings 20Hz 25Hz 5-25 Coral IPx Office Installation Manual External Connections... -
Page 164: Table 5-8: Champ 50 Connector Card Pinout (4/8/20S 4/8/16/24Sa)
ST14 ST14 SR15 SR15 SR15 ST15 ST15 ST15 SR16 SR16 ST16 ST16 SR17 SR17 ST17 ST17 SR18 SR18 ST18 ST18 SR19 SR19 ST19 ST19 SR20 ST20 SR21 ST21 SR22 ST22 SR23 ST23 5-26 External Connections Coral IPx Office Installation Manual... -
Page 165: Table 5-9: Champ 50 Connector Card Pinout (8/16/24Sft)
Champ/card connection for the 8SFT Office, 16SFT Office, and 24SFT Office peripheral cards. Table 5-9 Champ 50 8SFT 16SFT 24SFT Connector Card Pinout Office Office Office (8/16/24SFT) 5-27 Coral IPx Office Installation Manual External Connections... -
Page 166: Table 5-10: Champ 50 Connector Card Pinout (4Sa+8Fx, 4Sa+16Fx, 8Sa+8Fx, 8Sa+16Fx, 4S+8Fx 4S+16Fx, 8S+8Fx, 8S+16Fx)
Office, 4S+16Fx Office, 8S+8Fx Office and 8S+16Fx Office peripheral cards. Table 5-10 Champ 50 4S+8Fx 4S+16Fx 8S+8Fx 8S+16Fx Connector Card Pinout 4SA+8Fx 4SA+16Fx 8SA+8Fx 8SA+16Fx (4SA+8Fx, 4SA+16Fx, 8SA+8Fx, 8SA+16Fx, Office Office Office Office 4S+8Fx, 4S+16Fx, 8S+8Fx, 8S+16Fx) 5-28 External Connections Coral IPx Office Installation Manual... -
Page 167: Table 5-11: Block 66 Mdf Pinout (4/8/16/24Sa, 4/8/20S)
24/49 Violet/Brown 25/50 Violet/Slate Never insert “4/8/20S Office” and “4/8/16/24SA Office” cards in the same Coral unit. Table 10-5 Table 10-6 Never exceed the number of POTs and FlexSets stations listed in 5-29 Coral IPx Office Installation Manual External Connections... -
Page 168: Table 5-12: Block 66 Mdf Pinout (8/16/24Sft)
A/B14 A/B14 16/41 Yellow/Blue A/B15 A/B15 17/42 Yellow/Orange A/B16 18/43 Yellow/Green A/B17 19/44 Yellow/Brown A/B18 20/45 Yellow/Slate A/B19 21/46 Violet/Blue A/B20 22/47 Violet/Orange A/B21 23/48 Violet/Green A/B22 24/49 Violet/Brown A/B23 25/50 Violet/Slate 5-30 External Connections Coral IPx Office Installation Manual... -
Page 169: Table 5-13: Block 66 Mdf Pinout (4Sa+8Fx, 4Sa+16Fx, 8Sa+8Fx, 8Sa+16Fx, 4S+8Fx, 4S+16Fx 8S+8Fx, 8S+16Fx)
A/B15 A/B15 25/50 Violet/Slate Never insert “4/8/20S Office” and “4/8/16/24SA Office” cards in the same Coral unit. Table 10-5 Table 10-6 Never exceed the number of POTs and FlexSets stations listed in 5-31 Coral IPx Office Installation Manual External Connections... -
Page 170: Connections
8T-CID Office on page 5-35 4TBR Office on page 5-37 UDT Office (PRI-23), PRI-30 Office on page 5-38 UDT Office (T1), Office (30T or 30TM) on page 5-42 LAN/WAN (IPx Office Front Panel) 5-32 External Connections Coral IPx Office Installation Manual... -
Page 171: Table 5-14 4T / 4T-Cid Office Pinout
RJ-45 socket (female) 7 - SCT external view STT, STR, SCT and SCR are power failure transfer connections. Figure 5-6 on page 5-18 for power failure transfer wiring interconnections diagram and database programming. 5-33 Coral IPx Office Installation Manual External Connections... -
Page 172: Figure 5-10 8T / 8T-Cid Office Pinout
6 - SCR external view 7 - SCT STT, STR, SCT and SCR are power failure transfer connections. Figure 5-6 on page 5-18 for power failure transfer wiring interconnections diagram and database programming. 5-34 External Connections Coral IPx Office Installation Manual... -
Page 173: Table 5-16 4Tbr Office Pinout - For All Connectors
4 - R x(+) 5 - R x(-) 6 - T x(-) RJ-45 plug (male) clip at rear RJ-45 socket (female) external view Figure 10-17 on page 10-39 For synchronization jumpers, see 5-35 Coral IPx Office Installation Manual External Connections... -
Page 174: Table 5-17 Udt Office (T1 Or Pri-23) Pinout
7 -48VDC PRI-23/T1 8 GND (UDT Office) Card Type -48VDC on Pin 7 Enabled Disabled PRI-23 1 2 3 1 2 3 Figure 10-19 on page 10-41 For synchronization jumpers, see 5-36 External Connections Coral IPx Office Installation Manual... -
Page 175: Table 5-18: Pri-30 Office Pinout
2 RxA 3 GND(shield) 4 TxB 5 TxA RJ-45 plug (male) clip at rear 7 -48VDC PRI-30 Office 8 GND Nominal Line Impedance Figure 10-18 on page 10-40 For synchronization jumpers, see 5-37 Coral IPx Office Installation Manual External Connections... -
Page 176: Table 5-19 30T Office Pinout (30T Or 30Tm)
RJ-45 plug (male) clip at rear 8 GND 30T Office Nominal Line Card Type Impedance 30TM Not installed 30TM requires card issue 005005241 or higher Figure 10-16 on page 10-38 For impedance jumpers, see 5-38 External Connections Coral IPx Office Installation Manual... -
Page 177: Lan, Wan, And Printer Connections
LAN, WAN, and Printer Connections This section describes how to connect LAN, WAN, and a printer to the Coral Office main unit. The Coral IPx Office main unit includes: Eight RJ-45 ports for connection to the LAN One RJ-45 port for connection to the WAN (requires an NTU Office card) -
Page 178: Connecting To The Lan
DHCP server. Connecting to the WAN ....................The Coral IPx Office can connect to the WAN whether or not an NTU Office card is supplied with the system. See Chapter 11, System Networking, for more information. -
Page 179: Connecting To A Printer
Connecting to a Printer ....................The Coral IPx Office can function as a printer server when an NTU Office card is supplied with the system. Connecting to a Printer when an NTU Office Card is Supplied If an NTU Office card is supplied, a printer can be connected via the USB port. -
Page 180: Lan/Wan Pinout
For information on LAN/WAN connections, see Chapter 11, System Networking. For further information on how to make the connection, refer to the Chapter 3 of the Coral Voice over IP Installation Manual. 5-42 External Connections Coral IPx Office Installation Manual... -
Page 181: Chapter 6: System Description
Chapter System Description General System Description..............6-1 System Configuration Options............6-25 Coral IPx Office Installation Manual... -
Page 183: General System Description
IPx Office unit mounted onto a 19" rack including the front and rear rack-mounting brackets. Instructions for mounting Mounting the Office onto a Rack, page 2-16. the cage onto the rack can be found on Coral IPx Office Installation Manual System Description... -
Page 184: Figure 6-1 Front View Of The Table-Mounted Ipx Office Unit
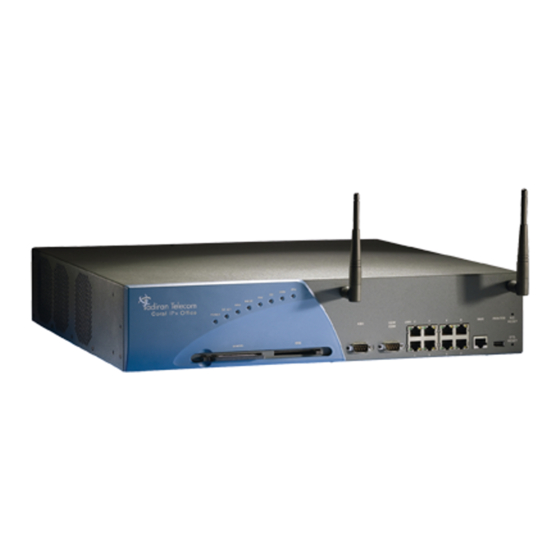
Figure 6-1 Front View Rear side of the Table-Mounted IPx Side panel Office Unit Exhaust fans Side panel Front panel Figure 6-2 Front View of the Rack-Mounted IPx Office Unit System Description Coral IPx Office Installation Manual... -
Page 185: Figure 6-3 Main Unit Front Panel
SYS. RESET System reset button Printer Connector Flash memory KB0 COM connectors card slot port Compact flash UGW COM memory disk connector port slot Figure 6-4 Expansion LED Indicators Unit Front Panel POWER Coral IPx Office Installation Manual System Description... -
Page 186: Table 6-1 Front Panel Features
Used to connect the NTU Office card to the LAN. Any one connector can be used. WAN Connector* Used to connect the NTU Office card to the WAN. Printer Connector* Used to connect the system to a printer. System Description Coral IPx Office Installation Manual... -
Page 187: Rear Side
The rear side includes the slots for inserting the power supply card and the peripheral cards. The peripheral card slots are designated slot 2-3, slot 4-5, slot 6-7, slot 8-9, and slot 10-11. (Each card slot is recognized by the programming interface as two separate slots.) Coral IPx Office Installation Manual System Description... -
Page 188: Figure 6-5 Rear Side Of The Ipx Office Unit
Software Authorization Unit (SAU) connector. See Software Authorization Management, page 8-16. Do not touch the battery switch. If the battery switch is turned off or the battery is removed, the database memory will be lost. System Description Coral IPx Office Installation Manual... -
Page 189: Figure 6-6 Left Panel Of The Ipx Office Main Unit
The bracket and unit assembly are then attached to the rack. Two additional brackets are mounted onto the rack and provide additional support from below. See Figure 6-2 on page 6-2. For more information, see Mounting the Office onto a Rack, page 2-16. Coral IPx Office Installation Manual System Description... -
Page 190: Unit Cover
Figure 6-8 Left View of Cool air the IPx Office Main Unit intake Cover Warm air exhaust Figure 6-9 Left View of the IPx Office Expansion Cool air Unit Cover intake Warm air exhaust System Description Coral IPx Office Installation Manual... -
Page 191: Figure 6-10 Removing The Unit Cover
9. U sing moderate force, lift the cover from the rear section. 10. Remove the cover completely. Figure 6-10 Removing the Unit Cover Unfasten all 8 screws and lift cover upwards Coral IPx Office Installation Manual System Description... -
Page 192: Figure 6-11 Closing The Cover
Office unit and lift the rear side of the cover upward. 4. Close the unit cover. 5. Using a Phillips screwdriver, fasten all of the M3 screws. Figure 6-11 Closing the Cover Place cover in position and replace all 8 screws 6-10 System Description Coral IPx Office Installation Manual... -
Page 193: Unit Interior
Main Control Board (MCB Office) LED Office Card connector Main BackPlane (MBP) Flash (IMC8 or IMC16) Card Compact flash disk Battery NTU Office card WiFi card Three Cooling fans Peripheral card slots Power supply card slot 6-11 Coral IPx Office Installation Manual System Description... - Page 194 The networking card integrates full networking capabilities within the IPx Office system. For further information, see Chapter 11, System Networking. WiFi Card The WiFi card integrates full WiFi capabilities within the IPx Office system. For further information, see Chapter 11, System Networking. 6-12 System Description Coral IPx Office Installation Manual...
-
Page 195: Figure 6-13 Ipx Office Expansion Unit Interior
EBP (Expansion BackPlane) Office card. Figure 6-13 IPx Office Expansion Unit Interior MBP Office card Two Cooling fans Power supply card slots LED Office Connector Empty space Peripheral card slots 6-13 Coral IPx Office Installation Manual System Description... -
Page 196: Rear Section
The power supply unit is attached to the unit with two screws that ensure that the unit is grounded. These power supply units are described in detail Chapter 7, Power Supply. 6-14 System Description Coral IPx Office Installation Manual... - Page 197 IPx Office and IPx Expansion Unit Installation Configurations, page is inserted in slot 8-9. See 6-35. Cage Ground Terminal The ground connection is used to connect the cage to the master ground unit. See Figure 6-14 for more details. 6-15 Coral IPx Office Installation Manual System Description...
-
Page 198: Table 6-2 Blank Panel Description
Type 1-A Blank Panel Electrical Hazard. Contact with live internal components could cause shock, burn, or death. During system operation, peripheral card slots that are not occupied must be protected by a blank panel. 6-16 System Description Coral IPx Office Installation Manual... -
Page 199: Figure 6-16 Ipx Office With Blank Panels
Increasing the risk of damage to the system caused by the influx of electrostatically charged dust and particles Poor aesthetic appearance Figure 6-16 IPx Office Half Size with Blank Panels Type I-A Type I-B Type I-C Full Size Type 6-17 Coral IPx Office Installation Manual System Description... -
Page 200: Heat Removal
Do not operate the unit before closing the cover. Figure 6-17 Heat Flow Schematic in the Main Cover open: cool air Unit bypasses system components Cover closed: cool air is forced over system components 6-18 System Description Coral IPx Office Installation Manual... -
Page 201: Cooling Fans
IPx Office unit and then expel the warm exhaust air from the left panel of the unit. The fans can be replaced when necessary. The main unit includes three fans; the expansion unit includes two fans. When one fan needs to be replaced, replace the other fans as well. 6-19 Coral IPx Office Installation Manual System Description... -
Page 202: Figure 6-18 Fan Dismounting
3. Release the top fan plugs from the fan and the MBP Office, and the bottom fan plugs from the IPx Office unit holes. Figure 6-18 Dismounting Disconnect fan wires from connector Remove top fan plugs Release bottom fan plugs from unit 6-20 System Description Coral IPx Office Installation Manual... -
Page 203: Figure 6-19 Fan Installation
When one fan needs to be replaced, replace the other fans as well. Figure 6-19 Installation Insert rubber plugs into bottom holes Slip fan into openings A and B at bottom Insert rubber plugs into top holes C and D Connect wires 6-21 Coral IPx Office Installation Manual System Description... -
Page 204: Safety Labels
REN : 4.7B ONLY FCC REGISTERED OR GRANDFATHERED EQPT. MAY BE USED WITH THIS FCC WEEE standard symbol REGISTERED COMMON EQPT. (used for marking compliance to Waste of Electrical and Electronic Equipment standard) 6-22 System Description Coral IPx Office Installation Manual... -
Page 205: Figure 6-21 Electrical Hazard Label
Verify that the power cord or wires have been disconnected AND the ON/OFF switch is turned OFF before removing the power supply unit. Figure 6-21 Electrical Hazard Label WARNING! HAZARD OF ELECTRIC SHOCK. DISCONNECT POWER BEFORE SERVICING 6-23 Coral IPx Office Installation Manual System Description... -
Page 206: Figure 6-22 Esd And Ground Labels
This label indicates that only the threaded rod above the label is to be used as a grounding terminal. See Figure 6-22 Figure 6-22 ESD and Ground Labels WARNING! CONDUCTIVE WRIST STRAP SHOULD BE PLACED AROUND WRIST AND GROUNDED WHENEVER PCB's ARE TO BE REMOVED FROM THEIR SLOT. 6-24 System Description Coral IPx Office Installation Manual... -
Page 207: System Configuration Options
Figure 6-29 on page 6-33 IPx 800X IPx 800X Figure 6-30 on page 6-34 FlexiCom 200 CLSX — Figure 6-31 15.5 on page 6-34 FlexiCom 200 CLSX FlexiCom 200 CLSX Figure 6-32 15.5 6-25 Coral IPx Office Installation Manual System Description... - Page 208 One FlexiCom 200 - CSLX cabinet may house up to six peripheral and shared service cards. Slots 1 and 2, are universal I/O slots. Slot 3 is used to house a shared service card. 6-26 System Description Coral IPx Office Installation Manual...
-
Page 209: Table 6-4 Number Of Universal I/O Slots Per System Configuration
Main + IPx 800X + IPx 800X Main + F.C. 200 CSLX — Main + F.C. 200 CSLX + F.C. 200 CSLX Figure 6-23 System with One Unit (IPx Office) 5 Office card I/O slots Common control 6-27 Coral IPx Office Installation Manual System Description... -
Page 210: Figure 6-24 System With Ipx Office Main Unit And One Ipx Office Expansion Unit
One IPx Office Expansion Unit 4 Office card I/O slots Common control Figure 6-25 System with IPx Office Main Unit and Two IPx Office Expansion Units 4 Office card I/O slots Common control 6-28 System Description Coral IPx Office Installation Manual... -
Page 211: Figure 6-26 System With Two Units (Ipx Office And Ipx 500X)
Figure 6-26 System with Two Units (IPx Office and IPx 500X) Coral IPx 500x Expansion 10 IPx I/O slots 1 power supply PS500 4 Office card I/O slots Common control 6-29 Coral IPx Office Installation Manual System Description... -
Page 212: Figure 6-27 System With Three Units (Ipx Office And Two Ipx 500X Cages)
Three Units (IPx Office and Two IPx 500X Cages) Coral IPx 500x 2nd Expansion 20 IPx I/O slots Coral IPx 500x 1st Expansion 2 power supplies PS500 4 Office card I/O slots Common control 6-30 System Description Coral IPx Office Installation Manual... -
Page 213: Figure 6-28 System With Two Units Ipx Office And Ipx 800X)
System with Two Units IPx Office and IPx 800X) 11 Coral universal I/O slots 1 shared Coral IPx 800x service slot Expansion 1 power supply PS19 4 Office card I/O slots Common control 6-31 Coral IPx Office Installation Manual System Description... -
Page 214: Figure 6-29 System With Three Units (Ipx Office, Ipx 500X, And Ipx 800X)
11 Coral universal I/O slots 1 shared service slot 1 power supply PS19 Coral IPx 500x 10 IPx 1st Expansion I/O slots 1 power supply PS500 4 Office card I/O slots Common control 6-32 System Description Coral IPx Office Installation Manual... -
Page 215: Figure 6-30 System With Three Units (Ipx Office And Two Ipx 800X Cages)
1 shared service Coral IPx 800 slot 2nd Expansion 22 Coral universal I/O slots 2 power supplies PS19 Coral IPx 800x 1st Expansion PX Control card slot 4 Office card I/O slots Common control 6-33 Coral IPx Office Installation Manual System Description... -
Page 216: Figure 6-31: System With Two Units (Ipx Office And One Flexicom 200 Cabinet)
2 I/O slots FlexiCom 200 CXL 1 shared service slot 2nd Expansion 2 I/O slots FlexiCom 200 CSLX 1 shared service slot 1st Expansion 4 Office card I/O slots IPx Office Main Common control 6-34 System Description Coral IPx Office Installation Manual... -
Page 217: Ipx Office And Ipx Expansion Unit Installation Configurations
(120 cm) long, is supplied with each ESIM Office card. The cable includes a 50-pin male SCSI pin-type connector that connects to the female connector on the front panel of the ESIM card. The 50-pin, angled, SCSI connector is connected to the first expansion cage. 6-35 Coral IPx Office Installation Manual System Description... - Page 218 The male connector connects to the main unit or the first expansion cage. The female connector connects to the second expansion cage. The figures below show how to interconnect the IPx Office main unit with expansion units. 6-36 System Description Coral IPx Office Installation Manual...
-
Page 219: Figure 6-33 Connection Between Two Units
SYNC ESIX Office Female Female Coral IPx Office Main Unit Male Female Figure 6-35 Connection between the IPx Office Female and 500X Male 1st expansion cage IPx 500X IPx Office Male Female 6-37 Coral IPx Office Installation Manual System Description... -
Page 220: Figure 6-36 Connection Between The Ipx Office Unit And Two 500X
Unit and the 800X Cage expansion cage IPx 800X Male (rear panel) PS Office AC OUTPUT: Cat. No. 77440950200 slot #1 IPx Office +3.3V -48V INPUT: 100-240VAC 2.2A 50/60Hz SYNC SEC PRM ESIM Office Male Female 6-38 System Description Coral IPx Office Installation Manual... -
Page 221: Figure 6-38 Connection Between The Ipx Office Unit, 500X And 800X Cages
Female Male expansion cage IPx 500X PS Office AC OUTPUT: IPx Office Cat. No. 77440950200 slot #1 +3.3V -48V INPUT: 100-240VAC 2.2A 50/60Hz SYNC SEC PRM ESIM Office Male Female 6-39 Coral IPx Office Installation Manual System Description... -
Page 222: Figure 6-39: Connection Between The Ipx Office Unit And Two 800X Cages
IPx 800X with PX card Female PScsxAC OUTPUT: Cat. No. 77440950200 IPx Office slot #1 (rear panel) +3.3V -48V INPUT: 100-240VAC 2.2A 50/60Hz SYNC SEC PRM ESIM Office Male Female 6-40 System Description Coral IPx Office Installation Manual... -
Page 223: Figure 6-40 Connection Between The Ipx Office Unit And One Flexicom 200 Cabinet
Figure 6-40 Connection between the IPx Office Unit and One FlexiCom 200 Cabinet FlexiCom 200 CSLX 1st Expansion Female Male IPx Office Main Female Male 6-41 Coral IPx Office Installation Manual System Description... -
Page 224: Figure 6-41 Connection Between The Ipx Office Unit And Two Flexicom 200 Cabinets
Figure 6-41 Connection between the IPx Office Unit and Two FlexiCom 200 Cabinets FlexiCom 200 CSLX 2nd Expansion FlexiCom 200 CSLX Female 1st Expansion Male Female Male IPx Office Female Male 6-42 System Description Coral IPx Office Installation Manual... -
Page 225: Suggestions For Peripheral Card Distribution
....................IPx Office Main Unit The Coral IPx Office main unit is a non-blocking system. The IPx Office system incorporates 1024X1024 timeslots. The timeslots are distributed as follows: slots 2-3, 4-5, 8-9, and 10-11 share the time slots 0-127 (128 time slots). Slot 6-7 uses time slots 128-255 (128 time slots). -
Page 226: Table 6-7 Timeslot Distribution In Coral Ipx Office Expansion Unit
128 time slots IPx Office Expansion Units Installed IPx Office main unit 128 time slots Peripheral service & group controller IPx Office expansion un 1024 time IPx Office expansion unit slots 384 time slots 6-44 System Description Coral IPx Office Installation Manual... -
Page 227: Table 6-8 Timeslot Distribution In Ipx 500/800 Expansion Cages
Figure 6-43 distribution of PCM highways in Coral IPx Office systems. To ensure efficient use of timeslots of the IPx 500X and IPx 800X expansion cages, heavy consumer cards (cards with a large number of ports: 30T, T1, PRI-30, PRI-23, or PUGW with MRC-32 units) should be distributed evenly among the slot sets, i.e. -
Page 228: Figure 6-43 Pcm Timeslot Distribution With Ipx 500X/800X Cages Installed
IPx 500X / 800X IPx 500X / 800X & group 1st expansion cage 2nd expansion cage controller 384 time slots 1024 time slots Applicable in Applicable in Applicable in IPx 800X IPx 500X IPx 800X 6-46 System Description Coral IPx Office Installation Manual... -
Page 229: Table 6-9 Timeslot Distribution In Ipx 500/800 Expansion Cages
Both FlexiCom 200 cabinets share time slots 256-384 (128 time slots) between a maximum of six card slots. The timeslots are detailed in Table 6-9. Figure 6-44 illustrates the distribution of PCM highways in Coral IPx Office systems. Table 6-9 Timeslot Expansion Card Slots... -
Page 230: Optional Coral Ipx 800X Expansion Cage
There is no option to install a backup battery for the IPx 800X cage. PX Card The PX (Peripheral eXpansion) buffer card occupies slot 1 of the first IPx 800X expansion cage in an IPx Office+IPx 800X+IPx 800X system configuration. 6-48 System Description Coral IPx Office Installation Manual... - Page 231 Coral IPx 500 Installation Procedure and Hardware Reference Manual Coral IPx 800 Installation Procedure and Hardware Reference Manual Coral FlexiCom and IPx Product Description FlexiCom 200 CSLX Expansion cabinets require Coral IPx Office Software Version 15.5 or higher. 6-49 Coral IPx Office Installation Manual...
- Page 232 NOTES: 6-50 System Description Coral IPx Office Installation Manual...
-
Page 233: Chapter 7: Power Supply
Chapter Power Supply 7.1 PS Office AC Power Supply Unit ..........7-1 7.2 PS Office DC Power Supply Unit..........7-13 Coral IPx Office Installation Manual... -
Page 235: Ps Office Ac Power Supply Unit
General Description ....................The PS Office AC power supply unit provides operating voltages for the Coral IPx Office main unit and expansion unit. Power Source The PS Office AC operates from a nominal input of 100-240VAC/47-63Hz. PS Office AC Front Panel Figure 7-1 displays the front panel of the PS Office AC. -
Page 236: Figure 7-1 Ps Office Ac Front Panel
DC to DC Convertor Circuit board that houses the module responsible for converting the Circuit Board -48 VDC output to the other voltage levels. Connection to Connects the power supply to the cage backplane. Backplane Power Supply Coral IPx Office Installation Manual... -
Page 237: Figure 7-2 Ps Office Ac Card Layout
Power input fuse 5A/250V S.B. Figure 7-3 PS Office AC Card Rear View -48V output AC to DC converter LED indicator circuit board Backplane DC to DC converter Connector circuit board Coral IPx Office Installation Manual Power Supply... -
Page 238: Circuit Description
+5VDC and +3.3VDC. Figure 7-4 PS Office AC Input fuse On/off AC Block Diagram 5A/250V S.B. switch -48VDC LED Indicator (on circuit board) 100-240VAC DC Input fuse 47-63Hz 5A/250V S.B. +3.3VDC +5VDC Power Supply Coral IPx Office Installation Manual... - Page 239 Turning the power switch OFF allows you to shut down all power to the Coral IPx Office system. It is used for maintenance purposes. Monitoring Circuitry The PS Office AC also limits the -48VDC output to feed the peripheral card slots. Coral IPx Office Installation Manual Power Supply...
-
Page 240: Installation And Activation
Installation and Activation ....................The power supply unit is inserted into the Coral IPx Office unit in the right side of the IPx Office unit from the rear. Installing the AC Power Supply 1. Verify that the IPx Office unit ground wire is connected and the ground nut is tightened. - Page 241 8. Turn the PS Office AC power switch ON and verify that the front panel LED indicators illuminate as described in Chapter 6, System Description. 9. Turn the PS Office AC power switch OFF. Coral IPx Office Installation Manual Power Supply...
-
Page 242: Figure 7-5: Ipx Office Ac Power Connections
PS Office AC slots 2 - 3 Cat. No. 77440950200 OUTPUT: +3.3V -48V slots 4 - 5 INPUT: 100-240V 2.2A 50/60Hz slots 6 - 7 slots 10 - 11 slot 1 slots 8 - 9 Power Supply Coral IPx Office Installation Manual... -
Page 243: Troubleshooting
Blown main or circuit fuse/breaker in the building electrical panel Faulty PS Office AC Blown fuse FS1 or F2 on the PS Office AC. Replace fuse as described on Replacing the PS Office AC Fuses, page 7-10. Coral IPx Office Installation Manual Power Supply... -
Page 244: Replacing The Ps Office Ac Fuses
2. Remove all peripheral cards from the IPx Office unit or control and peripheral cards from the relevant cage so that they protrude from the cage by approximately 1 inch (2.5 cm). 7-10 Power Supply Coral IPx Office Installation Manual... - Page 245 Ensure that the card’s rear panel connectors engage properly with the backplane and that they initialize properly. 7-11 Coral IPx Office Installation Manual Power Supply...
-
Page 246: Specifications
Fuses: Input (AC) ....FS1 - 5A/250V S.B. replaceable Intermodule ....F2 - 5A/250V S.B. replaceable Output ......None Controls and Adjustments: ......power switch Weight:............1.2 kg External AC Input Connection: ....straight connector 7-12 Power Supply Coral IPx Office Installation Manual... -
Page 247: Ps Office Dc Power Supply Unit
....................The PS Office DC card’s component side power supply unit provides internal operating voltages for the Coral IPx Office main unit and expansion unit. The PS Office DC operates from a nominal input of –48VDC, typically supplied by an external 48VDC rectifier or stationary battery plant. -
Page 248: Figure 7-6 Ps Office Dc Front Panel
See DC Input Power Connects the PS Office DC power supply to the -48VDC Connector power source. Connection to Backplane Connects the power supply to the cage backplane. 7-14 Power Supply Coral IPx Office Installation Manual... -
Page 249: Figure 7-7 Ps Office Dc Card Layout
Figure 7-7 PS Office DC Card Layout Power input fuse 6.3V/250V S.B. Figure 7-8 DC Power Supply Rear View Backplane Connector 7-15 Coral IPx Office Installation Manual Power Supply... -
Page 250: Circuit Description
If the voltage input is less than –38±0.5VDC or greater than –58±0.5VDC, the power supply shuts down. The power supply will turn on when the voltage is greater than –58±0.5VDC or less than –45±0.5VDC. 7-16 Power Supply Coral IPx Office Installation Manual... -
Page 251: Figure 7-9 Ps Office Dc Block Diagram
Power input fuse -48VDC or approx. 0.5V to 1.0V lower than -VIN (input voltage) - VIN Active Passive Inrush -48VDC Filter current VRTN filter Input: -40 to -60VDC -48VDC nom. +3.3VDC +5VDC Backplane connector 7-17 Coral IPx Office Installation Manual Power Supply... -
Page 252: Installation And Activation
Secure the power supply unit to the cage with the two removable screws on the right and left of the front panel. See Figure 7-6 The screws on the front panel must be tightened properly to prevent dangerous electrical shock. 7-18 Power Supply Coral IPx Office Installation Manual... - Page 253 8. Turn the PS Office DC power switch ON and verify that the front panel LED indicators illuminate as described in Chapter 6, System Description. 9. Turn the power switch OFF. 7-19 Coral IPx Office Installation Manual Power Supply...
-
Page 254: Figure 7-10 Ps Office Dc Connection
Ground Wires 48VDC (yellow-green) supplied by customer Black Circuit Breaker 30A 250V S.B. R=1.0 ohm max. DC 16AWG power wires with Molex connector supplied by the manufacturer 6.6ft (2.0m) Building Entrance Ground 7-20 Power Supply Coral IPx Office Installation Manual... - Page 255 5. Carefully remove the PS Office DC from its slot. 6. Place the PS Office DC over the anti-static material with the component side facing upwards. 7-21 Coral IPx Office Installation Manual Power Supply...
-
Page 256: Troubleshooting
7. Replace only with the same type and rating of fuse. See the PS Office DC card Figure 7-7 on page 7-15. layout in Installation and Activation, page 8. Reinstall the power supply unit as described on 7-18. 7-22 Power Supply Coral IPx Office Installation Manual... -
Page 257: Specifications
-48VDC nom. regulated 1.0A max. Fuses: Intermodule ....F2 - 6.3A/250V S.B. replaceable Output ......None Controls and Adjustments: ......Power switch Weight:............0.8 kg External DC Input Connection: ....Molex 39-01-4031 connector (3 circuit minifit pitch 4.2mm) 7-23 Coral IPx Office Installation Manual Power Supply... - Page 258 NOTES: 7-24 Power Supply Coral IPx Office Installation Manual...
- Page 259 Chapter Common Control Cards 8.1 Control Cards ................8-1 8.2 MCB Office Card................8-5 8.3 LED Card...................8-27 8.4 MRC Card..................8-29 8.5 IMC8 Flash Memory Card ............8-35 8.6 Compact Flash Disk ..............8-41 8.7 DBM Card..................8-43 Coral IPx Office Installation Manual...
-
Page 261: Chapter 8: Common Control Cards
Main Control Processor, page 8-8. Universal Gateway (UGW) provides the Coral IPx Office system with the ability to connect to the IP World. The UGW circuit was part of the Universal GateWay (UGW) card in earlier systems. The UGW circuitry includes the... - Page 262 SAU (Software Application Unit). The SAU is described in further detail in Software Authorization Management, page 8-16. The NTU (NeTwork Unit) Office card. The NTU card is described in further detail in Chapter 11, System Networking. Common Control Cards Coral IPx Office Installation Manual...
-
Page 263: Figure 8-1 Mcb Office Card Layout
MCB Office LED card Card Layout connector DBM-x card location IMC8/IMC16 connector flash memory Compact flash card (optional) MBP Office connector NTU Office card location U141 Media gateway (MRC) card location ESIM connector Coral IPx Office Installation Manual Common Control Cards... -
Page 264: Card Handling Procedures
Do not attach a control card to any connector other than the one designated. Irreparable damage may occur to a control card that is attached to the wrong connector if power is applied. Common Control Cards Coral IPx Office Installation Manual... -
Page 265: Mcb Office Card
....................This section describes the features and functions of the MCB Office main control card. The MCB Office card is the control processor card for Coral IPx Office systems. The MCB Office includes the following embedded circuits: Main Control Processor (MCP) - Page 266 MBP Office connector connects the MCB Office card to the backplane. ESIM connector provides an interface between the MCB Office and the first expansion cage. The MCB Office card includes a 48-pin, female connector that can facilitate an ESIM card. Common Control Cards Coral IPx Office Installation Manual...
-
Page 267: Figure 8-2 Mcb Office Card Layout
A = Media gateway MRC screws 3 network J13 for ADSL B = Hard disk holes card connectors Backup C = NTU Office card screws P2, P6, P8 Battery D = DBM card screws not used switch Coral IPx Office Installation Manual Common Control Cards... -
Page 268: Main Control Processor
A monitoring circuit on the card constantly measures the voltage level of the battery. It signals the main processor when the remaining energy stored in the battery is reduced to the level that it can no longer provide sufficient power to maintain the Common Control Cards Coral IPx Office Installation Manual... -
Page 269: Universal Gateway
8-2. Universal Gateway ....................The embedded Universal GateWay (UGW) circuit provides the Coral IPx Office system with the ability to connect to the IP World. All Coral IP stations (FlexSet-IP 280S, FlexIP SoftPhone, SIP) and external telephony gateways (Coral Teleport for analog SLTs and Loop-Start/Ground-Start trunks) receive their Coral signalling from the UGW circuit. -
Page 270: Group Controller Circuit
The group controller supports up to two HDLC highways, 16 PCM streams, and up to two expansion cages. Each PCM stream includes 64 Time Slots. Each shelf unit (one or two expansion units) receives Time Slots, divided into groups of 128 Time Slots. Figure 8-5. 8-10 Common Control Cards Coral IPx Office Installation Manual... -
Page 271: Figure 8-3 Coral Ipx Office Voice Switching
* The number of URC shared service resources are database programmable and can be adjusted as required. See the relevant Program Interface Manual for URC defaults, maximums and resource points details. Fourteen-Party Meet-Me Conferences 8-11 Coral IPx Office Installation Manual Common Control Cards... -
Page 272: Figure 8-4 Highways For Ipx Office With Ipx Expansion Units
2nd IPx Office expansion unit 384 time slots Peripheral service & group controller 1024 time slots 128 time slots Tone generator 64 time slots (reserved) 64 time slots 128 time slots 8-12 Common Control Cards Coral IPx Office Installation Manual... -
Page 273: Figure 8-5 Highways For Ipx Office With Ipx 500X/800X Cages
Applicable in Applicable in Applicable in 1024 time IPx 800X IPx 500X IPx 800X slots 128 time slots Tone generator 64 time slots (reserved) 64 time slots 128 time slots 8-13 Coral IPx Office Installation Manual Common Control Cards... -
Page 274: Figure 8-6 Highways For Ipx Office With Flexicom 200 Cslx Cabinets
FLexiCom 200 FLexiCom 200 CSLX CSLX 128 time slots Peripheral service & group controller 1024 time slots 128 time slots Tone generator 64 time slots (reserved) 64 time slots 128 time slots 8-14 Common Control Cards Coral IPx Office Installation Manual... - Page 275 A call between two ports requires one transmit and one receive time slot on a single peripheral highway. Therefore, the group controller is capable of establishing calls between any and any other. This switching matrix allows for a Constant Frame Delay operation mode. 8-15 Coral IPx Office Installation Manual Common Control Cards...
-
Page 276: Software Authorization Management
Relevant system messages appear on the PI, warning that the system will not operate without the proper SAU. Replacing an MCB Office card necessitates removing the SAU from the old card and installing it onto the replaced MCB Office card. 8-16 Common Control Cards Coral IPx Office Installation Manual... -
Page 277: Figure 8-7 Software Authorization Unit (Sau) Detail
The last digit of the serial number is a verification digit. Any leading zeros, as well as the verification digit do not appear in the SAU number reported in the PI root menu. 8-17 Coral IPx Office Installation Manual Common Control Cards... -
Page 278: Front Panel Features
These elements, include LED indicators, buttons, connectors, and disk card slots. Because they are accessed directly from the front panel of the unit, they Front Panel, page 6-3. are described fully in 8-18 Common Control Cards Coral IPx Office Installation Manual... -
Page 279: Imc8 Flash Memory Card
Do not remove the IMC8 flash memory card from its drive during system operation. Removing the IMC8 flash memory card while the system is operating will cause the system to crash. 8-19 Coral IPx Office Installation Manual Common Control Cards... -
Page 280: Kb0 Rs-232E Programming Port
9-pin, male, D type connector. The interface allows connection of a common, asynchronous, ASCII data terminal, personal computer or external modem for programming the various features of the Coral IPx Office system and monitoring diagnostic information. Figure 8-8 illustrates the pin assignments of the DB-9P. -
Page 281: Ugw Rs-232E Programming Port
9-pin, male, D type connector. The interface allows connection of a common, asynchronous, ASCII data terminal, personal computer or external modem for programming the various features of the Coral IPx Office system and monitoring diagnostic information. -
Page 282: Installing The Dbm Memory Card
DBM-X card. In the event of a power failure, the DBM-X is powered from the lithium battery installed on the MCB Office. For further DBM Card, page 8-43. information, see 8-22 Common Control Cards Coral IPx Office Installation Manual... -
Page 283: Lithium Battery Condition Testing
Replace the battery only with the same or equivalent type recommended by the manufacturer. Dispose of used batteries according to requirements specified by the battery manufacturer and/or local regulatory agencies. 4. Turn on the battery switch. 8-23 Coral IPx Office Installation Manual Common Control Cards... -
Page 284: Figure 8-10 Mcb Office Card Battery Insulator Release
Figure 8-10 MCB Office Card Battery Insulator Release PS Office connector Compact flash card (optional) Release button Backup battery MBP Offic connector J10 / J13* Backup battery switch 8-24 Common Control Cards Coral IPx Office Installation Manual... -
Page 285: Specifications - Mcb Office
C-UGW COM: ......RS-232E, DB-9S Baud rate......9600 bps to 115,200 bps Parity........None, Odd, Even Number of bits....7, 8 Stop bit........1 Default ........11500 bps, No parity, 8 data bits, 1 stop bit, VT-100 8-25 Coral IPx Office Installation Manual Common Control Cards... - Page 286 NOTES: 8-26 Common Control Cards Coral IPx Office Installation Manual...
-
Page 287: Led Card
GC (red) - indicates the GC status UGW (red) - indicates the UGW status CPU (red) - indicates the MCP circuit status Figure 8-11 LED Office MAINT. GC ACT. Card POWER LED Office 8-27 Coral IPx Office Installation Manual Common Control Cards... -
Page 288: Replacing The Led Office Card
Connect the LED Office card cable from the MCB Office card. Connect the LED Office card cable from the EBP Office card. Closing the Unit Cover, page 6-10 8. Close the unit cover. 8-28 Common Control Cards Coral IPx Office Installation Manual... -
Page 289: Mrc Card
No media channels are needed for pure IP-to-IP connections (direct-connects). See Figure 8-12 for an illustration of IP-to-IP connections versus non IP-to-IP connections in the Coral. Each Coral IPx Office main unit may be equipped with one MRC module. Figure 8-12 Description... -
Page 290: Table 8-3: Coral Ipx Office Main Unit Number Of Ip Endpoints
The VoIP capacity of the Coral IPx Office main unit is 240 IP endpoints, which is a combination of IP terminals, IP trunks, and MRC media channels. MRC media channels are needed when an IP endpoint (SIP or MGCP) is connected to any non-IP port (i.e. -
Page 291: Figure 8-13: Mrc Card Layout - Bottom View
J7, respectively. The card is initialized via the MCB Office, there is no MAC number label on the card, and the MAC number is not used for PI programming. Figure 8-13 MRC Card Bottom view Layout - Bottom View Connector P2 Connector P1 8-31 Coral IPx Office Installation Manual Common Control Cards... -
Page 292: Installing The Mrc
Electrical Hazard. Contact with live internal components could cause shock, burn, or death. Before opening the unit cover, power must be removed from the system. Opening the Unit Cover, page 6-9. 5. Open the IPx Office unit. See 8-32 Common Control Cards Coral IPx Office Installation Manual... -
Page 293: Figure 8-14 Mrc Assembly Onto Mcb Office
4. Insert the M3 lock washers over the four Phillips M3X6 screws and fasten the MRC card to the MCB Office card. Figure 8-14 Assembly onto MCB Office M3 spacers for MRC 8-33 Coral IPx Office Installation Manual Common Control Cards... -
Page 294: Removing The Mrc
3. Place your thumbs on the MCB Office card, on either side of the MRC card near the MCB Office front side. Use your fingers to lift the edge of the MRC card on both sides and gently disengage it from the MCB Office card. 8-34 Common Control Cards Coral IPx Office Installation Manual... -
Page 295: Imc8 Flash Memory Card
The IMC8 card is used to store the generic feature software version of the Coral IPx Office system. The generic feature software determines the feature operation of the Coral IPx Office system. In addition, the IMC8 card is used to store the database backup and the boot code. See Figure 8-15. -
Page 296: Removing The Imc8
If the following message appears on the display, database backup is being executed: TEMP. BLOCKED B A C K U P. If the database is not being backed up, turn OFF the power supply in the main cage. 8-36 Common Control Cards Coral IPx Office Installation Manual... - Page 297 If the main power supply is turned OFF, press the flash memory card release button on the front panel of the main cage. This releases the flash card from the drive. 8-37 Coral IPx Office Installation Manual Common Control Cards...
-
Page 298: Inserting The Imc8
HIT <CTRL l> NOW ******************************** CHK RAM END CHK RAM Custom Init Code... The second message may appear after two or three minutes, following several short messages that appear during system start-up: 8-38 Common Control Cards Coral IPx Office Installation Manual... - Page 299 SAU. This provision enables the generic feature software and/or feature authorizations to be upgraded onto a memory card in a remote system that can then replace the existing memory card. 8-39 Coral IPx Office Installation Manual Common Control Cards...
-
Page 300: Specifications
Specifications ....................Storage Capacity:........8,388,608 Bytes (8MB) Memory Configuration: ......16 bits PCMCIA:............Standard Compatible 8-40 Common Control Cards Coral IPx Office Installation Manual... -
Page 301: Compact Flash Disk
The CFD card is inserted with the front side facing up. Figure 8-16 CFD Card Removing the CFD ....................Press the card release button on the front panel of the Coral IPx unit. 8-41 Coral IPx Office Installation Manual Common Control Cards... - Page 302 NOTES: 8-42 Common Control Cards Coral IPx Office Installation Manual...
-
Page 303: Dbm Card
General Information ....................The DBM memory expansion card is a component of the Coral IPx Office common control section. The DBM integrates 4MB or 8 MB of Static Random Access Memory (SRAM), used to store the configuration database of a IPx Office system. The DBM is an optional card that expands the database memory space. - Page 304 Coral Directory, Traffic, or Call Log features are used CoraLINK Adapter circuitry is relevant to your system version Refer to the (Chapter-4 Size Definition, Route: Program Interface Reference Manual SIZ, CHECK MEMORY?) to display the database memory status. 8-44 Common Control Cards Coral IPx Office Installation Manual...
-
Page 305: Installing The Dbm Card
Do not insert or remove the control card while the Coral is powered. Sudden power surges could damage system components. Verify that the power switch is turned off and the AC power cord is disconnected. 4. Place the main card on the anti-static sheet. 8-45 Coral IPx Office Installation Manual Common Control Cards... - Page 306 DBM card rests on the standoff spacers. A slight resistance will be felt as the cards engage. 5. Insert the M3 spring curved washers over the three Phillips M3X6 screws and fasten the DBM card to the MCB Office card. 8-46 Common Control Cards Coral IPx Office Installation Manual...
-
Page 307: Figure 8-18 Dbm Assembly Onto Mcb Office
Figure 8-18 Assembly onto MCB Office M3 spacers for DBM-X 8-47 Coral IPx Office Installation Manual Common Control Cards... -
Page 308: Removing The Dbm Card
MCB Office front side. Use your fingers to lift the edge of the DBM card on both sides and gently disengage the multi-pin connector P1 on the DBM from MCB Office connector P13. 8-48 Common Control Cards Coral IPx Office Installation Manual... -
Page 309: Specifications - Dbm Card
Memory device:.........128kb 8 bit SRAM Operating voltage: ........3.3VDC Nom. Backup Battery: ........Located on the MCB Office Mother Board:...........MCP-IPx2, MEX-IP2, MCB Office Storage Capacity: DBM-4............4MB DBM-8............8MB Memory Configuration: ......16 bits PCMCIA: ..........Standard Compatible 8-49 Coral IPx Office Installation Manual Common Control Cards... - Page 310 NOTES: 8-50 Common Control Cards Coral IPx Office Installation Manual...
- Page 311 9.10 VoIP Media Gateway (MG) ............9-59 9.11 Remote Maintenance (Modem)..........9-61 9.12 Data Serial Ports (RS-232E) ..........9-67 9.13 Music..................9-71 9.14 Voice Paging (Public Address) and Relay-1 ......9-79 9.15 UNA/Bell and Relay-2 ............9-87 9.16 Accessory or Alarm Relay-3...........9-93 9.17 Relay Contacts..............9-103 Coral IPx Office Installation Manual...
-
Page 313: Shared Service Circuitry
Shared Service Cards in the Main Unit ....................The Coral IPx Office main unit is equipped with the following shared service cards: One MRC module (optional) One of the following four OFFICE cards:... -
Page 314: U-Rmi, U-Mr, Rmi And Mr Office Cards
Caller ID transmitters (iDSP) for SLT users, adapted to Bellcore standards Each shared service circuit and function is described in detail in the following sections. Refer to these subsections for more information. Shared Service Cards Coral IPx Office Installation Manual... -
Page 315: Additional Shared Service Cards In The Expansion Cages
56Kbps) 8DRCM IPx 800X [discontinued] Same as 8DRCF but with Bell 103/212A or ITU V.21/V.22, 300/1200bps remote maintenance modem. 8DTD IPx 800X [discontinued] 8 circuit DialTone Detector and call progress tone analyzer. Coral IPx Office Installation Manual Shared Service Cards... - Page 316 #3 The second FlexiCom 200 CSLX expansion cabinet includes:shelf #3, slot #5 to slot #7 Refer to Chapter 6 of the Program Interface (PI) and Database Reference Manual for additional details. Shared Service Cards Coral IPx Office Installation Manual...
-
Page 317: Mrc-8, 16, 32, 64 Modules
This slot does not physically exist, but is embedded onto the MCB Office card. This slot number is recognized as such by the PI, only. Refer to the Program Interface and Database Reference Manual - Chapter 6, Card List, for further details. Coral IPx Office Installation Manual Shared Service Cards... -
Page 318: Layout And Installation
The MRC card includes two connectors that connect to connectors J4 and J7 on the MCB Office. For more information about various aspects of the card, refer to Section on page 8-29 8, MRC Card Figure 9-1 MRC Card Lower view Upper view Layout URC type Shared Service Cards Coral IPx Office Installation Manual... -
Page 319: U-Rmi / U-Mr / Rmi / Mr Office Cards
Shared service circuits in the U-RMI Office, U-MR Office, RMI Office and MR Office cards are embedded in the MR/RMI-F (U60) unit and the URC (U73) unit. See: MR/RMI-F EPROM (U60) on page 9-18. URC PROM (U73) on page 9-21 Coral IPx Office Installation Manual Shared Service Cards... -
Page 320: Features
CONF circuits supported by the U-RMI Office and U-MR Office cards. (max: *) The max. number is dependant on the number of URC resource points. Therefore, increasing one of these resources requires decreasing another. Shared Service Cards Coral IPx Office Installation Manual... -
Page 321: Figure 9-2 U-Rmi / U-Mr / Rmi Mr Office Architecture
Meet-Me Conferences * The number of URC shared service resources are database programmable and can be adjusted as required. See the relevant Program Interface Manual for URC defaults, maximums and resource points details. Coral IPx Office Installation Manual Shared Service Cards... - Page 322 9-49. Use a self-contained table of call progress tone profiles to identify standard dial, busy, and ringback tone signals 16 (max: 32*) Caller ID circuit transmitters adapted to Bellcore standards which includes the time and Caller Name/Num display 9-10 Shared Service Cards Coral IPx Office Installation Manual...
-
Page 323: Figure 9-3 U-Rmi Office Card Circuits Layout, Front Panel And Jumpers
P6 P5 1-2 and 3-4 MODEM 1-2 (RLY1) PAGE Relay 1-2 (RLY3) RELAY contacts 3-4 (RLY3) RELAY 3-4 (RLY2) BELL P3 P2 Relay Relay M2/P U-RMI Office Relay Relay contacts contacts 9-11 Coral IPx Office Installation Manual Shared Service Cards... -
Page 324: Figure 9-4 Rmi Office Card Circuits Layout, Front Panel And Jumpers
P6 P5 1-2 and 3-4 MODEM 1-2 (RLY1) PAGE Relay 1-2 (RLY3) RELAY contacts 3-4 (RLY3) RELAY 3-4 (RLY2) BELL P3 P2 Relay Relay M2/P RMI Office Relay Relay contacts contacts 9-12 Shared Service Cards Coral IPx Office Installation Manual... -
Page 325: Figure 9-5 U-Mr Office Card Circuits Layout, Front Panel And Jumpers
Relay contacts 1-2 and 3-4 1-2 (RLY1) PAGE Relay 1-2 (RLY3) RELAY contacts JUMPERS 3-4 (RLY3) RELAY 3-4 (RLY2) BELL P3 P2 Relay Relay M2/P U-MR Office Relay Relay contacts contacts 9-13 Coral IPx Office Installation Manual Shared Service Cards... -
Page 326: Figure 9-6 Mr Office Card Circuits Layout, Front Panel And Jumpers
Relay contacts 1-2 and 3-4 1-2 (RLY1) PAGE Relay 1-2 (RLY3) RELAY contacts JUMPERS 3-4 (RLY3) RELAY 3-4 (RLY2) BELL P3 P2 Relay Relay M2/P MR Office Relay Relay contacts contacts 9-14 Shared Service Cards Coral IPx Office Installation Manual... -
Page 327: Configuration Jumpers
Tx and Rx analog lines. Applying each jumper between terminals 1 and 2 enables the modem. Applying each jumper between terminals 2 and 3 disables the modem. Modem Jumpers - Enable/Disable on page 9-61 9-15 Coral IPx Office Installation Manual Shared Service Cards... -
Page 328: Indicators
Steadily On Card has not received a card database from system Flashing Diagnostic test failed by circuitry on card Figure 9-7 Card LED MR/RMI-F Indications diagnostic LED diagnostic LED M2/P U-RMI Office 9-16 Shared Service Cards Coral IPx Office Installation Manual... -
Page 329: External Connectors
1 2 3 4 M2/P U-RMI Office Relay Relay contacts 1-2 contact 3-4 PAGE or RELAY BELL or RELAY Figure 9-9 Music and Paging Plugs Connection Left Common Right 9-17 Coral IPx Office Installation Manual Shared Service Cards... -
Page 330: Mr/Rmi-F Eprom (U60)
Described on page 9-71. One external voice paging interface for public address. Described on page 9-79. Two relay contacts. Described on page 9-103. 9-18 Shared Service Cards Coral IPx Office Installation Manual... - Page 331 The Port List supplies detailed information on which port is active or inactive. Port List (Route: PLIS) Use this option to assign a short/full name to MR and RMI-F ports, see Table 9-9. 9-19 Coral IPx Office Installation Manual Shared Service Cards...
-
Page 332: Table 9-9 Mr And Rmi-F Pi (Route: Plis)
Name Short : Full 0-22 None — — — PAGE 7074 PAGE0 BLANK 7050 BELL0 BLANK RELAY 7086 BLANK BLANK MODEM 7070 MODM0 BLANK Provided with U-RMI and RMI Office cards. 9-20 Shared Service Cards Coral IPx Office Installation Manual... -
Page 333: Urc Prom (U73)
Bellcore standards which includes the time and Caller Name/Num display The maximum number for the embedded resources is dependant on the number of URC resource points: increasing a resource necessitates decreasing another. 9-21 Coral IPx Office Installation Manual Shared Service Cards... -
Page 334: Table 9-11 Pi Defaults Per Urc2 Resource
CONF (Meet Me) 16x2 Table 9-15 on page 27 3-WAY Table 9-16 on page 28 Caller ID (CID) 1x16 Table 9-17 on page 29 1x16 Table 9-18 on page 31 TOTAL 9-22 Shared Service Cards Coral IPx Office Installation Manual... - Page 335 CONF SWITCH DELAY Sizes Def (Route: SIZ) CONF_CKTS parameter. Between 1 to 6 ports required for the URC. Sizes TAB (Route: SYSGEN,2) RESOURCES parameter. Between 64 to112 ports required for the URC. 9-23 Coral IPx Office Installation Manual Shared Service Cards...
-
Page 336: Table 9-12: Urc2 Features
FSK transmitters 80-111 — — Table 9-17 on page 29 for displaying CID (Caller ID) for SLT users Dial and progress 112-143 — — Table 9-18 on page 31 tone detectors 9-24 Shared Service Cards Coral IPx Office Installation Manual... -
Page 337: Table 9-13 Urc Dtr/Dtmf Pi Configuration
— DTR /DTMF — — — DTR /DTMF — — — DTR /DTMF — — — DTR /DTMF — — — DTR /DTMF — — — DTR /DTMF — — — 9-25 Coral IPx Office Installation Manual Shared Service Cards... - Page 338 DTR /DTMF — — — DTR /DTMF — — — DTR /DTMF — — — The ports listed above the double line indicate the default range. See Table 9-11 on page 9-22. 9-26 Shared Service Cards Coral IPx Office Installation Manual...
-
Page 339: Table 9-14 Urc Dtb Pi Route
URC Spare ports (not used) URC Configuration PI Route: PLIS PI Route: DTB,11 Total Spare Name Resource Shelf/Slot/Ckt Type Dial No. Points Short : Full Needed — — — — — — 9-27 Coral IPx Office Installation Manual Shared Service Cards... -
Page 340: Table 9-16 Urc Three-Way Conference (C3Way) Pi Configuration
— — C3WAY — — — C3WAY — — — C3WAY — — — The ports listed above the double line indicate the default range. See Table 9-11 on page 9-22. 9-28 Shared Service Cards Coral IPx Office Installation Manual... -
Page 341: Table 9-17: Urc Idsp Cid (Caller Id) Transmitters Pi Configuration
— — — iDSP — — — iDSP — — — iDSP — — — iDSP — — — iDSP — — — iDSP — — — iDSP — — — 9-29 Coral IPx Office Installation Manual Shared Service Cards... - Page 342 — — iDSP — — — iDSP — — — iDSP — — — The ports listed above the double line indicate the default range. See Table 9-11 on page 9-22. 9-30 Shared Service Cards Coral IPx Office Installation Manual...
-
Page 343: Table 9-18 Urc Dial Tone Detector (Dtd) Pi Configuration
— — — — — — — — — — — — — — — — — — — — — — — — — — — — — — — 9-31 Coral IPx Office Installation Manual Shared Service Cards... - Page 344 — — — — — — — — — — — — — — The ports listed above the double line indicate the default range. See Table 9-11 on page 9-22. 9-32 Shared Service Cards Coral IPx Office Installation Manual...
-
Page 345: Three-Way Conference (3-Way)
The max. number is dependant on the number of URC resource points. The 3-way conference circuitry is completely digital. During the conferencing session, each participant hears the voices of other participants. 9-33 Coral IPx Office Installation Manual Shared Service Cards... -
Page 346: Database Programming
C3WAY in the TYPE field of Shelf #1, Slot #7, Ckt #56-79(max.). Table 9-16 URC Three-Way Conference (C3WAY) PI Configuration, page 9-28. Refer to Program Interface (PI) and Database Reference Manual, Chapter 6, System Port List for more details. 9-34 Shared Service Cards Coral IPx Office Installation Manual... -
Page 347: Additional 3-Way Circuits
Includes, but is not limited to, the following conference functions: Six 3-way conference (6 x 3-way), and One x 6-party conference (1 x 6-party) These cards are described in the “Coral Service and Peripheral Cards Installation Manual”. 9-35 Coral IPx Office Installation Manual Shared Service Cards... -
Page 348: Specifications - 3-Way Conference
24 max. 8 default U-MR Office card 24 max. 8 default RMI Office card MR Office card 8DRCF card 6 (requires IPx 800X expansion cage) CNF card 8 (requires IPx 800X expansion cage) 9-36 Shared Service Cards Coral IPx Office Installation Manual... -
Page 349: Multi-Party Conference (Conf)
The conference bridge is a Meet Me feature. Station users can dial the programmable access code and/or transfer or be transferred to the conference call. Access to the conference bridge may be defined through the Tenant feature. 9-37 Coral IPx Office Installation Manual Shared Service Cards... -
Page 350: Feature Descriptions
Feature Descriptions ....................The Meet Me Bridge Conference Circuit (CONF) in the Coral IPx Office system enables: Group Call Multiparty conference URC Chained Meet Me Groups The URC has 6 circuits that may be allocated as Conference ports. Each of these ports can enable one conference of 14 participants. -
Page 351: Database Programming
This branch may be used to assign various multi-party conference call features. Refer to Groups, in the Chapter 10 - Program Interface and Database for details. Reference Manual Feature Timers (Route: FE.T) GRP_CALL_RING 9-39 Coral IPx Office Installation Manual Shared Service Cards... - Page 352 If you choose 1 - Dial Number, select field [All]. Refer to Program Interface (PI) and Database Reference Manual, Chapter 6, System Port List for more details. Numbering Plan (Route: NPL,0) CONFERENCE RELEASE - field 9, index 173. 9-40 Shared Service Cards Coral IPx Office Installation Manual...
- Page 353 CONF MEMBERS CONF SWITCH DELAY Special Port Facilities (Route: PDB,3) LINKED TO CONF DIAL# - Refer to in the Chapter 23 - Conference Program Interface and Database for details. Reference Manual 9-41 Coral IPx Office Installation Manual Shared Service Cards...
-
Page 354: Additional Multi-Party Conference Circuits
Includes the following conference functions, among others: One x 6-party conference (1 x 6-party) Six 3-way conference (6 x 3-way) These cards are described in the “Coral Service and Peripheral Cards Installation Manual”. 9-42 Shared Service Cards Coral IPx Office Installation Manual... -
Page 355: Specifications - Multi-Party Conference
8DRCF card ......1 x 6-party (requires IPx 800X exp. cage) CNF card......2 x 15-party (requires IPx 800X exp. cage) Number of Participants: Per (U-RMI or U-MR) circuit..14 max. Per (U-RMI or U-MR) card ..84 max. 9-43 Coral IPx Office Installation Manual Shared Service Cards... - Page 356 NOTES: 9-44 Shared Service Cards Coral IPx Office Installation Manual...
-
Page 357: Dtmf Receiver (Dtr)
24 circuits, which receive and decode Dual Tone Multi-Frequency (DTMF) dialing tones. The DTR is required to support telephone station apparatus or trunks that send DTMF tones to the Coral IPx Office system to activate system features or select other ports. -
Page 358: How Many Dtmf Receiver Circuits (Dtrs) Are Required
8 circuit DTMF Receiver and decoder card 8DRCF IPx 800X Includes 8 DTR circuit DTMF receiver and decoder functions, among other functions These cards are described in the Coral Service and Peripheral Cards Installation Manual. 9-46 Shared Service Cards Coral IPx Office Installation Manual... -
Page 359: Database Programming
Port List (Route: PLIS,0) Port type must show: DTR in the TYPE field of Shelf #1, Slot #7, Ckt #0-23(max. for URC2) or 0-47(max. for URC4) Table 9-13 URC DTR/DTMF PI Configuration, page 9-25. 9-47 Coral IPx Office Installation Manual Shared Service Cards... -
Page 360: Specifications - Dtr
Frequency Reject: ........More than ±3.5% Tip: Sizing the number of DTR receivers must take into account the use of DISA, FlexiCall and (IRSS) Freedom features as well as the number of DTMF phones. 9-48 Shared Service Cards Coral IPx Office Installation Manual... -
Page 361: Dial Tone Detector (Dtd)
By matching the cadence of the monitored tone with the one contained in the list, the DTD identifies the tone and reports the tone type via the peripheral bus to the system processor. 9-49 Coral IPx Office Installation Manual Shared Service Cards... -
Page 362: Database Programming
DTD in the TYPE field of Shelf #0, Slot #7, Ckt #112-143(max.) Table 9-18 URC Dial Tone Detector (DTD) PI Configuration, page 9-31. Refer to Program Interface (PI) and Database Reference Manual, Chapter 6, System Port List for more details. 9-50 Shared Service Cards Coral IPx Office Installation Manual... -
Page 363: Additional Dtd Circuits
8DRCF IPx 800X Includes 8 DTD circuit dialtone detector and call progress tone analyzer functions, among other functions. These cards are described in the Coral Service and Peripheral Cards Installation Manual. 9-51 Coral IPx Office Installation Manual Shared Service Cards... -
Page 364: Specifications - Dtd
U-MR Office card ....32 max. 16 default RMI Office card ......0 MR Office card .......0 8DRCF card ......8 (requires IPx 800X expansion cage) Detection Level:..........-28 to 0 dBm Rejection Level:..........-32 dBm Minimum 9-52 Shared Service Cards Coral IPx Office Installation Manual... -
Page 365: Caller Id For Slt (Idsp)
The CID display unit detects this information and transforms it back into ASCII codes. Up to 32 SLT sets can receive CID information simultaneously from a single URC iDSP application. Multi-appearance and waiting call’s information is not supported. 9-53 Coral IPx Office Installation Manual Shared Service Cards... -
Page 366: Database Programming
Table 9-17 URC iDSP CID (Caller ID) Transmitters PI Configuration, page 9-29. Refer to Program Interface (PI) and Database Reference Manual, Chapter 6, System Port List for more details. iDSP Card Database (Route: CDB,9) CLID TYPE. 9-54 Shared Service Cards Coral IPx Office Installation Manual... -
Page 367: Additional Cid Circuits
The additional cards include: Card Cage Description iDSP IPx 800X 64 circuit FSK (Frequency Shift Keying) tone generator card. These cards are described in the Coral Service and Peripheral Cards Installation Manual. 9-55 Coral IPx Office Installation Manual Shared Service Cards... -
Page 368: Specifications - Cid
Number of Circuits: U-RMI Office card....32 max. 16 default U-MR Office card ....32 max. 16 default RMI Office card ......0 MR Office card .......0 iDSP card ........64 (requires IPx 800X expansion cage) 9-56 Shared Service Cards Coral IPx Office Installation Manual... -
Page 369: Mfc Receiver (Mfr)
Card Cage Description 16MFR IPx 800X 16 circuit Multi-Frequency Code (MF or MFC tone) Receiver and decoder card. These cards are described in the Coral Service and Peripheral Cards Installation Manual. 9-57 Coral IPx Office Installation Manual Shared Service Cards... -
Page 370: Specifications
Specifications ....................Number of Circuits: U-RMI Office card....0 U-MR Office card ....0 RMI Office card ......0 MR Office card .......0 16MFR card ......16 (requires IPx 800X expansion cage) 9-58 Shared Service Cards Coral IPx Office Installation Manual... -
Page 371: Voip Media Gateway (Mg)
IPx 500X PUGW and PUGWipx support SIP and MGCP end points. † UGW-E and PUGW-Eipx support MGCP end points. These cards are described in the Coral VoIP (Voice Over IP) Installation Manual. 9-59 Coral IPx Office Installation Manual Shared Service Cards... - Page 372 NOTES: 9-60 Shared Service Cards Coral IPx Office Installation Manual...
-
Page 373: Remote Maintenance (Modem)
During normal system operation, it is advisable to set the modem transmit and receive function to “Off” for more secure system operation. displays the jumper settings for the Figure 9-11 modem. 9-61 Coral IPx Office Installation Manual Shared Service Cards... -
Page 374: Figure 9-11 Modem - Jumper Configuration
(SMDR) data or wake-up reports. It may not be used as a switched data port. Setting the Transmit or Receive function of the modem to “On” during normal system operation exposes the Coral IPx Office system to penetration by unauthorized parties. 9-62... -
Page 375: Database Programming
Use the MODEM parameter to determine whether a specific station user is allowed to dial to the MODEM. Refer to Chapter 7 - Station and Trunk COS, in the Program Interface (PI) and Database Reference Manual, for more details. 9-63 Coral IPx Office Installation Manual Shared Service Cards... - Page 376 These parameters set the transmission value levels of the modem while in CONNECT state with any possible port in the system. For more information see Chapter 19 in the Program Interface (PI) and Database Reference And Database Manual. 9-64 Shared Service Cards Coral IPx Office Installation Manual...
-
Page 377: Additional Modem In The Optional Ipx 800X Cage
These cards are described in the Coral Service and Peripheral Cards Installation Manual. Shared service cards may be installed in any available peripheral card slot in the optional Coral IPx 800X expansion unit. 9-65 Coral IPx Office Installation Manual Shared Service Cards... -
Page 378: Specifications - Modem
Data communications via the modem use the 7 bit, American Standard Code for Information Interchange (ASCII) character set, although each port may be programmed to send and receive a “dummy” 8th character bit. Data is exchanged in asynchronous character transmission mode. 9-66 Shared Service Cards Coral IPx Office Installation Manual... -
Page 379: Data Serial Ports (Rs-232E)
The Coral IPx provides one EIA RS-232E Asynchronous, ASCII serial data interface (KB0) via the MCB Office, for the following functions: System database programming Diagnostics and system maintenance KB0 RS-232E Programming Port, page 8-20 9-67 Coral IPx Office Installation Manual Shared Service Cards... -
Page 380: Rs-232E Ports In The Optional Ipx 800X Cage
The KB1, KB2 and KB3 data ports may only be used to communicate with the system processor for programming and maintenance purposes, or for retrieving station message detail recording (SMDR) data or wake-up reports. It may not be used as switched data ports. 9-68 Shared Service Cards Coral IPx Office Installation Manual... -
Page 381: Specifications - Rs-232E
Specifications - RS-232E ....................Number of Circuits: U-RMI Office card....0 U-MR Office card ....0 RMI Office card ......0 MR Office card .......0 8DRCF card ......3 (requires IPx 800X expansion cage) 9-69 Coral IPx Office Installation Manual Shared Service Cards... - Page 382 NOTES: 9-70 Shared Service Cards Coral IPx Office Installation Manual...
-
Page 383: Music
P3 jumper located on the U-RMI Office, U-MR Office, RMI Office and MR Office cards. defines the position of P3 for the music selection. Figure 9-15. Table 9-21 9-71 Coral IPx Office Installation Manual Shared Service Cards... -
Page 384: Configuring The Music M1 Jumper To External Or Internal
Figure 9-12 Music-1 External Simplified Diagram Connectors Internal Music Source INTERNAL EXTERNAL Music 1 (Stereo Phone Jack) External Source Figure 9-13 Music-1 Internal/External Function Selection P2 Jumper Setting Internal Music External Music 9-72 Shared Service Cards Coral IPx Office Installation Manual... -
Page 385: Configuring The Music M2/P Jumper To Music
Simplified Diagram Connectors M2/P Music 2 (Stereo Phone Jack) M2/P External Source MUSIC PAGE Page Figure 9-15 Music-2 M2/P Music/Paging M2/P Function Selection P3 Jumper Setting Paging Output External Music Input 9-73 Coral IPx Office Installation Manual Shared Service Cards... -
Page 386: Database Programming
6. Hunt Group (Route: HUNT) Use the MUSIC_SOURCE field to determine which music source will be sounded for callers that queue on the group. 9-74 Shared Service Cards Coral IPx Office Installation Manual... - Page 387 The following three fields MUSIC/TONE, MUSIC_SOURCE# and RETAIN_WAIT_Q__SOURCE are used to activate WAIT_Q features. For more information see Chapter 27 - CoraLINK in the Program Interface (PI) and Database Reference manual. 9-75 Coral IPx Office Installation Manual Shared Service Cards...
-
Page 388: External Connections
Background Music M/P2 lists the function of each interface connector, as they appear Table 9-7 on page 9-17 on the card front panel, illustrates that connector. Figure 9-8 on page 9-17 9-76 Shared Service Cards Coral IPx Office Installation Manual... -
Page 389: Additional Music Interfaces In The Optional Ipx 800X Cage
IPx 800X Includes the following functions, among others: 1 internal or external music interface 1 external music interface These cards are described in the Coral Service and Peripheral Cards Installation Manual. 9-77 Coral IPx Office Installation Manual Shared Service Cards... -
Page 390: Specifications - Music
8DRCF card ......2 (requires IPx 800X expansion cage) M1/M2 (Music-On-Hold and Background Music): Uses.........Music-On-Hold (MOH), Background Music Termination ......Capacitor-coupled transformer, non-grounded Impedance .......600Ω Nominal Input Level ......-15 dBm Nominal MUSIC Connectors: Connector Type .......Stereo 3.5 mm phone plug 9-78 Shared Service Cards Coral IPx Office Installation Manual... -
Page 391: Voice Paging (Public Address) And Relay-1
P3 located on the U-RMI Office, U-MR Office, RMI Office and MR Office cards. See Figure 9-18. defines the position of P3 for the music selection. Table 9-22 9-79 Coral IPx Office Installation Manual Shared Service Cards... -
Page 392: Figure 9-17: Paging & Relay Contacts 1-2 Simplified Diagram
P4 for the paging selection. Figure 9-20. Table 9-23 Figure 9-17 Paging & External Relay Contacts 1-2 Connectors Simplified Diagram M2/P Voice Page Output PAGE (Stereo Phone Jack) Relay contacts RLY 1 PAGE 9-80 Shared Service Cards Coral IPx Office Installation Manual... -
Page 393: Configuring The Paging M2/P Jumper To Paging
External Simplified Diagram Connectors Music-2 Source MUSIC PAGE M2/P M2/P Page (Stereo Phone Jack) Output Figure 9-19 Paging M2/P Music/Paging Selection M2/P Function P3 Jumper Setting Paging Output External Music Input 9-81 Coral IPx Office Installation Manual Shared Service Cards... -
Page 394: Configuring The Relay Contacts 1-2 Jumper To Paging
RLY 1 PAGE (RLY1) PAGE (RLY3) RELAY System Alarm or Dial-Operated Figure 9-21 Relay Relay Contacts Contacts 1-2 PAGE/RELAY Selection 1-2 Function P4 Jumper Setting (RLY1) PAGE (RLY3) RELAY Database Programming ....................9-82 Shared Service Cards Coral IPx Office Installation Manual... - Page 395 Use the PAGE parameter to determine whether a specific station user is allowed to dial and access the External Voice Paging system. Refer to Chapter 7 - Station and Trunk COS, in the Program Interface and Database Reference Manual, for more details. 9-83 Coral IPx Office Installation Manual Shared Service Cards...
-
Page 396: External Connections
Contacts Figure 9-23 Page - External Wiring To Amplified Connectors Speakers M2/P Balanced Voice 600 ohm Page Output (Out) Coral Amplified IPx Office Speakers RLY1 Amplified Speaker Power Supply U-RMI Office 9-84 Shared Service Cards Coral IPx Office Installation Manual... -
Page 397: Relay Electrical Limitations
Includes the following functions, among others: 1 external voice paging interface (or public address) 1 paging relay contacts These cards are described in the Coral Service and Peripheral Cards Installation Manual. 9-85 Coral IPx Office Installation Manual Shared Service Cards... -
Page 398: Specifications - Paging
PAGE Connector: Connector Type .......Stereo 3.5 mm phone plug Relay Contacts 1-2 (RLY1): Contact Type ......Isolated (Dry) Form A (SPST-NO) Voltage Limit......50VDC Maximum Current Limit ......0.5A Maximum non-inductive Power Limit ......30VA Maximum 9-86 Shared Service Cards Coral IPx Office Installation Manual... -
Page 399: Una/Bell And Relay-2
Contacts RLY2 are designated to operate in conjunction with UNA for central ringing applications. Figure 9-24 UNA & Relay Relay Contacts 3-4 Contacts Simplified Diagram RLY 2 Central Bell Incoming Call 9-87 Coral IPx Office Installation Manual Shared Service Cards... -
Page 400: Configuring The Relay Contacts 3-4 Jumper To Bell
System Alarm or Dial-Operated RLY 2 (RLY3) RELAY (RLY2) PAGE Central Bell Incoming Call Figure 9-26 Relay Relay Contacts Contacts 3-4 BELL/RELAY Selection 3-4 Function P4 Jumper Setting (RLY2) BELL (RLY3) RELAY 9-88 Shared Service Cards Coral IPx Office Installation Manual... -
Page 401: Database Programming
Refer to Chapter 7 - Station and Trunk COS, in the Program Interface (PI) and Database Reference Manual, for more details. 6. Sizes Def (Route: SIZ) [BELL/UNA] Use the BELL/UNA parameter to determine the number of Bell/Universal Night Answering (UNA) groups. 9-89 Coral IPx Office Installation Manual Shared Service Cards... -
Page 402: External Connections
Power Supply Supply lists the function of each interface connector, as they appear Table 9-7 on page 9-17 on the card front panel, illustrates that connector. Figure 9-8 on page 9-17 9-90 Shared Service Cards Coral IPx Office Installation Manual... -
Page 403: Relay Electrical Limitations
IPx 800X Includes the following functions, among others: 1 universal night answer or central bell 1 bell relay contact These cards are described in the Coral Service and Peripheral Cards Installation Manual. 9-91 Coral IPx Office Installation Manual Shared Service Cards... -
Page 404: Specifications - Bell/Una
8DRCF card ......1 (requires IPx 800X expansion cage) Relay Contacts 3-4 (RLY2): Contact Type ......Isolated (Dry) Form A (SPST-NO) Voltage Limit......50VDC Maximum Current Limit ......0.5A Maximum non-inductive Power Limit ......30VA Maximum 9-92 Shared Service Cards Coral IPx Office Installation Manual... -
Page 405: Accessory Or Alarm Relay-3
Coral technician when needed. A major or a minor system alarm can be programmed to appear on designated display telephones and/or operate a relay and hence an external alert device. 9-93 Coral IPx Office Installation Manual Shared Service Cards... -
Page 406: Circuit Description
Figure 9-29 RLY3 Simplified Diagram RLY 3 Major/Minor Alarm Signal Auxiliary Dial Operated Accessory Relay Contacts: (1/2) when P4 is connected between legs 2/3 (3/4) when P4 is connected between legs 3/4 9-94 Shared Service Cards Coral IPx Office Installation Manual... -
Page 407: Configuring The Relay Contacts 1-2 Jumper To Rly3
Diagram PAGE RLY 3 (RLY1) PAGE (RLY3) RELAY System Alarm or Dial-Operated Figure 9-31 Relay Relay Contacts Contacts 1-2 RLY3/PAGE Selection P4 Jumper 1-2 Function Setting (RLY3) RELAY (RLY1) PAGE 9-95 Coral IPx Office Installation Manual Shared Service Cards... -
Page 408: Configuring The Relay Contacts 3-4 Jumper To Rly3
System Alarm or Dial-Operated (RLY3) RELAY (RLY2) PAGE UNA or Bell Incoming Call Figure 9-33 Relay Relay Contacts Contacts 3-4 RLY3/BELL Selection P4 Jumper 3-4 Function Setting (RLY3) RELAY (RLY2) BELL 9-96 Shared Service Cards Coral IPx Office Installation Manual... -
Page 409: Database Programming
Use the RELAY parameter to determine whether a specific station user is allowed to switch the Relay ON and OFF. Refer to Chapter 7 - Station and Trunk COS, in the Program Interface and Database Reference Manual, for more details. 9-97 Coral IPx Office Installation Manual Shared Service Cards... - Page 410 Use this parameter to define the relay dial number as the minor alarm situation destination. MAJOR_RLY Use this parameter to define the relay dial number as the major alarm situation destination. 9-98 Shared Service Cards Coral IPx Office Installation Manual...
-
Page 411: External Connections
(RLY3) Connections Alarm Device RLY3 Coral IPx Office Alarm U-RMI Office Power Supply Relay Contacts: (1-2) when P4 is connected between legs 2-3 (3-4) when P4 is connected between legs 3-4 9-99 Coral IPx Office Installation Manual Shared Service Cards... -
Page 412: Relay Electrical Limitations
Coral IPx 800X expansion cage. The additional cards include: Card Cage Description 8DRCF IPx 800X Includes one auxiliary or major/minor alarm relay contacts, among other functions. These cards are described in the Coral Service and Peripheral Cards Installation Manual. 9-100 Shared Service Cards Coral IPx Office Installation Manual... -
Page 413: Specifications - Relay
8DRCF card ......1 (requires IPx 800X expansion cage) Relay Contacts 1-2 and 3-4 (RLY3): Contact Type ......Isolated (Dry) Form A (SPST-NO) Voltage Limit ......50VDC Maximum Current Limit ......0.5A Maximum non-inductive Power Limit ......30VA Maximum 9-101 Coral IPx Office Installation Manual Shared Service Cards... - Page 414 NOTES: 9-102 Shared Service Cards Coral IPx Office Installation Manual...
-
Page 415: Relay Contacts
Contact arching occurs while the contact is opening and burns away the precious metal surface, increasing the chance of the contact being 9-103 Coral IPx Office Installation Manual Shared Service Cards... -
Page 416: Figure 9-36 Dc Arc Suppression For U-Rmi / U-Mr / Rmi / Mr Office Card Relays
“welded” closed or failing completely. Arcing also generates high frequency energy that may be coupled to any one of the data buses of the Coral IPx Office, causing unreliable or unpredictable system behavior. If the contact is to operate a relay or solenoid, use an alternating current (AC) operated device and an AC power source, if at all possible. -
Page 417: Configuring The Relay Contacts Jumper
4-5 & 2-3 RLY2 & RLY3 1-2 & 3-4 Figure 9-37 Simplified Relay Diagram RLY 1 PAGE RLY 3 RELAY RLY 2 BELL Straps Relay contacts RLY2 or RLY3 RLY1 or RLY3 9-105 Coral IPx Office Installation Manual Shared Service Cards... -
Page 418: Specifications - Relays
8DRCF card ......3 (requires IPx 800X expansion cage) Relay Contacts (1-2 and 3-4): Contact Type ......Isolated (Dry) Form A (SPST-NO) Voltage Limit......50VDC Maximum Current Limit ......0.5A Maximum non-inductive Power Limit ......30VA Maximum 9-106 Shared Service Cards Coral IPx Office Installation Manual... - Page 419 Chapter Peripheral Cards 10.1 Peripheral Card Installation .............10-1 10.2 Peripheral Card Description ............10-5 10.3 Digital Trunk Synchronization ..........10-15 10.4 Service and Peripheral Cards..........10-31 Coral IPx Office Installation Manual...
-
Page 421: Peripheral Card Installation
Installation Manual. Card Handling Procedures ....................Each of the Coral IPx Office cards contains circuitry sensitive to electrostatic discharge (ESD). Failure to observe safe handling procedures for static-sensitive circuitry may result in permanent damage to a card. An anti-static wrist strap, connected to the ground terminal pole and tightened with the wing nut should be worn while inserting, removing, or handling any card in the system. -
Page 422: General Installation Procedure
2. If the I_TYPE for the card slot shows a card type other than the card currently installed, enter NO_CARD to clear the slot. Refer to Program Interface and Database Reference Manual - Chapter 6, for further details. 10-2 Peripheral Cards Coral IPx Office Installation Manual... -
Page 423: Diagnostic Led Indication
1. In the U-RMI Office and U-MR Office card a second LED is located in the middle of the card. In the 4S+8/16Fx Office, 4SA+/816Fx Office, 8S+8/16Fx Office and 8SA+8/16Fx Office cards a second LED is located in the right side of the card. 10-3 Coral IPx Office Installation Manual Peripheral Cards... - Page 424 LED Flashing The Coral IPx Office system continuously runs diagnostic routines to monitor the performance and integrity of its database and circuitry. When the circuitry on a particular card fails to perform as expected the system instructs the card to flash its diagnostic LED.
-
Page 425: Peripheral Card Description
Coral_IPx Office unit. XXX Office Cards Peripheral cards with the suffix “Office” are special form-factor cards for use in the Coral IPx Office system. These cards come in four sizes as shown in Table 10-8. -
Page 426: Figure 10-1 Coral Ipx Office Peripheral Card Slot Location
10 - 11 slots 8 - 9 Figure 10-2 Coral IPx Office Peripheral Card Types Type -A Half size XXX Office Type -B XXX Office Type -C XXX Office Full size Type XXX Office 10-6 Peripheral Cards Coral IPx Office Installation Manual... -
Page 427: Table 10-2: Coral Ipx Office Peripheral Card Type
These cards are a combination of two cards † If either 30T Office, 4TBR Office, PRI-30 Office, 2DT or UDT Office is installed in slot 10-11, blank panel 1-A must cover the opening directly above the installed card. 10-7 Coral IPx Office Installation Manual Peripheral Cards... -
Page 428: Table 10-3: Coral Ipx Office Peripheral Card Slot Location
ESIX Office Expansion Unit 30T Office (30T or 30TM jumper selection) 4TBR Office PRI-30 Office Office (T1 or PRI-23 jumper selection) Office (T1, 30T, PRI-30 or PRI-23 jumper selection) ESIM Office Main Unit 10-8 Peripheral Cards Coral IPx Office Installation Manual... - Page 429 4TBR Office PRI-30 Office Office (T1 or PRI-23 jumper selection) Office (T1, 30T, PRI-30 or PRI-23 jumper selection) 4T Office 4T-CID* Office (4T + 4CID) These cards are a combination of two cards 10-9 Coral IPx Office Installation Manual Peripheral Cards...
- Page 430 (POTs) in each unit. There are no limitations for the Coral IPx Office main unit when the loop resistances (including the telephone set) is up to 600 Ω...
-
Page 431: Table 10-5 4/8Sa Office Card Configurations
24SFT 8SA+16SAx 8SA+16SAx 8SA+16SAx 4SA+8Fx 4SA+16Fx 8SA+8SAx 8SA+16SAx 8SA+16SAx 8SA+8SAx 8SA+8Fx 8SA+16Fx 8SA+16SAx 8SA+8SAx 8SA+16SAx 8SA+16SAx Legend (Range of possible configurations): Main Unit Expansion Range Unit Ω Ω Max. 1800 Max. Green 10-11 Coral IPx Office Installation Manual Peripheral Cards... -
Page 432: Table 10-6 4/8S Office Card Configurations
4S+16Fx 8S+16Fx 8S+12Sx 8S+12Sx 8S+12Sx 8S+12Sx 8SFT 16SFT 24SFT 8S+12Sx 8S+12Sx 8S+12Sx 4S+8Fx 4S+16Fx 8S+12Sx 8S+12Sx 8S+12Sx 8S+8Fx 8S+16Fx 8S+12Sx 8S+12Sx Legend (Range of possible configurations): Range Main Unit Expansion Unit Green 10-12 Peripheral Cards Coral IPx Office Installation Manual... - Page 433 16 FlexSets and 8 POTs can be combined as follows: 8SA+16Fx and optional 8T/IPC (preferred combination) 4SA+16Fx and 4SA Example-3: 32 FlexSets and 8 POTs can be combined as follows: 8SA+8Fx and 24SFT (preferred combination) 4SA+16Fx and 4SA+16Fx 8SA+16Fx and 16SFT 10-13 Coral IPx Office Installation Manual Peripheral Cards...
- Page 434 30T Office (30T or 30TM jumper selection) - Single trunk (30 E1 channels) per card, up to 2 cards per system. 4TBR Office - 4 trunks (8 BRI channels) per card, up to 2 cards per system. 10-14 Peripheral Cards Coral IPx Office Installation Manual...
-
Page 435: Digital Trunk Synchronization
MCB Office (Main Control Board), incorporating the external clock rate into the Coral IPx Office internal clock. To allow the clock signal to be fed into the Coral IPx Office internal clock, the ESIM and the digital trunk interface cards are properly strapped to accept those signals. -
Page 436: Synchronization Slots In The Main And Expansion Cages
Synchronization Slots in the Main and Expansion Cages ....................Two slots, located in the Coral IPx Office main unit, are set to accept the digital trunk cards: slot # 8-9 and slot # 10-11. Each card can be installed into either slot. See Figure 10-3 below. - Page 437 If it is, the system then locks onto the secondary external clock source. If no secondary clock source is defined, or the secondary clock is also in LOS or Red alarm, the Coral IPx Office system uses its internal clock source, and the system free runs. 10-17...
-
Page 438: Choosing The Best Synchronization Source
Choosing the Best Synchronization Source ....................Optional Synchronization Cards In the Coral IPx Office main unit and IPx expansion unit: PRI-30 Office, 2DT Office (PRI), UDT Office (PRI-23) T1 - 2DT Office (T1), UDT Office (T1) E1 - 2DT Office (30T), 30T Office (30T or 30TM) - Page 439 4. 4TBR and 8TBR card (all types) connected to the PSTN. 5. 4TBR and 8TBR card (all types) connected to a private network. The three possibilities are the same as listed in order of preference in possibilities 3.a - 3.c above. 10-19 Coral IPx Office Installation Manual Peripheral Cards...
-
Page 440: Synchronization Instructions
IPx Office expansion unit: PRM (shelf#2/3, slot 8/10) SEC (shelf#2/3, slot#8/10) IPx 500X/800X first expansion cage: PRM (shelf#2, slot#4), SEC (shelf#2, slot#5) IPx 500X/800X second expansion cage: PRM (shelf#3, slot#4), SEC (shelf#3, slot#5) 10-20 Peripheral Cards Coral IPx Office Installation Manual... - Page 441 8. Verify that the system is synchronized upon your settings: Access the PI Synchronization branch (Route DTDB, 3), check the following parameter: CURR_CLK Verify that the value 1 is displayed, indicating that the system is synchronized by the primary synchronization source. 10-21 Coral IPx Office Installation Manual Peripheral Cards...
-
Page 442: Figure 10-3: Digital Trunk Cards Jumper Settings For Synchronization
Synchronization source Not from Not from this card this card Primary Primary (green) (green) Secondary Secondary (yellow) (yellow) Synchronization indicators 2DT Office 2DT Office SYNC Synchronization Source this card Primary (green) Secondary (yellow) 10-22 Peripheral Cards Coral IPx Office Installation Manual... -
Page 443: Figure 10-4 Esim Office Card Jumper Settings For Synchronization
IPx Office EX, IPx 500X, IPx 800X, and CSLX 200. Jumper Sync. Card Unit Primary Main Main Secondary Any Exp. Primary Secondary Main Main Primary Any Exp. Secondary Primary Any Exp. Secondary Any Exp. 10-23 Coral IPx Office Installation Manual Peripheral Cards... -
Page 444: Figure 10-5 Esix Office Card Jumper Settings For Synchronization
Figure 10-5 ESIX Office Card Jumper Settings for Synchronization DISABLED ENABLED Synchronization indicators ESIX Office NOTE: For jumper configurations, refer to the drawings on the following pages. 10-24 Peripheral Cards Coral IPx Office Installation Manual... -
Page 445: Synchronization Configurations
....................This section describes the different synchronization configurations available with the Coral IPx Office. The Coral IPx Office system can house any combination of primary and secondary synchronization units and cages. Both the ESIM and ESIX Office card include a green LED indicator labelled PRM and a yellow LED indicator labelled SEC. -
Page 446: Figure 10-7 Primary And Secondary In Main
ESIX card jumper configuration PRM LED ON SEC LED ON ESIX Office ESIX Office SYNC ESIM card in main unit ESIM card jumper configuration PRM LED ON SEC LED ON SYNC ESIM Office 10-26 Peripheral Cards Coral IPx Office Installation Manual... -
Page 447: Figure 10-9 Primary And Secondary In Second Expansion
ESIX card jumper configuration PRM LED OFF SEC LED ON SYNC ESIX Office ESIX Office ESIM card in main unit ESIM card jumper configuration PRM LED OFF SEC LED ON SYNC ESIM Office 10-27 Coral IPx Office Installation Manual Peripheral Cards... -
Page 448: Figure 10-11 Primary In First Expansion And Secondary In Main
ESIX card jumper configuration PRM LED OFF SEC LED OFF ESIM card in main unit ESIM card jumper configuration PRM LED OFF SEC LED ON ESIM card in main unit Both LEDs OFF 10-28 Peripheral Cards Coral IPx Office Installation Manual... -
Page 449: Figure 10-14 Primary In First And Secondary In Second
ESIX card jumper configuration PRM LED ON SEC LED OFF ESIX Office ESIX Office SYNC ESIM card in main unit ESIM card jumper configuration PRM LED ON SEC LED ON SYNC SEC PRM ESIM Office 10-29 Coral IPx Office Installation Manual Peripheral Cards... -
Page 450: Figure 10-15 Primary In Second And Secondary In First
ESIX card jumper configuration PRM LED OFF SEC LED ON ESIX Office ESIX Office SYNC ESIM card in main unit ESIM card jumper configuration PRM LED ON SEC LED ON SYNC ESIM Office 10-30 Peripheral Cards Coral IPx Office Installation Manual... -
Page 451: Service And Peripheral Cards
10.4 Service and Peripheral Cards This section includes a list of all peripheral cards currently used in the Coral IPx Office system. The Coral Service and Peripheral Cards Installation Manual provides a full description of all service and peripheral cards used in the Coral IPx Office system. - Page 452 Coral IPx Office - Service and Peripheral Card Types Card Name Card Card PI Slot Description Type Slot P_TYPE Figure 10-16 30T Office 8-9, 10-11 Even: Odd: ----- 30T or 30T/M application card, jumper selection. 30 channel, E1 digital trunk interface card. Provides a 4-wire, digital multiplexed, CEPT compatible trunk interface at 2.048Mbps rate.
- Page 453 Coral IPx Office - Service and Peripheral Card Types Card Name Card Card PI Slot Description Type Slot P_TYPE Figure 10-33 4SA+8Fx Office* 2-3, 4-5 Even: 4SLS Odd: 8SFT Combination station card, 4SA Office and 8Fx Office cards on 4S Office board. 12 ports total.
- Page 454 ESIM Office card. ESIX Office Even: ----- The ESIX Office card is installed into the Coral IPx Office/X Exp. Unit Odd: ----- expansion unit (slot 6-7) and the Coral IPx Office expansion cable is attached to the connectors on the front panel of the ESIM and ESIX Office cards.
- Page 455 Coral IPx Office - Service and Peripheral Card Types Card Name Card Card PI Slot Description Type Slot P_TYPE Figure 10-18 PRI-30 Office 8-9, 10-11 Even: PRI30 Odd: ----- 30 channel, PRI (Primary Rate Interface) digital trunk card. ISDN compatible digital interface, European ETSI standard (30B+D) at 2.048Mbps E1 rate.
-
Page 456: Table 10-9: Coral Ipx Office Piggyback Modules For Peripheral Cards
Cards Item Description 4CID Office The 4CID Office is installed on the 4T Office card in Coral IPx Office Figure 10-37 systems. See The 4CID Office card is used for detecting CID (Caller ID) information, modulated in FSK (Frequency Shift Keying), sent from the PSTN over Loop-Start trunks. -
Page 457: Table 10-10: U-Rmi Office, U-Mr Office, Rmi Office And Mr Office Features
Chapter 9, Shared Service Circuitry U-RMI Office card see Figure 9-3 RMI Office card see Figure 9-4 U-MR Office card see Figure 9-5 MR Office card, see Figure 9-6 10-37 Coral IPx Office Installation Manual Peripheral Cards... -
Page 458: Figure 10-16 30T Office Card (30T Or 30Tm)
Nominal Line Impedance Card software Flash SYNC 30T Office 1 RxB 2 RxA 3 GND(shield) 4 TxB 5 TxA RJ-45 plug (male) clip at rear RJ-45 socket (female) external view 8 GND 10-38 Peripheral Cards Coral IPx Office Installation Manual... -
Page 459: Figure 10-17 4Tbr Office Card
BRI line 0, 1, 2, 3 3 - Tx(+) 4 - R x(+) 5 - R x(-) 6 - T x(-) RJ-45 plug (male) clip at rear RJ-45 socket (female) external view 10-39 Coral IPx Office Installation Manual Peripheral Cards... -
Page 460: Figure 10-18: Pri-30 Office Card
-48VDC P.S. SYNC RAI CRC PRI-30 Office 1 RxB 2 RxA 3 GND(shield) 4 TxB 5 TxA RJ-45 plug (male) clip at rear 7 -48VDC RJ-45 socket (female) external view 8 GND 10-40 Peripheral Cards Coral IPx Office Installation Manual... -
Page 461: Figure 10-19 Udt Office Card (T1 Or Pri-23)
Enabled Disabled -48VDC P.S. SYNC UDT Office 1 RxB 2 RxA 3 GND(shield) 4 TxB 5 TxA RJ-45 plug (male) clip at rear 7 -48VDC RJ-45 socket (female) external view 8 GND 10-41 Coral IPx Office Installation Manual Peripheral Cards... -
Page 462: Figure 10-20 2Dt Office Card (30T, T1, Pri-30 Or Pri-23)
2 DCD 3 GND(shield) 3 DTR 4 TxB 4 GND 5 TxA 5 RD 6 TR RJ-45 plug (male) clip at rear -48VDC 7 CTS RJ-45 socket (female) external view 8 RTS 10-42 Peripheral Cards Coral IPx Office Installation Manual... -
Page 463: Figure 10-21 4T Office Card
RJ-45 plug (male) 6 - SCR clip at rear RJ-45 socket (female) 7 - SCT external view Figure 5-6 illustrates wiring interconnections between the trunk card, station card, and a single line station set. 10-43 Coral IPx Office Installation Manual Peripheral Cards... -
Page 464: Figure 10-22 4T-Cid Office Card
RJ-45 plug (male) 6 - SCR clip at rear RJ-45 socket (female) 7 - SCT external view Figure 5-6 illustrates wiring interconnections between the trunk card, station card, and a single line station set. 10-44 Peripheral Cards Coral IPx Office Installation Manual... -
Page 465: Figure 10-23 8Sft Office Card
Figure 10-23 8SFT Office Card Card software EPROM 8SFT Office Pins FlexSet 1/26 A/B0 2/27 A/B1 3/28 A/B2 4/29 A/B3 5/30 A/B4 6/31 A/B5 7/32 A/B6 8/33 A/B7 10-45 Coral IPx Office Installation Manual Peripheral Cards... -
Page 466: Figure 10-24 16Sft Office Card
1/26 A/B0 2/27 A/B1 3/28 A/B2 4/29 A/B3 5/30 A/B4 6/31 A/B5 7/32 A/B6 8/33 A/B7 9/34 A/B8 10/35 A/B9 11/36 A/B10 12/37 A/B11 13/38 A/B12 14/39 A/B13 15/40 A/B14 16/41 A/B15 10-46 Peripheral Cards Coral IPx Office Installation Manual... -
Page 467: Figure 10-25 24Sft Office Card
9/34 A/B8 10/35 A/B9 11/36 A/B10 12/37 A/B11 13/38 A/B12 14/39 A/B13 15/40 A/B14 16/41 A/B15 17/42 A/B16 18/43 A/B17 19/44 A/B18 20/45 A/B19 21/46 A/B20 22/47 A/B21 23/48 A/B22 24/49 A/B23 10-47 Coral IPx Office Installation Manual Peripheral Cards... -
Page 468: Figure 10-26 4S Office Card
Figure 10-26 4S Office Card 8/16Fx Office connector 3-WAY Card software EPROM 8/16Fx Office connector Ring Frequency 20Hz 25Hz 4S Office Pins SLT Station 1/26 2/27 3/28 4/29 10-48 Peripheral Cards Coral IPx Office Installation Manual... -
Page 469: Figure 10-27 4Sa Office Card
IJU13 Power circuitry Normal Software Upgrade AJU13 Card processor Card software flash 4SA Office Maintenance port External I/O connector Card status RS-232 9-pin male indicator Pins SLT Station 1/26 2/27 4/29 5/30 10-49 Coral IPx Office Installation Manual Peripheral Cards... -
Page 470: Figure 10-28 8S Office Card
8/16Fx Office 12Sx Office connector connector 3-WAY Card software EPROM 12Sx and 8/16Fx Office connector Ring Frequency 20Hz 25Hz 8S Office Pins SLT Station 1/26 2/27 3/28 4/29 5/30 6/31 7/32 8/33 10-50 Peripheral Cards Coral IPx Office Installation Manual... -
Page 471: Figure 10-29 8Sa Office Card
Power Circuitry Normal Software Upgrade AJU13 Card Processor Card Software Flash 8SA Office Maintenance port External I/O connector Card Status RS-232 9-pin male Indicator Pins SLT Station 1/26 2/27 4/29 5/30 7/32 8/33 10-51 Coral IPx Office Installation Manual Peripheral Cards... -
Page 472: Figure 10-30 20S Office Card
20S Office = 8S Office + 12Sx Office 20Hz 25Hz 8S Office Pins SLT Station 1/26 2/27 3/28 4/29 5/30 6/31 7/32 8/33 9/34 10/35 11/36 12/37 13/38 14/39 15/40 16/41 17/42 18/43 19/44 20/45 10-52 Peripheral Cards Coral IPx Office Installation Manual... -
Page 473: Figure 10-31 8Sa+8Sax And 8Sa+16Sax
8/33 8/33 9/34 9/34 10/35 11/36 12/37 12/37 13/38 13/38 14/39 14/39 15/40 15/40 16/41 16/41 17/42 17/42 18/43 18/43 19/44 19/44 20/45 20/45 21/46 21/46 22/47 22/47 23/48 23/48 24/49 24/49 10-53 Coral IPx Office Installation Manual Peripheral Cards... -
Page 474: Figure 10-32 4S+8Fx, 4S+16Fx, 8S+8Fx And 8S+16Fx Office Card
21/46 A/B12 4S16F Office = 4S Office + 16Fx Office 22/47 A/B13 8S8F Office = 8S Office + 8Fx Office 23/48 A/B14 24/49 A/B15 8S16F Office = 8S Office + 16Fx Office 10-54 Peripheral Cards Coral IPx Office Installation Manual... -
Page 475: Figure 10-33 4Sa+8Fx, 4Sa+16Fx, 8Sa+8Fx And 8Sa+16Fx Office Card
21/46 A/B12 4SA16F Office = 4SA Office + 16Fx Office 22/47 A/B13 8SA8F Office = 8SA Office + 8Fx Office 23/48 A/B14 8SA16F Office = 8SA Office + 16Fx Office 24/49 A/B15 10-55 Coral IPx Office Installation Manual Peripheral Cards... -
Page 476: Figure 10-34 8T Office Card
RJ-45 plug (male) 6 - SCR clip at rear RJ-45 socket (female) 7 - SCT external view Figure 5-6 illustrates wiring interconnections between the trunk card, station card, and a single line station set. 10-56 Peripheral Cards Coral IPx Office Installation Manual... -
Page 477: Figure 10-35 8T-Cid Office Card
RJ-45 plug (male) 6 - SCR clip at rear RJ-45 socket (female) 7 - SCT external view Figure 5-6 illustrates wiring interconnections between the trunk card, station card, and a single line station set. 10-57 Coral IPx Office Installation Manual Peripheral Cards... -
Page 478: Figure 10-36 Ipc Office Card
Figure 10-36 IPC Office Card Fax/PCI card location Applications Hard Disk Battery NETWORK VIDEO COM 1 USB1 USB2 DSP2 BUSY SHUTDOWN RESET IPC Office DSP1 10-58 Peripheral Cards Coral IPx Office Installation Manual... -
Page 479: Figure 10-37 4Cid Office Card
Figure 10-37 4CID Office Card 4CID Office Mounting holes for metal screws and spacers for connecting to 4T Office Metal Metal washer washer Metal Metal Metal spacer screw screw 4CID Office Office 10-59 Coral IPx Office Installation Manual Peripheral Cards... -
Page 480: Figure 10-38 8Cid Card
Figure 10-38 8CID Card 8CID Mounting holes for metal screws and spacers for connecting to 8T Office Metal Metal washer washer Metal Metal Metal spacer screw screw 8CID 8T Office 10-60 Peripheral Cards Coral IPx Office Installation Manual... -
Page 481: Figure 10-39 8Fx Office Card - Component Side
Figure 10-39 8Fx Office Card - Component side Card software EPROM 8Fx Office System Diagnostic Tip: Figure 10-42 For installation instructions refer to 10-61 Coral IPx Office Installation Manual Peripheral Cards... -
Page 482: Figure 10-40 16Fx Office Card - Component Side
Figure 10-40 16Fx Office Card - Component side Card software EPROM 16Fx Office System Diagnostic Tip: Figure 10-42 For installation instructions refer to 10-62 Peripheral Cards Coral IPx Office Installation Manual... - Page 483 8/16Fx Office Mounting holes for plastic screws and spacers for connecting to 4/8S Office Plastic Plastic Plastic spacer screw screw 8/16Fx Office 4/8S Office Tip: Figure 10-42 For installation instructions refer to 10-63 Coral IPx Office Installation Manual Peripheral Cards...
-
Page 484: Figure 10-42 8/16Fx Office Card - Installation
8/16Fx Office onto 4/8S Office card and fasten 5 plastic screws. 12Scsx and 8/16Fcsx connector Reassemble front 8/16Fx Office panel and fasten screws A & B and 4/8S Office nuts C & D. 10-64 Peripheral Cards Coral IPx Office Installation Manual... -
Page 485: Figure 10-43 12Sx Office Card - Top Side
Figure 10-43 12Sx Office Card - Top Side 12Sx Office Mounting holes for plastic screws and spacers for connecting to 8S Office Plastic Plastic Plastic screw spacer screw 12Sx Office 8S Office 10-65 Coral IPx Office Installation Manual Peripheral Cards... -
Page 486: Figure 10-44 12Sx Office Card - Rear Side
Figure 10-44 12Sx Office Card - Rear Side 12Sx Office 10-66 Peripheral Cards Coral IPx Office Installation Manual... -
Page 487: Chapter 11: System Networking
Chapter System Networking 11.1 NTU Office Card Description ............11-3 11.2 Installing and Replacing the NTU Office Card ......... 11-9 11.3 Assembling and Removing the WiFi Card........11-13 Coral IPx Office Installation Manual... -
Page 489: Ntu Office Card Description
11.1 NTU Office Card Description Introduction ....................This section describes the networking functions of the Coral IPx Office system. For a Installing and Replacing the NTU description on how to install the NTU Office card, see Office Card, page 11-9. -
Page 490: Figure 11-1 System Operation Without An Ntu Office Card
MRC, which converts the RTP packets into PCM streams and directs them to the Coral. Figure 11-1 System Operation without an MCB Office NTU Office Card Packets media Embedded Embedded HDLC Time Controller switch Switch Processor WAN port LAN ports (Not in use) External Router 11-4 System Networking Coral IPx Office Installation Manual... -
Page 491: System Operation With An Ntu Office Card
System Operation with an NTU Office Card ....................The Coral IPx Office system enables seamless integration between the digital and IP world with or without an NTU Office card. With an NTU Office card, the Coral IPx Office can connect to the WAN directly from the WAN port without any additional Figure 11-2. -
Page 492: Figure 11-2 System Operation With An Ntu Office Card
Figure 11-2 System Operation with an NTU MCB Office Office Card NTU Office Wi-Fi Embedded Router media Packets Embedded Embedded Time HDLC switch Controller Switch Processor Printer 11-6 System Networking Coral IPx Office Installation Manual... -
Page 493: Ntu Office Card Components
USB printer port Power connector NTU Office ON/OFF switch card Connectors to LAN ports WiFi card Connector to WAN port Wi.-Fi Reset button WiFi antenna connector Front panel of unit Reset button wires 11-7 Coral IPx Office Installation Manual System Networking... - Page 494 NOTES: 11-8 System Networking Coral IPx Office Installation Manual...
-
Page 495: Installing And Replacing The Ntu Office Card
The NTU Office card assembly kit includes additional parts. However, you only need to use the parts listed below. Table 11-1 Assembly Part Quantity Parts Used in NTU Office card Assembly Kit USB cable LAN cable WAN cable Power harness 11-9 Coral IPx Office Installation Manual System Networking... -
Page 496: Installing The Ntu Office Card
11-5. card housing). See 1. If necessary, unplug the power cord that supplies the Coral IPx Office system. Electrical Hazard. Contact with live wires could cause shock, burn, and death. Remove power from the Coral IPx Office cover before opening the cover. -
Page 497: Figure 11-4 Ntu Office Card Fasteners
NTU Office card Figure 11-5 NTU Office MBP Office card Card Assembly MCB Office card Power harness USB cable On/Off LAN cable WAN cable Wi.-Fi NTU Office card WiFi card WiFi antenna cables 11-11 Coral IPx Office Installation Manual System Networking... -
Page 498: Replacing The Ntu Office Card
This section describes how to replace the NTU Office card (without replacing the card housing). 1. Unplug the power cord that supplies the Coral IPx Office system. Electrical Hazard. Contact with live wires could cause shock, burn, and death. Remove power from the Coral IPx Office cover before opening the cover. -
Page 499: Assembling And Removing The Wifi Card
6-9. 3. Remove the unit cover. See 4. Insert the antenna cables through the front panel of the Coral IPx Office unit. 5. Fasten the WiFi cable threaded connectors to the NTU card housing. 6. Connect the other side of the WiFi cables to the WiFi card as follows (see... -
Page 500: Figure 11-6 Wifi Antenna Cable Installation
Step a Step b for the second WiFi cable. Figure 11-6 WiFi Insert threaded Antenna Cable connector Installation into holes in card frame Fasten washers and nuts Press clamp connectors gently into place 11-14 System Networking Coral IPx Office Installation Manual... -
Page 501: Figure 11-7 Wifi Card Assembly
3. Close the WiFi card flap. Figure 11-7 WIFI Card Assembly Connector WI-FI card Connector Insert WiFi card at an angle Press card down until it snaps into place Close WiFi card flap 11-15 Coral IPx Office Installation Manual System Networking... -
Page 502: Removing The Wifi Card
....................1. Remove the WiFi antennas. 2. Unplug the power cord that supplies the Coral IPx Office system. Electrical Hazard. Contact with live wires could cause shock, burn, and death. Turn OFF the ON/OFF switch and disconnect the power cord before opening the cover. -
Page 503: Figure 11-8 Wifi Card Removal
Figure 11-8 WIFI Card Removal Open flap and disconnect cables from WiFi card Grip sides of card holder and gently pull outwards Card springs upwards Pull to remove card 11-17 Coral IPx Office Installation Manual System Networking... -
Page 504: Assembling The Wifi Antennas
Assembling the WiFi Antennas ....................Closing the Unit Cover, page 6-10. 1. Close the Coral IPx Office unit cover. Figure 11-9. 2. Assemble the WiFi antennas as shown in Figure 11-9 WiFi Antenna Assembly Removing the WiFi Antennas ....................Figure 11-10. -
Page 505: Configuring The Networking Software
Configuring the Networking Software ....................Configure the networking software as described in the documentation provided by the NTU Office card software vendor at http://www.draytek.com. The NTU Office card is named Vigor 2900 by the vendor. 11-19 Coral IPx Office Installation Manual System Networking... -
Page 506: Specifications
Protocol ........PPTP / L2TP / IPSec / L2TP over IPSec Encryption.......AES (128 bits ) ........MPPE (40,128 bits) ........Hardware-based DES / 3DES (56 / 168 bits ) Authentication......MD5, SHA-1 IKE Authentication ....Pre-shared Key Connection ......Teleworker-to-LAN .......LAN-to-LAN .......DHCP over IPSec .......IPSec Pass-through 11-20 System Networking Coral IPx Office Installation Manual... - Page 507 Built-in diagnostic function Firmware upgrade via TFTP Remote firmware upgrade via FTP Quick start wizard Logging via syslog SNMP management MIB-II Max. Power..........10 Watt Dimensions ..........L22.0 * W16.0 * H3.67 (cm) Power ............15VDC. 1.2A 11-21 Coral IPx Office Installation Manual System Networking...
- Page 508 Frequency Band ..........2.4 GHz Transmission Rate........Up to 54 MHz Channels Support........US / Canada: 11 channels (1~11) .........Japan: 14 channels (1‘13) or 1(14th) .........Major European country: 13 channels (1~13) .........France: 4 channels (10~13) 11-22 System Networking Coral IPx Office Installation Manual...
- Page 510 International Headquarters Tadiran Telecom Ltd. 18 Hasivim Street P.O.Box 7607 Petach Tikva 49170 Israel Tel. +972-3-9262000, Fax. +972-3-9262310 USA Headquarters Tadiran Telecom, Inc. 4 Tri Harbor Court Port Washington, NY 11050 Tel. +1-516-632-7200, Fax. +1-516-632-7210 http://www.tadirantele.com C o r a l...
Need help?
Do you have a question about the Coral IPx Office and is the answer not in the manual?
Questions and answers