Table of Contents
Advertisement
Quick Links
Download this manual
See also:
User Manual
Advertisement
Table of Contents

Related Manuals for SHOWTEC Scanmaster 2 MKII


Summary of Contents for SHOWTEC Scanmaster 2 MKII
- Page 1 MANUAL ENGLISH Scanmaster 2 MKII Ordercode: 50333 Highlite International B.V. – Vestastraat 2 – 6468 EX – Kerkrade – the Netherlands...
-
Page 2: Table Of Contents
Scanmaster 2 MKII Table of contents Warning ........................................2 Safety Instructions ....................................2 Operating Determinations ................................3 Connection with the mains ................................3 Return Procedure .....................................4 Claims .........................................4 Description of the device ..................................5 Overview ......................................5 Backside......................................7 Installation ......................................7 Set Up and Operation ...................................7 Scenes ........................................7 Record a Scene ....................................8... -
Page 3: Warning
Save the carton and all packing materials. In the event that a fixture must be returned to the factory, it is important that the fixture be returned in the original factory box and packing. Your shipment includes: Showtec Scanmaster 2 MKII DC power adapter ... -
Page 4: Operating Determinations
If your Showtec device fails to work properly, discontinue use immediately. Pack the unit securely (preferably in the original packing material), and return it to your Showtec dealer for service. -
Page 5: Return Procedure
Scanmaster 2 MKII Return Procedure Returned merchandise must be sent prepaid and in the original packing, call tags will not be issued. Package must be clearly labeled with a Return Authorization Number (RMA number). Products returned without an RMA number will be refused. Highlite will not accept the returned goods or any responsibility. -
Page 6: Description Of The Device
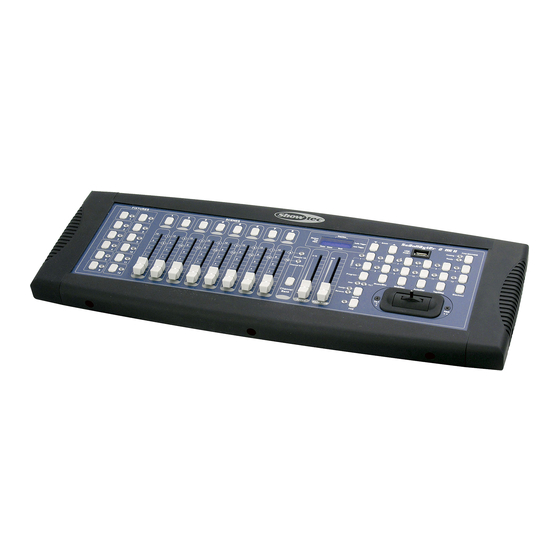
Scanmaster 2 MKII Description of the device Features The Scanmaster 2 MKII is a light controller from Showtec. 192 DMX channels 8 dimming faders & total Speed fader & Fade Time fader 30 banks of 8 programmable scenes ... - Page 7 Scanmaster 2 MKII 01) FIXTURE buttons (1-12) To select fixtures for setting, programming or recording. 02) SCENE buttons (1-8) Press the scene buttons to load or store relevant scenes. There is a maximum of 240 programmable scenes. 03) Channel faders (1-8) These faders control the dimming output of each corresponding channel.
-
Page 8: Backside
Connect the device to the main power supply. The Scanmaster 2 MKII allows you to program 12 fixtures, 16 DMX channels each; 30 banks of 8 programmable scenes, 12 chases of 99 steps using 8 channel faders, a joystick and other buttons. If you use the joystick, you can easily and accurately control the movement of a fixture. -
Page 9: Record A Scene
Scanmaster 2 MKII Record a Scene 01) Enter the Programming mode. 02) Check if the BLACKOUT LED (20) is not on. If it is, press the button once to exit the Blackout mode. 03) Check if the SPEED and FADE TIME faders (05/06) are set to zero. -
Page 10: Copy A Scene
Scanmaster 2 MKII Copy a Scene 01) Enter the Programming mode. 02) Tap the BANK Up/Down button (11), to select the bank containing the scene you wish to copy. 03) Select the scene which you wish to copy, by pressing its SCENE button (02). -
Page 11: Chases
Scanmaster 2 MKII Chases Programming a Chase In order to program a chase, you need to have preprogrammed scenes. This function allows you to cycle through 12 programmable chases, with up to 240 scenes each, in a preselected order. It is recommended to delete all chases from the controller before programming chases for the first time. -
Page 12: Chase Playback
Scanmaster 2 MKII Chase Playback There are 3 ways to start chase playback: manual trigger, auto trigger and audio trigger. Manual Trigger 01) When the power is turned on, the device will operate in Manual mode, and all channel outputs will be in blackout state (the Blackout LED on the display will flash). -
Page 13: Delete A Scanner Of Dmx Channels
Scanmaster 2 MKII verified that you are in Reverse mode and the Tilt LED is on, check which fader is responsible for Tilt. In order to do this, press and hold down the MODE button (08) and press the SCENE button (02), which is the same as the number of the fader responsible for Tilt (fader 5/scene 5). -
Page 14: Midi Control
Scanmaster 2 MKII MIDI Control MIDI Channel Settings 01) Press and hold down the MIDI button (17) for 3 seconds. The display will show the current MIDI channel: "ln:01." This means that the current MIDI channel is 01. 02) Press the BANK Up/Down button (11), to select the DMX channel 01-16 you wish to assign to the MIDI channel. -
Page 15: File Transfer
Scanmaster 2 MKII File Transfer File Transfer allows the user to transfer all information stored in one Scanmaster 2 MKII to another Scanmaster unit. You must connect the units by using 3-pin XLR cables. Connect the sending unit’s DMX OUT connector to the receiving unit’s DMX IN connector. -
Page 16: Troubleshooting
02) Check power from the wall, all cables, etc. 03) If all of the above appears to be O.K., plug the unit in again. 04) If nothing happens after 30 seconds, unplug the device. 05) Return the device to your Showtec dealer. Product Specifications 192 DMX channels 8 dimming faders &... -
Page 17: Notes
Scanmaster 2 MKII Notes Ordercode: 50333... - Page 18 Scanmaster 2 MKII Ordercode: 50333...
- Page 19 Scanmaster 2 MKII Ordercode: 50333...
- Page 20 ©2016 Showtec...
Need help?
Do you have a question about the Scanmaster 2 MKII and is the answer not in the manual?
Questions and answers