SMC Networks SMC7004AWBR User Manual
2.4ghz 11 mbps wireless cable/dsl broadband router with printer server
Hide thumbs
Also See for SMC7004AWBR:
- User manual (94 pages) ,
- Datasheet (2 pages) ,
- Quick installation manual (25 pages)
Table of Contents
Advertisement
Quick Links
Download this manual
See also:
User Manual
Advertisement
Table of Contents

Related Manuals for SMC Networks SMC7004AWBR


Summary of Contents for SMC Networks SMC7004AWBR
- Page 1 SMC7004AWBR...
-
Page 3: User Guide
Barricade 2.4 GHz 11 Mbps Wireless Cable/DSL Broadband Router with Print Server User Guide From SMC’s Barricade line of Broadband Routers 38 Tesla Irvine, CA 92618 April 2003 Phone: (949) 679-8000 Pub. # 01-111234-001... - Page 4 38 Tesla Irvine, CA 92618 All rights reserved. Printed in Taiwan Trademarks: SMC is a registered trademark; and Barricade is a trademark of SMC Networks, Inc. Other product and company names are trademarks or registered trademarks of their respective holders.
- Page 5 OMPLIANCES FCC - Class B This equipment has been tested and found to comply with the limits for a Class B digital device, pursuant to Part 15 of the FCC Rules. These limits are designed to provide reasonable protection against harmful interference in a residential installation.
- Page 6 “Appareils Numériques,” NMB-003 édictée par le ministère des Communications. EC Conformance Declaration - Class B SMC contact for these products in Europe is: SMC Networks Europe, Edificio Conata II, Calle Fructuós Gelabert 6-8, 2 08970 - Sant Joan Despí, Barcelona, Spain.
-
Page 7: Table Of Contents
ABLE OF ONTENTS About theWireless Barricade Router ....1 LED Indicators ........1 Features and Benefits . - Page 8 ABLE OF ONTENTS Network Address Translation (NAT) ....46 Firewall ........50 DDNS (Dynamic DNS) Settings .
-
Page 9: About Thewireless Barricade Router
Cable/DSL Broadband Router. SMC is proud to provide you with a powerful yet simple communication device for connecting your local area network (LAN) to the Internet. LED Indicators The SMC7004AWBR includes status LED indicators, as described in the following figure and table. Link/Act Speed... -
Page 10: Features And Benefits
About the Wireless Barricade Router Condition Status Link/Act The indicated LAN port has established a valid (Green) network connection. Flashing The indicated LAN port is transmitting or receiving traffic. Speed The port is transmitting or receiving traffic ar (Amber) 100 Mbps. The port is transmitting or receiving traffic at 10 Mbps. - Page 11 Features and Benefits • Firewall with client privileges, hacker prevention, and NAT (Network Address Translation) • NAT also enables multi-user access with a single-user account, and virtual server functionality (providing protected access to Internet services such as Web, FTP, mail and Telnet) •...
-
Page 12: Installing The Wireless Barricade
NSTALLING THE IRELESS ARRICADE Before installing the Wireless Barricade, verify that you have all the items listed under “Package Contents.” If any of the items are missing or damaged, contact your local SMC distributor. Also be sure that you have all the necessary cabling before installing the Wireless Barricade. -
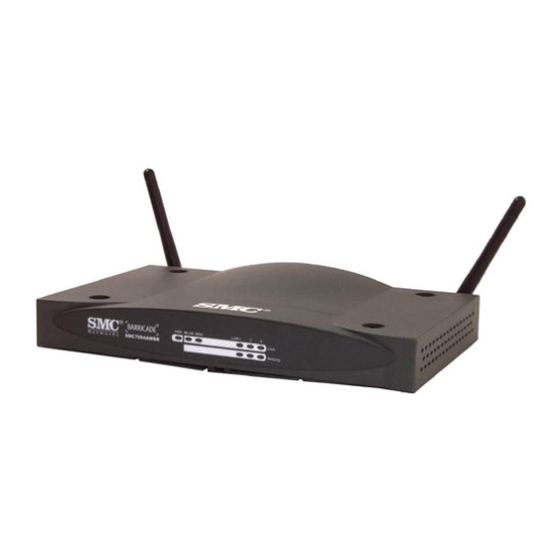
Page 13: Hardware Description
Hardware Description Hardware Description The Wireless Barricade may be connected to the Internet or to a remote site using its RJ-45 WAN port or RS-232 serial port. It can be connected directly to your PC or to a local area network using any of the three Fast Ethernet LAN ports or through the wireless interface. - Page 14 Installing the Wireless Barricade On the rear panel, the Wireless Barricade provides: • Three RJ-45 ports for connection to a 10BASE-T/ 100BASE-TX Ethernet Local Area Network (LAN). These ports can auto- negotiate the operating speed to 10/100 Mbps, the mode to half/full duplex, and the pin signals to MDI/MDI-X (i.e., allowing these ports to be connected to any network device with straight-through cable).
- Page 15 Hardware Description The following figure shows the components of the Wireless Barricade: PWR WLAN WAN LAN 1 Link/Act SMC7004AWBR Speed RESET Printer 1 A MAX 1 A MAX Figure 1. Front and Rear Panels...
-
Page 16: System Requirements
Installing the Wireless Barricade Item Description LEDs Power, WLAN, WAN and LAN port status indicators. (See “LED Indicators” on page 1.) Wireless Dual antennas provide optimal reception by dynamically Antennas choosing the best antenna for each client. Reset Use this button to reset the power and restore the default Button factory settings. -
Page 17: Connect The System
Connect the System • For wired LAN connection, you need a computer equipped with a 10 Mbps, 100 Mbps, or 10/100 Mbps Fast Ethernet card,or a USB-to-Ethernet converter. For wireless LAN connections, each computer must have an IEEE 802.11b compatible wireless adapter. •... - Page 18 3. Connect your printer: Use standard parallel printer cable to connect your printer to the printer port on the Wireless Barricade. 4. Power on: Connect the power adapter to the Wireless Barricade. Internet Internet Access SMC7004AWBR Device Wireless Broadband Router Link Acti vity N WAN 004 AW...
-
Page 19: Configuring Client Tcp/Ip
ONFIGURING TCP/IP LIENT If you have not previously installed the TCP/IP protocols on your client PCs, refer to the following section. If you need information on how to configure a TCP/IP address on a PC, refer to “Setting Up TCP/IP” on page 13. Installing TCP/IP Windows 95/98/Me 1. -
Page 20: Windows 2000
Configuring Client TCP/IP 5. Select Microsoft in the manufacturers list. Select TCP/IP in the Network Protocols list. Click the OK button to return to the Network window. 6. The TCP/IP protocol will be listed in the Network window. Click OK. The operating system may prompt you to restart your system. -
Page 21: Setting Up Tcp/Ip
Setting Up TCP/IP 4. Double-click Protocol. 5. Choose Internet Protocol (TCP/IP). Click the OK button to return to the Network window. 6. The TCP/IP protocol will be listed in the Network window. Click OK to complete the installation procedure. Setting Up TCP/IP To access the Internet through the Wireless Barricade, you must configure the network settings of the computers on your LAN to use the same IP subnet as the Wireless Barricade. -
Page 22: Configuring Your Computer In Windows 95/98/2000/Me
Configuring Client TCP/IP Subnet Mask: 255.255.255.0 Note: These settings may be changed to suit your network requirements, but you must first configure at least one computer as described in this chapter to access the Wireless Barricade’s Web configuration interface.See “Configuring the Wireless Barricade” on page 25 for information on configuring the Wireless Barricade.) If you have not previously configured TCP/IP for your computer, refer to“Configuring Client TCP/IP”... - Page 23 Setting Up TCP/IP 3. On the Network window Configuration tab, double-click the TCP/IP entry for your network card. 4. Click the IP Address tab. 5. Click the “Obtain an IP address “option. 6. Next click on the Gateway tab and verify the Gateway field is blank.
- Page 24 Configuring Client TCP/IP 8. On the Network Properties Window, click the OK button to save these new settings. Note: Windows may ask you for the original Windows installation disk or additional files. Check for the files at c:\windows\options\cabs, or insert your Windows CD-ROM into your CDROM drive and check the correct file location, e.g., D:\win98, D:\win9x.
- Page 25 Setting Up TCP/IP 192.168. 2.1. These values confirm that your Wireless Barricade is functioning. Click OK to close the IP Configuration window. Configuring Your Computer in Windows NT 4.0 1. From the Windows desktop click Start/Settings/Control Panel. 2. Double-click the Network icon.
- Page 26 Configuring Client TCP/IP 5. Click on the IP Address tab. 6. In the Adapter drop-down list, be sure your Ethernet adapter is selected. 7. Click on “Obtain an IP address from a DHCP server”. 8. Click OK to close the window. 9.
- Page 27 Setting Up TCP/IP 3. Type IPCONFIG /RENEW and press the <ENTER> key. Verify that your IP Address is now 192.168.2.xxx, your Subnet Mask is 255.255.255.0 and your Default Gateway is 192.168.2.1. These values confirm that the Wireless Barricade is functioning. 4.
- Page 28 Configuring Client TCP/IP 3. Locate and double-click the Local Area Connection icon for the Ethernet adapter that is connected to the Wireless Barricade. When the Status dialog box window opens, click the Properties button. 4. In the Local Area Connection Properties box, verify the box next to Internet Protocol (TCP/IP) is checked.
- Page 29 Setting Up TCP/IP 2. Locate and double-click the Local Area Connection icon for the Ethernet adapter that is connected to the Wireless Barricade. Next, click the Properties button. 3. In the Local Area Connection Properties box, verify the box next to Internet Protocol (TCP/IP) is checked. Then highlight the Internet Protocol (TCP/IP), and click the Properties button.
- Page 30 Configuring Client TCP/IP 2. In the TCP/IP dialog box, make sure that Ethernet is selected in the Connect Via: field. 3. Select Using DHCP Server in the Configure field. Manual IP Configuration 1. Check Specify an IP address on the IP Address tab.
- Page 31 Setting Up TCP/IP 2. In the Gateway tab, add the IP address of the Wireless Barricade (default: 192.168.2.1) in the New gateway field and click Add. 3. On the DNS Configuration tab, add the IP address for the Wireless Barricade and click Add.
-
Page 32: Verifying Your Tcp/Ip Connection
Configuring Client TCP/IP Verifying Your TCP/IP Connection After installing the TCP/IP communication protocols and configuring an IP address in the same network as the Wireless Barricade, use the Ping command to check if your computer has successfully connected to the Wireless Barricade. The following example shows how the Ping procedure can be executed in an MS-DOS window. -
Page 33: Configuring The Wireless Barricade
ONFIGURING THE IRELESS ARRICADE The Wireless Barricade can be configured by any Java-supported browser including Internet Explorer 4.0 or above, or Netscape Navigator 5.0 or above. Using the Web management interface, you can configure the Wireless Barricade and view statistics to monitor network activity. Note: NOTE: Before you attempt to configure your router, if you have access to the Internet please visit... -
Page 34: Disable Proxy Connection
Configuring the Wireless Barricade Disable Proxy Connection You will also need to verify that the HTTP Proxy feature of your web browser is disabled. This is so that your web browser will be able to view the Wireless Barricade configuration pages. The following steps are for Internet Explorer and for Netscape. -
Page 35: Netscape (4 Or Above)
Netscape (4 or above) Netscape (4 or above) 1. Open Netscape. Click Edit, and then select Preferences. 2. In the Preferences window, under Category, double-click Advanced, then select the Proxies option. 3. Check “Direct connection to the Internet.” 4. Click the OK button to save the changes. To access the Wireless Barricade’s management interface, enter the SMC Barricade Wireless Broadband Router IP... -
Page 36: Navigating The Web Browser Interface
Configuring the Wireless Barricade Navigating the Web Browser Interface The Wireless Barricade’s management interface features a Setup Wizard and an Advanced Setup section. Use the Setup Wizard if you want to quickly set up the Wireless Barricade for use with a cable modem or DSL modem. Advanced setup supports more advanced functions like hacker attack detection, IP and MAC address filtering, intrusion detection, virtual server setup, virtual DMZ hosts, and other... -
Page 37: Setup Wizard
Setup Wizard Setup Wizard Time Zone Click on the Setup Wizard picture. The first item in the Setup Wizard is Time Zone setup. For accurate timing of client filtering and log events, you need to set the time zone. Select your time zone from the drop-down list, and click NEXT. - Page 38 Configuring the Wireless Barricade Cable Modem After selecting Cable Modem as the Broadband Type, a message will appear stating that your data has been successfully saved. Note: Select Home to return to the home page, then select Advanced Settings/WAN to configure the required parameters.
- Page 39 Setup Wizard PPPoE Enter the PPPoE User Name and Password assigned by your Service Provider. The Service Name is normally optional, but may be required by some service providers. Leave the Maximum Transmission Unit (MTU) at the default value (1454) unless you have a particular reason to change it. Enter a Maximum Idle Time (in minutes) to define a maximum period of time for which the Internet connection is maintained during inactivity.
-
Page 40: Advanced Setup
Configuring the Wireless Barricade Advanced Setup Use the Web management interface to define system parameters, manage and control the Wireless Barricade and its ports, or monitor network conditions. The following table outlines the selections available from this program. Menu Description System Sets the local time zone, the password for administrator access, and the IP address of a PC that will be allowed to... -
Page 41: System
Advanced Setup Menu Description UPnP With Universal Plug and Play, a device can automatically dynamically join a network, obtain an IP address, communicate its capabilities, and learn about the presence and capabilities of other devices. Devices can then directly communicate with each other. This further enables peer to peer networking. - Page 42 Configuring the Wireless Barricade Sets the time zone for the Wireless Barricade. This information is used for log entries and client access control. Password Settings Use this menu to restrict access based on a password. By default, there is no password. For security reasons you should assign one before exposing the Wireless Barricade to the Internet.
-
Page 43: Wan
Advanced Setup during inactivity. If the connection is inactive for longer than the maximum idle time, it will perform system logout, and you have to login to the Web management system again. (Default: 10 minutes) Remote Management Remote Management allows a remote PC to configure, manage, and monitor the Wireless Barricade using a standard Web browser. - Page 44 Configuring the Wireless Barricade Dynamic IP The Host Name is optional, but may be required by some ISPs. The default MAC address is set to the WAN’s physical interface on the Wireless Barricade. Use this address when registering for Internet service, and do not change it unless required by your ISP.
- Page 45 Advanced Setup Point-to-Point Over Ethernet (PPPoE) Enter the PPPoE User Name and Password assigned by your Service Provider. The Service Name is normally optional, but may be required by some service providers. The MTU (Maximum Transmission Unit) governs the maximum size of the data packets.
- Page 46 Configuring the Wireless Barricade Point-to-Point Tunneling Protocol (PPTP) Point-to-Point Tunneling Protocol (PPTP) can be used to join different physical networks using the Internet as an intermediary. Using the above screen allows client PCs to establish a normal PPTP session and provides hassle-free configuration of the PPTP client on each client PC.
- Page 47 Advanced Setup Static IP Address If your Internet Service Provider has assigned a fixed IP address, enter the assigned address and subnet mask for the Wireless Barricade, then enter the gateway address of your ISP. You may need a fixed address if you want to provide Internet services, such as a Web server or FTP server.
- Page 48 Configuring the Wireless Barricade BigPond Enter your User Name and Password to configure the built-in client for the BigPond Internet service available in Australia.
- Page 49 Advanced Setup Domain Name Servers map numerical IP addresses to the equivalent domain name (e.g., www.smc.com). Your ISP should provide the IP address of one or more domain name servers. Enter those addresses in this screen. Dial-up If you are accessing the Internet via an ISDN TA or PSTN modem attached to the serial port on the Wireless Barricade,...
- Page 50 Configuring the Wireless Barricade then you must specify your account information on this screen as described below. Note: If not checked, then this connection will only be used for backup access if the primary WAN link fails • Auto Backup/Failover – If this is enabled, then if the telephone connection goes down, the router will automatically redial.
-
Page 51: Lan
Advanced Setup • LAN IP – Use the LAN menu to configure the LAN IP address for the Wireless Barricade and to enable the DHCP server for dynamic client address allocation. • Set a period for the lease time if required. For home networks this may be set to Forever, which means there is no time limit on the IP address lease. -
Page 52: Wireless Settings (Wireless)
Configuring the Wireless Barricade Wireless Settings (Wireless) To configure the Wireless Barricade as a wireless access point for wireless clients (either stationary or roaming), all you need to do is define the service set identifier (ESSID), the rates of transmission of data and of commands, the radio channel, and the encryption options. - Page 53 Advanced Setup If set to Fully Automatic, the data rate will be automatically selected. If set to Automatic 1 to 2 Mbps the data rate will automatically be selected between these values. If manually set to a specific value then the data rate is fixed at that value. Basic Rate –...
-
Page 54: Network Address Translation (Nat)
Configuring the Wireless Barricade You can automatically generate encryption keys or you can manually enter the keys. For automatic 64-bit security, you enter a passphrase that is used to create four keys and click Generate (as shown below). A passphrase may consist of up to 32 alphanumeric digits. - Page 55 Advanced Setup Address Mapping Allows one or more public IP addresses to be shared by multiple internal users. Enter the Public IP address you wish to share into the Global IP field. Enter a range of internal IPs that will share the global IP.
- Page 56 Configuring the Wireless Barricade Virtual Server If you configure the Wireless Barricade as a virtual server, remote users accessing services such as Web or FTP at your local site via public IP addresses can be automatically redirected to local servers configured with private IP addresses (LAN IP Addresses).
- Page 57 Advanced Setup The more common TCP service ports include: HTTP: 80, FTP: 21, Telnet: 23, and POP3: 110. Note: This tool can support both port ranges, multiple ports, and combinations of the two. For example: Port Ranges:100-150 Multiple Ports: 25,110,80 Combination: 25-50,80 Special Applications Some applications, such as Internet gaming, videoconferencing,...
-
Page 58: Firewall
Configuring the Wireless Barricade Specify the public port number normally associated with an application in the Trigger Port field. Set the protocol type to TCP or UDP, then enter the ports that the application requires. The ports may be in the format 7, 11, 57, or in a range, e.g., 72-96, or a combination of both, e.g., 7, 11, 57, 72-96. - Page 59 Advanced Setup Access Control Using this option allows you to specify different privileges based on IP address for the client PCs.
- Page 60 Configuring the Wireless Barricade Note: Click on Add PC and define the appropriate settings for client PC services (as shown in the following screen). MAC Filtering Table...
Need help?
Do you have a question about the SMC7004AWBR and is the answer not in the manual?
Questions and answers