Benning PV 1-1 Operating Manual
Battery-operated photovoltaic tester
Hide thumbs
Also See for PV 1-1:
- Short instructions (14 pages) ,
- Short instructions (14 pages) ,
- Short instructions (14 pages)

Related Manuals for Benning PV 1-1


Summary of Contents for Benning PV 1-1
- Page 1 Bedienungsanleitung Operating manual PV 1-1 NULL ON/OFF press 2 sec. Auto NULL 500V 250V 1000V DIN EN 62446 (VDE 0126-23), ÖVE/ÖNORM EN 62446...
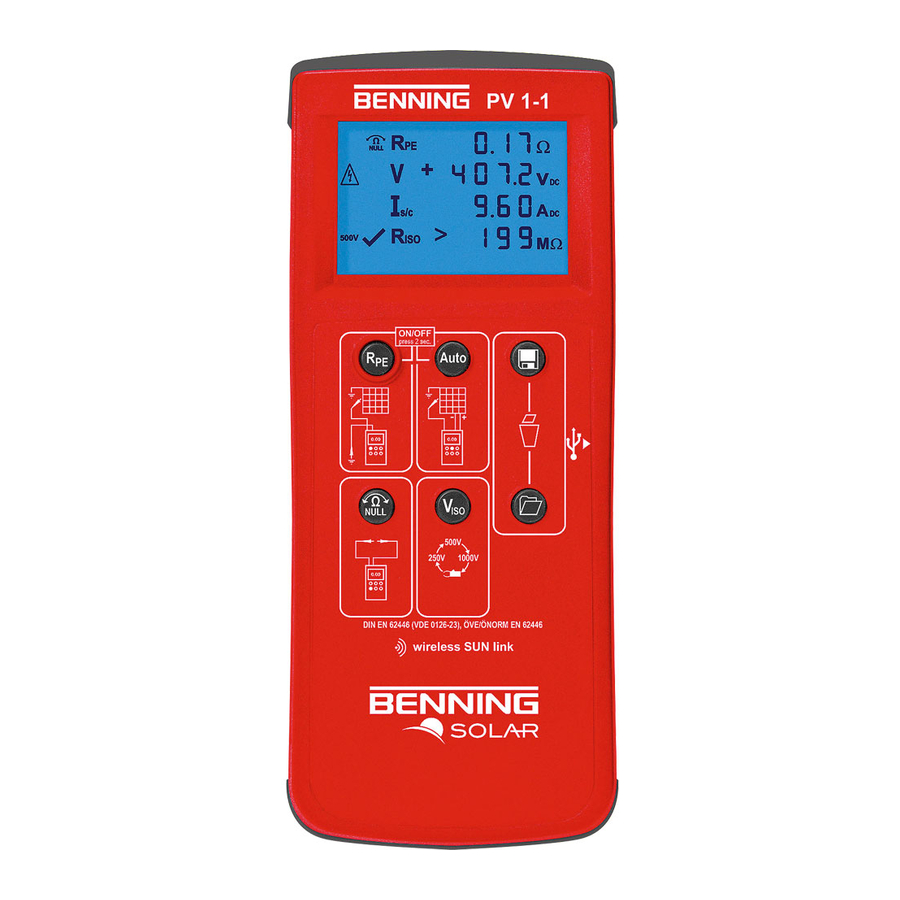
- Page 2 DIN EN 62446 (VDE 0126-23), ÖVE/ÖNORM EN 62446 Bild 1: Gerätefrontseite Fig. 1: Appliance front face CAT I CAT III 1000 V 300 V 10 A Bild 2: Geräteoberseite Fig. 2: Top side of the device BENNING PV 1-1 10/ 2013...
- Page 3 Null balance of the measuring lead for R measurement PV 1-1 PV 1-1 NULL NULL ON/OFF press 2 sec. Auto NULL 500V 250V 1000V DIN EN 62446 (VDE 0126-23), ÖVE/ÖNORM EN 62446 ON/OFF press 2 sec. Auto NULL 500V 250V 1000V BENNING PV 1-1 10/ 2013...
- Page 4 PV strings which are connected in ON/OFF press 2 sec. Auto parallel! ON/OFF press 2 sec. Auto NULL 500V 250V 1000V DIN EN 62446 (VDE 0126-23), ÖVE/ÖNORM EN 62446 NULL 500V 250V 1000V BENNING PV 1-1 10/ 2013...
- Page 5 Auto NULL 500V 250V 1000V Bild 8: AC/ DC-Strommessung mit optionalem Stromzangenadapter BENNING CC 3 Fig. 8: AC/ DC current measurement by means of optional current clamp adapter PV 1-1 BENNING CC 3 NULL DIN EN 62446 (VDE 0126-23), ÖVE/ÖNORM EN 62446...
- Page 6 D Bild 9: Funkverbindung zum optionalen Einstrahlungs- und Temperaturmessgerät BENNING SUN 2 Fig. 9: Radio connection to the optional insolation and temperature measuring instrument BENNING SUN 2 PV-Modul/ -Strang PV-module/ -string Max. P ≤ 10 kW Vo/c ≤ 1000 V Is/c ≤...
- Page 7 Internationale, nationale und gegebenenfalls regionale Vorschriften der Elektrotechnik sind in jedem Fall einzuhalten. Einschlägige Kenntnisse der Elektrotechnik werden vorausgesetzt. Das BENNING PV 1-1 ist zur Messung in trockener Umgebung vorgesehen (näheres hierzu im Abschnitt 6: Umgebungsbedingungen). In der Bedienungsanleitung und auf dem BENNING PV 1-1 werden folgende Symbole ver-...
- Page 8 BENNING PV 1-1 führen! Die PV-Prüfbuchsen 9 und J sind ausschließlich für die Kontaktierung mit PV-Generatoren (PV-Modul, PV-Strang) vorgesehen. Das Prüfgerät BENNING PV 1-1 direkt nach beendeter Prüfung vom PV-Generator trennen. Messspitzen nicht berühren! Bei Isolationswiderstandsmessungen können hohe elektrische Spannungen an den Messspitzen anliegen.
- Page 9 Ein Stück Sicherung Nennstrom 500 mA, F, 1000 V, Trennvermögen ≥ 1000 A, D = 6,3 mm, L = 32 mm (T.Nr. 749771) Das BENNING PV 1-1 benötigt sechs 1,5 V Mignon-Batterien/ Typ AA, IEC LR6 Hinweis auf optionales Zubehör: AC/ DC-Stromzangenadapter BENNING CC 3 zum Anschluss an das BENNING PV 1-1.
- Page 10 über eine Temperaturüberwachung begrenzt. Sobald die interne Betriebs temperatur den Maximalwert erreicht hat, wird die Funktion des Gerätes eingeschränkt um das Gerät abküh- len zu lassen. Trennen Sie das BENNING PV 1-1 direkt nach der Messung und auch während der Abkühlphase vom Prüfobjekt.
- Page 11 Bei Arbeitstemperatur von 31 °C bis 40 °C: relative Luftfeuchte kleiner 75 %, Lagerungstemperatur: Das BENNING PV 1-1 kann bei Temperaturen von - 25 °C bis + 65 °C (Luftfeuchte 0 bis 90 %) gelagert werden. Dabei sind die Batterien aus dem Gerät herauszuneh- men.
- Page 12 Befindet sich das BENNING PV 1-1 in Funkverbindung mit dem BENNING SUN 2, synchro- nisiert sich das Datum/ die Uhrzeit des BENNING PV 1-1 automatisch nach ca. 10 s auf das Datum/ die Uhrzeit des BENNING SUN 2, wenn eine Abweichung > 1 Min. festgestellt wird.
- Page 13 Falls die DC-Polarität fehlerhaft ist oder die DC-Spannung im Bereich von < 5 V bzw. > 1000 V liegt, ist keine automatische PV-Messung möglich. Verbinden Sie das BENNING PV 1-1 über die mitgelieferten PV-Sicherheitsmessleitungen mit dem PV-Modul bzw. dem PV-Strang.
- Page 14 -Taste 3 drücken, zur automatischen Messung des ersten PV-Strangs. Auto -Taste 8 drücken, um die Messwerte zu speichern. Verbinden Sie den nächsten PV-Strang mit dem BENNING PV 1-1 und drücken Sie die Auto -Taste 3 zum Start der automatischen Messung.
- Page 15 Datum-/ Zeitstempel) des Einstrahlungs- und Temperaturmessgerätes BENNING SUN 2 (Option) per Funk empfangen. Hierzu muss einmalig das BENNING PV 1-1 mit dem BENNING SUN 2 gekoppelt werden. Typische Funkreichweite des BENNING SUN 2 im Freigelände: ca. 30 m Gebäude-/Metallkonstruktionen oder Störsignale können die Funkreichweite verringern.
- Page 16 Fehlern bei Messungen, Erkennbaren Folgen von längerer Lagerung unter unzulässigen Bedingungen und Erkennbaren Folgen von außerordentlicher Transportbeanspruchung. In diesen Fällen ist das BENNING PV 1-1 sofort abzuschalten, von den Prüfstellen zu entfernen und gegen erneute Nutzung zu sichern. 9.3 Reinigung Reinigen Sie das Gehäuse äußerlich mit einem sauberen und trockenen Tuch (Ausnahme spezi-...
- Page 17 Batterie-/ Sicherungswechsel Hinweis: Die PV-Prüfbuchsen 9 + J des BENNING PV 1-1 sind durch eine 15 A / 1000 V Solar-Siche- rung geschützt. Diese Sicherung ist nicht durch den Anwender austauschbar. Wenn die Solar- Sicherung durch Überlastung zerstört wird, zeigt das BENNING PV 1-1 einen Fehlercode an.
-
Page 18: Table Of Contents
Always observe international, national and - if applicable - regional regulations of electrical engi- neering. Relevant skills of electrical engineering are absolutely required. The BENNING PV 1-1 is intended for making measurements in dry environment (More details in chapter 6. “Environmental conditions”). -
Page 19: Safety Note
Via the 4 mm safety test leads, voltage measurements on mains supply circuits are possible. Via the 4 mm test sockets K and L, the BENNING PV 1-1 must be used only in electric circuits of overvoltage category III with max. 300 V AC/ DC for phase-to-earth measurements. -
Page 20: Scope Of Delivery
Note on optional accessories: AC/ DC current clamp adapter BENNING CC 3 for connection to the BENNING PV 1-1. The measured AC/ DC current values can be stored in the memory of the BENNING PV 1-1 and can be recalled (part no. 044038). -
Page 21: General Information
The BENNING PV 1-1 is intended for electrical safety tests according to VDE 0126-23 (DIN EN 62446). The BENNING PV 1-1 is not intended for continuous use. The BENNING PV 1-1 use is lim- ited in use by delays in the firmware and also has temperature measuring circuits. If the inter- nal temperature reaches the set limits then functionality will be reduced in order to allow the BENNING PV 1-1 to cool down. -
Page 22: Electrical Specifications
Before starting the BENNING PV 1-1, always check the device, the leads and the test object for damages. 8.1.1 Switching the BENNING PV 1-1 ON/ OFF Press and hold the keys 2 and 3 for approx. 2 seconds to switch the BENNING PV 1-1 on. BENNING PV 1-1 10/ 2013... - Page 23 BENNING PV 1-1 will be synchronized automatically after 10 seconds to the date/ time of the BENNING SUN 2, if the device detects a deviation of more than 1 minute. BENNING SUN 2 (master) → BENNING PV 1-1 (slave).
- Page 24 In case DC polarity is wrong or DC voltage is within the range of < 5 V or > 1000 V, it is not possible to make an automatic PV measurement. Connect the BENNING PV 1-1 to the PV module or the PV string by means of the enclosed PV safety measuring leads.
- Page 25 8.5 Current measurement by means of optional AC/ DC current clamp adapter BENNING CC 3 (part no. 044038) By means of the optional AC/ DC current clamp adapter BENNING CC 3, the BENNING PV 1-1 can be used to measure the operating current of a PV system. The determined current values can be stored in the internal memory of the BENNING PV 1-1 and can be recalled.
-
Page 26: Maintenance
/ time stamp of the BENNING SUN 2. If the BENNING PV 1-1 is outside the radio range of the BENNING SUN 2, the "W/m²" sym- bol on the LC display starts flashing. Moreover, "_ _ _ _" is shown on the LC display, if the measured insolation value is outside the measuring range. - Page 27 9.6 "Calibration" for the address. 9.2 Securing the instrument Under certain circumstances safe operation of the BENNING PV 1-1 is no longer ensured, for example in the case of: Visible damage of the casing. Incorrect measurement results.
-
Page 28: 10. Environmental Notice
BENNING PV 1-1. Danger of electric shock! The 4 mm test sockets K + L of BENNING PV 1-1 are protected against overload by means of one built-in fuse (500 mA, 1000 V, F, D = 6.3 mm, L = 32 mm) (P.no.749771). - Page 29 Benning Elektrotechnik & Elektronik GmbH & Co. KG Münsterstraße 135 - 137 D - 46397 Bocholt Phone: +49 (0) 2871 - 93 - 0 • Fax: +49 (0) 2871 - 93 - 429 www.benning.de • E-Mail: duspol@benning.de...
Need help?
Do you have a question about the PV 1-1 and is the answer not in the manual?
Questions and answers