Table of Contents
Advertisement
User Manual for your
KF24.1
60 cm Induction hob
NOTE
: This User Instruction Manual contains important
information, including safety & installation points, which will
enable you to get the most out of your appliance. Please keep it
in a safe place so that it is easily available for future reference; for
you or any person not familiar with the operation of the appliance.
GS 09/12/10
Advertisement
Table of Contents

Subscribe to Our Youtube Channel
Related Manuals for Smeg KF24.1


Summary of Contents for Smeg KF24.1
- Page 1 User Manual for your KF24.1 60 cm Induction hob NOTE : This User Instruction Manual contains important information, including safety & installation points, which will enable you to get the most out of your appliance. Please keep it in a safe place so that it is easily available for future reference; for you or any person not familiar with the operation of the appliance.
- Page 2 For future reference please record the following information which can be found on the Rating Plate and the date of purchase which can be found in the invoice: Model Number ……………………. Serial Number ……………………. Date of Purchase ……………………. Supplier …………………….
-
Page 3: Table Of Contents
CONTENTS Environmental note Important safety information 5 – 8 Specifications Electrical details Ceramic hob surface layout Control panel layout Using the ceramic hob Before first use Touch controls Turning the hob on Turning on a zone and setting a power level 11 - 12 Turning off a zone gradually Turning off a zone instantly... -
Page 4: Environmental Note
Environmental note... -
Page 5: Important Safety Information
o The packaging materials used are environmentally friendly and can be recycled. o Please discard all packaging material with due regard for the environment. Important safety information Your safety is of the utmost importance to Applico. Please make sure that you read this instruction booklet before attempting to install or use the appliance. - Page 6 o You should not store or place flammable or highly flammable liquids/materials on top of or near the appliance. Items made from aluminium, plastic or plastic film should also be kept away from the appliance, as they may fuse to the surface. o Repairs may only be carried out by an Authorised Service Agent.
- Page 7 Care should be taken when utilising the appliance, otherwise there is a risk of burns being caused. o You should not allow the electrical connection cables to come into contact with the hob surface when it is hot or any hot cookware.
- Page 8 Installation This appliance must be correctly installed by a suitably qualified person, strictly in accordance with the manufacturer’s instructions. Please see the specific section of this booklet that refers to installation. Applico Ltd. declines any responsibility for injury or damage, to person or property, as a result of improper use or incorrect installation of this appliance.
- Page 9 o Food or liquid that has high sugar content may damage the hob top, if it comes into contact with the ceramic hob surface. Any spillages should be wiped up immediately, however this may not prevent the hob surface from becoming damaged.
-
Page 10: Specifications
Specifications Product dimensions: Aperture dimensions: Height: 510 mm Height: 495 mm Width: 580 mm Width: 565 mm Depth: 54 mm Product specifications: o 2 x 2.30 kW induction zone (diametre 200 mm) o 2 x 1.40 kW induction zone (diametre 160 mm) o Front touch control operation o Timer o Auto pan detection... -
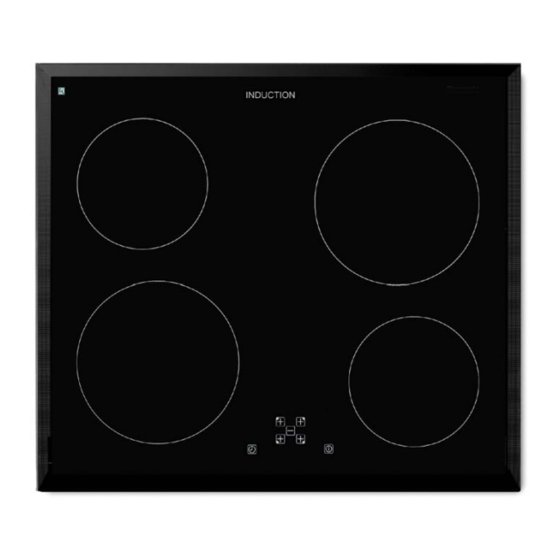
Page 11: Ceramic Hob Surface Layout
Mains Supply Lead: 3 core x 6 mm² (not supplied) Ceramic hob surface layout Control panel layout ON/OFF button Zone selection buttons Cooking zone indicators Minus button Plus buttons Decimal point symbol Timer button Timer display Timer + zone neons... -
Page 12: Using The Ceramic Hob
Using the ceramic hob Before first use IMPORTANT: You should clean the ceramic hob surface (see “Cleaning and maintenance” section). o You should switch on one cooking zone at a time, for 5 minutes at the maximum setting. This will help to eliminate any new smell that exists and evaporate any humidity that has formed on the heating elements during transit. -
Page 13: Turning Off A Zone Gradually
IMPORTANT: A zone must be selected within 10 seconds of turning the hob on. o Press the zone selection button (2) of the cooking zone that you want to use. o A decimal point symbol (6) will appear in the cooking zone indicator (3) of the zone that you have selected. -
Page 14: Turning Off A Zone Instantly
o Press the minus button (4) until the number in the cooking zone indicator reaches “0”. After 3 seconds, the zone will switch off automatically. o An “H” will show in the cooking zone indicator (3) until the temperature of the zone falls below 60°C (see the section on the “residual heat indicator”... -
Page 15: Residual Heat Indicator
It is possible to turn the hob off at any time by pressing the ON/OFF button (1). Residual heat indicator o After a zone is switched off, the corresponding cooking zone indicator (3) will show the letter “H”. This means that the temperature of the zone is over 60°C and is therefore still high enough to cause injury. -
Page 16: Cookware That Is Suitable For An Induction Hob
o If a cooking zone is selected but no pan is detected, the pan sensor system will check for the presence of a pan approximately every 2 seconds. o You should check that your pans are suitable for use on an induction zone hob (see the pan manufacturer’s trademark or instructions). -
Page 17: Switching On The Safety Lock
o After 10 seconds, the audible signal will cease but “ER03” will remain on the display until the object is removed from the control panel. o If any of the hob zones are still hot, then the “ER03” code will alternate with the letter “H”. -
Page 18: Switching Off The Safety Lock Temporarily
o When the safety lock feature is activated, it will disable all of the other buttons on the control panel, except the ON/OFF button (1). o If you turn off the appliance whilst the safety lock is activated, the next time that you turn the hob on, the safety lock will still be engaged. -
Page 19: Safety Cut-Out
Safety cut-out o If one or more of the cooking zones are accidentally left on, a safety cut out will activate after a certain period of time. The length of time depends on the power level that a zone or zones have been set on. - Page 20 o Press the zone selection button (2) of the cooking zone that you want to set for automatic pre-heating. o A decimal point symbol (6) will appear in the cooking zone indicator (3) of the zone that you have selected. The decimal point symbols (6) will disappear from the other cooking zone indicators (3).
-
Page 21: Increasing The Power Level During Automatic Pre-Heating
Increasing the power level during automatic pre-heating It is possible to increase the power level that the hob will cook at, even if automatic pre-heating has already commenced. o Press the zone selection button (2) of a cooking zone that is already set for automatic pre-heating. -
Page 22: The Hob Timer (Switching A Zone Off)
o Turn on the hob using the ON/OFF button (1) and then press the timer button (7). The timer display (8) will show “00”. Use the timer button (7) to adjust the countdown time shown on the timer display (8). o Once the timer button (7) is released, the countdown will start immediately. -
Page 23: Cooking Zone Temperature Control
o If the temperature sensor records a temperature that is above 105°C, it will reduce the power of the cooking zone. o If the temperature sensor records a temperature that is above 120°C, the cooking zone will be switched off and the corresponding cooking zone indicator will show the error code o IMPORTANT: If the hob temperature sensor consistently reduces the power of the cooking zones or shows the error code... -
Page 24: Configuration Menu
Prior to introduction of the configuration all pots and pans must be removed from the cooking zone and a pan suitable for induction should be available. Within 2 minutes after voltage application the configuration can be initiated. The Touch control remains switched off. ... -
Page 25: Hob Guidelines
Hob guidelines o The first few times the hob top is used, it may give off an acrid, burning smell. This smell will disappear completely with repeated use. o The hob surface is fitted with cooking areas of different diametre and power. -
Page 26: Cleaning And Maintenance
o IMPORTANT: The hob surface is tough; however it is not unbreakable and can be damaged. Especially if pointed or hard objects are allowed to fall on it with some force. o DO NOT USE THE HOB IF THE SURFACE BECOMES BROKEN OR CRACKED. -
Page 27: Cleaning Table
Cleaning table Type of deposit Remove Remove What should I immediately? when the use to remove appliance the deposit? has cooled down? Sugar or Ceramic hob food/liquid scraper containing sugar Tin foil or plastic Ceramic hob scraper Fat splashes Ceramic hob cleaner Metallic Ceramic hob... -
Page 28: Using A Specialist Ceramic Hob Cleaner
Using a specialist ceramic hob cleaner It is possible to purchase a specialist ceramic hob cleaner/conditioner. You should follow the instructions given by the manufacturer of the specialist ceramic hob cleaner. You should ensure that it is suitable for use on your appliance. Installation The installation must be carried out by a suitably qualified person, in accordance with the current... -
Page 29: Unpacking The Appliance
o If the hob is positioned so that the right or left hand side of the appliance will be near to the edge of a kitchen unit. There must be a gap of at least 150 mm between the side of the hob and the vertical surface of the kitchen unit. -
Page 30: Installing The Appliance
Installing the appliance o Cut a hole in the worktop that corresponds with the drawings shown above. - Page 31 o The flush-mounted cook tops are designed for installation in work tops made of all kinds of material, providing they can withstand a temperature of 100°C, and are between 25 and 40 mm thick. If the cook top is installed in a position so that the side of a kitchen unit comes up against its left-hand or right- hand side, the distance between the vertical panel and the edge of the cook top must always be at least 150 mm.
- Page 32 o IMPORTANT: Underneath the appliance there must be a partition made of insulating material (e.g. wood). There must be a gap of at least 17 mm between the underneath of the appliance and this partition. o IMPORTANT: You must make sure that there is a 5mm gap below the underneath of the worktop at the front edge of the hob for ventilation purposes.
-
Page 33: Electrical Connection
o Place a fixing bracket (B) over the hole in each corner of the underneath of the hob. Then place a screw (C) through the hole and fixing bracket (B). Tighten the screws partially, so that the fixing brackets stay in place. IMPORTANT: Do not tighten the screws fully. -
Page 34: Connecting The Mains Supply Cable
o Cable type: H05 RRF 3 core x 6 mm² Connecting the mains supply cable o The mains terminal block is located on the underside of the hob and the terminals are accessible by removing the terminal block cover. You should remove the cover screw to access this. o The cable connections must be in accordance with the diagram located on the bottom of the hob. -
Page 35: Replacing The Mains Supply Cable
o The brass links must be positioned as marked in the diagram above and once established ALL terminal screws must be tightened down firmly. o If when the hob is first switched on, only two of the zones work, you should recheck that the terminal screws are all fully tightened between the links. -
Page 36: My Appliance Isn't Working Correctly
My appliance isn’t working correctly o The cooking zones are not functioning or will not switch * It has been more than 10 seconds since the appliance was switched on. You should switch the appliance on again, using the ON/OFF button. * The safety lock has been switched on (see the “Locking the hob top”... - Page 37 * This maybe caused by burnt on remnants of food. This will not affect the working of the appliance. However you should make sure that the cleaning instructions are being followed regularly. o Only two of the zones on my hob are working * You should recheck that the terminal screws are all fully tightened between the links.
- Page 38 This includes situations where appliances have been tiled in, sealed in with sealant, have wooden obstructions placed in front of the appliance, like plinths. Or any installation other than the one specified by Applico Ltd. has been completed.
- Page 39 WARRANTY REGISTRATION CARD THIS WARRANTY IS VALID IN NEW ZEALAND ONLY Note: d) damage to surface coatings caused by Please complete the following details when you cleaning or maintenance using products not unpack the product and return the bottom portion of recommended by the owner’s handbook;...
- Page 40 Affix stamp here Applico Ltd Warranty Department Private Bag 92-900 Onehunga Auckland...
Need help?
Do you have a question about the KF24.1 and is the answer not in the manual?
Questions and answers