Table of Contents
Advertisement
Quick Links
We advise you to read this manual carefully, which contains all the instructions for maintaining the
appliance's aesthetic and functional qualities. For further information on the product: www.smeg.com
PRECAUTIONS
General safety instructions
Risk of personal injury
• WARNING: During use the
appliance and its accessible
parts become very hot. Keep
children well away from the
appliance.
• Protect your hands by wearing
oven gloves when moving food
inside the oven.
• Never try to put out a fire or
flames with water: Turn off the
appliance and smother the
flames with a fire blanket or
other appropriate cover.
• This appliance may only be
91477A593/E
Questo manuale d'istruzione è fornito da trovaprezzi.it. Scopri tutte le offerte per
il tuo prodotto tra le
migliori offerte di Cucine e Piani cottura
31
31
35
36
36
36
36
36
37
37
37
37
37
38
38
38
39
39
39
40
40
used by children aged 8 years
and over, and by people of
reduced physical, sensory or
mental capacity, or lacking in
experience in the use of
electrical appliances, provided
that they are supervised or
have been given instructions on
the safe use of the appliance
and of the hazards associated
with it.
• Children must not play with the
appliance.
• Keep children under the age of
eight at a safe distance unless
they are constantly supervised.
• Keep children under the age of
Smeg CX90GM
o cerca
40
41
41
42
43
44
44
44
45
45
47
47
48
49
49
52
52
53
56
56
PRECAUTIONS - 31
Advertisement
Table of Contents

Related Manuals for Smeg CX90GM


Summary of Contents for Smeg CX90GM
-
Page 1: Table Of Contents
Instructions for the installer Preliminary operations We advise you to read this manual carefully, which contains all the instructions for maintaining the appliance’s aesthetic and functional qualities. For further information on the product: www.smeg.com PRECAUTIONS General safety instructions used by children aged 8 years... - Page 2 8 away from the appliance hot during use. Take care never when it is in use. to touch the heating elements • Cleaning and maintenance inside the oven(s). must not be carried out by • Do not insert pointed metal unsupervised children.
- Page 3 • DO NOT USE AEROSOLS IN for it to be replaced in order to THE VICINITY OF THIS avoid possible hazards. APPLIANCE WHILST IT IS IN • WARNING: A gas cooking USE. appliance produces heat, • DO NOT MODIFY THIS humidity and combustion APPLIANCE.
- Page 4 prevent them from being • If you wish to use greaseproof removed must face downwards paper, place it so that it will not and towards the back of the interfere with the hot air oven. circulation inside the oven. • Do not use the open door to rest pans or trays on the internal glass pane.
-
Page 5: Installation
when fitting. are shown on the gas setting • Avoid exerting too much label. pressure on the door when • Have the gas connection open. performed by authorised • Take care that no objects are personnel. stuck in the doors. •... -
Page 6: Appliance Purpose
• The tightening torque of the Manufacturer’s liability screws of the terminal supply The manufacturer declines all liability for damage to persons or property caused by: wires must be 1.5 - 2 Nm. • use of the appliance other than that •... -
Page 7: Information For European Control Bodies
Information for European Control for use in high temperature applications such as ovens. Bodies • This appliance contains light sources of Fan forced mode efficiency class "G". the ECO function used to define the energy How to read the user manual efficiency class complies with the specifications This user manual uses the following reading of European standard EN 60350-1. -
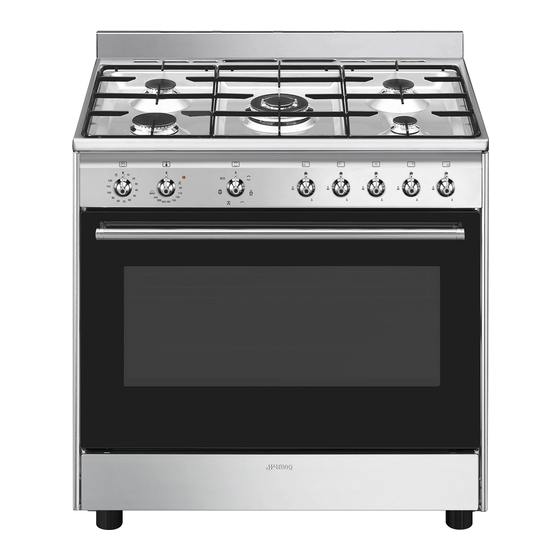
Page 8: Description
DESCRIPTION General description 1 Upstand (on some models only) 5 Seal 2 Hob 6 Door 3 Control panel 7 Fan 4 Oven light Frame shelf AUX = Auxiliary Burner SR = Semi-rapid Burner R = Rapid Burner UR-3c = Ultra Rapid Burner 38 - DESCRIPTION 91477A593/E... -
Page 9: Control Panel
Control panel 1 Minute minder knob the appliance and which may continue for a brief period of time even after the appliance has Allows you to set manual cooking or a minute been turned off. minder timer with automatic oven switch-off at the end of cooking. -
Page 10: Use
Rack Deep tray To be placed over the top of the oven tray; for Useful for collecting fat from foods placed on cooking foods which may drip. the rack above. Preliminary operations the oven cavity. See General safety instructions. • Remove any protective film from the outside or inside of the appliance, including accessories. -
Page 11: Using The Hob
igniters and thermocouples. Practical tips for using the hob For better burner efficiency, to minimise gas consumption and prevent damage to the cooking hob, use pans with lids and of suitable size for the burner, so that the flames do not reach up the sides of the pan. -
Page 12: Cooking Advice
STATIC VAPOR CLEAN (on some models only) Traditional cooking, ideal for preparing This function facilitates cleaning using a single dish. For example cooking the steam produced by a small amount roast meats, fatty meats, bread, pies. of water poured onto the depression on the bottom. -
Page 13: Cooking Information Table
set temperature by about 10°C, selecting a • Avoid overlapping the food. longer cooking time if necessary. • To defrost meat, use the rack placed on the second level and a tray on the first level. In Advice for cooking on two shelves: this way, the liquid from the defrosting food •... -
Page 14: Cleaning And Maintenance
Weight Temp. Time Food Function Shelf (Kg) (°C) (minutes) Pork fillet FAN WITH GRILL Beef fillet GRILL Salmon trout TURBO/CIRCULAIRE 150 - 160 35 - 40 Monkfish TURBO/CIRCULAIRE 60 - 65 Turbot TURBO/CIRCULAIRE 45 - 50 Pizza TURBO/CIRCULAIRE 8 - 9 Bread CIRCULAIRE 190 - 200... -
Page 15: Knobs
lukewarm water and non-abrasive detergent. Cleaning the door Make sure to remove any encrustations. Dry Door disassembly them thoroughly and return them to the hob. For easier cleaning it is recommended to The continuous contact between the remove the door and place it on a tea towel. pan supports and the flame can cause To remove the door proceed as follows: modifications to the enamel over time in... - Page 16 Removing the internal glass panes glass For easier cleaning the internal glass panes of the door can be removed. 1. Open the door and lock it with the appropriate pins. 2. Remove the internal glass pane by pulling the rear part gently upwards, following the movement indicated by the arrows 1.
-
Page 17: Cleaning The Oven Cavity
8. Be sure to fit the 4 pins of the inner glass well slide it out of the seats B at the back. into their seats on the door. • When cleaning is complete, repeat the above procedures to put the rack/tray support frames back in. -
Page 18: Extraordinary Maintenance
Vapor Clean cycle setting 2. Remove the rack/tray support frames. 3. Use a tool (e.g. a spoon) to remove the bulb 1. Turn the functions knob to symbol cover. (where present). 2. Turn the temperature knob to the symbol. 3. Allow the cleaning cycle to run for 18 minutes. -
Page 19: Installation
INSTALLATION The inside diameter of the hose must be The appliance must be installed by a 8 mm for LPG and 13 mm for Natural qualified technician and according to gas and Town gas. the regulations in force. Make the connection to the gas mains using a Gas connection rubber hose whose specifications comply with current standards (verify that the reference... - Page 20 connector 1 of the appliance, placing the seal 2 Connection to LPG between them. Connection with a steel hose with bayonet fitting Carry out the connection to the gas mains using a steel hose with bayonet fitting compliant with B.S. 669. Use a pressure regulator and make the connection on the gas cylinder following the guidelines set out in the standards in force.
- Page 21 issue a certificate of conformity. Replacing nozzles 1. Remove the pan supports, burner caps and flame-spreader crowns to access the burner cups. 2. Replace the nozzles using a 7-mm wrench according to the type of gas to be used (see the “Burner and nozzle characteristics Extraction using a hood table”).
-
Page 22: Gas Types And Countries
spindle clockwise all the way. Lubricating the gas cocks Over time the gas cocks may become difficult to Following adjustment to a gas other turn and get blocked. Clean them internally and than the one originally set in the factory, replace the lubrication grease. -
Page 23: Positioning
4 Natural Gas G2.350 - 13 mbar UR-3c Rated heating capacity (kW) Nozzle diameter (1/100 mm) Pre-chamber (printed on nozzle) (F3) (H3) Reduced flow rate (W) 1600 5 LPG G30/31 - 30/37 mbar UR-3c Rated heating capacity (kW) 1.75 Nozzle diameter (1/100 mm) Pre-chamber (printed on nozzle) Reduced flow rate (W) 1600... - Page 24 Appliance overall dimensions Levelling the appliance See General safety instructions. The appliance must be level on the floor in order to ensure greater stability. After making the gas and electrical connections, screw on the four legs supplied with the appliance (1). Screw or unscrew the feet at the bottom until the appliance is stable and level on the floor (2).
- Page 25 Fastening to the wall 5. Align the base of the fastening bracket with the ground and tighten the screws to fix the measurements. The symbols above indicate the danger if the anti-tip are not installed devices and the importance of their correct installation. The anti-tip devices must be installed in order to prevent the appliance from tipping over.
-
Page 26: Electrical Connection
9. Push the cooker towards the wall, and at the Connection with plug and socket same time insert the bracket in the plate Make sure that the plug and socket are of the fastened to the rear of the appliance. same type.
Need help?
Do you have a question about the CX90GM and is the answer not in the manual?
Questions and answers