
Related Manuals for Miele FM3


Summary of Contents for Miele FM3
-
Page 1: Operating Instructions
Operating Instructions Steam Ironing System To prevent accidents and appliance damage, read these instructions before installation or use. en - US, CA M.-Nr. 10 462 410... -
Page 2: Caring For The Environment
Consult with local authorities, dealers or Miele in order to dispose of and recycle electrical and electronic appliances. Miele assumes no responsibility for deleting any personal data left on the appliance being disposed. -
Page 3: Table Of Contents
Contents Caring for the environment .................. 2 IMPORTANT SAFETY INSTRUCTIONS .............. 6 Product description..................... 13 Transport ...................... 16 Assembly...................... 17 Adjusting the height ....................18 Connection...................... 20 Plug in the power cord ..................20 Removing the iron and the steam hose holder ............. 21 Connecting the steam hose .................. - Page 4 Contents Active iron board ....................36 Suction function .................... 36 Inflation function.................... 36 Automatic switch on/off ................... 36 Memory function .................... 37 Heated ironing surface .................. 37 Steamer ........................ 38 Connecting the steamer ..................38 Using the steamer ....................40 Brush attachment....................
- Page 5 Contents Cleaning the water filter..................58 Disconnect the power supply................ 58 Removing the water container ................. 58 Removing the water filter cover................ 58 Removing the sealing ring................ 59 Pull out water filter.................... 59 Cleaning the water filter.................. 59 Inserting the water filter.................. 60 Inserting the water container................
-
Page 6: Important Safety Instructions
The steam ironing system is intended for domestic use only as de- scribed in these operating instructions. Any other use is not permitted. Miele cannot be held liable for dam- age resulting from incorrect or improper use or operation. ... - Page 7 IMPORTANT SAFETY INSTRUCTIONS Safety with children Children must be kept away from the appliance unless they are supervised. Children must be supervised in the vicinity of the steam ironing system. Do not allow children to play with it. ...
- Page 8 (lower) storage compartment. If the power cord is damaged, it must be replaced by Miele Tech- nical Service. For safety reasons this must only be fitted by a Miele authorized service technician or the Miele service department.
- Page 9 Faulty components must only be replaced by genuine Miele parts. Only when these parts are fitted can Miele guarantee the safety stan- dards of the appliance. To avoid a circuit overload, do not operate an iron on the same circuit with another high wattage appliance.
- Page 10 IMPORTANT SAFETY INSTRUCTIONS Only use the steam ironing system when all removable outer pan- els are installed so that it is not possible to touch live components or moving parts. The steam ironing system must not be used in a non-stationary lo- cation (e.g.
- Page 11 IMPORTANT SAFETY INSTRUCTIONS Use caution when the appliance is heated, if you come in contact with the soleplate of the iron or the steamer jets you could be burned. The warning symbol "Hot surface" () on the iron indicates that it is hot. ...
- Page 12 Using accessories Accessory parts may only be fitted when expressly approved by Miele. If other parts are used or fitted, any claims from the warranty, warranty and/or product liability will be invalidated. SAVE THESE INSTRUCTIONS...
-
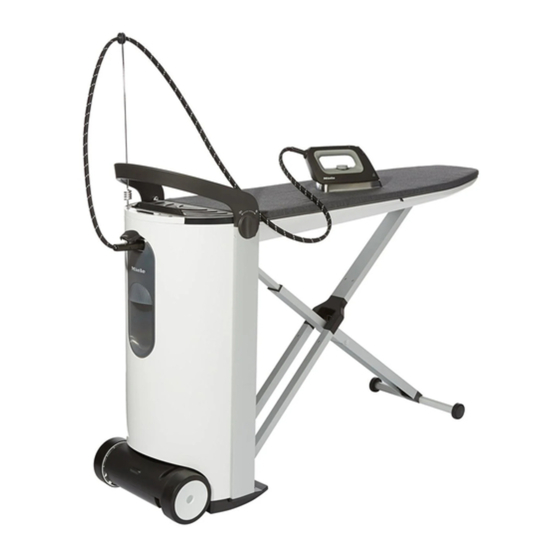
Page 13: Product Description
Product description a Ironing board i X-frame for the ironing board b Iron with steam hose j Iron resting surface c Steam hose holder k Power cord d Handle l Storage compartment (lower) For the power cord, the steamer*, the e Water container non-stick soleplate, and the holder for the power cord. - Page 14 Product description Tower Tower (top view) with open storage com- partment (top) a Rotary dial for height adjustment d Steam hose holders and dismantling the appliance e Control panel b Iron resting surface f Steam hose holder c Steam connection g Iron with steam hose...
- Page 15 Product description Some of the messages in the display are more than one line long. Touch the or button to read them in full. Control panel on tower h On/Off button Switches the steam ironing system on or off. i Display Displays messages and instructions for the user.
-
Page 16: Transport
Transport The steam ironing system is fitted with two wheels. This allows the appliance to be pulled across an even surface when folded up. When transporting the appliance, use both handles on the underside of the appliance. The steam ironing system must only be transported or lifted when ... -
Page 17: Assembly
Assembly Take the steam ironing system to its set up location. Use both hands to pull the ironing board upwards into a horizontal posi- tion until this audibly clicks into place Use one hand to pull the release on both sides of the tower. -
Page 18: Adjusting The Height
Assembly Adjusting the height The steam ironing system can be ad- justed to suit your personal preference. The maximum working height is 40¼" (102 cm). When adjusting the height, ensure the power cord does not become trapped in the mechanism. The steam ironing system is now as- sembled. - Page 19 Assembly At the same time, pull the handle on the tower upwards with the other hand up or press the handle down. Do not push down on the ironing board while adjusting the height! Always use the handle on the tower to do this.
-
Page 20: Connection
Connection Plug in the power cord The steam ironing system is designed for the connection to a properly in- stalled grounded socket for AC 120 V, 15 A, 60 Hz. Guide the power cord through the groove in the cover. Close the (lower) storage compart- ment. -
Page 21: Removing The Iron And The Steam Hose Holder
Connection Removing the iron and the The steam ironing system is suitable steam hose holder for right- or left-handed people. The operation is optimized for both sides. Connecting the steam hose Lift the lid of the steam connection. Open the lid of the storage compart- ment (upper) on the tower. - Page 22 Connection Do not place the iron in its up- right position! It can easily tip over or fall to the floor. Always place the iron onto the rest- ing surface with its soleplate down. If the iron remains on the resting surface for any length of time, the surface will become hot.
-
Page 23: Before First Use
Before first use Before using the steam ironing sys- Using the test strips to determine the tem for the first time, remove all water hardness packaging (e.g., the protective foil from the tower). Determining the water hard- ness To ensure the steam ironing system will function properly and the descaling re- minder appears at the appropriate time, the appliance must be set to the water... -
Page 24: Before Using For The First Time
Before first use Language setting Before using for the first time The following steps must be carried out before using the appliance for the first time: english (GB) Switch on the steam ironing system Use the arrow buttons or to select your preferred language setting. -
Page 25: Setting The Water Hardness Level
Before first use Setting the water hardness level Level 7 Set water hardness... Use the arrow buttons or on the control panel to set the water hard- Before the water hardness can be set, ness level in your household. the display message Set water hard- must be acknowledged by press- Tip: If the water hardness is fluctuating... -
Page 26: The Steam Ironing System Is Now Set Up For Use
Before first use The steam ironing system is now set up for use This completes the settings for using the appliance for the first time. The message Initial set-up complete will ap- pear in the display. Confirm this mes- sage by pressing the OK button. -
Page 27: Switching On The Appliance
Switching on the appliance Switch on the steam ironing Depending on the operating duration, system immediately after switching the ap- pliance on, the automatic rinse func- tion can be started (see "Automatic rinsing") or you may start the descal- ing process (see "Descaling"). While the rinse and descaling pro- cesses are running, the steam ironing system is not available for ironing. -
Page 28: Filling The Water Container
Switching on the appliance Filling the water container Filling the water container If the water container is empty or not installed in the tower, the message Insert or refill the water container displayed. Removing the water container Open the twist lock at the rear of the water container by turning the lock counterclockwise. -
Page 29: Steam Operation
Switching on the appliance Steam operation Water quality Use only fresh tap water. Water prepared using commercially available water filters may also be Ready used. For water hardness of more than 15 gpg (14°dH) you can use tap water mixed at After inserting the water container, wait a 1:1 ratio with distilled water. -
Page 30: Selecting The Ironing Temperature
Switching on the appliance Selecting the ironing tempera- The temperature level Delicate/Syn- ture thetic (low temperature) indicates a temperature of the iron plate that is too low to iron with steam. If you use this temperature level, do not use the ... - Page 31 Switching on the appliance Care label Ironing with steam for best re- Ironing without steam (on the garment) sults (Material / Temperature setting) (Material / Temperature setting) With non-stick soleplate Minimum iron, synthetics Low temperature (see "Ironing with non-stick iron soleplate") Minimum iron, synthetics, ap- pliqués, prints, flocking, etc.
-
Page 32: Cooldown Function
Switching on the appliance CoolDown Function Auto Off function If the iron or the steamer is not used for approx. 25 minutes, the entire steam ironing system switches off automati- Iron switched off cally. The iron will switch off automatically, if it has not been moved for more than 3 minutes. -
Page 33: Ironing
Slider for constant steam c "Power output" button d "Inflation/suction button" a "Steam" button Irons supplied with previous Miele b Slider for constant steam steam ironing systems (B 1xxx/B 2xxx) cannot be used with this appliance. c "Suction" button ... -
Page 34: Ironing With Steam
Ironing Ironing with steam The continuous bursts of steam must be finished before the iron is put The steam of your ironing system is back on the resting surface! ready to be used if the Ready If the steam button was not unlocked shown in the display. -
Page 35: Ironing Without Steam
Ironing Attaching the non-stick soleplate Ironing without steam Place the tip of the iron inside the Remove the water container from the non-stick soleplate. steam ironing system if you would like to iron without steam. This will not heat the steam generator, which also saves energy at the same time. -
Page 36: Removing The Non-Stick Soleplate
Ironing Removing the non-stick soleplate Active iron board Hold the handle of the iron. The steam ironing system uses a fan that sucks away the steam or uses the The non-stick soleplate is still inflation function to inflate the ironing very hot after ironing! board for optimum positioning while Avoid direct contact with it. -
Page 37: Memory Function
Ironing Memory function Fan control for the B 3847: The memory function saves the fan di- rection and the power setting used last with your steam ironing system. When you use the appliance the next time, you do not need to set it again. Heated ironing surface When the iron is connected and the ap- pliance is switched on, the surface of... -
Page 38: Steamer
Steamer Connecting the steamer The B 3847 steam ironing system is equipped with a steamer in addition to You can also plug the steamer into the the iron. The steamer is available as steam connection of the ironing sys- an optional accessory for the B 3312 tem as an alternative to the iron. - Page 39 Steamer Attaching the steamer to the steam You can at any time plug the iron into connection the steam connection as an alterna- tive to the steamer. You do not need to switch off the steam ironing system to do this. After switching between the iron and the steamer, there is a short interval be- fore the steam is ready.
-
Page 40: Using The Steamer
Steamer Use short bursts of steam Using the steamer Briefly press the button. Danger of burning due to hot Then release the button again. steam! Never direct the steam or the steam Using steam jets at people, animals or electrical ... -
Page 41: Brush Attachment
Steamer Brush attachment The steamer comes with a brush at- tachment which can be clipped on. The brush attachment helps to raise the fibers. You can hold the steamer directly onto the fabric while the brush at- tachment is in place. Always try it first on an inconspicu- ous part of the fabric. -
Page 42: Switching Off
Switching off To switch off the steam system, press the button on the control panel. The illuminated button goes out. The steam system is now switched off. The last selected fan settings are saved and are available for the next time you Storage compartment (lower) switch on the steam ironing system. -
Page 43: Dismantling
Dismantling Set the ironing board at its lowest working height To dismantle the steam ironing sys- tem, the ironing board must first be placed at its lowest working height. Make sure you do not trap the power cord in the system. Ensure the residual water container is completely emptied, pushed in and locked in place. -
Page 44: Folding The Ironing Board
Dismantling Folding the ironing board Push the ironing board up by the ta- pered end until it is upright and locks Turn one of the two rotary dials to the into position on the tower. position as far as it will go. The ironing board is now unlocked. -
Page 45: Disconnecting The Steam Hose
Dismantling Disconnecting the steam hose Storing the iron Do not pull on the steam hose! The iron soleplate is still very hot Hold the plug at the end of the steam after use! hose. The plug may still be warm im- Avoid direct contact with it. -
Page 46: Emptying The Water Container
Dismantling Emptying the water container Storing the steam ironing sys- Empty the water container if the steam ironing system will not be used for a long period of time. Take the appliance to its storage place. Do not store the appliance in a room ... -
Page 47: Cleaning And Care
Cleaning and care Draining the residual water container Automatic rinsing After the rinsing process is completed, The automatic rinse function clears the residual water container must be the steam generator of mineral de- emptied. The message Empty posits from the evaporated water. drawer appears in the display on the After approx. -
Page 48: Descaling
Ready You will need 1 descaling tablet for each descaling process. Miele descaling tablets are available to order from Miele or the Miele website. (see "Optional accessories"). The ironer or steamer must not be connected during descaling. The appliance can be left unattended during descaling providing the iron or steamer is not connected. -
Page 49: Descaling Warning
Cleaning and care Descaling warning Follow the required procedures when prompted by the messages in the dis- Descale soon will appear in the dis- play. After starting the descaling play the next time you switch the steam process, you must be present after ap- ironing system on if there are only about prox. -
Page 50: Starting The Descaling Process Early
Cleaning and care Starting the descaling process early Descaling process The following display messages will guide you through the entire descaling process. Only proceed with the re- Ready quired action if you are prompted to do so by the appropriate message in the display. - Page 51 Cleaning and care Fill water container to the mark Add descaler Turn the twist lock on the rear of the water container counterclockwise and remove the twist lock. Hold the water container by its han- dle. Pull the handle down. Level marking on the water container The water container is released from the ...
- Page 52 Cleaning and care Insert water cont. Put the water container back into the tower. Add descaler After about 10 minutes (the time it takes for the descaling tablet to dissolve), the descaling process begins automatically. Press the OK button to display the Messages in the display will tell you next process step.
- Page 53 Cleaning and care Empty drawer Pre-rinse This message may be displayed after If the steam ironing system is still from inserting the water container with the the previous use, the cool down phase descaling tablet. If you do not see this will start first.
- Page 54 Cleaning and care Rinse water container and fill to Empty drawer the mark Remove the residual water container Pull the residual water container out from the tower. of the tower. The message Insert drawer is shown As long as the water container is not in- in the display.
- Page 55 Cleaning and care Empty drawer Descale Remove and empty the residual water After an activation period of approx. 1 hour, the descaling solution is drained container. from the steam generator into the resid- The message Insert drawer is now ual water container.
-
Page 56: Cleaning The Housing
Cleaning and care To avoid damaging the surface of the Cleaning the housing soleplate, do not use the following Before cleaning the casing, the cleaning agents: power cord must be removed from – abrasive cleaning agents, (e.g., pow- the wall socket! der cleaners and cream cleaners, chrome polish, eraser sponges). -
Page 57: Cleaning Or Replacing The Ironing Board Cover
Cleaning and care Wash and dry the ironing board cover Cleaning or replacing the iron- according to the care label or replace ing board cover the cover if it is damaged. If the ironing board cover is soiled, you Never use the steam ironing system can wash and dry it. -
Page 58: Cleaning The Water Filter
Cleaning and care Removing the water filter cover Cleaning the water filter The water filter prevents foreign ob- jects in the water from entering the steam ironing system and causing damage. The water filter can be cleaned if it is dirty or clogged. -
Page 59: Removing The Sealing Ring
Cleaning and care Removing the sealing ring Pull out water filter Use the hook on the water filter cover Push the round tool on the water filter to pull the sealing ring up and out of cover onto the water filter from the right-hand socket. -
Page 60: Inserting The Water Filter
If the water filter is not inserted, the Then replace the water filter cover steam ironing system will not work. over both sockets. The water filter must be replaced if it is worn or damaged. Replacement filters are available from your Miele retailer or Miele Service. -
Page 61: Optional Accessories
The separate needle felt under the sep- arate pad is steam-permeable and pleasantly cushioned. The ironing board covers can be used for any Miele steam ironing system, re- gardless of model. Basic ironing board cover The standard ironing board cover is made of 100 % cotton, and can be... -
Page 62: Steamer
Optional accessories Steamer Care products The steamer makes ironing hanging tex- The Miele care product range has been tiles easier, e.g. dresses and jackets. It developed specially to clean your appli- comes with a removable brush attach- ance thoroughly and gently. -
Page 63: Frequently Asked Questions
With the help of the following notes minor faults in the performance of the appli- ance, some of which may result from incorrect operation, can be put right without contacting Miele. Please note the following though: Repair work to electrical appliances must only be carried out by a suitably qualified person in strict accordance with current local and national safety codes. -
Page 64: Problem Solving Guide
Frequently asked questions Problem solving guide Problem Possible cause and solution The steam ironing sys- The appliance does not have any power. tem cannot be switched Check whether – the plug is inserted into the wall socket. – the fuse in your fuse panel is OK. After a power outage, The steam ironing system is switched off the steam ironing sys-... - Page 65 Then let go of the rotary dial on the side and sub- sequently release the unlocking button on the tower. Now the ironing board can either be folded away or brought into its working position. If the ironing board still will not lock into place, contact Miele service.
- Page 66 Rectify the indicated malfunction and proceed as described in the following pages (see "Display messages"). The steam ironing system is damaged. Contact Miele Service. The ironing board does Steam has not been used for a while. not heat up.
- Page 67 Put the dry ironing board cover back on (see "Cleaning or replacing the ironing board cover"). If the ironing cover gets damp again, contact Miele Service. Water is leaking from The frequent removal and replacement of the water...
- Page 68 Rectify the indicated malfunction and proceed as described in the following pages (see "Display messages"). If there is still no steam, contact Miele service. When using the steam The temperature selected on the iron is too low. button on the iron, ...
-
Page 69: Display Messages
Press the button to switch the steam ironing system back on again. The steam ironing system will attempt to correct the fault itself. If the fault message continues to be displayed, switch off at the wall socket and withdraw the plug. Contact Miele Service. - Page 70 Push the residual water container back in the tower until it clicks into place. There is a fault. If the fault message continues to be displayed, contact Miele Service. Message in the display: There is a fault. ...
- Page 71 The steam ironing system is ready for use again and continues with the process that had been started when the fault was detected. There is a fault. If the fault message continues to be displayed, contact Miele Service.
- Page 72 Press the button to switch the steam ironing system off and then back on again. F45: LNG The steam ironing system will try and rectify the fault itself. If the fault message continues to be displayed, con- tact Miele Service.
-
Page 73: Technical Service
– Your Miele dealer – Miele Technical Service The telephone number for Miele is listed at the back of these instructions. Technical service requires the model and serial number of your appliance. The information can be found on the data plate which is located on the tower behind the water container. -
Page 74: Electrical Connection
Miele’s Technical Service De- You will find the necessary connection partment. data on the data plate, which is located in the tower behind the water container. -
Page 75: Technical Data
Technical data Dismantled dimensions (H x W x D) 50 3/8" x 18 1/2" x 14 9/16" (1280 x 470 x 370 mm) Assembled dimensions (H x W x D) 38 3/16" x 18 1/2" x 58 1/4" (970 x 470 x 1480 mm) Weight 64 lb (29 kg) Voltage... - Page 79 Technical Service. U.S.A. Canada Miele, Inc. Importer Miele Limited National Headquarters 9 Independence Way Headquarters and Miele Centre Princeton, NJ 08540 161 Four Valley Drive Phone: 800-843-7231 Vaughan, ON L4K 4V8 609-419-4298 Fax: www.miele.ca www.mieleusa.com...
- Page 80 FashionMaster en - US, CA M.-Nr. 10 462 410 / 01...
Need help?
Do you have a question about the FM3 and is the answer not in the manual?
Questions and answers