Table of Contents
Advertisement
Quick Links
Advertisement
Table of Contents

Related Manuals for Tektronix ADA400A


Summary of Contents for Tektronix ADA400A
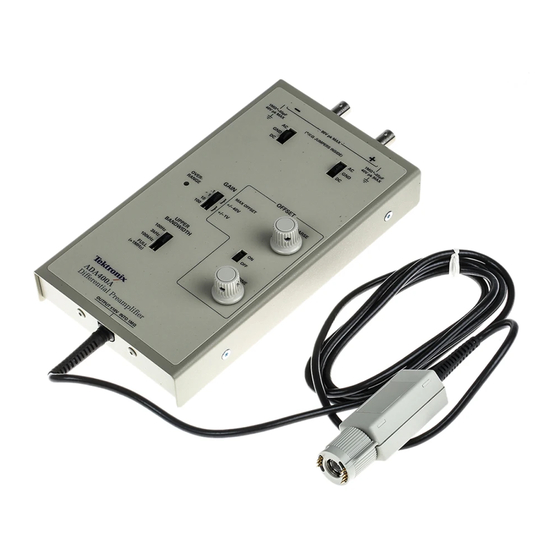
- Page 1 Instruction Manual ADA400A Differential Preamplifier 070-9164-02 Warning The servicing instructions are for use by qualified personnel only. To avoid personal injury, do not perform any servicing unless you are qualified to do so. Refer to the Safety Summary prior to...
- Page 2 Copyright © Tektronix, Inc. All rights reserved. Tektronix products are covered by U.S. and foreign patents, issued and pending. Information in this publication supercedes that in all previously published material. Specifications and price change privileges reserved. Tektronix, Inc., P.O. Box 500, Beaverton, OR 97077...
- Page 3 Tektronix, with shipping charges prepaid. Tektronix shall pay for the return of the product to Customer if the shipment is to a location within the country in which the Tektronix service center is located.
-
Page 5: Table Of Contents
........... . ADA400A Differential Preamplifier... - Page 6 Figure 20: Potentiometer Connections ......Figure 21: Diagram of the ADA400A Differential Preamplifier ..
- Page 7 Table 24: Electrical Faults ........ADA400A Differential Preamplifier...
- Page 8 Table of Contents ADA400A Differential Preamplifier...
-
Page 9: General Safety Summary
Do Not Operate With If you suspect there is damage to this product, have it inspected by qualified Suspected Failures service personnel. Do Not Immerse in Liquids Clean the instrument using only a damp cloth. Refer to cleaning instructions. ADA400A Differential Preamplifier... - Page 10 WARNING indicates an injury hazard not immediately accessible as you read the marking. CAUTION indicates a hazard to property including the product. Symbols on the Product The following symbols may appear on the product: Double DANGER Protective Ground ATTENTION Insulated High Voltage (Earth) Terminal Refer to Manual ADA400A Differential Preamplifier...
-
Page 11: Preface
Preface This manual contains both user and service information for the ADA400A Differential Preamplifier. The following is a brief overview of what each section of the manual contains. H Getting Started includes a description of the product features and a list of standard and optional accessories. -
Page 12: Contacting Tektronix
This phone number is toll free in North America. After office hours, please leave a voice mail message. Outside North America, contact a Tektronix sales office or distributor; see the Tektronix web site for a list of offices. ADA400A Differential Preamplifier... -
Page 13: Getting Started
These measurements are typical in setups that depend on transducers or other sensitive devices to supply the electrical signal. Highlights of the ADA400A Differential Preamplifier are as follows: H Selectable gains of X100, X10, X1, and X0.1 provide wide range of sensitivity. -
Page 14: Installation
TEKPROBE Interface to any oscilloscope with the TEKPROBE interface. NOTE. To avoid misleading scale factor readouts of the ADA400A Differential Preamplifier, the oscilloscope must be compatible with the scale factor coding; otherwise, you must remove the preamplifier housing and disconnect the internal line that carries the scale factor coding. -
Page 15: Figure 1: Configuration Jumper For Scale Factor Coding
Preamplifier to any oscilloscope that does not provide TEKPROBE power. The 1103 TEKPROBE Power Supply has connections for two probe channels. NOTE. Use the offset controls of the ADA400A Differential Preamplifier to adjust the offset level. The offset controls on the 1103 TEKPROBE Power Supply do not operate with the ADA400A Differential Preamplifier. -
Page 16: Functional Check
1. If the readings do not match, the oscilloscope is not compatible with the scale factor coding of the ADA400A Differential Preamplifier. See page 2. If the scale factor coding is disabled, see table 3 on page 10 for proper readings. -
Page 17: Table 1: Gain Settings
10. Return the GAIN setting to .1 and the input coupling switches to GND. The ADA400A Differential Preamplifier is now ready to use. For a complete performance verification procedure, refer to page 29. - Page 18 Getting Started ADA400A Differential Preamplifier...
-
Page 19: Operating Basics
Operating Basics Operating Basics contains a graphical overview and a brief description of each control and connector of the ADA400A Differential Preamplifier. See Figures 2 through 4 and Table 2. Ω Ω Input Coupling Vertical Gain Control Overrange Indicator Vertical Offset... -
Page 20: Figure 3: Input Connectors And Fuses
Operating Basics + Input Fuse + Input BNC - - Input BNC - - Input Fuse Connector Connector Figure 3: Input Connectors and Fuses TEKPROBE Interface Pins Signal Output Figure 4: Output Connector ADA400A Differential Preamplifier... -
Page 21: Table 2: Controls, Connectors, And Indicators
Offset Controls. The ON/OFF switch activates the offset controls. The COARSE and FINE controls provide a maximum of 40 volts offset in the X0.1 and X1 gain settings and a maximum of 1 volt offset in X10 and X100 gain settings. See page 16. ADA400A Differential Preamplifier... -
Page 22: Determining The Effective Volts/Division
The effective volts per division is the volts per division setting of the oscilloscope divided by the gain setting of the ADA400A Differential Preamplifier. For example, if the volts/division setting on the oscilloscope is 500 mV/division and the gain setting is 10, the effective volts/division is 500 divided by 10 or 50 mV. -
Page 23: Reference
Reference The Reference section describes how to connect the inputs of the ADA400A Differential Preamplifier and make the proper control settings. To achieve the best performance it is important to make the proper signal and ground connec- tions, set the controls to optimize the performance of the preamplifier, and reduce unwanted electrical interference. - Page 24 DC and AC voltages, do not connect voltages that exceed the input rating. CAUTION. To avoid damaging the inputs of the ADA400A Differential Preampli- fier, do not apply more than 40 volts (DC + peak AC) between any one input and ground or 80 volts (DC + peak AC) differential between the inputs.
-
Page 25: Figure 5: Selecting The Input Impedance
Figure 5: Selecting the Input Impedance Input Configurations There are two basic types of input configurations on the ADA400A Differential Preamplifier: single-ended or differential. Whether one or the other of these configurations is appropriate depends on the type of signal and the electrical environment of the test setup. -
Page 26: Figure 6: Differential Rejection Of Common-Mode Signal
These capacitors limit low-frequency response. Connecting the signals differentially virtually eliminates these effects. Differential. Figure 6 shows two signals connected to the ADA400A Differential Preamplifier. One signal is connected to the + input and the other is connected to the - - input. -
Page 27: Setting The Controls
DC. Setting the impedance to 50 Ω loads Impedance and Coupling (reduces) the amplitude of the output signal from the ADA400A Differential Preamplifier. AC coupling on the oscilloscope interferes with the signal output. Use the input coupling switch on the preamplifier to select other types of signal coupling. - Page 28 This light indicates that the output signal is distorted or “clipped” and the oscilloscope display may not be accurate. Try a lower gain setting or check the position of the offset controls if the OVERRANGE indicator is on. ADA400A Differential Preamplifier...
-
Page 29: Figure 8: Input And Offset Range For X 0.1 Gain
Figure 9: Input and Offset Range for X 1 Gain (“Clipped” Waveform) +10 V Maximum Differential and Single-Ended Input Common-Mode +1 V Range - - 1 V Offset Range - - 10 V Figure 10: Input and Offset Range for X 10 Gain ADA400A Differential Preamplifier... -
Page 30: Figure 11: Input And Offset Range For X 100 Gain
Limiting Bandwidth The ADA400A Differential Preamplifier has a selector for limiting the upper bandwidth. Limiting the bandwidth is desirable in setups where electrical interference from higher frequency sources is a problem. The ADA400A... -
Page 31: Tips For Reducing Signal Interference
20 to 100 kHz. Sources of interference can include florescent lights, laser printers, monitors, CRTs, even radio transmissions. Proper setup of the ADA400A Differential Preamplifier minimizes or eliminates signal interference in most cases. There are three important strategies to reducing signal interference: 1. - Page 32 Limiting the bandwidth is a useful technique for keeping unwanted high frequency noise from interfering with the display of lower frequency signals. The ADA400A Differential Preamplifier allows you to limit the upper bandwidth to 100 Hz, 3 kHz, 100 MHz, and FULL (1 MHz).
-
Page 33: Specifications
Specifications This section describes three classes of characteristics for the ADA400A Differential Preamplifier: nominal, warranted, and typical. Nominal Characteristics Nominal traits are described using simple statements of fact such as “Differen- tial, ‘+’ and ‘- -’” for the characteristic “Input Configuration,” rather than in terms of limits that are performance requirements. -
Page 34: Warranted Characteristics
H The instrument must have had a warm-up period of at least 20 minutes. H The instrument must be used with an oscilloscope that is compatible with the scale factor coding of the ADA400A Differential Preamplifier. See page 2. Table 5: Warranted Characteristics — Signal Acquisition System... -
Page 35: Table 6: Warranted Characteristics - Environmental
Operating: 2.66 g rms overall, 3 axis, 20 min/axis (60 min total) Non-operating: 3.48 g rms overall, 3 axis, 20 min/axis (60 min total) Mechanical Shock Half Sine, 500 g’s 3 axis, 3 drops each axis, 1 ms duration, 18 drops total ADA400A Differential Preamplifier... -
Page 36: Typical Characteristics
EN 55022 Class B limits for radiated emissions when operated as a system with a TDS460 series oscilloscope (FCC 47 CFR, Part 15, Subpart B for Class A equipment.) ADA400A Settings: Gain=100; Offset=off; DC coupled; Filter=1 MHz TDS 460 Settings: 500 ns/div; 5 mV/div; DC coupled Immunity:... - Page 37 52 dB 100 Hz 100 dB 75 dB 10 kHz 100 dB 95 dB 100 kHz 90 dB 90 dB 100 Hz 100 dB 80 dB 10 kHz 100 dB 100 dB 100 kHz 90 dB 90 dB ADA400A Differential Preamplifier...
-
Page 38: Figure 12: Typical Dc And Ac Coupled Cmrr In X0.1 Gain
Width: 112 mm (4.41 in) Depth: 203 mm (8.00 in) Cable Length 2 m (78.7 in) Gain - - 0.1 DC Typical AC Typical 10 k 100 k Frequency (Hz) Figure 12: Typical DC and AC Coupled CMRR in X0.1 Gain ADA400A Differential Preamplifier... -
Page 39: Figure 13: Typical Ac And Dc Coupled Cmrr In X1 Gain
Frequency (Hz) Figure 13: Typical AC and DC Coupled CMRR in X1 Gain Gain - - 10.0 DC Typical DC Warranted AC Typical 10 k 100 k Frequency (Hz) Figure 14: Typical and Warranted CMRR in X10 Gain ADA400A Differential Preamplifier... -
Page 40: Figure 15: Typical And Warranted Cmrr In X100 Gain
Specifications Gain - - 100.0 DC Typical DC Warranted AC Typical 10 k 100 k Frequency (Hz) Figure 15: Typical and Warranted CMRR in X100 Gain ADA400A Differential Preamplifier... -
Page 41: Performance Verification
See the Installation section on page 2. H The ADA400A Differential Preamplifier has a period of at least a 20 minutes to warm up prior to verification. -
Page 42: Procedures
2 to properly configure the scale factor coding. To convert the volts/division settings for oscilloscopes that cannot read the scale factor from the ADA400A, multiply the volts/div setting in the procedure by the gain setting of the ADA400A. ADA400A Differential Preamplifier... -
Page 43: Table 10: Equipment Settings For Gain Checks
5. Check input resistance = 1 MΩ ± 2% (980 kΩ to 1.02 MΩ). 6. Remove coaxial cable from ADA400A ‘+’ input and connect it to the ‘- -’ input. 7. Set the ADA400A ‘- -’ input to DC. - Page 44 Setting Output 50 mV, 1 kHz 2. Connect a dual input connector to inputs of ADA400A. 3. Connect a coaxial cable from calibration generator output to dual input connector. 4. Adjust vertical position knob on the oscilloscope to center square wave on screen.
-
Page 45: Table 11: Equipment Settings For Offset Adjust
16. Adjust vertical position knob on oscilloscope to center square wave on screen. 17. Check DC gain accuracy is ± 2% (19.6 V to 20.4 V). 18. Disconnect setup from the inputs of the ADA400A. Offset Adjust Equipment One digitizing oscilloscope (item 1) -
Page 46: Table 12: Equipment Settings For X100, 100 Khz Cmrr Checks
One 50 Ω terminator (item 7) Two 10X attenuators (item 8) Two coaxial cables (item 9) 1. Connect the ADA400A to Ch1 of the oscilloscope and make the equipment settings according to Table 12. Table 12: Equipment Settings for X100, 100 kHz CMRR Checks... -
Page 47: Table 13: Equipment Settings For X100, 10 Khz Cmrr Checks
2. Connect a coaxial cable from sine wave generator trigger output to Ch4 of the oscilloscope. 3. Connect dual input connector to inputs of ADA400A. 4. Connect 50 Ω terminator to dual input connector. 5. Connect two 10X attenuators to 50 Ω terminator. -
Page 48: Table 14: Equipment Settings For X100, 100 Hz Cmrr Checks
23. Do steps 5 to 10 but with only one 10X attenuator. 24. Set oscilloscope to 1 mV/div. Measure trace is < 1 division wide (1 mV, 60 dB). 25. Modify the equipment settings according to Table 16. ADA400A Differential Preamplifier... -
Page 49: Table 16: Equipment Settings For X10, 10 Khz Cmrr Checks
31. Do steps 5 to 10 but with only one 10X attenuator. 32. Set oscilloscope to 100 V/div. Measure trace is < 0.56 division wide (56 V, 85 dB). 33. Disconnect setup. This completes the performance verification procedure. ADA400A Differential Preamplifier... - Page 50 Performance Verification ADA400A Differential Preamplifier...
- Page 51 WARNING The following servicing instructions are for use only by qualified personnel. To avoid injury, do not perform any servicing other than that stated in the operating instructions unless you are qualified to do so. Refer to all safety summaries before performing any service.
-
Page 53: Adjustment Procedures
Specifications. H You must calibrate the ADA400A Differential Preamplifier at the center temperature range of 22 ± 5_ C. H You must warm up the ADA400A Differential Preamplifier for at least 20 minutes prior to adjustment. Equipment Required... -
Page 54: Procedure
Connect the output of theADA400A Differential Preamplifier to the oscillo- scope, turn the oscilloscope on, and let the ADA400A warm up for 20 minutes. NOTE. Before performing these procedures, make sure your oscilloscope can display the proper scale factor. If you are using an oscilloscope that is not... -
Page 55: Figure 16: Location Of Adjustments Underneath Inner Shield
(LF Compensation) (LF Compensation) *CV13 *CV12 (HF CMRR) *CV17 *CV18 RV17 (LF CMRR) RV106 (10X Gain) CV4 (HF) RV62 (100X Gain) RV32 RV33 (Offset Zero) (Offset Balance) *Factory adjust only Figure 16: Location of Adjustments Underneath Inner Shield ADA400A Differential Preamplifier... -
Page 56: Table 18: Equipment Settings For Gain Adjustments
One dual input coupler (item 6) One calibration generator (item 4) One coaxial cable (item 9) One adjustment tool (item 10) 1. Connect the ADA400A to Channel 1 and make the equipment settings according to Table 18. Table 18: Equipment Settings for Gain Adjustments ADA400A... -
Page 57: Table 19: Equipment Settings For Offset Adjustments
9. Adjust RV106 to 5.0 divisions. Zero Offset Adjustments Equipment One digitizing oscilloscope (item 1) Required 1. Connect the ADA400A to Channel 1 and make the equipment settings according to Table 19. Table 19: Equipment Settings for Offset Adjustments ADA400A Setting... -
Page 58: Table 20: Equipment Settings For Attenuator Balance Adjustments
One 50 Ω terminator (item 7) Two coaxial cables (item 9) One adjustment tool (item 10) 1. Connect the ADA400A to Channel 1 and make the equipment settings according to Table 20. Table 20: Equipment Settings for Attenuator Balance Adjustments... -
Page 59: Table 21: Equipment Settings For Cmrr Adjustments
One 50 Ω terminator (item 7) Two 10X attenuators (item 8) Two coaxial cables (item 9) One adjustment tool (item 10) 1. Connect the ADA400A to Channel 1 and make the equipment settings according to Table 21. Table 21: Equipment Settings for CMRR Adjustments ADA400A... - Page 60 One dual input coupler (item 6) One 50 Ω terminator (item 7) Two coaxial cables (item 9) One adjustment tool (item 10) 1. Connect the ADA400A to Channel 1 and make the equipment settings according to Table 22. ADA400A Differential Preamplifier...
-
Page 61: Table 22: Equipment Settings For Lf Adjustments
Calibration Generator Setting Output Mode Fast Rise, 10 kHz 2. Connect dual input connector to ADA400A input. 3. Connect 50 Ω terminator to dual input connector. 4. Connect a coaxial cable to calibration generator fast rise output to 50 Ω terminator. - Page 62 Adjustment Procedures ADA400A Differential Preamplifier...
-
Page 63: Maintenance
Tektronix product catalog lists all service locations worldwide. Should the ADA400A Differential Preamplifier require replacement under terms of the warranty, return the preamplifier to a Tektronix service center. Include the following information: name of purchaser, return address, name and phone number of a person that Tektronix may contact, date of purchase, and a description of the defect. -
Page 64: Cleaning
Replacement Procedures Refer to the procedures in this section before replacing any part on the ADA400A Differential Preamplifier. For a list of all customer replaceable parts, see the Replaceable Parts section that begins on page 59 and the exploded view on page 63. -
Page 65: Figure 17: Replacing Tekprobe Interface Pins
Align the tab to the slot and gently press the two pieces together. See Figure 18. Once installed, the TEKPROBE collar should rotate freely to lock and unlock. Slot Figure 18: Replacing the TEKPROBE collar ADA400A Differential Preamplifier... -
Page 66: Figure 19: Input Connectors And Fuses
2. Remove the four screws that hold the top housing, separate the top housing from the bottom housing and set the top housing to one side. NOTE. If you intend to electrically adjust the ADA400A or move a jumper, do not proceed further. The adjustments and jumpers are accessible through holes in the circuit board shield. -
Page 67: Figure 20: Potentiometer Connections
Replacing the Cable After performing the procedure to access the internal components of the Assembly ADA400A Differential Preamplifier, replace the cable assembly as follows: 1. Remove the remaining two screws that hold the circuit board to the bottom housing. NOTE. To prevent contaminating sensitive areas of the circuit board, handle the circuit board by the edges only. -
Page 68: Replacement Parts
Output 100 Hz, 3 kHz, 100 kHz 1 MHz Input Coupling/ Cable +15V Input Protection - - 15V Scale Factor AC-GND-DC Gain .1, 1, 10, 100 Data Coding Ground Figure 21: Diagram of the ADA400A Differential Preamplifier ADA400A Differential Preamplifier... - Page 69 Maintenance Input Protection and Any signals on the inputs of the ADA400A Differential Preamplifier must pass Coupling through the input protection and coupling circuits. Input Protection. The input protection circuit shunts excessively high-voltage signals to ground and blows the protective fuse if the current exceeds 1/16 am- pere for any length of time.
-
Page 70: Troubleshooting
200 pounds. 2. Put the probe into a plastic bag or wrap to protect it from dampness. 3. Place the probe into the box and stabilize it with light packing material. 4. Seal the carton with shipping tape. ADA400A Differential Preamplifier... -
Page 71: Replaceable Parts
Replaceable Parts This section contains a list of the replaceable modules for the ADA400A Differential Preamplifier. Use this list to identify and order replacement parts. Parts Ordering Information Replacement parts are available through your local Tektronix field office or representative. -
Page 72: Using The Replaceable Parts List
Using the Replaceable Parts List This section contains a list of the mechanical and/or electrical components that are replaceable for the ADA400A Differential Preamplifier. Use this list to identify and order replacement parts. The following table describes each column in the parts list. - Page 73 ST CHARLES ROAD ELGIN IL 60120 SHAKEPROOF DIV 80009 TEKTRONIX INC 14150 SW KARL BRAUN DR BEAVERTON OR 97077- - 0001 PO BOX 500 93907 TEXTRON INC 600 18TH AVE ROCKFORD IL 61108- - 5181 CAMCAR DIV ADA400A Differential Preamplifier...
- Page 74 SCREW,MACHINE:4- - 40 X 0.875,PNH,STL CD PL TORX, 93907 B20- - 69595- - 003 STANDARD ACCESSORIES 159- - 0024- - 00 FUSE,CARTRIDGE:3AG,0.062A,250V,0.3SEC 71400 AGC 1/16 070- - 9164- - xx MANUAL,TECH:INSTRUCTION,ADA400A,DP 80009 0709164xx OPTIONAL ACCESSORIES P6101B PROBE,PASSIVE:15MHZ 1X 2.0M 80009 P6101B ADA400A Differential Preamplifier...
-
Page 75: Figure 22: Ada400A Differential Preamplifier - Exploded View
Replaceable Parts Figure 22: ADA400A Differential Preamplifier — Exploded View ADA400A Differential Preamplifier... - Page 76 Replaceable Parts ADA400A Differential Preamplifier...
-
Page 77: Glossary
A timing measurement that is the reciprocal of the period. Frequency is measured in Hertz (Hz) where 1 Hz = 1 cycle per second. Floating A signal or voltage that does not have a reference to ground. ADA400A Differential Preamplifier... - Page 78 A connection to one input of the preamplifier only. The coupling of the other side must be set to ground (GND). Waveform The shape or form (visible representation) of a signal expressed as amplitude versus time (Y-T). ADA400A Differential Preamplifier...
-
Page 79: Index
18, 57 jumper overview, 7–10 input impedance, 12 cover, procedure for removing, 54 scale-factor coding, 2 diagnostic procedures, 58 maintenance, 51–58 effective volts/division, 10 offset range, 16 electrostatic discharge, preventing, 51 overrange detection circuit, 57 ADA400A Differential Preamplifier... - Page 80 Phone number, Tektronix, viii troubleshooting, 58 potentiometers, procedure for replacing, 54 procedures, performance verification, 29 Product support, contact information, viii URL, Tektronix, viii repackaging, 58 replacement procedures, 52 warranty service, 51 Web site address, Tektronix, viii safety, general summary, v ADA400A Differential Preamplifier...
Need help?
Do you have a question about the ADA400A and is the answer not in the manual?
Questions and answers