Table of Contents
Advertisement
Quick Links
Advertisement
Chapters
Table of Contents

Related Manuals for Schaerer Matic 2


Summary of Contents for Schaerer Matic 2
- Page 1 Schaerer Matic 2 Operating instructions V06 / 05.2010...
- Page 2 Schaerer Ltd. P.O. Box Original operating instructions Allmendweg 8 BASM2_EN CH-4528 Zuchwil info@schaerer.com / www.schaerer.com N° 021286...
-
Page 3: Operating Instructions
All information, illustrations, and specifications in this manual are based on the latest product information available at the time of publication approval. Schaerer Ltd. reserves the right to change the content at any time without any prior notice. -
Page 4: The Operating Instructions
Introduction Chapter THE OPERATING INSTRUCTIONS This manual will inform you in detail on programming, commissioning, use and cleaning of your new machine. It also contains important safety instructions to ensure safe use. We therefore recommend that you read all instructions carefully before commissioning the machine and that you keep them handy for future reference. -
Page 5: Symbols And Pictograms
Introduction Symbols and pictograms Note: This section provides you with important notes and information. Important! This note indicates possible damage to property as well as possible financial and statutory penalties (e.g. loss of rights to claim under guarantee, liability suits, etc.). Danger! This note indicates a risk of severe and/or fatal injury if specific procedural rules are violated. -
Page 6: Table Of Contents
Daily cleaning brewing system......................5-3 Daily cleaning - Schaerer Matic 2 ......................5-4 Daily cleaning - Schaerer matic 2 Milk system beside machine ............5-6 Daily cleaning - Schaerer matic 2 Milk system under counter ............. 5-8 Error messages and malfunctions ....................6-2 Error messages with display ........................ - Page 7 Introduction Chapter Page Optional features..........................7-3 Payment systems ..........................7-3 Water softener (Filados/Brita) .......................7-3 Cup warmer............................7-3 User instructions for special machines (water tank) ................7-4 Swan neck.............................7-5 Coffee powder doser..........................7-6 Coffee grounds disposal to container ....................7-6 Automatic and manual steam output ....................7-6 Coffee output accelerator........................7-8 7.10 Variations ..............................7-8 7.11 Optional features cold milk-System ....................7-13 Appendix ..............................8-2...
- Page 8 Introduction Page 1-6 BASM2 - EN - V06...
-
Page 9: Contents
Safety instructions Chapter Contents Chapter Text Page Safety instructions ................2-2 General ..............................2-2 Safety symbols ..........................2-2 Prevention of accidents ........................2-3 Hygiene ..............................2-5 Designated use ..........................2-5 Liability ..............................2-6 BASM2 - EN - V06 Page 2-1... -
Page 10: Safety Instructions
Safety instructions SAFETY INSTRUCTIONS General This chapter warns you about possible dangers when operating your new machine. The information contained herein on how to recognize hazardous situations enables a safe and proper operation. The coffee machine will be handed over by a service technician authorized by the manufacturer. -
Page 11: Prevention Of Accidents
Safety instructions Prevention of accidents In the event of incorrect operation or misuse, one or more of the following might occur: Risk of severe and/or fatal injury of the operator, third persons or animals that are in close proximity to the machine, ... - Page 12 Safety instructions Danger! Parts of the product outlets, the hot water pipe and the steam pipe become very hot during the machine's cleaning cycle and when coffee, milk, hot water or steam are delivered. Always touch all outlets only at the specially designed protective elements.
-
Page 13: Hygiene
Note: Use of this equipment is subject to the "General Terms and Conditions" of Schaerer Ltd. and these operating instructions. In legal terms, any other use is not an intended use. The manufacturer accepts no liability for damage resulting from unintended use. -
Page 14: Liability
Intrusion into the machine with objects and opening of the housing If cleaning agents other than those recommended by Schaerer Ltd. have been used Important! The manufacturer's warranty exclusively covers machines that have been properly maintained at the intervals specified and where original spare parts are used that were directly supplied by the manufacturer or one of the manufacturers’s authorized... - Page 15 Product description Chapter Contents Chapter Text Page Product description ................3-3 Coffee machine data ........................3-3 Full view (Model 19 SM-2)........................3-3 3.1.1 3.1.2 Control surface ...........................3-4 3.1.2.1 Stand-by-Button..........................3-5 3.1.2.2 Decaf button ............................3-5 3.1.3 Installation plan for model 1 SM-2 Tea....................3-6 3.1.4 Installation plan for model 19 SM-2, 15 SM-2, 18 SM-2 ..............3-7 3.1.5 Installation plan for model 191 SM-2, 151 SM-2, 181 SM-2 ..............3-8...
- Page 16 Product description Chapter Text Page Equipment and accessories for the cold milk-System .............. 3-30 3.6.1 Shipment (included)......................... 3-30 3.6.2 Extra parts for the cold milk-System....................3-30 Special settings ..........................3-31 3.7.1 Time-specific settings ........................3-31 3.7.1.1 Service reminder..........................3-31 3.7.2 Cleaning settings ..........................
-
Page 17: Product Description
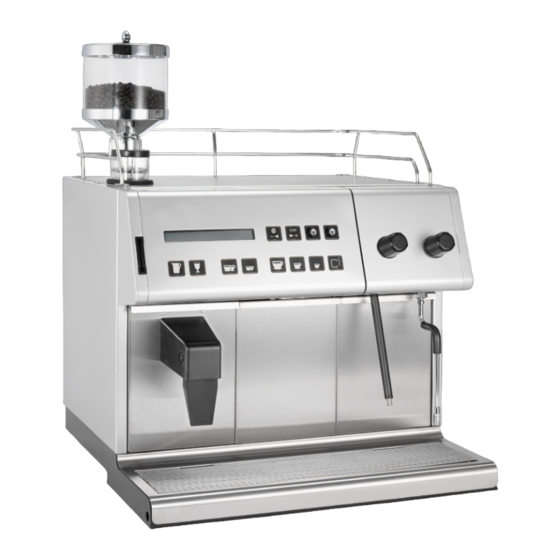
Product description PRODUCT DESCRIPTION Coffee machine data 3.1.1 Full view (Model 19 SM-2) Legend: Heated cup plate Cup plate frame Sliding hatch to close the coffee bean container Coffee bean container for coffee grinder no. 1 (standard coffee grinder) Funnel for ground coffee ("decaf") Control panel Two-line illuminated display Card reader for programming... -
Page 18: Control Surface
Product description 3.1.2 Control surface Fig. 3.1 A Legend: Stand-by/On-button Decaf button - Coffee serving, e.g. without milk - Entry and exiting a sub-menu - Confirming program entries button : - Interrupt beverage output in operation - Cancel previously selected products - Plus function in programming button : - Activate cleaning process... -
Page 19: Stand-By-Button
Product description 3.1.2.1 Stand-by-Button Machine is in stand-by The control board is switched off. The coffee machine is, however, still connected to the power supply. Con- trol of the programmed operating temperature is ac- tive. Fig. 3.1 B button edge is dark Machine setting On Your coffee machine is ready for operation. -
Page 20: Installation Plan For Model 1 Sm-2 Tea
Product description 3.1.3 Installation plan for model 1 SM-2 Tea Page 3-6 BASM2 - EN - V06... -
Page 21: Basm2 - En - V06 Page
Product description 3.1.4 Installation plan for model 19 SM-2, 15 SM-2, 18 SM-2 BASM2 - EN - V06 Page 3-7... - Page 22 Product description 3.1.5 Installation plan for model 191 SM-2, 151 SM-2, 181 SM-2 Page 3-8 BASM2 - EN - V06...
-
Page 23: Purpose Of The Coffee Machine
Product description 3.1.6 Purpose of the coffee machine The following beverages can be prepared with basic model (without optional features): - Coffee - Espresso - Decaffeinated coffee (Decaf) - Hot water for tea, punch etc. - Steam for foaming milk (not possible with model 1 SM-2 ) Breakfast coffee (not possible with model1 SM-2) Optional feature: 3.1.7... -
Page 24: Cold Milk-System Data
Product description Cold milk-System Data 3.2.1 Full view of the option cold milk-System on counter Cup plate frame Cup plate Control panel Refrigerator door Milk container (in the fridge) Beverage outlet / height adjustable min. 80 mm, max. 180 mm (dispenser carriage) Drip grid Blocking button for height adjustment Page 3-10... -
Page 25: Control Surface Cold Milk-System On Counter
Product description 3.2.2 Control surface cold milk-System on counter Example of button commands: Product button Latté Product button Milk foam Product button hot milk Product button Macchiato Product button Milk coffee Product button Cappuccino BASM2 - EN - V06 Page 3-11... -
Page 26: Inside View Refrigerator On Counter (Temperature Regulator, Milk Sensor)
Product description 3.2.3 Inside view refrigerator on counter (Temperature regulator, Milk sensor) Milk sensor: Assembling instructions for the Temperature regulator: milk sensor: (See 3.2.7 “Adjust refrigerator temperature on counter“, on Page 3-15) Minus Note: The mounting instruction sticker must be kept clean. If it is very dirty or no longer legible, a new one must be requested from the Legend:... -
Page 27: Installation Plan For Cold Milk-System On Counter
Product description 3.2.4 Installation plan for cold milk-System on counter BASM2 - EN - V06 Page 3-13... -
Page 28: Serial Plate On Cold Milk-System
Product description 3.2.5 Serial plate on cold milk-System For warranty purposes and in case of failure please transfer the appliance’s serial plate data to the following area! Lift the panel on the appliance until it stops. The serial plate is located on the right partition. -
Page 29: Serial Plate On The Fridge On Counter
Product description 3.2.6 Serial plate on the fridge on counter For warranty purposes and in case of failure please transfer the appliance’s serial plate data to the following area! Lift the panel on the appliance until it stops. Open the door to the fridge. The serial plate is located in the front of the upper left corner in the fridge. - Page 30 Product description Lift the panel until it reaches the stop, in order to adjust the temperature regulator’s rotating knob. 2.1 Temperature warmer: Turn the rotating knob counter clockwise ( - ). 2.2 Temperature colder: Turn the rotating knob clockwise ( + ). 2.3 Return the temperature regulator to normal position: Turn the rotating knob counter clockwise until it reaches the stop;...
-
Page 31: Full View Of The Option Cold Milk-System Under Counter
Product description 3.2.8 Full view of the option cold milk-System under counter (See Chapter 3.2.9, on Page 3-10) Cup plate frame Beverage outlet / height adjustable min. 80 mm, max. 180 mm (dispenser carriage) Drip grid Refrigerator under counter Blocking button for height adjustment BASM2 - EN - V06 Page 3-17... -
Page 32: Full View Fridge Milk Under Counter
Product description 3.2.9 Full view fridge milk under counter Refrigerator lighting Milk pump Milk suction tube Milk container Collection tray (option) Temperature regulator (Display example) 3.2.10 Control surface cold milk-System under counter Example of button commands: Product button Latté Product button Milk foam Product button hot milk Product button Macchiato Product button Milk coffee... -
Page 33: Installation Plan For Cold Milk-System Under Counter
Product description 3.2.11 Installation plan for cold milk-System under counter BASM2 - EN - V06 Page 3-19... -
Page 34: Adjust Refrigerator Temperature Under Counter
Product description 3.2.12 Adjust refrigerator temperature under counter The temperature of the refrigerator can be adjusted using the integral temperature regulator under the counter. The temperature regulator is positioned on the lower left of the refrigerator. See the fol- lowing figures. Minus Plus Figure Temperature regulator... -
Page 35: Operating Information For The Coffee Machine
Product description Operating information for the coffee machine 3.3.1 Performance Characteristics The hourly capacity of ready-made beverages depends on the drink and drink con- tainer type and whether an optional brew acceleration feature is present, the so-called by-pass. The following amounts can be assumed in actual usage: Beverage capacity: 140 –... -
Page 36: Coffee Machine Model 19 Sm-2
Product description 3.3.2.3 Coffee machine model 19 SM-2 Width 615 mm Height 758 mm Depth 600 mm Net weight 103 kg Coffee outlet height 80 mm - 165 mm (without rocker) Tea outlet height 85 mm - 170 mm Subject to changes without notice! 3.3.2.4 Coffee machine model 15 SM-2 Width... -
Page 37: Coffee Machine Model 191 Sm-2
Product description 3.3.2.6 Coffee machine model 191 SM-2 Width 990 mm Height 758 mm Depth 600 mm Net weight 175 kg Coffee outlet height 80 mm - 165 mm (without rocker) Tea outlet height 85 mm - 170 mm Subject to changes without notice! 3.3.2.7 Coffee machine model 151 SM-2 Width... -
Page 38: Power Supply
Product description 3.3.3 Power supply Connection cable Fuse Model Power rating conductor cross- (installation site) section 1 SM2 3500-3700W 1 SM2 Garni 5400-5600W 1 SM2 UC 6400-6900W 3x 16A 5x 1.5mm 1 SM2 UC 8400-8900W (5kW DL) SM2 Europe 380-415V 3N~ 50/60 Hz 15 SM2 9500-9800W 151 SM2... -
Page 39: Water Supply / Drain
Product description 3.3.4 Water supply / drain The coffee machine must be connected to a G 3/8" drinking water line with fittings as shown in the installation diagram on pages to 3-8. If the coffee machine is to be connected to a newly installed water line, the line and the pressure hose must be properly rinsed to ensure that no dirt particles are fed into the machine. -
Page 40: Operating Information For The Cold Milk-System
Product description Operating information for the cold milk-System 3.4.1 Performance Characteristics cold milk-System The hourly capacity of ready-to-serve beverages depends on product type and amount. 3.4.2 Performance Characteristics Fridge Keep the milk at a temperature between 3 to 5° C. ... -
Page 41: Purpose Of The Cold Milk-System
Product description 3.4.5 Purpose of the cold milk-System Note: The appliance can only be used together with the coffee maker. You can use the appliance to prepare the following additional beverages: Cappuccino Milk coffee Macchiato Lattė ... -
Page 42: Equipment And Accessories For The Coffee Machine
Product description Equipment and accessories for the coffee machine 3.5.1 Model variations The Schaerer-matic SM-2 model is available in the following basic models (without op- tional features): Model Selectable products 1 SM-2 Coffee SM-2 Tea Coffee, hot water 19 SM-2... -
Page 43: Accessories (Not Included In Shipment)
- Coffee output accelerator: - Brew accelerator (also called by-pass) - Turbo program (coffee output accelerator) - SES (Schaerer Espresso System for special espresso) - Two, three or four grinders - Coffee powder doser - Coffee grounds ejection into ext. container (coffee ground container omitted) -
Page 44: Equipment And Accessories For The Cold Milk-System
Product description Equipment and accessories for the cold milk-System 3.6.1 Shipment (included) Item Order. no. User manual Quick Reference Card Milk container 061'279 Cleaning container 061'308 Measuring cup 061'205 - 1,0 lt „Daypure” cleaning agent 071'300 O-Ring Set for the foamer head 050'415 - 2,0 m Outlet hose... -
Page 45: Special Settings
Product description Special settings Note: All settings described in this section can only be programmed by an authorised ser- vice technician. 3.7.1 Time-specific settings 3.7.1.1 Service reminder After a certain period or a certain number of beverages, a reminder is displayed that it is time to have the machine serviced by a service technician. -
Page 46: Commissioning Of The Coffee Machine And The Cold Milk-System
Product description Commissioning of the coffee machine and the cold milk-System 3.8.1 Initial commissioning of the coffee machine and the cold milk-System The coffee machine and the cold milk-System must be installed and commissioned by a service technician authorised by the manufacturer. 3.8.2 Set-up conditions 3.8.2.1... -
Page 47: Counter Lead-Through
Product description 3.8.3 Counter lead-through 3.8.3.1 Counter lead-through for model 1 SM-2 Tea Legend: Counter installation Wastewater Current Fresh water 140 Optional feature: Additional bore holes for coffee ground disposal to another container 140 3.8.3.2 Counter lead-through for model 19/15/18 SM-2 ... -
Page 48: Counter Lead-Through For Cold Milk-System On Counter
Product description 3.8.4 Counter lead-through for cold milk-System on counter Note: See installation plan on Page 3-12 (3.8.6326). 3.8.5 Counter lead-through for cold milk-System under counter Note: See installation plan on Page 3-18 (3.8.6416). Page 3-34 BASM2 - EN - V06... - Page 49 Operation Chapter Contents Chapter Text Page OPERATION ..................4-3 Introduction............................4-3 Operating Modes ..........................4-4 Messages displayed when coffee machine is ready for operation ..........4-4 Routine operation ..........................4-5 4.4.1 Refilling of coffee beans ........................4-5 4.4.2 Making the coffee machine ready for operation .................4-5 4.4.2.1 Pre-checks............................4-5 4.4.2.2...
- Page 50 Operation 4.8.5.8 Change on/off time .......................... 4-24 Contents Chapter Text Page 4.8.5.9 Service reminder..........................4-25 4.8.5.10 Display language ..........................4-25 4.8.5.11 Change PIN code ..........................4-25 4.8.5.12 SAVE DATA card..........................4-26 4.8.5.13 Menu ..............................4-26 4.8.5.14 Save coffee machine data to card ....................4-27 4.8.5.15 Load machine data from card to coffee machine ................
-
Page 51: Operation
Operation OPERATION Introduction This chapter describes the basic functions of the coffee machine and the cold milk- System. Read them carefully to ensure easy and problem-free routine operation. Note: Proper installation and programming of the coffee machine and the cold milk-System by an authorised service technician are crucial for a smooth operation and good prod- uct quality. -
Page 52: Operating Modes
Operation Operating Modes There are 3 operating modes, shown on the display as follows: Your coffee machine is ready for operation. When a product button select product is pressed, the selected beverage is delivered. 12:00 01.10.2007 The internal or external payment system is active. Products can be credit operation dispensed according to the installed system. -
Page 53: Routine Operation
Operation Routine operation Note: For the functions described in this chapter, it is assumed that the coffee machine is ready for operation. The display must show the following text: Select product 12:00 01.10.2007 Display example 4.4.1 Refilling of coffee beans The coffee bean container(s) may only be filled with max. -
Page 54: Switch On The Coffee Machine
Operation 4.4.2.2 Switch on the coffee machine Switch on the coffee machine, by pressing the Stand-by button (cf. Fig. 4.4 A.). All of the buttons light up briefly. The edges of the stand-by button blinks green. Fig. 4.4 A. The following message is displayed: Select product 12:00 01.10.2007... -
Page 55: Serving Coffee Beverages
Operation 4.4.4 Serving coffee beverages Note: - If your coffee machine has a payment system installed and enabled, please read the instructions available separately. - With the [ ] button you can cancel the pre-selected coffee beverages if your cof- fee machine is not operated in payment mode (credit mode). -
Page 56: Prepare Products Using The Second Product Level
Operation 4.4.5 Prepare products using the second product level If a service technician has installed and enabled the second product level, the product buttons can be used to pre-select two different products. In this operating mode you can program the most popular coffee and hot water prod- ucts on level 1 and the less popular products on level 2 (second product level), such as ground decaffeinated coffee. -
Page 57: Obtain Hot Milk With Activated Sensors ("Jug Sensor") (Option)
Operation Place the empty cup(s) under the beverage outlet. Press [ Press the programmed button for this product. The pressed button is illuminated with a green light. The button [ ] blinks red. The following message is displayed: Select product Coffee pow der Put the coffee powder for one or two cups into the filter with a measuring spoon (cf. -
Page 58: Dispense Hot Water
Operation 4.4.7 Dispense hot water Note: Not possible with model 1 SM-2. Danger! Risk of injury by scalding! Keep hands and other body parts away from the out- let! 4.4.7.1 Dispense hot water with the hot water tap Basic model: Coffee machine 19 SM-2 and 191 SM-2 Note: The display does not change during hot water output:... -
Page 59: Generating Steam
Operation 3. * Stop or interrupt steam delivery (only possible with undosed output): Press [ The button [ ] is no longer illuminated if the output process has been stopped or cancelled. If dosed delivery has been programmed in, the hot water delivery is automati- cally discontinued after the specified dosage time ends. -
Page 60: Routine Operation Cold Milk-System
Operation Danger! The steam pipe is hot. Touch the steam pipe only by using the rubber handle. Clean the outside of the steam pipe with a wet and clean paper tissue. Point the steam pipe towards the drip grid. Clean the opening of the steam pipe by briefly opening the steam tap. -
Page 61: Preparing Hot Or Warm Milk
Operation Note: Fill only up with approx. 6° C cold milk. The milk in the refrigerator must be kept at a temperature between 3 °C - 5 °C. If this is not observed, purchase of an optimum product will not be possible. Lift the panel on the appliance until it stops and open the fridge door. -
Page 62: Preparing Milk Foam
Operation 4.5.3 Preparing milk foam Place a full cup of coffee or another beverage underneath the beverage out- let. Press the “Milk foam” button. The button lights green. The following message is displayed: Select product 12:00 01.10.2007 The product is served. 3.* If the “Start/Stop function has been programmed you can interrupt the milk supply by pressing on the “Milk foam”... -
Page 63: Preparing Cold Milk
Operation 4.* If you have keyed in the wrong quantity of the product press on the [ button. Continue with step 2 to key in the right quantity. Please note the following example of ”Wrong pre-selection of product”: You have pre-selected 7 x “Cappuccino” instead of 4 x. You notice the mistake while the first beverage is being served. -
Page 64: End Of Operation/Switching Off The Machine
Operation Note: “Cold milk” cannot be pre-selected. Option “press button”: As long as the button remains pressed, the product is being served. If the button doesn’t stay pressed, the product serving stops. 4.5.6 End of operation/switching off the machine If the coffee machine is not being used for a long time (e.g. at night), the coffee ma- chine and the cold milk system can be switched to standby. -
Page 65: Longer Idle Time Of The Coffee Machine
Operation Longer idle time of the coffee machine If the coffee machine is not used for several weeks or months (e.g. outside the sea- son), it must be fully switched off. 4.6.1 Several weeks (e.g. business vacation) Carry out the daily cleaning routine (cf. chapter 5.2 "Cleaning,"... -
Page 66: Dismantling The Coffee Machine And The Cold Milk-System
Operation If the fridge is idle for an extended period of time, to avoid a build-up of mould and unpleasant odours please prepare as follows: Empty the fridge completely, clean the inside and the sealing on the door and leave the door slightly open. The picture shows the fridge with open door. -
Page 67: Programming Using Standard Chip Cards
Operation Programming using standard chip cards For all the functions described in this chapter, it is assumed that the coffee machine is ready for routine operation in payment mode. 4.8.1 Menu view of programming level 2 (Standard) In programming level 2 you can make the principal settings or modifications to be un- dertaken for routine operation. -
Page 68: Operating Elements For Programming Level 2
Operation 4.8.2 Operating elements for programming level 2 The following buttons are used for programming: button: Next higher menu on the programming level Move upward in the sub-menus Adjust values upward button : Input confirmation during cleaning program Select menu one level lower on the programming level Move downward in the sub-menus Adjust values downward button:... -
Page 69: Menu
Operation 4.8.5 Menu 1. Read daily counter for coffees and teas per key. 2. Reset product counter 3. Read monthly counter 4. Change grinding quantity 5. Grinding mixture distribution 6. Change quantity of product dispensed 7. Change time 8. Change date 9. -
Page 70: Change Quantity Of Coffee Ground (Coffee Powder)
Operation 4.8.5.3 Change quantity of coffee ground (coffee powder) This function determines the amount of coffee powder that is dispensed for each indi- vidual coffee product. 1. Insert CHEF card into the card reader. 2. Press [ ] or [ ] until the following menu is displayed: change grind quantity select product 3. -
Page 71: Change Quantity (Water And/Or Milk For Coffee Products)
Operation 4.8.5.5 Change quantity (water and/or milk for coffee products) This function determines the amount of water and/or milk dispensed for each individ- ual product (all coffee products and milk). 1. Insert CHEF card into the card reader. 2. Press [ ] or [ ] until the following menu is displayed: change fill quantity select product 3. -
Page 72: Change On/Off Time
Operation 4.8.5.8 Change on/off time The appliance can be programmed to switch itself on and off automatically, e.g. to save electricity. (This feature must be enabled by the service engineer if it is not available). Insert CHEF card into the card reader. Press [ ] or [ ] key until the following menu is displayed: on / off time execute... -
Page 73: Service Reminder
Operation 4.8.5.9 Service reminder ■ The following optional message is only displayed if programmed: select product service wanted ■ If this message was enabled by the installer for the CHEF card, it can be sup- pressed. 1. Insert CHEF card into the card reader. 2. - Page 74 Operation 4.8.5.12 SAVE DATA card The SAVE DATA card is a backup card to which all the coffee machine data can be saved. ■ Whenever settings are changed by the service engineer, the coffee machine re- quests the programmer to save the new settings on the SAVE DATA card. ■...
-
Page 75: Load Machine Data From Card To Coffee Machine
Operation 4.8.5.14 Save coffee machine data to card 1. Insert SAVE DATA card into the card reader. 2. Press [ ] or [ ] until the following menu is displayed: SAVE DATA machine card 3. Press [ ] key to save the data from the coffee machine to the card: ... -
Page 76: Programming Using Optional Chip Cards
Operation Programming using optional chip cards The chip cards described in this chapter are available as optional features and are not included in the standard delivery package. You will find a list and a brief de- scription of the available chip cards in chapter 2.3.3. Note: For all the functions described in this list, it is assumed that the coffee machine is ready for routine operation in normal operating mode. -
Page 77: Programmable Security Level
Operation 4.9.1.2 Programmable security level If the service engineer has programmed security levels 1 or 3 for the PROGRAM card, the PIN code must be entered each time the coffee machine is used. 1. Insert PROGRAM card into the card reader: PIN-Code 0000 ` Decaf `... -
Page 78: Change Money Card Price Levels 1 + 2
Operation 6. Enter the numbers after the decimal point by pressing the [ ] and [ ] keys (price 1 0 - 99). 7. Confirm by pressing the [ ] key. price - 1 xx:xx price - 2 00:00 8. Enter the numbers before the decimal point by pressing the [ ] and [ ] keys (Price 2 0 - 99). -
Page 79: Change Token Price With Or Without Money Card Price Levels 1 + 2
Operation 10. If the changed data are to be saved on the DATA SAVE card, insert this card..Save ... 11. Wait for the acoustic signal. credit operation 12:00 01.10.2007 12. If changed data are not to be saved to the DATA SAVE card, press [ ] key. 4.9.1.6 Change token price with or without MONEY card price levels 1 + 2 1. -
Page 80: Change Product Price And Article Number (For External Cci / Csi Payment Systems)
Operation 4.9.1.7 Change product price and article number (for external CCI / CSI payment systems) 1. Insert PROGRAM card into the card reader. 2. Press [ ] or [ ] until the following menu is displayed: change price select product 3. -
Page 81: Reset Money Sales
Operation 4.9.1.9 Reset MONEY sales 1. Insert PROGRAM card into the card reader. 2. Press [ ] or [ ] until the following menu is displayed: sale amount MONEY amount 0.00 3. Press [ ] key. sale amount MONEY delete ? ` Decaf ` 4. -
Page 82: Delete Master Table
Operation 3. Press [ ] key. remove card 4. Remove PROGRAM card: insert card MASTER/PROGRAM 5. Insert MASTER card. card logged on remove card 6. Remove MASTER card. insert card MASTER/PROGRAM If other MASTER cards are to be logged on, repeat steps 5 and 6 several times. 7. -
Page 83: Menu
Operation 4. Press [ ] key. PIN-Code 0000 ` +/- ` ` Decaf ` 5. Set the first digit of the new PIN code using keys [ ] and [ ]. 6. Confirm by pressing the [ ] key. 7. Repeat steps 5 and 6 for each successive digit until the full PIN code is entered. 8. -
Page 84: Coffee Test Card
Operation ■ If all the product keys had previously been disabled using the [ ] key, this actio can be cancelled: Press [ ] key: the disabled product keys are enabled again. ■ Several keys can be enabled simultaneously. ■... - Page 85 Daily cleaning brewing system .......................5-3 5.2.1 Inside Cleaning ...........................5-3 Daily cleaning - Schaerer Matic 2....................5-4 Daily cleaning - Schaerer matic 2 Milk on counter................5-6 Daily cleaning - Schaerer matic 2 Milk under counter ..............5-8 BASM2 - EN - V06 Page 5-1...
-
Page 86: Cleaning
- To ensure that all products are available in best quality, careful daily and weekly cleaning is imperative. Important! For daily and weekly cleaning, always use the cleaning agents recommended by Schaerer Ltd. Daily cleaning: ► „Coffeepure“ cleaning powder ► “Daypure” liquid milk system cleaner Weekly cleaning: ►... -
Page 87: Daily Cleaning Brewing System
Cleaning Daily cleaning brewing system The machine cleaning program consists of an automatic cleaning cycle and a manual one. Together they form one operation cycle. The cleaning program should be operated daily. Upon request, the service technician can program the time for daily cleaning depend- ing on the specific quantity of the coffee beverages to be dispensed. -
Page 88: Daily Cleaning - Schaerer Matic 2
Cleaning Daily cleaning - Schaerer Matic 2 Page 5-4 BASM2 - EN - V06... - Page 89 Cleaning BASM2 - EN - V06 Page 5-5...
-
Page 90: Daily Cleaning - Schaerer Matic 2
Cleaning Daily cleaning - Schaerer matic 2 Milk on counter Page 5-6 BASM2 - EN - V06... - Page 91 Cleaning BASM2 - EN - V06 Page 5-7...
-
Page 92: Daily Cleaning - Schaerer Matic 2 Milk System Under Counter
Cleaning Daily cleaning - Schaerer matic 2 Milk under counter Page 5-8 BASM2 - EN - V06... - Page 93 Cleaning BASM2 - EN - V06 Page 5-9...
- Page 94 Cleaning Page 5-10 BASM2 - EN - V06...
- Page 95 Error messages and malfunctions Chapter Contents Chapter Text Page ERROR MESSAGES AND MALFUNCTIONS ........6-2 Error messages with display......................6-2 6.1.1 Error messages coffee machine......................6-2 Malfunctions without display messages..................6-4 Error messages and malfunctions cold milk-System..............6-5 6.3.1 Error messages without display......................6-5 6.3.2 Too little milk foam..........................6-5 6.3.3 Milk splashes when served.........................6-6...
-
Page 96: Error Messages And Malfunctions
Error messages and malfunctions ERROR MESSAGES AND MALFUNCTIONS Error messages with display 6.1.1 Error messages coffee machine Danger! Inform your authorised customer service representative immediately if you can- not rectify a malfunction! Do not attempt to repair the coffee machine yourself! Display message Cause Rectification... - Page 97 Error messages and malfunctions Display message Cause Rectification "Product Data Error" When illuminated green, the product button Press [ indicates a programming error. If the [ C ] If the display message comes back on button turns green, the product indicates a after the coffee machine is switched on programming error on level 2.
-
Page 98: Malfunctions Without Display Messages
Error messages and malfunctions Display message Cause Rectification "Timeout internal commu- Communication with an external device Check if the external unit is correctly con- nication" (e.g. cold milk solution unit) has been inter- nected and ready for operation. rupted. If the message persists, contact a manu- facturer-authorised customer service representative. -
Page 99: Error Messages And Malfunctions Cold Milk-System
Error messages and malfunctions Error messages and malfunctions cold milk-System 6.3.1 Error messages without display 6.3.2 Too little milk foam Possible cause: The hole in the air baffle on the foamer valve is blocked. Action: Open the Panel. Remove the expander (a) from the outlet (b). -
Page 100: Milk Splashes When Served
Error messages and malfunctions 6.3.3 Milk splashes when served Cause: Milk temperature in the fridge is too high. Action: Correct the temperature (cf. “Adjust refrigerator temperature“, on Pa- 3-3 / 3-12). 6.3.4 Cup sensor „Cup control“ option Cause: The cup sensor’s lens is dirty. Action: Place the cup correctly underneath the beverage outlet. -
Page 101: Milk Container Empty" „Milk Level Control" Option
Error messages and malfunctions Sometimes the following message is displayed after the problem has been solved: Wait approx. 5 minutes. Select product ** Heating steam ** The following message is now displayed: Note: Select product If the problem is not solved please contact 12:00 01.12.2004 the after sales service organization. -
Page 102: Button
Error messages and malfunctions 6.3.10 „Button ?“ Cause: A depressed button no longer returns to the starting position. The following message is displayed: Action: >> buttons ? << Selection locked Attention! An improper repair can lead to expensive repair costs. Try to loosen the depressed button. -
Page 103: Fridge Malfunctions
Error messages and malfunctions 6.3.13 „Level sensor steam time-out“ Cause: Water supply problem. The following message is displayed: Action: Select product ** timeout level probe steam ** Press the Stand-by button on the coffee machine, as shown in the adjacent pic- ture. -
Page 104: Fridge Does Not Work
Error messages and malfunctions Attention! Never open the appliance! Only let an after sales service organization inspect cooling ducts on the back of the appliance that are touching and vibrating! 6.4.3 Fridge does not work Attention! Let only a service technician inspect the connection between fridge and coffee maker! Please check: ... - Page 105 Optional features Chapter Contents Chapter Text Page Optional features................7-2 Payment systems ..........................7-2 Water softener (Filados/Brita) ......................7-2 Cup warmer ............................7-2 User instructions for special machines (water tank)..............7-3 7.4.1 Refill fresh water tank .........................7-3 7.4.2 Empty wastewater tank ........................7-3 7.4.3 User instructions for machines with fresh and wastewater tanks (trolley-mounted) ......7-4 Swan neck ............................7-4 Coffee powder doser........................7-5 Coffee grounds disposal to container....................7-5...
-
Page 106: Optional Features
Optional features OPTIONAL FEATURES Payment systems Your coffee machine can be connected to your cash register by means of a payment system, for example. This facilitates daily, weekly and monthly accounting. Your coffee machine has been prepared for connection to a payment system and it is compatible with all conventional systems on the market. -
Page 107: User Instructions For Special Machines (Water Tank)
Optional features User instructions for special machines (water tank) This chapter discusses coffee machines which are equipped with a fresh and waste- water container. 7.4.1 Refill fresh water tank When the level in fresh water tank becomes too low, the [STOP] key flashes. The following message is displayed: Select product Water tank empty... -
Page 108: Swan Neck
Optional features 7.4.3 User instructions for machines with fresh and wastewater tanks (trolley-mounted) Capacities are as follows: - Fresh water tank: 16 litters. - Wastewater tank: 11 litters - The fresh water tank must be filled daily with fresh, clean drinking water. - If the machine is out of use for lengthy periods, both tanks must be emptied and cleaned. -
Page 109: Coffee Powder Doser
Optional features Coffee powder doser A dosage device for ground coffee eliminates the need to manually fill a brand of cof- fee into the funnel on the coffee machine. Serving is just as easy as with coffee bev- erages made from freshly ground coffee beans. Coffee grounds disposal to container If a large amount of coffee is served or if the coffee machine is used in a self-service establishment, we recommend adding a coffee grounds container. -
Page 110: Release Steam With The Steam Button
Optional features 7.8.2 Release steam with the steam button Press the [Steam] button to release steam. Steam is delivered according to whether the dosed or undosed program was selected. Perform the following procedure: Danger! Keep away from underneath the steam pipe while steam is delivered! Hold the cup in such a way that no liquid is spilled onto your hands or other body parts during heating! Point the steam pipe towards the drip grid. -
Page 111: Coffee Output Accelerator
Note: Just ask a manufacture-authorised customer service representative for assistance. 7.10 Variations The Schaerer-Matic line of products allows you to tailor your hot beverage selection to specific needs. 7.10.1 Coffee grinders (two, three or four grinders) Depending on the needs of your customers, you can equip your coffee machine with two, three or four coffee grinders. -
Page 112: Grinding Mixture Setting
Optional features 7.10.1.1 Grinding mixture setting Setting range: 0 - 100 % The coffee mixture is set by steps of 1 %. The [ ] button is used to increase the grinding quantity of the coffee grinder in question while the [ ] button reduces it. -
Page 113: Hot Water And Steam Unit
Optional features Select the desired grinding mixture using [ ] or [ ] .Finally press [ The product button is no longer illuminated. The following message is displayed: Change grinder balance Select product 5. * If the grinding mixture is not what you would like or if you would like to change the grinding mixture for other coffee products, continue with step 6. -
Page 114: Milk Unit (Cold Milk Storage)
Optional features 7.10.3 Milk unit (cold milk storage) You can also create a variety of milk coffee drinks and trendy mixed milk beverages (cold milk output is also possible). Note: Just ask a manufacture-authorised cus- tomer service representative for assis- tance. -
Page 115: Machine Configuration For High Capacity Performance (Model 151 Sm-2)
Optional features 7.10.6 Machine configuration for high capacity performance (Model 151 SM-2) Machine configuration from left to right: - SM-2 with 1 ground coffee doser and coffee grinder each - Hot water and steam unit - SM-2 with 1 ground coffee doser and coffee grinder each Note: Just ask a manufacture-authorised cus-... -
Page 116: Optional Features Cold Milk-System
Optional features 7.10.9 Vision As the figure shows, the coffee machine can be incor- porated optimally into interior architecture décor. It is also possible to see the coffee as it is made. Note: Just ask a manufacture-authorised cus- tomer service representative for assis- tance. - Page 117 Appendix Chapter Contents Chapter Text Page Appendix....................... 8-2 CE Declaration of conformity ......................8-2 8.1.1 Manufacturer's address ........................8-2 8.1.2 Applied Standards ..........................8-2 Cleaning agent ..........................8-3 8.2.1 Cleaning powder for coffee machine....................8-3 Serial plate of steam generator and instant heater...............8-4 8.3.1 Steam generator (Type SM - DA…) ....................8-4 8.3.2 Steam generator (Type SM - DA…) ....................8-4 8.3.3...
-
Page 118: Appendix
EU directives. In case of any modifications of the units that have not been approved by Schaerer, this declaration is rendered invalid. A quality management system certified by Bureau Veritas, in accordance with SN EN ISO 9001: 2008, has been used to ensure the proper adherence to the requirements. -
Page 119: Cleaning Agent
Appendix Cleaning agent 8.2.1 Cleaning powder for coffee machine Important! Before you use the cleaning powder, read the label on the cleaning powder container and the "HEALTH AND SAFETY DATA SHEET." Should you not be in possession of the safety sheet, please order it from the distributing company. Purpose: For the daily cleaning of the coffee machine’s coffee system. -
Page 120: Serial Plate Of Steam Generator And Instant Heater
4500 W 6000 W 3000 W 8.3.1 Steam generator (Type SM - DA…) Basic model: Coffee machine 191 SM-2, 151 SM-2, 181SM-2, M. Schaerer AG, CH-3302 Moosseedorf Type F-Nr. DA..Constr. year: 1,7 bar 128 ºC Vol. 8,3 l : 3x 10 ºC... -
Page 121: Environmental Aspects
Appendix Environmental aspects Packaging: The machines are shipped in reusable cartons and palettes. Spare parts: Parts exchanged during a service are reconditioned as far as possible and used again. Coffee grounds: The coffee grounds in the grounds container can be put in the garden or added to the compost. - Page 122 Appendix Seite 8-6 BASM2 - EN - V06...
-
Page 123: Index
Index Index A B C D E F G H I K L M N O P R S T U V W Text Chapter Page Index Accessories (not included in shipment) 3.5.3 ....................Adjust refrigerator temperature on counter 3.2.7 ................ - Page 124 Cup warmer ..............................Index Daily cleaning - Schaerer Matic 2 ........................ Daily cleaning - Schaerer matic 2 Milk on counter ..................Daily cleaning - Schaerer matic 2 Milk under counter ................Daily cleaning brewing system ....................
- Page 125 Index Text Chapter Page Index Error messages without display 6.3.1 ....................... Exiting programming level 2 4.8.4 ........................Extra parts for the cold milk-System 3.6.2 ......................Index Fridge does not work 6.4.3 ..........................Fridge malfunctions ............................Full view (Model 19 SM-2) 3.1.1 ......................
- Page 126 Index Text Chapter Page Index „Level sensor steam time-out“ 6.3.13 ......................... Liability ................................Load machine data from card to coffee machine 4.8.5.15 ................Location 3.8.2.1 ..............................Log on MASTER card 4.9.1.12 ........................... Longer idle time of the coffee machine ..................
- Page 127 Index Text Chapter Page Index Payment systems ............................Performance Characteristics 3.3.1 ........................Performance Characteristics cold milk-System 3.4.1 ..................Performance Characteristics Fridge 3.4.2 ......................Power supply 3.3.3 ............................... Power supply for the cold milk-System 3.4.3 ....................
- Page 128 Index Text Chapter Page Index Stand-by-Button 3.1.2.1 ............................Standstill for several months (e.g. outside the season) 4.6.2 ................ Steam generator (Type SM - DA…) 8.3.1 ......................Steam generator (Type SM - DA…) 8.3.2 ......................Swan neck ............................
Need help?
Do you have a question about the Matic 2 and is the answer not in the manual?
Questions and answers