PRESONUS StudioLive RM32AI Visual Quickstart Manual
Hide thumbs
Also See for StudioLive RM32AI:
- Owner's manual (70 pages) ,
- Owner's manual (72 pages) ,
- Reference manual (19 pages)
Table of Contents
Advertisement
Quick Links
Table of Contents
Table of Contents
Front - 3
Rear - 4
Parameter Box - 9
9.1
Channel Options - 10
9.2
10.0 Presets Button - 10
Mix Settings - 12
13.1
FX Settings - 13
13.2
PreSonus
-AI - 2
™
StudioLive
RM32AI/RM16AI
®
™
Visual Quick Start Guide
Advertisement
Table of Contents

Related Manuals for PRESONUS StudioLive RM32AI


Summary of Contents for PRESONUS StudioLive RM32AI
-
Page 1: Table Of Contents
2.0 Register Your StudioLive RM-Series Mixer! — 2 -AI — 2 3.0 Download UC-Surface for iPad® and QMix ™ 4.0 Meet the StudioLive RM32AI and RM16AI — 3 Front — 3 Rear — 4 5.0 Wired Ethernet Control Setup — 4 6.0 Wireless Control Setup —... -
Page 3: What's In The Box
What’s in the Box PreSonus StudioLive RM32AI/RM16AI ® ™ Visual Quick Start Guide What’s in the Box • StudioLive RM32AI or RM16AI ™ • USB Wi-Fi dongle • FireWire 800 cable • Ethernet cable • Power cable • Product registration and software authorization card... -
Page 4: Register Your Studiolive Rm-Series Mixer
Your StudioLive RM-series mixer is more than a mixer; it’s a powerful suite of integrated hardware and software solutions that take you from stage to studio to fans. The following software is included with the StudioLive RM32AI and RM16AI. • UC-Surface battle-ready mix-control application •... -
Page 5: Meet The Studiolive Rm32Ai And Rm16Ai
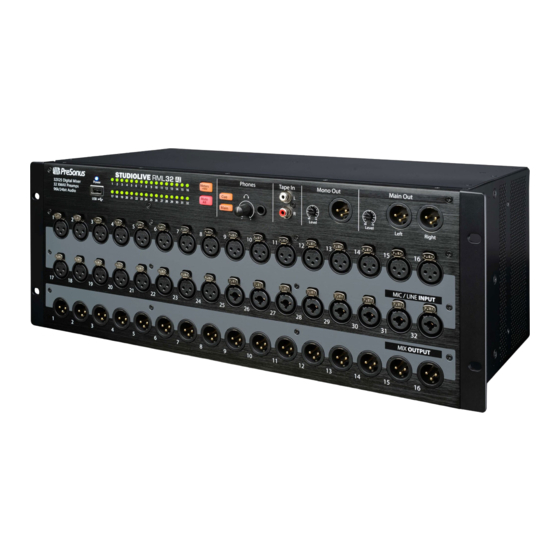
Meet the StudioLive RM32AI and RM16AI PreSonus StudioLive RM32AI/RM16AI ® ™ Visual Quick Start Guide Meet the StudioLive RM32AI and RM16AI Front 9 10 Meters +48V 11 12 13 14 15 16 STUDIOLIVE RM32 Mute 32 channel x 25 bus digital mix core... -
Page 6: Rear
Ethernet cable Your StudioLive RM32AI and RM16AI can be set up for control with a wired Ethernet connection in seconds. Simply connect the included Ethernet cable to the Ethernet control port on the back of the mixer and to a network router that is also connected to your computer or iPad. -
Page 7: Wireless Control Setup
PARTS INSIDE. REFER SERVICING TO QUALIFIED PERSONNEL. AVIS RISQUE DE CHOC ELECTRIQUE — NE PAS OUVRIR DESIGNED AND ENGINEERED BY PRESONUS • MANUFACTURED IN CHINA • PATENTS PENDING “PreSonus”,“STUDIOLIVE” AND “ACTIVE INTEGRATION” ARE REGISTERED TRADEMARKS OF PRESONUS AUDIO ELECTRONICS SERIAL NUMBER... -
Page 8: Computer Recording Setup
Touch screen computer StudioLive RM32AI and RM16AI have been designed for tight integration with the included Capture and Studio One Artist software. You can record a live show quickly and with confidence to Capture, save the StudioLive AI mixer scene with the Capture Session, and then open that recording, complete with mixer scene, in Studio One. -
Page 9: Getting Started With Uc-Surface
Visual Quick Start Guide Getting Started with UC-Surface StudioLive RM32AI and RM16AI are controlled with the UC-Surface battle-ready mix-control application, which is designed specifically for live mixing. All primary mixing functionality is at your fingers without the need to navigate complex views or deep menus. - Page 10 Getting Started with UC-Surface PreSonus StudioLive RM32AI/RM16AI ® ™ Visual Quick Start Guide Connected device tabs. These tabs switch between different mixers available for control on the network. Selecting a tab will open the associated mixer control. Settings button. Selecting this button will open the mixer settings screen. This is where you can configure global mixer settings such as sampling rate, permissions, wireless network settings, and more.
-
Page 11: Fat Channel Area
Fat Channel Area PreSonus StudioLive RM32AI/RM16AI ® ™ Visual Quick Start Guide Fat Channel Area The information displayed in this area will change based on where you are in your workflow. • Select any input channel, the Flex Master Channel, or a Main output to display the associated Fat Channel DSP. -
Page 12: Channel Options
Filter Groups for quicker navigation and enhanced mixing workflows. Learn more about Filter Groups in the section describing the Mix selection area or in the user manual and video guides in your My PreSonus account. 10.0 Presets Button This button brings up the Presets menu when working with the Fat Channel, graphic EQ, or FX bus and calls up the Complete Scenes menu when working in the Scenes/ Mute Groups. -
Page 13: Channel Strip Area
11.0 Channel Strip Area PreSonus StudioLive RM32AI/RM16AI ® ™ Visual Quick Start Guide 11.0 Channel Strip Area This area displays the input channels and fader levels for the selected mix. EQ micro view. Selects the associated channel and brings up the Fat Channel. -
Page 14: Mix Selection Area
13.0 Mix Selection Area PreSonus StudioLive RM32AI/RM16AI ® ™ Visual Quick Start Guide 13.0 Mix Selection Area This is the primary navigation area for your mixer. Here you’ll select the mix that’s currently being controlled by the channel faders. This is also where you’ll find the settings for each mix. -
Page 15: Fx Settings
13.0 Mix Selection Area PreSonus StudioLive RM32AI/RM16AI ® ™ Visual Quick Start Guide 13.2 FX Settings When an FX mix is selected, this area provides quick access to all FX mutes and Tap Tempo buttons for the delay effects. 14.0 Main Output Area EQ micro view. -
Page 16: Input Meter Bridge And Navigation
15.0 Input Meter Bridge and Navigation PreSonus StudioLive RM32AI/RM16AI ® ™ Visual Quick Start Guide 15.0 Input Meter Bridge and Navigation The Meter Bridge along the bottom the application shows the input meters for all available channels. A highlighted window shows the channels that are currently displayed in the input channel area. You can use the Meter Bridge to navigate to a specific channel by selecting the channel to “jump”...
Need help?
Do you have a question about the StudioLive RM32AI and is the answer not in the manual?
Questions and answers