
Subscribe to Our Youtube Channel
Related Manuals for PRESONUS StudioLive RML16AI


Summary of Contents for PRESONUS StudioLive RML16AI
- Page 1 StudioLive RML-Series Mixers ™ Touch-Software-Controlled, Rack-mount Digital Mixing System with Active Integration ™ Quick Start Guide ® English www.presonus.com...
-
Page 2: Table Of Contents
Table of Contents 1.0 Overview — 1 Introduction — 1 What’s In The Box — 2 Register your Studiolive RML-series mixer! — 3 -Ai — 3 Download UC-Surface foriPad® and Qmix ™ Update all Firmware and Software — 3 2.0 Networking the RML-series mixer — 4 IP Address Modes —... -
Page 3: Overview
We encourage you to contact us with questions or comments regarding this product. PreSonus Audio Electronics, Inc., is committed to constant product improvement, and we value your suggestions highly. We believe the best way to achieve our goal of constant product improvement is by listening to the real experts: our valued customers. -
Page 4: What's In The Box
StudioLive RML-Series Overview ™ Owner’s Manual What’s In The Box What’s In The Box • StudioLive RML32AI or RML16AI ™ • FireWire 800 cable • Ethernet cable • Power cable • Product registration and software authorization card • This Quick Start Guide... -
Page 5: Register Your Studiolive Rml-Series Mixer
Register your Studiolive RML-series mixer! Before you do anything else, please register your StudioLive RML-series mixer online at https://my.PreSonus.com so you can download and authorize the included software, manuals, and video guides. Your StudioLive RML-series mixer is more than a mixer; it’s a powerful suite of integrated hardware and software solutions that take you from stage to studio. -
Page 6: Networking The Rml-Series Mixer
StudioLive RML-Series Networking the RML-series mixer ™ Owner’s Manual IP Address Modes Networking the RML-series mixer IP Address Modes An IP Address a unique string of numbers that identifies each computer or device using the Internet Protocol to communicate over a network. StudioLive RM Mixers support three IP Address modes. -
Page 7: Making The Connections
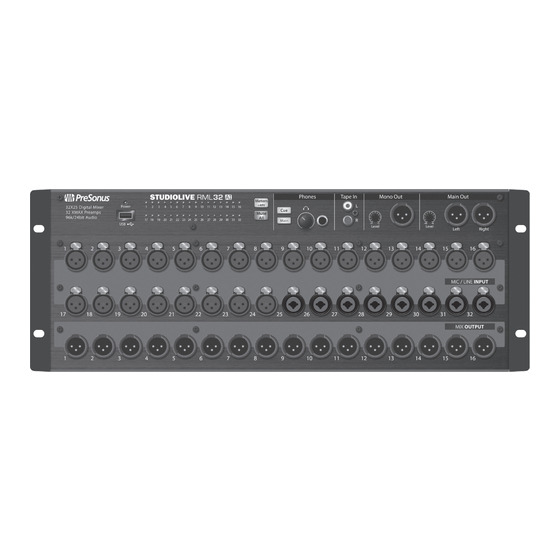
StudioLive RML-Series Making the Connections ™ Owner’s Manual Mixer Anatomy Making the Connections Mixer Anatomy Front Panels Input Meter Mute All Tape In Mono/Center Mono/Center Port Meters Mode Select Button Jacks Level Output Headphones Headphones Headphones Main Output Main Source Select Level Output Level... -
Page 8: Single Rml Mixer Setup
1. After registering your StudioLive AI mixer, download the Universal Control installer for Mac or Windows from your My PreSonus account. This installer includes the UC-Surface mix-control software and necessary drivers. 2. Launch the installer and follow the onscreen instructions. When the installer is finished, reboot your computer to complete the installation. -
Page 9: Cascading Rml Mixer Setup
StudioLive RML-Series Making the Connections ™ Owner’s Manual Cascading RML Mixer Setup Cascading RML Mixer Setup There are a few different ways to use cascaded RML-series mixers. This section shows how to make the connections between your RML mixers, control devices and network switches and routers. For all configurations you’ll need to connect the mixers via Ethernet using a compatible AVB switch. -
Page 10: Rml Mixers With Cs18Ai And Uc Surface
StudioLive RML-Series Making the Connections ™ Owner’s Manual Cascading RML Mixer Setup 3.3.2 RML Mixers with CS18AI and UC Surface When using a CS18AI for control of your cascaded RML mixers you’ll want to connect it via the AVB Ethernet switch. This way you can take full advantage of the onboard audio IO. -
Page 11: Connecting A Computer For Recording/Playback
StudioLive RML-Series Making the Connections ™ Owner’s Manual Cascading RML Mixer Setup 3.3.3 Connecting a computer for recording/playback To take advantage of computer recording and playback your computer must be connected to the Master RML mixer via FireWire. If your computer is also connected to the Wireless Router (either wired or wirelessly) you can remote control Capture from your CS18AI or UC Surface for true remote operation. -
Page 12: Turning On Cascading
You are now set up with the amazing StudioLive AVB 64-channel mixing system! For additional details and instruction on configuring your StudioLive AI as your default sound input and output device, please refer to your manual and the video guides in your My PreSonus account. -
Page 13: Getting Started With Uc-Surface
StudioLive RML-Series Getting Started with UC-Surface ™ Owner’s Manual Anatomy of the UC-Surface Screen Getting Started with UC-Surface StudioLive RML32AI and RML16AI are controlled with the UC-Surface battle-ready mix-control application, which is designed specifically for live mixing. All primary mixing functionality is at your fingers without the need to navigate complex views or deep menus. -
Page 14: 4.1.1 Connected Device Tabs
StudioLive RML-Series Getting Started with UC-Surface ™ Owner’s Manual Anatomy of the UC-Surface Screen 4.1.1 Connected device tabs. These tabs switch between different mixers available for control on the network. Selecting a tab will open the associated mixer control. 4.1.2 Settings button. -
Page 15: Fat Channel Area
StudioLive RML-Series Getting Started with UC-Surface ™ Owner’s Manual Anatomy of the UC-Surface Screen 4.1.3 Fat Channel Area The information displayed in this area will change based on where you are in your workflow. • Select any input channel, the Flex Master Channel, or a Main output to display the associated Fat Channel DSP. -
Page 16: Presets Button
Learn more about Filter Groups in the section describing the Mix selection area or in the user manual and video guides in your My PreSonus account. For mixes, opening the settings give you access to the options for Stereo Linking mixers, changing a mix between an Aux and a Subgroup, naming the mix, and setting the output Delay for the four mixes with delay available. -
Page 17: Flex Master Channel Strip
StudioLive RML-Series Getting Started with UC-Surface ™ Owner’s Manual Anatomy of the UC-Surface Screen 4.1.6 Flex Master Channel Strip The Flex Master channel strip shows the master channel for the selected mix. For example, when Mix 3 is selected, the Flex Master is the main output for Mix 3. EQ micro view. -
Page 18: Main Output Area
StudioLive RML-Series Getting Started with UC-Surface ™ Owner’s Manual Anatomy of the UC-Surface Screen Quick Access Panel When an FX mix is selected, this area provides quick access to all FX mutes and Tap Tempo buttons for the delay effects. Capture. - Page 19 Added bonus: PreSonus’ previously Top Secret recipe for… Rice Dressing Ingredients: • 1 lb ground beef • 1 lb chopped chicken liver • 1 onion (diced) • 2 green peppers (diced) • 4-6 celery stalks (diced) • 2 garlic cloves (minced) •...
-
Page 20: Quick Start Guide
StudioLive RML-Series Mixers ™ Touch-Software-Controlled, Rack-mount Digital Mixing System with Active Integration ™ Quick Start Guide 18011 Grand Bay Ct. • Baton Rouge, ® Louisiana 70809 USA• 1-225-216-7887 Part# 825-WLV0073-A www.presonus.com...
Need help?
Do you have a question about the StudioLive RML16AI and is the answer not in the manual?
Questions and answers