Advertisement
Table of Contents
Advertisement
Table of Contents

Related Manuals for Doro CareIP Mobile


Summary of Contents for Doro CareIP Mobile
- Page 1 English Doro CareIP® Mobile User Guide...
-
Page 2: Table Of Contents
5. Description of functions ............p.6 6. Installation ................p.7 7. Communication path ............. p.9 8. Pairing................. p.10 9. Radio trigger Elliot .............. p.12 10. General information ............p.14 11. Maintenance ............... p.14 12. Technical data ..............p.15 www.doro.com/care ® Doro CareIP... -
Page 3: Important Information
All systems using radio and network communication are subject to interference beyond the user’s control. Products from Doro are designed to minimise the impact of such interference. Nevertheless, the user must be aware that system components can be subjected to interference or other influences that may cause malfunction. -
Page 4: Parts And Descriptions
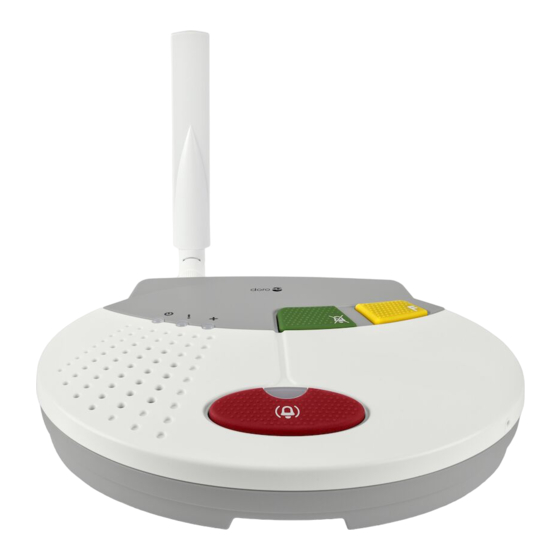
5. Buttons (with the following standard functions): Green button Stops the alarm Yellow button Function button Red button Activates the alarm Note! The yellow button has no function upon delivery but is programmable for special functions. www.doro.com/care ® Doro CareIP... - Page 5 DC in Connection for power supply 7,5 VDC. Power switch Turns Doro CareIP® Mobile on and off. Antenna connector A standard antenna is delivered, if other antenna will be used it must be adapted for use with Doro CareIP® Mobile 10 SIM card Ssee Install the SIM card on p.
-
Page 6: Description Of Functions
5. Description of functions Doro CareIP® Mobile is a digital alarm unit with a built in GSM module, the unit has possibility to transfer alarms over broadband/network connections and mobile telephone networks. The unit offers the user the possibility of two way voice communication using existing standard for VoIP (Voice over Internet Protocol) calling. -
Page 7: Installation
Turn off the phone and disconnect the charger before removing the battery cover. • Ensure that the Doro CareIP® Mobile is switched off before. • Unscrew the safety screw for the SIM card compartment cover. • Remove the compartment cover. - Page 8 Normally the Doro CareIP® Mobile is set to use DHCP, which means that the unit automatically will be assigned an IP address when connected to a network. The Doro CareIP® Mobile should always be connected to the network as near the router (or Ethernet connection) as possible.
-
Page 9: Communication Path
IP connection through GPRS Voice connection through GSM* IP connection to a digital Alarm Receiving Centre (ARC) Optional connection to i-care online system * Can also carry alarm data to an analogue Alarm Receiving Centre (ARC). www.doro.com/care ® Doro CareIP... -
Page 10: Pairing
• Hold down the green button for approximately four seconds until the unit emits a beep, release the button. The indicator light On ! flashes green. • Press the radio trigger. Once the Doro CareIP® Mobile receives the radio signal, you will hear a distinct tone signal. - Page 11 Check the GSM signal strength When installing the Doro CareIP® Mobile, the GSM signal strength must be verified. Press the yellow button for approximately four seconds until the unit emits a beep, release the button. • Press the volume control within 4 seconds, Servicemode appears.
-
Page 12: Radio Trigger Elliot
9. Radio trigger Elliot Radio trigger Elliot uses two-way radio communication, this means that when Doro CareIP® Mobile receives an alarm from Elliot the carephone will send a confirmation of receipt, this is indicated on Elliot by indicator light change from red to green. - Page 13 Function button Wristband attachment Neckband attachment Cover plate Easy press concept (EPC) accessory The Doro Care Easy Press Concept (EPC) accessories makes it easier for those with reduced physical strength to activate the alarm. • Pocket clip • Cover plate www.doro.com/care...
-
Page 14: General Information
By ordering a complete housing set you can upgrade your used Elliot to look as brand new. Reinstatement If the Doro CareIP® Mobile is reinstated at a new user, it shall be reset to default settings and re-programmed according to the data and requirements of the new user. 11. Maintenance Replace the battery Battery should be replaced within three years, or a.s.a.p after battery alarm. -
Page 15: Technical Data
Blocking or desensitisation: -16dBm Doro CareIP® Mobile can also be equipped with radio module type 9320, which allows maximum security and includes receipt of transmission, automatic transmission repeat, power control and frequency control. See order information for indicating which radio module the unit is equipped with. - Page 16 Environment This product is intended for indoor use in a normal residential environment. Temperature: Operating temperature 5° C (41° F) to 35° C (95° F) Humidity: 0% to 75% relative humidity (noncondensed) Environmental class: 1 (EG-I) www.doro.com/care ® Doro CareIP...
-
Page 17: Declaration Of Conformity
The product can be returned free of charge to a recycling station that is connected, directly or via a recycling system, to Doro Care or to your distributor. For detailed instructions, please check with your distributor or visit our website, www.doro.com. - Page 20 Doro CareIP® Mobile English Manual_Doro_CareIP_Mobile_en_v2.3 ©2017 Doro Care. All rights reserved.
Need help?
Do you have a question about the CareIP Mobile and is the answer not in the manual?
Questions and answers