
Related Manuals for Vaisala HM41


Summary of Contents for Vaisala HM41
- Page 1 User’s Guide www.vaisala.com Vaisala HUMICAP® Hand-Held Humidity and Temperature Meter HM40 Series M211088EN-C...
- Page 2 The contents of this manual are subject to change without prior notice. This manual does not create any legally binding obligations for Vaisala towards customers or end users. All legally binding obligations and agreements are included exclusively in the applicable supply contract or the General Conditions of Sale and General Conditions of Service of Vaisala.
-
Page 4: Table Of Contents
Table of Contents ................... 1 First Startup ..................... 4 Initial Settings ................4 Product Overview ................. 5 HM41 – Front .................... 7 HM41 – Back ..................... 8 HM42 for Tight Spaces ............... 9 HM45 – Remote Probe with Handle ..........10 HM46 for Mechanically Demanding Applications .... - Page 5 Settings Submenu ................30 Language ..................30 Units ....................31 Time & Date ................. 31 Pressure ..................33 Reminder ..................34 Backlight ..................35 Battery ..................35 Power off ..................36 Navigation ................... 36 Rounding ..................36 Factory Settings ............... 37 How to Measure ...................
- Page 6 General ..................59 HM41 Dimensions ..............60 HM45 Dimensions ..............61 HM42 and HM46 Probe Dimensions ........ 62...
-
Page 7: First Startup
First Startup 1. Check that the probe is securely attached and remove the yellow transport protection cap from the probe. 2. Open the battery cover and insert two AA-size batteries. 3. Close the battery cover and turn on the meter by pressing the Power button. -
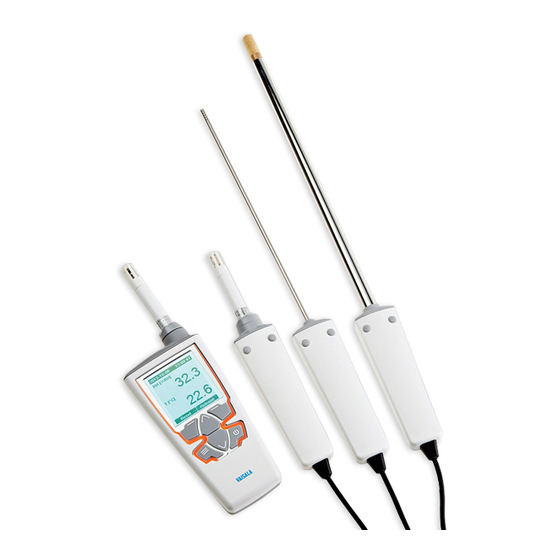
Page 8: Product Overview
- HM45 – The HM45 uses the same HMP113 probe as HM41, but with a probe handle connected to the HM40 meter with a spiral cable, providing additional reach. - Page 9 - Powered by standard AA size batteries (2×). - Indicator operation temperature range -10°C ... +60°C. Probe operation temperature ranges -40 °C … +180°C, depending on probe model. - Short (HM41/HM45) or long (HM42/HM46) soft case, depending on probe length. - Belt clip. Optional accessories: - Different filters for increased protection against contaminants.
-
Page 10: Hm41 - Front
HM41 – Front Filter and sensor HMP113 probe Probe holder Display Left function Right function Down Menu Power... -
Page 11: Hm41 - Back
HM41 – Back Belt clip Battery cover Batteries 2 x AA... -
Page 12: Hm42 For Tight Spaces
HM42 for Tight Spaces... -
Page 13: Hm45 - Remote Probe With Handle
HM45 – Remote Probe with Handle HMP113 probe Orientation mark Cable connector Probe holder HM40 handle... - Page 14 You can connect the HM45 handle to the belt clip for single handed use. Simply push the belt clip into the slot in the handle. When the handle is connected to the meter in this way, you can lay down the meter on top of the handle.
-
Page 15: Hm46 For Mechanically Demanding Applications
HM46 for Mechanically Demanding Applications... -
Page 16: Batteries
Do not confuse them with lithium-ion batteries, which cannot be used in the HM40. NiMH batteries are rechargeable, and available from Vaisala as an option. For order codes, see section Accessories and Parts on page 53. Instructions for using the optional USB charger are provided in section... -
Page 17: Charging
2. When the LED stops blinking and stays on, the batteries are charged. The charging time is several hours for two fully discharged NiMH batteries. If you are not using a Vaisala-supplied charger and rechargeable batteries, read and follow the manufacturer’s own charging instructions. -
Page 18: Parameters Explained
Parameters Explained The table below describes the parameters measured by the HM40. All of the parameters are measured or calculated when the meter is on, independent of what is currently displayed. The parameters are also described in the indicator’s Help menu (see page 29). Parameter Symbol Unit(s) -
Page 19: Measurement Views
Measurement Views Screen Layout and Controls Alert indicator Current quantity Battery indicator Measurement display area Current view Long press: Change tag point view Short press: tag point and hold screen Enter menu Change quantity Long press: power on/off Short press: activate backlight Pressing the right function button holds the screen and tags the current measurement point. -
Page 20: Indicators
Indicators Battery charge indicator Fresh batteries will always show three bars. When the indicator shows two bars, the voltage of the batteries has started to drop. When there is a single (blinking) bar left, you should replace the batteries. The meter will turn off automatically when the battery voltage drops too low. - Page 21 Parameter indicator The selected parameter is highlighted by a light frame. The symbol on the right stands for all parameters. For the list of parameters, see section Parameters Explained on page 15. Calibration reminder indicator This indicator appears when you have set up a calibration reminder and the calibration is due.
-
Page 22: Numeric View
Numeric View The Numeric view shows the current values of the selected humidity parameter and temperature. In the all parameters view, the font is smaller to fit all values on screen. -
Page 23: Statistics View
Statistics View The Statistics view shows the current value of the selected parameter, as well as the maximum, average, and minimum value since the measurement was started. There is also a counter that shows how long the measurement has been running. The icons are: Maximum Average... -
Page 24: Graph View
Graph View The Graph view shows a continuously updating graph of the selected parameter and temperature. The graph limits and spacing adjust dynamically to show the full range of measurements. HM40 has no permanent memory for graph data: when the meter is turned off, the graphs are cleared. - Page 25 You can change the timescale of the graph in the Main menu. By default, the graph will automatically change the timescale to fit the measured data. If you select a short timescale, only the most recent data will be visible. The graph view is not available in the all parameters view.
-
Page 26: Hold And Tag
Hold and Tag If you press the right function button (Hold button) in a measurement view, two things happen: - The measurement view freezes until you press the Release button. - The latest measurement point is tagged (marked and stored in permanent memory). See section Tagged Points on page 26. - Page 27 You can view the measurement values at the tagged points in the menu. You can also view and delete tagged points from memory in the menu options. See Tagged Points on page 26. When the screen is held, the top of the display displays the current date and time.
-
Page 28: Main Menu
Main Menu You can open the menu from the measurement view at any time by pressing the menu button. If you are already in the menu, pressing the menu button returns you to the measurement view. If you are in a submenu, the menu button returns you to the previous menu level. -
Page 29: Tagged Points
Some menu screens have more content than can be visible at one time. This is indicated by a scroll bar that appears on the right side of the screen. Use the arrow buttons to scroll up and down. Tagged Points Select Tagged points in the main menu to see the list of stored points and values. -
Page 30: Graph Duration
The data stored for each tagged point includes: - Time when the point was tagged. - Serial number of the probe that was used (useful for identifying the point) - Measured value of each parameter. Press the Delete button to delete the point that is currently shown. -
Page 31: Settings
Settings Opens the Settings menu. The menu options are described in section Settings Submenu on page 30. Calibration In the Calibration submenu, you can perform an adjustment procedure that corrects the humidity and temperature measurement of the meter. For more information and the adjustment procedure, see section Calibration on page 47. -
Page 32: Help
Help Opens a menu with help topics on measurement, calibration, and the measured parameters. The help menu also includes a device information screen where you can view technical information about your indicator and probe. -
Page 33: Settings Submenu
Settings Submenu Language In the Language screen, you can change the display language of the meter. The choices are: - English (en) - German (de) - French (fr) - Finnish (fi) - Spanish (es) - Swedish (sv) - Chinese (zh) - Russian (ru) - Japanese (jp) - Portuguese (pt) -
Page 34: Units
Units The Units setting determines the measurement system that is used for the parameters: metric or non- metric. - Metric - Non-metric The Pressure unit is set separately: - hPa - bar - atm - PSI Time & Date In the Time & Date menu, you can set the current date and time, and their presentation formats. - Page 35 In the Date setup screen, you can set the current date: - Arrow buttons change the selected value - Left function button selects the next value (year, month, or day). - OK button stores the date and returns to the Settings menu.
-
Page 36: Pressure
Pressure In the Pressure setup screen, you can set the current ambient pressure. The pressure information is used when calculating certain humidity parameters, such as mixing ratio (symbol x). If the ambient pressure differs significantly from the default setting of 1.0132 bar (due to high altitude, for example), set the correct pressure value so that the HM40 meter can calculate the... -
Page 37: Reminder
Reminder Use the Reminder option to set a reminder for calibrating the probe. You can choose a preferred calibration interval of 3, 6, 12, or 24 months. Calibrating the probe resets the calibration interval. To remove the reminder from use, select Disabled. -
Page 38: Backlight
Backlight Always on: Screen is always lit. This option will shorten the battery life significantly. Always off: Screen is always unlit. This option provides the best battery life. Delay (30s): Backlight will automatically turn on when the user presses any button. The backlight will turn off after 30 seconds of inactivity. -
Page 39: Power Off
Power off The Power off setting defines how long the device can remain inactive before powering off automatically. The time limit options are 10, 30, and 60 minutes. Select Never to disable automatic power off. HM40 has no permanent memory for graph data: when the meter is turned off, the graphs are cleared. -
Page 40: Factory Settings
Factory Settings The Factory settings option restores all settings to their default values. Probe calibration is not affected. -
Page 41: How To Measure
How to Measure Remove the Transport Protection Cap Remove the yellow transport protection cap from the probe when taking the meter into use. Measure in a Stable Environment If the measurement conditions are changing, you cannot get a reliable measurement result. Do not measure near heat sources, air conditioning, open doors, or windows. - Page 42 Avoid Condensation and Rain If the humidity sensor element becomes wet, the meter cannot measure until the sensor is dry again. Avoid rain and conditions where condensation can form on the sensor. Do not replace the transport protection cap if the probe or the cap is wet, since it will prevent the probe from drying.
-
Page 43: Application Examples
HM45 HM45 uses the same HMP113 probe as HM41. In HM45, the probe is attached to a handle that is connected to the HM40 indicator with a spiral cable, providing additional reach. - Page 44 HM42 HM42 has a small, Ø 4 mm probe head with a length of 235 mm. The thin structure of the probe makes it suitable for measurements in tight places such as joint spaces between tiles and beneath flooring. Typical applications include mapping the affected area in water damage restoration, measuring moisture in insulation materials, and measuring the equilibrium humidity of, for example, timber.
- Page 45 When measuring, for example, from a wall so that the probe is placed in a horizontal position, make sure the probe does not bend: do not leave the probe unsupported. Always insert the probe at least 4 cm inside the structure from which you are taking measurements.
- Page 46 HM46 HM46 uses a 32 cm stainless steel probe that is optimized for mechanically demanding applications that require a robust probe structure, for example measurements in relatively high temperatures (up to +100 °C, temporarily even +180 °C) or in dirty processes.
-
Page 47: Maintenance
Maintenance Cleaning The HM40 can be cleaned by wiping it with a moist cloth. If the filter becomes contaminated, it is very likely to affect the humidity measurement since residue on the filter will retain some moisture. Dirty filters should be replaced. -
Page 48: Changing The Filter
Changing the Filter For information on filter options, see Filters on page 54. 1. Turn the filter counter- clockwise to open it. 2. Turn the filter until it can be removed. 3. Pull the filter out straight. Do not touch the sensors with the filter. -
Page 49: Changing The Probe
Changing the Probe Changing the probe is tool-free and is done in the same way for the HM41 probe attached to the meter body and when using one of the probes with a handle. 1. Press the power button to turn off the meter. -
Page 50: Calibration
You can do this yourself using a humidity reference (for example, the Vaisala Humidity Calibrator HMK15), or send the probe to a Vaisala Service Center for calibration For instructions on setting a calibration reminder message (3-24 month interval), see Reminder on page 34. -
Page 51: Calibrating The Hm40 Using Hmk15
Calibrating the HM40 Using HMK15 The HMK15 Humidity calibrator allows you to produce known humidity environments using saturated salt solutions. Performing a good calibration takes some time and preparation. Read the HMK15 User’s Guide before performing your first calibration with the HMK15. - Page 52 3. Select the number of calibration points at menu item [2] Points. You can perform a 1- point or 2-point calibration. For a 2-point calibration, you need two reference environments. For example, LiCl and NaCl salt chambers provide 11% and 75% relative humidity references.
- Page 53 5. Select menu item [3] Point 1 and press the Set button. The meter now shows the currently measured value of the selected parameter. Set the reference value using the arrow buttons and press the OK button. The correction to the measurement at point 1 is now shown in the text for menu item [3].
- Page 54 7. Select menu item [4] Point 2 and press the Set button. The meter now shows the currently measured value of the selected parameter. Set the reference value using the arrow buttons and press the OK button. The correction to the measurement at point 2 is now shown in the text for the menu item [4].
- Page 55 9. Select menu item [6] Apply to save the calibration in the probe. Check the applied corrections in the confirmation screen and press the Apply button. To exit without applying the correction, press the Cancel button.
-
Page 56: Accessories And Parts
Membrane filter, up to 80 °C 10159HM Plastic grid filter, up to 80 °C 6221 Disposable sleeve (50 pcs) 1558 Probe holder HM36915 When ordering an HMP113 probe for HM41 and HM45, use the HMP113 configuration code V00B2C1A0 to get the compatible probe. -
Page 57: Filters
Filters HM41 & HM45 (HMP113 probe) Plastic grid filter The standard choice. It provides the fastest response time, as air can flow freely around the sensors. Plastic grid with Has a membrane under the plastic grid (0.2 µm membrane filter pore size) for additional protection against contaminants. -
Page 58: Chargers And Batteries
Chargers and Batteries You can order an external battery recharger with USB connection and compatible NiMH rechargeable batteries from Vaisala. For more information, see the following sections of this manual: - Batteries on page 13 - Charging on page 14... -
Page 59: Technical Data
Measurement range 0 ... 100 %RH Accuracy (including non-linearity, hysteresis, and repeatability) HM41 at 0 … +40 °C ±1.5 %RH (0 ... 90 %RH) ±2.5 %RH (90 ... 100 %RH) at -10 … 0 °C and +40 … +60 °C ±3.0 %RH (0 ... - Page 60 26 s steel grid HM46 (90 %) with brass sintered filter 40 s Stability ±2 %RH over 2 years Humidity sensor HM41, HM45, HM46 HUMICAP® 180R HM42 HUMICAP® 100R-Mini Temperature Measurement range HM41 -10 ... +60 °C (+14 ...+140 °F) HM42 -40 ...
-
Page 61: Mechanical
Probe holder PC/ABS blend (grey) Probe handle PC/ABS blend (white), PC/ABS blend (gray, HM45) or PBT (gray, HM42/46 HMP113 probe or probe PC/ABS blend (white, HM41/45), measurement head or stainless steel (HM42/46) Filter HM41, HM45 PC (glass reinforced) HM42 Stainless steel, PTFE membrane... -
Page 62: General
General Power-up time <3 s Batteries 2 × AA sized, 1.5 V Calculated parameters Td, Tw, a, x, h Menu languages English, Chinese (simplified), Finnish, French, German, Japanese, Portuguese, Russian, Spanish, Swedish Display LCD (140 x 160 pixels) Operation time (typical) typical 100 hours (without backlight) Operation temperature range... -
Page 63: Hm41 Dimensions
HM41 Dimensions The dimensions are given in millimeters (mm). -
Page 64: Hm45 Dimensions
HM45 Dimensions The dimensions are given in millimeters (mm). -
Page 65: Hm42 And Hm46 Probe Dimensions
HM42 and HM46 Probe Dimensions The dimensions are given in millimeters (mm). - Page 67 Download manuals at: www.vaisala.com/manuals Technical support by e-mail: helpdesk@vaisala.com Warranty information: www.vaisala.com/warranty Vaisala Service Centers: www.vaisala.com/servicecenters Purchase instruments and spare parts online at store.vaisala.com *M211088EN* ...
Need help?
Do you have a question about the HM41 and is the answer not in the manual?
Questions and answers