VTech BM1000 User Manual
Safe & sound
digital audio baby monitor
Hide thumbs
Also See for BM1000:
- Quick start manual (133 pages) ,
- User manual (21 pages) ,
- User manual (26 pages)
Table of Contents
Advertisement
Advertisement
Table of Contents

Subscribe to Our Youtube Channel
Related Manuals for VTech BM1000


Summary of Contents for VTech BM1000
- Page 1 Safe & Sound Digital Audio Baby Monitor BM1000 User guide Model: BM1000...
- Page 2 Congratulations On purchasing your new VTech product. Before using this product, please read Important safety instructions on the next page of this manual. This manual has all the feature operations and troubleshooting necessary to install and operate your new VTech product.
-
Page 3: Important Safety Instructions
Important safety instructions When using your equipment, basic safety precautions should always be followed to reduce the risk of fire, electric shock and injury, including the following: 1. Follow all warnings and instructions marked on the product. 2. Adult setup is required. 3. - Page 4 Important safety instructions 16. This product should not be placed in any area where proper ventilation is not provided. Slots and openings in the back or bottom of this product are provided for ventilation. To protect them from overheating, these openings must not be blocked by placing the product on a soft surface such as a bed, sofa or rug.
- Page 5 Important safety instructions Cautions Use and store the product at a temperature between 10 o C and 39 o C. 2. Do not expose the product to extreme cold, heat or direct sunlight. Do not put the product close to a heating source. 3.
-
Page 6: Table Of Contents
Table of contents Getting started ..............1 Parts checklist..............1 Baby unit installation ............2 Parent unit installation ............ 3 Baby unit overview............4 Parent unit overview ............5 Parents unit lights. Positioning and operating range ........7 Position the audio monitor. -
Page 7: Getting Started
Check to make sure the package contains the following items. Save your sales receipt and original packaging in the event warranty service is necessary. Parent unit Parent unit 2 batteries for (BM1000 PU) battery parent unit compartment cover User guide... -
Page 8: Baby Unit Installation
Getting Started Baby unit installation Install the baby unit as shown below. Make sure the wall socket is switched on. Power outlet Baby unit power adaptor Self-adhesive strap 1. Choose either power adaptor that comes with the package. Insert the DC plug of the power adaptor into the DC socket on the side of the baby unit. -
Page 9: Parent Unit Installation
Getting Started Parent unit installation The package comes with two rechargeable batteries. You can power up the parent unit by using the two rechargeable batteries or by connecting it to the mains power. However, even if the parent unit is connected to the mains power, we recommend you to also install the rechargeable batteries. -
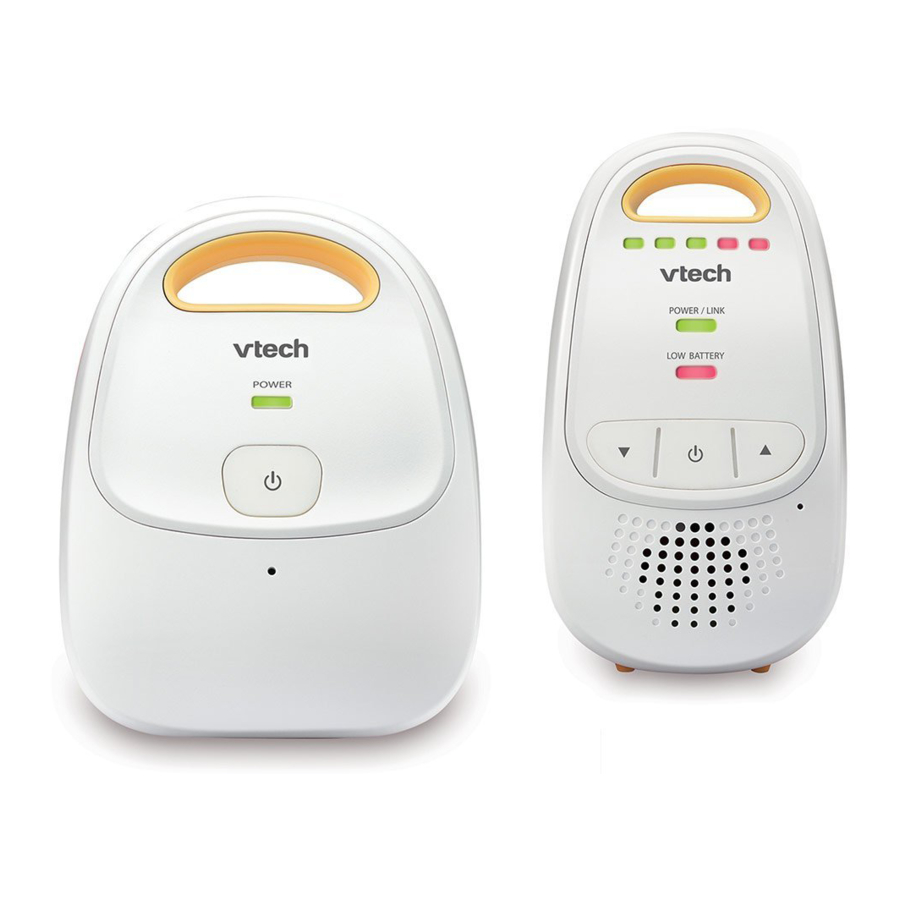
Page 10: Baby Unit Overview
Getting started Baby unit overview Power indicator On when the baby unit is switched on. Off when the baby unit is switched off. (On/off) Press and hold to turn on/off the baby unit. Microphone... -
Page 11: Parent Unit Overview
Getting started Parent unit overview Sensitivity LEDs Power Indicator Light Low Battery / Charging Indicator Light (Volume down) Press to decrease the speaker volume. (On/off) Press and hold to turn on or off. Speakerphone (Volume up) Press to increase the speaker volume. Belt Clip Battery Compartment Cover... -
Page 12: Parents Unit Lights
Getting started Parent unit overview (continued) Parents unit lights 3 green lights and 2 red lights indicating the sound level detected by the baby unit. Green lights indicate a moderate level of sound is detected. Red lights indicate a higher level of sound is detected. -
Page 13: Positioning And Operating Range
Getting Started Positioning and operating range Position the audio monitor Place the parent unit within the operating range of the baby unit. We recommend the parent unit is at least 1.5 metres away from the baby unit to avoid audio feedback. If you still experience audio feedback, move the parent unit and the baby unit farther apart. -
Page 14: Using Your Baby Monitor
Using your baby monitor Power the baby unit on or off • Press and hold for 2 seconds to turn on the baby unit. The Power indicator light turns on. • Press and hold for 2 seconds again to turn off the baby unit. -
Page 15: Appendix
Appendix Troubleshooting If you have difficulty with your audio monitor, please try the suggestions below. My audio monitor does not work at all. • Make sure the baby unit, parent unit and the batteries are installed and charged correctly. For optimum daily performance, charge the parent unit when it is not in use. - Page 16 Appendix Troubleshooting (continued) The parent unit plays any sounds from the baby unit and I think it is too noisy. • You may need to adjust the speaker volume on the parent unit. The parent unit does not play any sound when there is noise from the baby unit.
- Page 17 Appendix Troubleshooting (continued) The battery does not charge in the parent unit or the parent unit battery does not accept charge. • Make sure the batteries are installed in the parent unit battery compartment correctly. The Charging indicator light on the parent unit should be on when charging.
-
Page 18: Customer Service & Product Warranty
Appendix Customer service & Product warranty IMPORTANT Please retain this booklet with your sales receipt as proof of the date of purchase. -
Page 19: Technical Specifications
Appendix Technical specifications No. Of channels: Frequency: 1881.792 - 1897.344 MHz Power supply Use only adaptor listed below: Electrical power: Baby unit: Ten Pao - S004LB0600045 Input: 100 - 240VAC 50/60Hz 150mA Output: 6VDC 450mA Parent unit: Ten Pao - S004LB0600045 Input: 100 - 240VAC 50/60Hz 150mA Output 6VDC 450mA Use only battery listed below:... -
Page 20: Disposal Of Batteries And Product
Appendix Disposal of batteries and product The crossed -out wheelie bin symbols on products and batteries, or on their respective packaging, indicates they must not be disposed of in domestic waste as they contain substances that can be damaging to the environment and human health.
Need help?
Do you have a question about the BM1000 and is the answer not in the manual?
Questions and answers