Table of Contents
Advertisement
Quick Links
More detailed operating instructions are available in "Operating Instructions (PDF format)". To
read it, download it from the website.
https://eww.pavc.panasonic.co.jp/hdw/oi/HC-X1/
≥ Click the desired language.
* You will need Adobe Reader to browse or print the Operating Instructions (PDF format).
You can download and install a version of Adobe Reader that you can use with your OS from
the following website. (As of November 2016)
http://www.adobe.com/products/acrobat/readstep2.html
Please read these instructions carefully before using this product, and save this manual for future use.
E
GC
Basic Operating Instructions
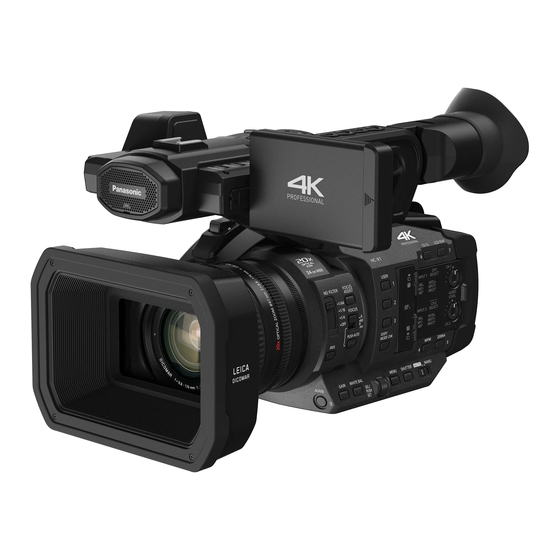
4K Video Camera
HC-X1
Model No.
DVQX1102ZA
F1116YF0
Advertisement
Table of Contents

Related Manuals for Panasonic HC-X1


Summary of Contents for Panasonic HC-X1
- Page 1 Basic Operating Instructions 4K Video Camera HC-X1 Model No. More detailed operating instructions are available in “Operating Instructions (PDF format)”. To read it, download it from the website. https://eww.pavc.panasonic.co.jp/hdw/oi/HC-X1/ ≥ Click the desired language. * You will need Adobe Reader to browse or print the Operating Instructions (PDF format).
-
Page 2: Information For Your Safety
Information for Your Safety For the AC mains plug of three pins Before use ∫ Caution for AC mains lead Remove the connector cover. For your safety, please read the following text How to replace the fuse carefully. The location of the fuse differ according to the This appliance is supplied with a moulded three type of AC mains plug (figures A and B). -
Page 3: Emc Electric And Magnetic Compatibility
∫ Concerning the battery Warning Risk of fire, explosion and burns. Do not disassemble, heat above 60 oC or incinerate. CAUTION ≥ Danger of explosion if battery is incorrectly replaced. Replace only with the type recommended by the manufacturer. ≥ When disposing of the batteries, please contact your local authorities or dealer and ask for the correct method of disposal. -
Page 4: Cautions For Use
Note regarding the Power Management ≥ Recorded data may be damaged, or pictures function specified under COMMISSION may be distorted, by strong magnetic fields REGULATION (EC) No 1275/2008 created by speakers or large motors. implementing Directive 2009/125/EC of the ≥ Electromagnetic wave radiation generated by European Parliament and of the Council. -
Page 5: About The Battery
≥ If sea water splashes onto the unit, wipe off When this unit is turned on, do not use it in the water with a well wrung cloth. Then wipe direct contact with the skin for a long period the unit again with a dry cloth. of time. - Page 6 Prepare spare batteries when going out for ≥ When using the AC adaptor or battery recording. charger, it may generate whirring sounds. ≥ Prepare batteries enough to last for 3 to 4 However, this is normal. times the period you are planning to record ≥...
- Page 7 LCD monitor will be slightly darker than usual Please note in advance that Panasonic is not immediately after the unit is turned on. The liable in any way for any direct or indirect...
-
Page 8: This Unit
SDHC logo or 48 GB or more Memory content Cards that do not have the SDXC logo are Panasonic does not accept any responsibility for not based on SD Memory Card damages directly or indirectly due to any type of Specifications. -
Page 9: Table Of Contents
≥ Most major credit and debit cards accepted. Focus ..........32 ≥ All enquiries transactions and distribution White Balance ........32 facilities are provided directly by Panasonic UK. Iris/Gain adjustment ......33 ≥ It couldn’t be simpler! Manual shutter speed ......33 ≥... -
Page 10: Accessories
Accessories Check the accessories before using this unit. Keep the accessories out of reach of children to prevent swallowing. Product numbers correct as of November 2016. These may be subject to change. SYA0021 Battery pack AG-VBR59 Microphone holder (l 18) VYC1146 Battery charger AG-BRD50... -
Page 11: Preparation
It can also play back the scenes and still pictures copied to the external media device. ≥ This unit supports USB 3.0. Refer to the following support site for information about an external media device. http://panasonic.jp/support/global/cs/e_cam (This Site is English only) DVQX1102... -
Page 12: Remote Operations With An Ipad
A USB 3.0 (Host mode) B External media device (commercially-available) Connecting to an external monitor Connect an external monitor to output images. A AV cable* C External monitor B HDMI cable* Use a commercially-available AV cable. Use a commercially-available High Speed HDMI cable. -
Page 13: Names And Functions Of Main Parts
Preparation Names and Functions of Main Parts USB HOST terminal 15 Camera remote terminal [CAM USB DEVICE terminal REMOTE] HDMI OUT connector [HDMI] ≥ FOCUS IRIS terminal (3.5 mm diameter mini Handle jack) Lens hood release button ≥ ZOOM S/S terminal (2.5 mm diameter super Audio input terminal 1 (XLR 3 pin) mini jack) [AUDIO INPUT1] (l 18) - Page 14 40 41 44 45 46 47 26 Tripod receptacle 36 PUSH AUTO button ≥ There are tripod mounting holes that are 37 Focus ring (l 32) 38 Zoom ring (l 31) compatible with 1/4-20UNC and 3/8-16UNC screws. Use the size that matches the 39 Iris ring (l 33) diameter of the tripod’s fixing screw.
- Page 15 61 62 50 SD Card slot cover (l 24) 63 Eye cup mount (l 17) 51 Access lamp (card 1) (l 24) 64 Eye sensor 52 Card slot 1 (l 24) 65 Viewfinder (l 27) 53 Access lamp (card 2) (l 24) 66 Eye cup (l 17) 54 Card slot 2 (l 24) 67 Battery release button [PUSH] (l 21)
- Page 16 75 76 77 78 79 80 81 82 83 84 75 Accessory shoe 80 Handle mounting hole 76 Sub zoom lever (l 31) (Size of the mounting hole) ≥ This lever functions in the same manner as j 1/4-20UNCk2 the zoom lever. j 3/8-16UNCk2 ≥...
-
Page 17: Attaching The Eye Cup
∫ Opening/closing the lens cover You can open/close the lens cover by sliding the lens cover open/close lever. ≥ When this unit is not in use, close the lens cover to protect the lens. OPEN CLOSE ≥ Do not press the lens cover hard. This may damage the lens or the lens cover. ≥... - Page 18 ∫ Attaching the front microphone ≥ The microphone holder is set up so that a 21 mm external microphone (AG-MC200G: optional) can be attached. Check in advance whether the microphone you wish to use can be attached. Attach the microphone holder to the microphone holder attachment part. ≥...
-
Page 19: Power Supply
Please be advised that we are not liable for any accident or failure occurring as a result of use of a counterfeit battery pack. To ensure that safe products are used we would recommend that a genuine Panasonic battery pack is used. Charging the battery When this unit is purchased, the battery is not charged. - Page 20 ≥ We recommend using Panasonic batteries (l 10, 19, 21). ≥ If you use other batteries, we cannot guarantee the quality of this product. ≥ Do not heat or expose to flame. ≥ Do not leave the battery(ies) in a car exposed to direct sunlight for a long period of time with doors and windows closed.
-
Page 21: Inserting/Removing The Battery
Inserting/removing the battery Install the battery by inserting it in the direction shown in the figure. ≥ Insert the battery until it clicks and locks. Removing the battery Make sure that the power switch is set to OFF and the status indicator is turned off, and then remove by holding onto it taking care not to drop. -
Page 22: Connecting To The Ac Outlet
≥ The batteries heat up after use or charging. This is not a malfunction. ≥ The optional battery charger AG-B23 (DE-A88) can be used to charge the battery but charging will take longer. Battery capacity indication ≥ The display changes as the battery capacity reduces. If the battery discharges, then will flash red. -
Page 23: Preparation Of Sd Cards
Preparation of SD cards The unit can record motion pictures or still pictures to an SD card. ≥ We recommend that you use a Panasonic Memory Card. Cards that you can use with this unit ∫ About the Speed Class ratings for recording motion pictures ≥... -
Page 24: Inserting/Removing An Sd Card
Inserting/removing an SD card When using an SD card for the first time, it is necessary to format the SD card. (l 29) When the SD card is formatted, all of the recorded data is deleted. Once the data is deleted, it cannot be restored. -
Page 25: Turning The Unit On/Off
Preparation Turning the unit on/off Set the power switch to ON while pressing the lock release button B to turn on the unit. To turn off the unit Set the power switch to OFF while pressing the lock release button. The status indicator goes off. -
Page 26: Using The Lcd Monitor/Viewfinder
Preparation Using the LCD monitor/Viewfinder The LCD monitor is turned on when the LCD monitor is extracted. When you move your eye closer to the eye cup of the viewfinder, the LCD monitor is turned off, and the viewfinder is turned on. Using the LCD monitor Extract the LCD monitor in the direction as indicated in the figure. -
Page 27: How To Use The Touch Screen
How to use the touch screen You can operate by directly touching the LCD monitor (touch screen) with your finger. ∫ Touch Touch and release the touch screen to select icon or picture. ≥ Touch the center of the icon. ≥... -
Page 28: Setting Date And Time
Preparation Setting date and time When this unit is turned on, the message [SET TIME ZONE AND DATE/TIME] may appear. To make these settings, select [YES], and follow the instructions from Step 2-3 of the time zone setting procedure. Time zone Time difference from the Greenwich Mean Time can be set. -
Page 29: Recording
Recording Selecting a media to record You can specify the card slot to which motion pictures are to be recorded. Select the menu. (l 39) MENU : [RECORD SETUP] # [MEDIA SELECT] # [SD CARD 1]/[SD CARD 2] Formatting media If you use the SD cards for the first time for recording with this unit, format the cards. -
Page 30: Recording Motion Picture
Recording Recording motion picture ≥ Before turning on this unit, open the lens cover. (l 17) Change the mode to Recording Mode. (l 25) ≥ Extract the LCD monitor. Press the recording start/ stop button B to start recording. -
Page 31: Using The Zoom
Conditions that disable controls Controls that are disabled in Auto Mode [A.IRIS] is set to [ON]. Iris Ring, IRIS button [AGC] is set to [ON]. GAIN button, the USER button to which [SUPER GAIN] is registered [AUTO SHUTTER] is set to [ON]. SHUTTER button [ATW] is set to [ON]. -
Page 32: Manual Recording
Recording Manual Recording FOCUS A IRIS button B FOCUS A/M/¶ switch ∞ C Jog dial SEL/ PUSH D SHUTTER button E WHITE BAL button F GAIN button IRIS G Iris ring SHUTTER H Focus ring WHITE BAL ... -
Page 33: Iris/Gain Adjustment
Iris/Gain adjustment When recording a scene that is too dark (or bright) or a scene in a similar situation, manually adjust the iris and gain. ∫ Iris adjustment ≥ Switch to Manual Mode. (l 30) A Iris value B Auto iris icon ... -
Page 34: User Button
Recording USER button Each of the USER button can register one function from the 44 available functions. ≥ There are 9 USER buttons (USER1 to 9) on the main body and 4 USER button icons (USER10 to USER13) displayed on the LCD monitor. Setting the USER button Select the menu. -
Page 35: Functions Of The User Button
Functions of the USER button ∫ List of USER button functions ≥ Please refer to “Operating Instructions” (PDF format) for more information about the functions of the USER button. Item Icon Function [INHIBIT] [INH] Invalid [FOCUS ASSIST 1] [FA1] Focus Assist 1 [BACKLIGHT] [B.Light] Backlight Compensation... - Page 36 Item Icon Function [SCENE FILE] [SCN FILE] Scene File [AUTO REC] [AutoRec] Auto Rec [AF AREA] [AF Area] AF area width adjustment [VFR] [VFR] Variable Frame Rate Mode [FOCUS MACRO] [F.Macro] Focus Macro [i.ZOOM] [i.Zoom] i.Zoom [USB MODE] [USB] USB Mode [AWB] [AWB] Auto White Balance...
-
Page 37: Playback
Playback Motion picture/Still picture playback Set this unit to playback mode. (l 25) Touch the play mode select icon A. Media display The selected media is displayed in yellow. Select the media C you wish to play back. ... - Page 38 ≥ (If you have touched the recording mode option [AVCHD]) After you have touched a recording format option, one of the following icons will be displayed on each thumbnail. : Scenes recorded in [PS 1080/59.94p]/[PS 1080/50.00p] : Scenes recorded in [PH 1080/59.94i]/[PH 1080/23.98p]/[PH 1080/50.00i] : Scenes recorded in [HA 1080/59.94i]/[HA 1080/50.00i] : Scenes recorded in [HE 1080/59.94i]/[HE 1080/50.00i] : Scenes recorded in [PM 720/59.94p]/[PM 720/50.00p]...
-
Page 39: Menu
Menu Using the menu screen MENU MENU Press the MENU button Touch the top menu A. Touch the submenu B. ≥ Next (Previous) page can be displayed by touching Touch the desired item to enter the setting. Touch [EXIT] to exit the menu setting. DVQX1102... -
Page 40: Menu Structure
Menu Menu structure Please refer to “Operating Instructions” (PDF format) for details. ∫ Menu structure in Recording mode [FILE SELECT]/[NAME EDIT]/[LOAD/SAVE]/[SYNCHRO SCAN]/ [MASTER DETAIL]/[DETAIL CORING]/[SKIN TONE DTL]/ [V DETAIL LEVEL]/[RB GAIN CONTROL SETTING]/ [CHROMA LEVEL]/[CHROMA PHASE]/[MATRIX]/[COLOR Scene file CORRECTION SETTING]/[MASTER PED]/[GAMMA MODE]/ [BLACK GAMMA]/[KNEE MODE]/[KNEE MASTER POINT]/ [KNEE MASTER SLOPE]/[DRS]/[DRS EFFECT]/ [AUTO IRIS LEVEL]/[AUTO IRIS LEVEL EFFECT]/[NR CONTROL]... - Page 41 [ZEBRA DETECT 1]/[ZEBRA DETECT 2]/[MARKER]/[GUIDE LINES]/[SAFETY ZONE]/[CENTER MARKER]/[REC COUNTER]/ [FOCUS DISPLAY]/[ZOOM DISPLAY]/[VIDEO OUT OSD]/[DATE/ TIME]/[DATE FORMAT]/[LEVEL GAUGE]/[AUDIO LEVEL METER]/ Display setting [LENS STATUS]/[CARD & BATTERY]/[OTHER DISPLAY]/[POWER LCD]/[LCD SET]/[EVF SETTING]/[EYE SENSOR]/[SELF SHOOT]/ [EVF COLOR]/[EVF/LCD DETAIL]/[EVF/LCD PEAK LEVEL]/[EVF/ LCD PEAK FREQ.] [FORMAT MEDIA]/[MEDIA STATUS]/[REC LAMP]/[CLOCK SET]/ [TIME ZONE]/[ALERT SOUND]/[ECONOMY (BATT)]/[ECONOMY Other Functions (AC)]/[USB MODE]/[USB MODE SELECT]/[INITIAL SET]/...
-
Page 42: Others
Others Troubleshooting ∫ It is not a malfunction in following cases The lens, the viewfinder or ≥ This is due to condensation. This is not a malfunction. Please LCD monitor fog up. refer to page 8. Object seems to be warped. ≥ Object seems to be warped slightly when the object moves across the image very fast, but this is because the unit is using MOS for the image sensor. - Page 43 Recording Problem Check points The unit arbitrarily stops ≥ Use an SD card that can be used for motion picture recording. recording. (l 23) ≥ The recordable time may have shortened due to the deterioration of the data writing speed or repeated recording and deletion.
-
Page 44: About Copyright
At least three (3) years from delivery of this product, in the U.S. and other countries. Panasonic will give to any third party who contacts ≥ Other names of systems and products mentioned us at the contact information provided below, for a... -
Page 45: Specification
Others Specification 4K Video Camera General Camera unit Pickup device: Power: 1.0-type (effective size) MOS solid state image DC 7.28 V (When using battery) sensor DC 12 V (When using AC adaptor) Number of pixels: Power consumption: FHD (1920k1080), UHD (3840k2160); 19.7 W (When using LCD monitor) 8.79 million pixels 4K (4096k2160) 24.00p;... - Page 46 Shutter speed: When [SYSTEM FREQ] = [50.00Hz] When [SYSTEM FREQ] = [59.94Hz] ≥ 50i/50p; ≥ 60i/60p mode; 1/50.0 to 1/250.0 sec. 1/60, 1/100, 1/120, 1/180, 1/250, 1/350, ≥ 25p; 1/500, 1/750, 1/1000, 1/1500, 1/2000, 1/25.0 to 1/250.0 sec. 1/3000, 1/4000, 1/8000 sec. VFR recording frame rate: ≥...
- Page 47 ≥ When [REC MODE] = [AVCHD] Memory card recorder (When [SYSTEM FREQ] = [59.94Hz]) [PS 1080/59.94p]; Average 25 Mbps (VBR) Recording media: [PH 1080/59.94i]; Average 21 Mbps (VBR) SDHC Memory Card (4 GB to 32 GB)/ [PH 1080/23.98p]; Average 21 Mbps (VBR) SDXC Memory Card (48 GB to 128 GB);...
-
Page 48: Digital Audio
When [DUAL CODEC REC] = [FHD 8Mbps] Digital video ≥ For main recording [REC MODE] = [MOV]/[MP4] Video signal for external output: [UHD 2160/29.97p 100M], 8 bit 4:2:2* [UHD 2160/25.00p 100M], It is set to 8 bit 4:2:0 when UHD 59.94p or [UHD 2160/23.98p 100M], UHD 50.00p is selected. -
Page 49: Audio Input
Audio input Other input/output Built-in microphone: CAM REMOTE terminal: Supports stereo microphone 2.5 mm diameter super mini jack k1 (ZOOM, S/S) AUDIO INPUT1/AUDIO INPUT2 terminal: 3.5 mm diameter mini jack k1 (FOCUS, IRIS) XLRk2, 3-pin USB HOST terminal: Input high impedance, LINE/MIC/MIC_48 V Type A connector, 9-pin (switch selection) In Recording mode;... -
Page 50: Battery Charger
AC adaptor Battery charger Power source: Input voltage: 100 V to 240 V, 12 V, 3.0 A 50 Hz/60 Hz, 1.2 A Output voltage: Power output: 8.4 V, 4.0 A 12 V, 3.0 A indicates safety information indicates safety information Charging current: Ambient operating temperature: Max. -
Page 51: Limited Warranty (Only For Australia)
Panasonic Customer Care Centre. If the failure in the product is not a major failure then Panasonic may choose to repair or replace the product and will do so in a reasonable period of time from receiving notice from you. - Page 52 Manufactured by: Panasonic Corporation Kadoma, Osaka, Japan Importer for Europe: Panasonic Marketing Europe GmbH Panasonic Testing Centre Winsbergring 15, 22525 Hamburg, Germany Panasonic Corporation DVQX1102ZA Web site: http://www.panasonic.com F1116YF0 © Panasonic Corporation 2016...
Need help?
Do you have a question about the HC-X1 and is the answer not in the manual?
Questions and answers
what should i format my sdcard