Table of Contents
Advertisement
Nighthawk Pro 200
Instruction Manual
V1.0
Thanks for purchasing the Nighthawk Pro 200. Please follow the instruction manual to install and configure your
Nighthawk Pro 200.
After completing the instruction manual, use the configurator GUI to configure flight controller settings for the
Nighthawk Pro 200. Please refer to this link to learn more:
"http://yinyanmodel.com/en/DownList.asp"
yinyanmodel.com
1
Advertisement
Table of Contents

Related Manuals for Emax Nighthawk Pro 200


Summary of Contents for Emax Nighthawk Pro 200
- Page 1 Nighthawk Pro 200 Instruction Manual V1.0 Thanks for purchasing the Nighthawk Pro 200. Please follow the instruction manual to install and configure your Nighthawk Pro 200. After completing the instruction manual, use the configurator GUI to configure flight controller settings for the Nighthawk Pro 200.
-
Page 2: Table Of Contents
18. Adult supervision is highly recommended for kids under the age of 18. Our Nighthawk Pro 200 features open-source flight controller and Electronic Speed Controllers to satisfy the FPV enthusiasts' need to update/upgrade their software and hardware. -
Page 3: Warnings
1. Please follow the instruction manual to install software and operate Nighthawk Pro 200. 2. DO NOT use Nighthawk Pro 200 while drunk, under influence of drugs, feeling dizziness, fatigue, nausea and/or any other conditions that may impair your ability to safely operate the product. -
Page 4: Specifications
Wheelbase(L x W x H) 200mm ( Not including propeller) 260mm x 185mm x 65mm Package(L x W x H) 207mm x 165mm x 43mm (Not including antenna) Nighthawk Pro 200(L x W x H) Camera CCD 600TVL Propeller T5050 Tri-Blade Propeller Flight controller... -
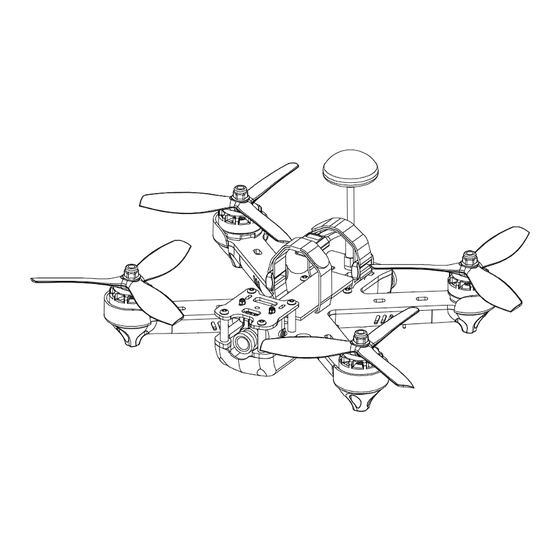
Page 5: Overall View
Nighthawk Pro 200 Overall View Explode View yinyanmodel.com... -
Page 6: Required Tools And Equipments
Installation Steps Step 1: Preparation Remove the Nighthawk Pro 200 from the package and place it on a leveled, horizontal place (like a table). Using a Micro USB cable, connect the Nighthawk Pro 200 to the Computer. Step 2: Driver and Configuration Software Installation Driver Installation Please install the Driver to your computer. -
Page 7: Flight Controller And Configurator
Nighthawk Pro 200 Flight Controller and Configurator (1)Please supply power to the Nighthawk Pro 200 using a 3S or 4S LiPo Battery. (2)Connect the flight controller to the computer using a Micro USB cable. A BLUE LED will light on the flight controller indicating initial setup and self checking. - Page 8 Nighthawk Pro 200 ESC CALIBRATION Please make sure to REMOVE PROPELLERS before performing ESC Calibration! (1) Please select "Configuration", change Maximum Throttle to 2000 and save (2) Please select "Motor" Tab ①Please check the box for “Motor Test Mode” ②Move the “Master Slider” to MAXIMUM (3)Power the unit using a 3S or 4S LiPo.
-
Page 9: Step 4 Installation
Nighthawk Pro 200 channel using the drop-down box on the right. You can use the slider to set a ppm range your auxiliary channel will operate. Check your settings you have made in modes and save them by clicking "SAVE" on the bottom-right corner. -
Page 10: Video Transmitter
After completion of initial setup and testing, It is finally time to take flight. Turn on the Radio Transmitter and connect a 3S-4S LiPo to the copter. Place the Nighthawk Pro 200 in the center of the test flight field (Safe flying zone). As soon as the Flight controller completes it's initial system startup and self checking, an LED will indicate solid blue when ready to Arm. -
Page 11: Flight Controller Instruction
Nighthawk Pro 200 Flight Controller Instruction Nighthawk Pro 200 flight controller is based on SP Racing F3 ACRO hardware. For more information, please visit "http://www.yinyanmodel.com/en/DownList.asp" to download manual. Transmitter Joystick Command Transmitter Joystick Commands (Mode 2 Transmitter used as example) -
Page 12: Reminder
“BOOT” pad. If during this period the other 2 LEDs light or you cannot continue to the next step, please repeat the operation. (3)After entering boot mode, perform firmware update. Thank you for purchasing an EMAX Product. Caution: Safety comes first! Make sure to fly in safe zone! This product may not be suitable for people under the age of 18.
Need help?
Do you have a question about the Nighthawk Pro 200 and is the answer not in the manual?
Questions and answers