
Related Manuals for Logik LTOC50W12


Summary of Contents for Logik LTOC50W12
- Page 1 Free-Standing Double Oven Electric Cooker Instruction / Installation Manual LTOC50W12 LTOC50W12_IB_261012_RICH.indd 1 12/11/2012 13:25...
-
Page 2: Table Of Contents
Contents Safety Warnings ..........................3 Unpacking ............................. 5 Installation ............................ 6 Adjusting the Feet ........................7 Moving the Cooker ........................7 Electrical Connection ........................8 Product Overview ......................... 9 Front View ...................................9 Top View ..................................9 Control Panel ................................10 Before Using Your Cooker ......................10 First Time Use of the Hob ...................... -
Page 3: Safety Warnings
Safety Warnings IMPORTANT SAFETY INSTRUCTIONS READ CAREFULLY AND KEEP FOR FUTURE REFERENCE • It is recommended that this appliance is installed by a qualified electrical engineer. The manufacturer is not responsible for any damage caused by incorrect installation. • Check whether there is any damage to the appliance after you have unpacked it. - Page 4 • Cleaning and user maintenance shall not be made by children without supervision. • Children should be supervised to ensure that they do not play with the appliance. • During use the appliance becomes hot. Care should be taken to avoid touching the heating elements inside the oven or the hotplates.
-
Page 5: Unpacking
Unpacking Remove all packaging from the unit. Retain the packaging. If you dispose of it please do so according to local regulations. The following items are included: Grill Pan Handle x 1 Grill Pan Rack x 1 The Main Unit Grill Pan x 1 Oven Shelf x 2 If items are missing, or damaged please contact Partmaster (UK only). -
Page 6: Installation
Installation • The cooker must be installed by a competent person, if in doubt consult a qualified technician, and in compliance with local electrical, safety and building regulation standards. • If the cooker is installed adjacent to furniture which is higher than the hob, a gap of at least 100 mm must be left between the side of the cooker and the furniture unless non-combustible materials (e.g. -
Page 7: Adjusting The Feet
Adjusting the Feet Using the fitted adjustable feet is MANDATORY. For safety reasons and to ensure adequate ventilation, the cooker chassis MUST NOT sit directly on the floor, a plinth, or other support surface. Your appliance must be level before use. The cooker has 4 levelling feet which can be adjusted by hand. Turn the feet anti-clockwise to lower the level or clockwise to raise the level, as shown below. -
Page 8: Electrical Connection
Electrical Connection The following installation procedure must be carried out by a competent person. If in doubt consult a qualified electrician. The electrical installation must comply with the IEE Regulations, Building & local By-Laws. The cooker must be connected to the mains supply via a full disconnection switch, with a contact separation of at least 3mm in all poles, correctly fused with a capacity appropriate to that shown on the cooker Rating Plate and incorporated in the fixed wiring in accordance with the latest wiring regulations. -
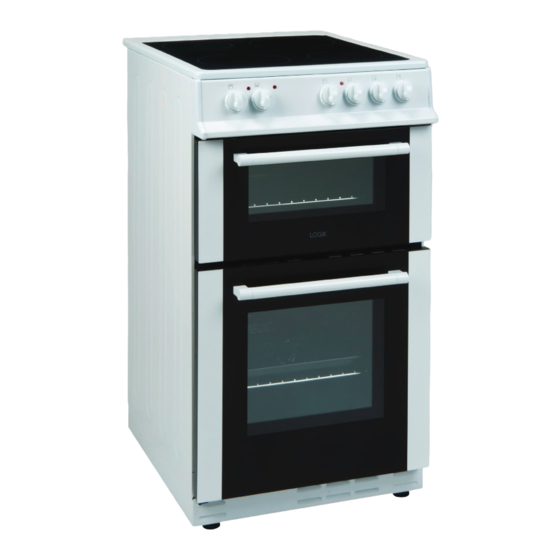
Page 9: Product Overview
Product Overview Front View Top Oven Door Handle Control Panel Oven Shelf Grill Tray Main Oven Door Top Oven Door Adjustable Feet Top View Large Ceramic Heater 1700W Hot Hob Warming Light Small Ceramic Heater 1200W * All images are for indication only; please refer to your individual unit for actual item. LTOC50W12_IB_261012_RICH.indd 9 12/11/2012 13:25... -
Page 10: Control Panel
Control Panel Top Oven Control Top Oven thermostat Lamp Main Oven Control Main Oven thermostat Lamp Ceramic Heater Controls Hob Indicator Lamp Before Using Your Cooker Before using your new cooker, please: • Make sure all the controls are turned off. • Read this Instruction/Installation Manual, taking special note of the 'Safety Warnings' section. -
Page 11: Using Your Hob
Always lift pans off the ceramic hob – do not slide, or they may scratch the glass. • The heated areas will be seen to switch on and off even when higher heat settings are used. This is due to a safety device, which prevents the glass from overheating. Some switching on and off when cooking at high temperatures is quite normal, causes no damage to the hob and little delay in cooking times. -
Page 12: Top Oven Control
Top Oven Control Function Description Grill Function The oven’s warning light and grill heating element will turn on. Use the grill for grilling and toasting food, use the Grill pan with the Grill pan grid on a shelf in the oven. Its recommended to pre-heat the grill for about 10 minutes. -
Page 13: Using The Oven
Using the Oven First Time Use of the Oven Ensure that nothing has been left in the top oven and main oven. Remove any insert cards or plastic bags. Before connecting the power, use a damp cloth to carefully wipe the inner cavity wall and housing. Clean all the detachable parts in hot, soapy water before using. -
Page 14: Preheating
Preheating When you need to preheat the oven, we recommend you do so for 10 minutes. For recipes needing high temperatures, e.g. bread, pastries, scones, soufflés etc., best results are achieved if the oven is preheated first. For best results when cooking frozen or cooked chilled ready meals always preheat the oven first, unless the cooking instructions advise you otherwise. -
Page 15: Cooking With The Grill
Cooking with the Grill Before using the grill for the first time, switch the grill on for 15 ~ 20 minutes. There may be a little smoke and odour upon initial start up (for about 10 mins). This is normal. It is due to the protective substance on the heating elements which protects the cooker from the effects of corrosion during shipping from the factory. -
Page 16: Cleaning Instructions
Cleaning Instructions Before you start cleaning your cooker, please: • Read the cleaning instructions and the ‘Safety Warnings’ sections. • Turn the cooker off at the mains socket. • Allow the cooker to completely cool down before cleaning and disconnect the appliance from the electrical supply. -
Page 17: Cleaning The Inside Of Your Cooker
Cleaning the Inside of Your Cooker • Do not use abrasive cleaners, cloths or pads to clean the enamel. • Clean the enamel on the inside of the cooker when it has cooled down, using household detergents or an ammonia-based cleaner. You may use an ‘off the shelf’ oven cleaner, if you carefully follow the manufacturers’ instructions. -
Page 18: Replacing The Oven Lamp
(300°C). • Refit the protective cover. Bulb specifications 230V~ 50 Hz, 25W, E14 Specifications Model LTOC50W12 Overall Dimension (WxDxH) 500(W) x 600(D) x 900(H) mm Main oven usable volume: 48 litres Usable Volume Top cavity usable volume: 30 litres Oven Lamp 25 W, E14, 300°C... - Page 19 For general information about this appliance and handy hints and tips, please visit www.knowhow.com/knowledgebank or call 0844 5611234. Visit Partmaster.co.uk today for the easiest way to buy electrical spares and accessories. With over 1 million spares and accessories available we can deliver direct to your door the very next day. Visit www.partmaster.co.uk or call 0844 800 3456 (UK customers only).
- Page 20 LTOC50W12_IB_261012_RICH.indd 20 12/11/2012 13:26...
Need help?
Do you have a question about the LTOC50W12 and is the answer not in the manual?
Questions and answers