Table of Contents
Advertisement
Available languages
Available languages
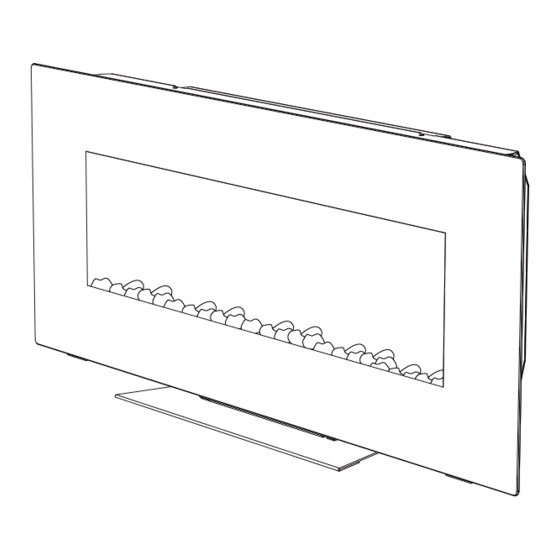
NICOLE
WALLMOUNT FIREPLACE
SKU#: 064-3142-2
Model: SP4320-HE-FG
Please note when you open the carton carefully check the unit and make sure there is no damage. If you
have any problem with assembling the unit, with how the various functions work or with damage or
missing parts. Please call# +1-844-455-4621 (9:00AM - 5:00PM EST) or email:
serviceprokonian@jakeglobal.com immediately for service before return the unit to the store where it
was purchased.
INSTRUCTION MANUAL ENCLOSED
prokonian
IMPORTANT
Advertisement
Table of Contents

Related Manuals for Prokonian SP4320-HE-FG


Summary of Contents for Prokonian SP4320-HE-FG
- Page 1 NICOLE WALLMOUNT FIREPLACE SKU#: 064-3142-2 Model: SP4320-HE-FG IMPORTANT Please note when you open the carton carefully check the unit and make sure there is no damage. If you have any problem with assembling the unit, with how the various functions work or with damage or missing parts.
- Page 2 DO NOT STORE OR USE GASOLINE OR OTHER FLAMMABLE VAPORS AND LIQUIDS IN THE VICINITY OF THIS OR ANY OTHER APPLIANCE. Thank you and congratulations on your purchase of a Prokonian fireplace. Please read the installation & operating instructions before using this appliance.
-
Page 3: Safety Information
SAFETY INFORMATION Please read and understand this entire manual before attempting to assemble, operate or install the product. This equipment has been tested and found to comply with the limits for Class B digital devices, pursuant to part 15 of the FCC rules. These limits are designed to provide reasonable protection against harmful interference in a residential installation. -
Page 4: Electrical Connection
SAFETY INFORMATION Use this appliance only as described in the manual. Any other use is NOT recommended by the manufacturer and may cause fire, electric shock or injury to persons. CAUTION • If possible, ALWAYS unplug this appliance when not in use. •... -
Page 5: Pre-Installation
PRE-INSTALLATION Package Contents Part Description Quantity Part Description Quantity Front Glass Cover Mounting Bracket Base Remote Control Fireplace Crystal Beads 1 Bag Hardware Contents Number of the hardware in ( ) is separated for backup Part Description Quantity Screw 4 + (1) Wall Anchor... -
Page 6: Tools Required
PRE-INSTALLATION Tools Required Measuring tape Level Stud finder Phillips screwdriver Electric drill IMPORTANT: Please read and understand this manual before any assembly. Before beginning assembly of product, make sure all parts are present. Compare parts with packaging contents list. If any part is missing, or if you have any questions, contact the service center at 1-844-455-4621 (toll free). -
Page 7: Installation
INSTALLATION WALL MOUNT INSTALLATION Step 1. Remove mounting bracket (D) from back of fireplace (C) by unscrew two screws at the top of the unit. Step 2. Release the latches on the both side to unlock the front glass as illustrated below to removing front glass (A). - Page 8 INSTALLATION Step 3. Remove the base (B) of fireplace (C) by unscrewing three screws at the rear base of the unit. Step 4. Choose a wall location to attach the mounting bracket (D). Position the mounting bracket (D) in the desired location.
- Page 9 INSTALLATION Step 5. Select the hardware appropriate for mounting bracket installation. STUD WALL • Secure the mounting bracket (D) to wall using screws (AA) at marked stud locations. DRYWALL • Drill holes at marked locations and secure the mounting bracket (D) to the wall with toggle bolts and washers (not included).
- Page 10 INSTALLATION Step 7. Distribute the crystal beads (F) evenly in the tray of the fireplace (C). Step 8. Re-install the front glass (A) to the fireplace (C). FREESTANDING INSTALLATION Step 1. Assembly the base (B) of fireplace (C) by fasten three screws.
- Page 11 INSTALLATION Step 2. Release the latches on the both side to unlock the front glass as illustrated below to removing front glass (A). Step 3. Distribute the crystal beads (F) evenly in the tray of the fireplace (C). Step 4. Re-install the front glass (A) to the fireplace (C).
-
Page 12: Power Button
OPERATING INSTRUCTIONS ° F ° C Power Button • Pressing the power button will turn ON or OFF the unit. • When the unit is in ON mode, touch control panel light will fully light up for 8 sec and then shut down if without any others operation including remote control. -
Page 13: Timer Button
OPERATING INSTRUCTIONS Timer Button: Timer Setting • Timer can be adjusted when heater is ON. It can adjusted from 0 hour (OFF) to 9 hours with 0.5 hour interval. • When TIMER is activated, the symbol will be displayed. • When TIMER digital is 0 H, TIMER function is invalided. The TIMER symbol will automatically disappear Clock Setting •... -
Page 14: Care And Maintenace
CARE AND MAINTENACE • Make sure the unit is turned OFF, unplugged and the heating elements of heater are cool whenever you are cleaning the heater. • Clean the metal trim using a water-dampened soft, clean cloth. DO NOT use brass polish or household cleaners as these products will damage the metal trim. -
Page 15: Replacing The Remote Control Battery
CARE AND MAINTENACE Note: When the heater is not in use, the heater should be stored in a dry location, away from possible damage. The power cord should be stored properly to avoid contact with hot or sharp objects. Replacing the Remote Control Battery When the remote control (E) stops operating or its range seems reduced, it is time to replace the batteries. -
Page 16: Troubleshooting Guide
TROUBLE SHOOTING GUIDE PROBLEM POSSIBLE CAUSE SOLUTION 1. No power, logs do 1. The unit does not have power. 1a, Check that unit is plugged into a standard 120 not glow. volt outlet. Then make sure power is set at “ON” position. - Page 17 9. The Company neither assumes, nor authorizes any third party to assume, on it behalf, any other liabilities with respect to the sale of the Prokonian product. 10. The warranties as outlined within this document do not apply to non Prokonian accessories used in conjunction with the installation of this product.
- Page 18 Please refer to part code when reordering For questions or comments about product: Email: serviceprokonian@jakeglobal.com or Call: +1-844-455-4621 Crafted in China Distributed by Prokonian Inc. Meriden,CT 06450...
- Page 19 NICOLE FOYER MURAL SKU#: 064-3142-2 Modèle: SP4320-HE-FG IMPORTANT Veuillez prendre note que lors de l’ouverture de la boîte, vérifier l’unité pour vous assurer qu’il y a aucun dommage. Si vous avez des problèmes à assembler l’unité, avec les fonctions ou un dommage ou des pièces manquantes, S.V.P.
- Page 20 PROPRIÉTÉ, DES BLESSURES CORPORELS OU LA MORT. NE PAS ENTREPOSER OU UTILISER DE L’ESSENCE OU AUTRE LIQUIDE INFLAMMABLE DANS LES ENVIRON DE CET APPAREIL. Merci et félicitation de l’achat d’un foyer PROKONIAN. S.V.P. veuillez lire les instructions d’installation et d’opération avec d’utiliser cet appareil. Prokonian, Inc.
-
Page 21: Information De Sécurité
INFORMATION DE SÉCURITÉ Assurez-vous de lire et de comprendre l’integralite du present manuel avant de tenter d’assembler, d’installer ou d’utiliser l’article. Cet article a été testé et déclaré conforme aux limites imposées aux dispositifs numériques de classe B, conformément à l’alinéa 15 du règlement de la FCC. Ces limites sont destinées à assurer une protection raisonnable contre les interférences nuisibles dans un environnement résidentiel. -
Page 22: Branchement Électrique
INFORMATION DE SÉCURITÉ N’utilisez cet appareil que pour l’usage prevu dans ce manuel. Toute autre utilisation n’est PAS recommandée par le fabricant et peut provoquer un incendie, une décharge électrique ou des blessures. MISE EN GARDE • Dans la mesure du possible, débranchez TOUJOURS cet appareil lorsqu’il n’est pas utilisé. •... -
Page 23: Contenu De L'emballage
PRÉ-INSTALLATION Contenu de l’Emballage Partie Description Quantité Partie Description Quantité Vitre Avant Support de Montage Base Télécommande Foyer perles de cristal 1 Bag Contenu de la Quincaillerie Nombre de matériel en () est séparé pour la sauvegarde Partie Description Quantité 4 + (1) Ancrage Mural... -
Page 24: Outils Requis
PRÉ-INSTALLATION Outils requis Ruban à mesurer Niveau Localisateur Tournevis Phillips Perceuse électrique de montant IMPORTANT: S.V.P. veuillez lire et comprendre ce manuel avant de faire l’assemblage. Avant de commencer l’assemblage du produit, veuillez vous assurer que toutes les pièces sont présentes. Comparer les pieces avec la liste du manuel. - Page 25 INSTALLATION INSTALLATION MURALE Étape 1. Retirez le support de montage (D) à l'arrière du foyer (C) en dévissant les deux vis en haut de l'unité. Étape 2. Relâchez les loquets sur les 2 côtés à la fois pour déverrouiller la vitre avant, comme illustré ci-dessous pour enlever la vitre avant (A).
- Page 26 INSTALLATION Étape 3. Retirez la base (B) du foyer (C) en dévissant les 3 vis à la base arrière de l'appareil. Étape 4. Choisissez un emplacement sur le mur pour fixer le support de montage (D). Positionner le support de montage (D) à...
- Page 27 INSTALLATION Étape 5. Sélectionnez le matériel approprié pour le montage du support. MONTANT DE MUR • Fixer le support de montage (D) au mur en utilisant les vis (AA) à l'emplacement des poteaux marqués. CLOISON SÈCHE • Percez des trous aux endroits indiqués et fixer le support de montage (D) au mur avec des boulons à ailettes et des rondelles (non inclus).
- Page 28 INSTALLATION Étape 7. Distribuer les perles de cristal (F) uniformément dans le plateau du foyer (C). Étape 8. Réinstaller la vitre avant (A) du foyer (C). INSTALLATION AVEC BASE Étape 1. Assembler la base (B) du foyer (C) en vissant les trois vis.
- Page 29 INSTALLATION Étape 2. Relâchez les loquets sur les 2 côtés à la fois pour déverrouiller la vitre avant, comme illustré ci-dessous pour enlever la vitre avant (A). Étape 3. Distribuer les perles de cristal (F) uniformément dans le plateau du foyer (C). Étape 4.
-
Page 30: Instructions D'opération
INSTRUCTIONS D’OPÉRATION ° F ° C Bouton d’Alimentation • Appuyer sur le bouton d'alimentation pour mettre l’appareil sous tension ou hors de l'appareil. • Lorsque l'appareil est en mode MARCHE, touchez le du panneau de commande va allumer la lumière pour 8 secondes et s’éteindra si aucune autre opération n’est fait incluant ceux sur la télécommande. -
Page 31: Verrouillage Sécuritaire
INSTRUCTIONS D’OPÉRATION Bouton de Minuterie: Réglage de la Minuterie • La minuterie peut être réglée lorsque le chauffage est en MARCHE. Elle peut être ajustée de 0 heure (ARRÊT) à 9 heures avec un intervalle de 0,5 heure. • Lorsque la MINUTERIE est activée, le symbole sera affiché. •... -
Page 32: Soins Et Entretien
SOINS ET ENTRETIEN • Assurez-vous que l'appareil est éteint, débranché l’appareil, attendre que l’appareil soit froid avant de nettoyer. • Nettoyer la garniture métallique à l'aide d'un chiffon doux et propre imbibé d'eau. NE PAS utiliser de vernis pour laiton ou de nettoyants ménagers, car ces produits endommagerait la garniture métallique. •... -
Page 33: Remplacement De La Pile De La Télécommande
SOINS ET ENTRETIEN Note: Lorsque l'appareil n’est pas en cours d'utilisation, l'appareil doit être entreposé dans un endroit sec, loin de possibles dommage. Le cordon d'alimentation doit être range correctement pour éviter tout contact avec des objets chauds ou tranchants. Remplacement de la pile de la télécommande Lorsque la télécommande (E) cesse de fonctionner ou si sa portée semble réduite, il est temps de remplacer les piles. -
Page 34: Guide De Dépannage
GUIDE DE DÉPANNAGE PROBLÈME CAUSE POSSIBLE SOLUTION 1. Pas d'alimentation, 1. L’unité n’a pas d’alimention. 1. Vérifiez que l'unité est branchée sur une prise les bûches ne brillent standard de 120 volts. Ensuite, assurez-vous que pas. l'alimentation est à la position "MARCHE" 2. -
Page 35: Service À La Clientèle
SI LE SERVICE SOUS GARANTIE EST REQUIS Contacter la compagnie à serviceprokonian@jakeglobal.com ou appeler au 1-844-455-4621. Vous devez avoir votre reçu d’achat, l’endroit de l’achat et le modèle et/ou numéro de série de votre produit PROKONIAN. Service à la clientèle Courriel: serviceprokonian@jakeglobal.com... - Page 36 S'il vous plaît se référer au code de la pièce lors de la commande Pour une question ou un commentaire sur le produit: Courriel: serviceprokonian@jakeglobal.com ou Appeler: +1-844-455-4621 Fabriqué en Chine DISTRIBUE PAR Prokonian Inc. Meriden,CT 06450...
Need help?
Do you have a question about the SP4320-HE-FG and is the answer not in the manual?
Questions and answers