
Subscribe to Our Youtube Channel
Related Manuals for Sunny SF-B2620


Summary of Contents for Sunny SF-B2620
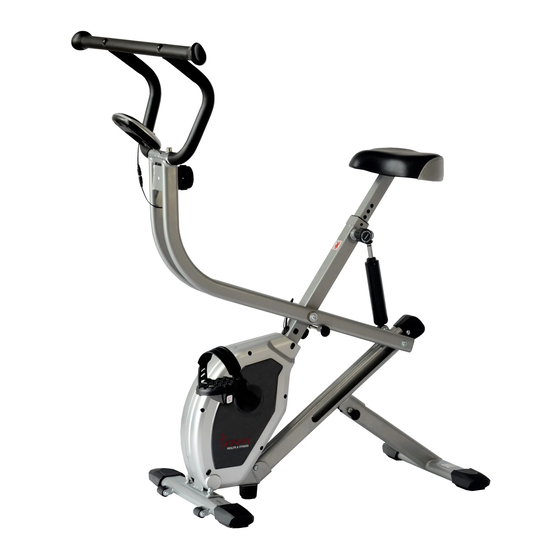
- Page 1 DUAL ACTION RIDER BIKE SF-B2620 USER MANUAL IMPORTANT : Read all instructions carefully before using this product. Retain this manual for future reference. For customer service, contact support@sunnyhealthfitness.com...
- Page 2 PRECAUTIONS IMPORTANT! Before exercising, please read this manual first and always remember these safety warnings. Before starting any exercise program, you should consult your physician to determine if you have any medical or physical conditions that could put your health and safety at risk or prevent you from using the equipment properly.
- Page 3 EXPLODED VIEW...
- Page 4 PARTS LIST DESCRIPTION Q'TY DESCRIPTION Q'TY A BOLT M8x45 PLASTICS COVER (LEFT) Φ8.5*Φ22.0*T1.5 B WASHER PLASTICS COVER (RIGHT) C NUT M8 END CAP D WRENCH S13-14-15 E BOLT M8x45 RUBBER BLOCK SPRING WASHER Φ8.4*Φ13.5*T2.5 CUSHION G NUT M8 END CAP H KNOB CRANK (LEFT) PIN Φ8*90...
- Page 5 DESCRIPTION Q'TY NUT M6 NUT M8 NUT M10 NUT M10x1.25 SCREW ST4.2x13.0 SCREW M4x12 BOLT M6x45 WASHER Φ10.5*Φ22.0*T1.4 BOLT M8x20 BOLT M8x30 BOLT M8x35 WASHER Φ8.0*Φ25.0*T2.0 SPRING WASHER Φ10.0xΦ9.3xT1.0 BOLT M8x60 BOLT M10x20 WASHER Φ6.5*Φ16.0*T1.0 BOLT M6x12 BOLT M6x15 BOLT M6x20 SCREW ST4.2x15.0 ARC WASHER Φ8.4*Φ19.0*T1.5...
- Page 6 ASSEMBLY DESCRIPTION Q'TY MAIN FRAME HANDLE BAR SUPPORTING POST REAR STABILIZER HANDLE BAR SEAT POST FRONT STABILIZER COMPUTER PEDAL(LEFT) PEDAL(RIGHT) SADDLE ·Read this manual before assembly. ·Check the parts first. ·Check the hardware. ·Ensure that you have the right tools. ·Prepare an area to assemble.
- Page 7 HARDWARE PACKAGE #K Φ8.4 We strongly recommend you that keep at least 4 feet of free space around the machine during your workout.
-
Page 8: Sliding Tube 1
ASSEMBLY STEP 1 Attach the Front Stabilizer (#10) to Main Frame (#3) using 2 Bolts (#A), 2 Nuts (#C), 2 Spring Washers(#F)and Washer (#B). Tighten with Wrench (#D). STEP 2 Attach the Rear Stabilizer (#7) to the Sliding Tube (#4), using 1 Bolt (#E), 1 Washer (#B), 1 Spring Washer (#F), and 1 Nut (#G). -
Page 9: Handle Bar Supporting Post 1
STEP 3 Use left hand to hold the Handle Bar Supporting Post (#6) and the right hand to grasp the Plastics Cover (#25&26), pull the main frame out horizontally. STEP 4 Unscrew Washers (#B) and Nuts (#G) from the Saddle (#57). Attach the Saddle (#57) to the Seat Post (#9) using 3 Washers (#B), 3 Nuts (#G). -
Page 10: Handle Bar
STEP 5 Insert the Pin (#I) to the Handle Bar Supporting Post (#6). Attach the Handle Bar (#8) to the Handle Bar Supporting Post (#6) using 2 Bolts (#E), 2 Spring Washers (#F), and 2 Arc Washers (#K). Tighten with Wrench (#J). Insert the Computer (#46) onto the computer bracket on Handle Bar (#8). - Page 11 Adjustment Guide How to adjust the seat height using Knob (H): A. Turn the knob about 3 times counterclockwise. B. Using one hand, pull out the knob, using the other hand, move the seat post to the desired height. C. Insert the knob and turn it TENSION ADJUSTMENT clockwise to tighten.
- Page 12 FOLD UP THE MACHINE 1. Loosen and pull out Knob (#H), then 3. Hold the Rear Stabilizer (#7) by the adjust Seat Post (#9) to the lowest right hand, pull Pin (#L) out first, then setting. Pull out the Pin (#I). rotate the Rear Stabilizer (#7) as shown below.
- Page 13 UNFOLD THE MACHINE 3. Hold the Handle Bar Supporting Post 1. Pull Pin (#L) out, hold the the Rear (#6) by the left hand, grasp the Saddle Stabilizer (#7) by the right hand and (#57), then press it downward till the Rear rotate the Rear Stabilizer (#7) as the Stabilizer (#7) touches the ground.
-
Page 14: Wheel
HOW TO MOVE THE BIKE Before attempting to move the bike, please make sure that it has been properly folded. The Pins (I&L) must be inserted. Put your hands on the Handle Bar (#8), tilt the bike until the Wheels (#42) are able to move on the ground. - Page 15 HOW TO USE THE BIKE: The Dual Function Rider Bike lets you work out both upper and lower body. You have several workout options: Biking function Rider function Biking function Hold the handlebar and pedal, just like a Put your feet in the pedals, but do not regular exercise bike.
-
Page 16: Operating Instructions
OPERATING INSTRUCTIONS The meter turns on when you start pedaling or when you press a key. After 4 minutes of inactivity, the meter shuts off. MODE: Press this button to select and set to a function, hold for 3~4 seconds to reset TIME, DISTANCE, CALORIES, except ODO, the data will be cleared.
Need help?
Do you have a question about the SF-B2620 and is the answer not in the manual?
Questions and answers