
Subscribe to Our Youtube Channel
Related Manuals for WolfVision VZ-3


Summary of Contents for WolfVision VZ-3
- Page 1 INSTRUCTIONS INSTRUCTIONS VZ-3 VZ-3 ENGLISH Check out our Internet Homepage for additional information www.wolfvision.com/support...
-
Page 2: Please Observe The Following
ENGLISH Precautions WARNING! Risk of electric shock Dangerous voltage inside Please observe the following: Use this Visualizer only with the correct voltage as shown on the type label ! Do not expose the Visualizer to heat or moisture ! Protect the Visualizer from excessive shocks ! Make sure that sufficient air circulation for cooling the Visualizer is possible (ventilation slots on the back of the tube)! If there is any abnormality (abnormal noise, smell, smoke etc.) disconnect the Visualizer from... -
Page 3: Copyright Information
No part of this document may be copied, reproduced, or transmitted by any means, without prior written permission from WolfVision. Except documentation kept by the purchaser for backup purposes. In the interest of continuing product improvement, WolfVision reserves the right to change product specifications without notice. -
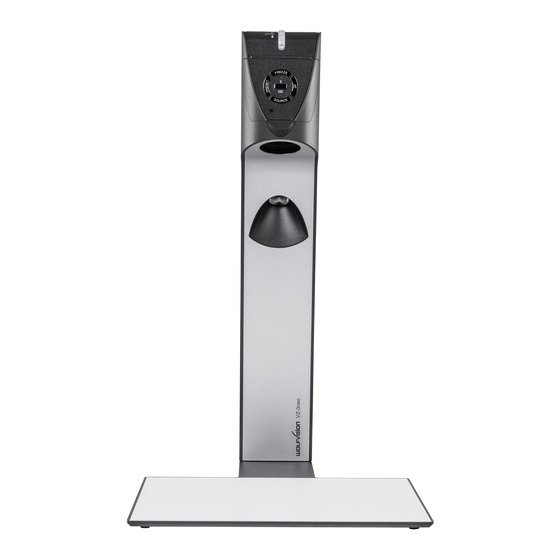
Page 4: Components Of The Visualizer
Components of the Visualizer #1 Working surface (see page 7) Connectors (on the back behind the cable cover - see below) #3 Light (maintenance-free LED) #4 Control keys (see next page) Zoom wheel (see next page) Connectors (#2) EXTERN IN LAN (PoE+) DVI-I output (see page 8) USB port (see page 7) - Page 5 Control Keys (camera head) (#4) One of the great features of WolfVision's Portable Visualizers is that only the most necessary keys are on the unit itself. Therefore anyone can use it without instructions: EXTERN key / MENU key / menu: navigation key - down Switches between Visualizer image and external input (for more details - see page 9).
-
Page 6: Working Surface
For choosing the right output setting please read the detailed description on page 8! 4. Slide-in cable cover until it rasted. 5. Lift the arm upwards. The VZ-3 is switched on automatically. (Alternative the Visualizer can be switched on by pressing the POWER key.) Power-on preset: The power-on preset is automatically activated when switching on the unit. -
Page 7: Digital Zoom
10). Auto Iris WolfVision Visualizers are equipped with an auto iris. This means that the brightness of the camera image adjusts automatically. The standard auto iris level can be set brighter or darker in the unit's on-screen menu. When picking up areas with bright spot, Back Light Compensation can be switched on in the unit‘s on-screen menu - see... -
Page 8: Ethernet / Lan Port
36 and 57V) will be added to a CAT-5 (or higher) ethernet cable and the Visualizer can receive power via the Ethernet/LAN-cable. When selecting a PoE+ adapter for the VZ-3 it is very important that the adapter complies to the IEEE 802.3at™-2009 industry standard. Before this standard was introduced, many incompatible PoE- systems were available on the market. -
Page 9: Dvi/Rgb Output
DVI/RGB Output Choosing the Correct Output Mode The DVI-I output (#5) can output analog and digital signals in following formats: - XGA (4:3 - 1024x768 pixels) at 60Hz - SXGA- (4:3 - 1280x960 pixels) at 60Hz native resolution - WXGA* (16:10 - 1280x800 pixels) at 60Hz native resolution - WXGA... -
Page 10: Integrated Seamless Switch
Following data are provided: Plug & Play Monitor VESA DDC Monitor name: "WolfVision" Video Input Definition: Analog at 0.7Vpp and separated synchronization signals Vertical range limits: 48Hz - 86Hz Horizontal range limits: 30kHz - 121kHz Maximum pixel clock: 170MHz Gamma: 2.2... - Page 11 The following chapter is for experienced users only: ON-SCREEN MENU / ON-SCREEN HELP For regular use of the WolfVision Visualizer, it is not necessary to go into the Visualizer's menu and change settings. Inexperienced users should not make any adjustments here.
-
Page 12: Maintenance
The firmware update can be done via USB or Ethernet (LAN). Firmware update files can be downloaded for free at www.wolfvision.com/support. Updates can be performed with the WolfVision Connectivity Software. This software can be found under the same link as the firmware files. - Page 13 Anti-theft ® T-bar lock (Kensington Lock) The Visualizer can be fixed with a security cable T-bar lock , so that it can not be stolen. Follow the instructions from the cable lock manual. slot for lock Fixing the Visualizer onto the table The Visualizer can also be fixed onto a table with the supplied table mounting set in order to minimize the risk of theft.
-
Page 14: Technical Data
Technical Data Camera / Technology (Signal format) 1-CCD 1/3" Progressive Scan Camera Pictures per second 30 frames (as picked up by the camera) Effective Pixel 1280 x 960 (=1,228,800) Total pixels of CCD 1,315,648 Pixels processed per second 36,864,000 (=effective pixels x frames per second) Color reproduction very good colors (sRGB color precision) - Page 15 Tel: +1(613)741-9898, Toll free: 877-513-2002, Fax: +1(613)741-3747 E-Mail: wolfvision.canada@wolfvision.com Japan WolfVision Co Ltd. Tokyo Tel: +81(0)3-3360-3231, Fax: +81(0)3-3360-3236 E-mail: wolfvision.japan@wolfvision.com United Kingdom WolfVision UK Limited Manchester Tel: +44(161)435-6081, Fax: +44(161)-435-6100 E-Mail: wolfvision.uk@wolfvision.com Internet Homepage: www.wolfvision.com E-Mail to technical support: support@wolfvision.com Printed in Austria - August 2011...
Need help?
Do you have a question about the VZ-3 and is the answer not in the manual?
Questions and answers