
Related Manuals for Theben SEL 173 DCF


Summary of Contents for Theben SEL 173 DCF
- Page 1 SEL 173 DCF Ref. Nr. 173 0 001 Bedienungsanleitung Mode d’emploi Operating instructions Istruzioni d’uso Gebruiksaanwijzing LU 110 LU 112 LU 113 LU star 126 LU star 128 LU star-time 129 LU 118 top...
-
Page 2: Table Of Contents
Description (page 60) Programming (page 72) 8.1 Setting the 7-day program switch-off time (page 72) Features (page 60) 8.2 Setting the 7-day program switch-on time (page 73) Use / Installation (page 61) 8.3 Programming the date program (page 73) 3.1 Safety notice (page 61) 8.4 Programming a one-off switching time (page 74) -
Page 3: Description
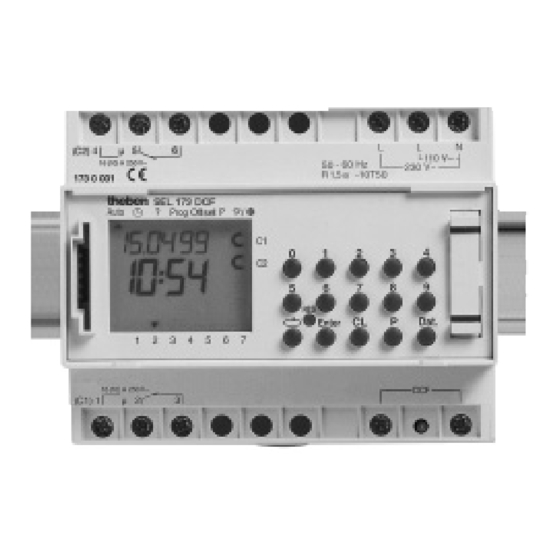
1.0 Description of the device 2.0 Features 1 Display - date day – 2-channel astronomical year time switch 2 Display - date month – Programming via time switch or PC programming with Obelisk software for 3 Display - year WIN 95 / WIN 98 / WIN NT o) Continuous connection OFF (F p) 4 Display - continuous connection ON (F –... -
Page 4: Use / Installation
– Suppress inductive consumer units with suitable RC filters. – The time switch SEL 173 DCF may only be used in dry rooms. – Do not fit the device in the immediate vicinity of noise sources, e.g. transformers, –... -
Page 5: Technical Specifications
3.4 Technical specifications The time switches are in accordance with the European directives 73/23/EEC. (Low-Voltage Directive) and 89/336/EEC (EMC Directive). Designation: SEL 173 DCF If the time switches are used together with other devices in an installation, take Type of program: Day/7-day/year care that the complete installation does not cause any radio interference. -
Page 6: Power Reserve
4.0 Power reserve 4.2 Changing the battery Important notice: In the event of a power failure the power reserve provides for retention of the Battery change with operating voltage current time (approx. 1.5 years). Even in non-energized condition and with a flat All stored program data are retained battery the switching times remain unlosably stored. -
Page 7: Overview Menu Selection
Ending the program menu: Use key v and place the cursor ▲ in the following 5.0 Commissioning (time switch without a DCF antenna) position. Ensure that the lithium battery is inserted (section 4.1). 5.1 Overview menu selection 5.2 Input correction v the cursor ▲... -
Page 8: Setting Astronomical Data
5.3 Setting astronomical data For commissioning, a reset must first of all be performed. To do so use a pointed object, e.g. pencil, to press the key RES. Longitude After reset, input the astronomical data longitudinal, latitude and time zone. With these data the time switch calculates the astronomical switching times for the whole year and files them in the EEPROM. -
Page 9: Setting The Date And Time
Note: 5.4 Setting the date and time After commissioningg (section 5.3) automatic summer / winter time is ready After the astronomical data, the date and time are set. programmed. Example: Basic setting for central Europe: dat 1. The time switch will be put into operation on 19.05.2000 at 09.25 h. Should another or no changeover norm be desired, it can be changed at any time as described in sections 5.5 –... -
Page 10: Changing The Automatic Summer/Winter Time
5.6 Changing the automatic summer / winter time 5.7 Changing the date and time Select the new automatic changeover (section 5.7). If the cursor is in pos. n, using keys 0 ... 9 any flashing value, the current time or the current date can be changed. -
Page 11: Connecting And Directing The Radio Antenna
– Connect the antenna to the time switch’s DCF 77 connection terminals. If a DCF antenna is connected to the time switch, the SEL 173 DCF functions as a radio time switch. After manual input of the astronomical data (section 5.3) the –... -
Page 12: Setting Astronomical Data
Example: The time switch has synchronized itself on 19. 5. 2000 at 9.25 h. 6.2 Setting astronomical data The astronomical data must be input during commissioning as described in section 5.3. 6.3 Setting the date and time (time switch with DCF antenna) A. -
Page 13: Manual Intervention Into The Program
7.0 Manual intervention into the program 7.2 Terminating continuous connection 7.1 Continuous connection ON or OFF A continuous connection must be manually terminated. After termination of the continuous connection the automatic program determines the switching status of Each channel can be switched manually ON or OFF as a continuous connection. the channels. -
Page 14: Manual Off
7.4 Manual OFF (switching preselection) 7.5 Disabling / enabling the keyboard Each channel can be manually switched off in the automatic program. With the Obelisk memory card, operator control of the time switch can be A switching preselection is corrected again in the automatic program by the next prevented for unauthorized persons. -
Page 15: Programming
8.0 Programming 8.1 Setting the 7-day program switch-off time On channel 1 the astronomical switching has programmed a switch-off time for During commissioning the time switch will have calculated from the astronomical each evening. If channel 2 has been activated as an astronomical channel, on channel 2 a switch-off time has also been programmed for each evening. -
Page 16: Setting The 7-Day Program Switch-On Time
8.2 Setting the 7-day program switch-on time 8.3 Programming the date program Example: Channel C1 should switch on at 7.30 h on 1.5. On channel 1 the astronomical switching has programmed a switch-on time for Position the cursor ▲. each morning. If channel 2 has been activated as an astronomical channel, a switch-on time will also have been programmed for each morning on channel 2. -
Page 17: Programming A One-Off Switching Time
8.5 Programming an offset 8.4 Programming a one-off switching time Example: Switch on channel C2 on 10.5. at 8.30 h 1 x The astronomical switch-on and switch-off times for channel 1 can be separated Note: Only date-related switching times can be programmed with the function from one another by means of the offset by a max. -
Page 18: Programming Astronomical Channel 2
Besides the normal 7-day program up to 9 different 7-day programs can be filed without any astronomical function. with the SEL 173 DCF. A defined 7-day program P1 ... P9 can be invoked at Channel 2 can be activated as an astronomical channel. Channel 2 takes the randomly defined time periods. -
Page 19: Programming A 7-Day Program With Priority P1 ... P9
Diagram - 7-day program with priority 9.1 Programming a 7-day program with priority P1 ... P9 Example: Channel C2 switches on daily at 8.15 h. weekly program P9 Priority assignment P1. weekly program P8 weekly program P7 weekly program P6 weekly program P5 weekly program P4 weekly program P3... -
Page 20: Defining A Time Period For The 7-Day Program
9.2 Defining a time period for the 7-day program P1 .. P9 9.3 Continuous connection with time limitation ON or OFF The time period of a 7-day program P1 ... P9 is defined by inputting a starting and Example: During the Christmas holidays all consumer units connected to C2 finishing date. -
Page 21: Interrogating A Program
10.0 Interrogating a program 10.2 Date related interrogation of switching times Fig. 1: Menu selection and display of the free memory locations, example: 104 During interrogation of the program the astronomical switching times are always Fig. 2: To select channel e.g. C1, press key 1 displayed for the current day only. -
Page 22: Channel-Related Interrogation Of A Date Program
10.3 Channel-related interrogation of a date program 10.5 Interrogating astronomical dates Fig. 1: Menu selection and display of the free memory locations, example: 104 Fig. 1: Menu selection and display of the free memory locations, example: 104 Fig. 2: To select channel e.g. C1, press key 1 Fig. -
Page 23: Changing A Stored Program
11.0 Changing a stored program Any program already stored, no matter whether a 7-day or a year program, can be changed in accordance with individual requirements. Select ? Channel 1 Astronomical times cannot be changed via the time switch. The astronomical times can be shifted with the offset. -
Page 24: Deleting
12.0 Deleting 12.1 Deleting individual switching times Astronomical switching times cannot be deleted via the time switch. Fig. 1: Menu selection ? and display of the free memory locations, example: 104 Fig. 2: to select channel, e.g.: C1, press key 1 With a total deletion the astronomical switching times apparently disappear. -
Page 25: Deleting A Date Program
12.2 Deleting a date program 12.3 Deleting a complete priority program Fig. 1: Menu selection ? and display of the free memory locations, example: 104 Fig. 1: Menu selection ? and display of the free memory locations, example: 104 Fig. 2: To select channel, e.g.: C1, press key 1 Fig. -
Page 26: Deleting All
12.5 Deleting all 13.0 Data interchange backup By means of the Obelisk memory card you can externally save the switching Fig. 1: Menu selection ? and display of the free memory locations, example: 104 times of the time switch. The data can be filed or transferred and read in from time Fig. -
Page 27: Preview: Programming With Obelisk Software
14.0 Tips & additional facilities 1. Special program for national holidays Procedure to accordingly switch on and off at other times any consumer units connected on national holidays: 13.3 Preview: programming with Obelisk software 1. Program your desired national holiday program. The on and off switch-off times must be effected daily. -
Page 28: Glossary
What does Obelisk memory card mean ? 15.0 Glossary A mobile data medium can be used to: What does automatic mode (Auto) mean ? – back up the programmed time program The cursor is positioned under Auto. The current time is displayed. –... - Page 29 16.0 Table of errors In order to increase the reliability of operation, several internal tests are run by the time switch. If any error appears during these tests, the LCD will display the following error numbers. Error no. 4, 5, 6, 7: Error in the transmittance of data memorized in the obelisque card.
- Page 30 Notizen Note Notice Nota...
- Page 31 Theben AG Hohenbergstraße 32 72401 Haigerloch Tel. +49 (0) 74 74 / 692-0 Fax +49 (0) 74 74 / 692-150 Service Tel. +49 (0) 90 01 84 32 36 Fax +49 (0) 74 74 / 692-207 hotline@theben.de Adresses, telephone numbers etc. at...
Need help?
Do you have a question about the SEL 173 DCF and is the answer not in the manual?
Questions and answers