Moxa Technologies MGate 5101-PBM-MN User Manual
Profibus master-to-modbus tcp gateway
Hide thumbs
Also See for MGate 5101-PBM-MN:
- Quick installation manual (2 pages) ,
- Quick installation manual (6 pages) ,
- Quick installation manual (6 pages)

Related Manuals for Moxa Technologies MGate 5101-PBM-MN


Summary of Contents for Moxa Technologies MGate 5101-PBM-MN
- Page 1 MGate 5101-PBM-MN PROFIBUS Master-to-Modbus TCP Gateway User’s Manual First Edition, August 2012 www.moxa.com/product © 2012 Moxa Inc. All rights reserved. www.ipc2u.ru www.moxa.pro...
- Page 1 MGate 5101-PBM-MN PROFIBUS Master-to-Modbus TCP Gateway User’s Manual First Edition, August 2012 www.moxa.com/product © 2012 Moxa Inc. All rights reserved.
- Page 2 MGate 5101-PBM-MN PROFIBUS Master-to-Modbus TCP Gateway User’s Manual The software described in this manual is furnished under a license agreement and may be used only in accordance with the terms of that agreement. Copyright Notice © 2012 Moxa Inc. All rights reserved.
- Page 2 MGate 5101-PBM-MN PROFIBUS Master-to-Modbus TCP Gateway User’s Manual The software described in this manual is furnished under a license agreement and may be used only in accordance with the terms of that agreement. Copyright Notice © 2012 Moxa Inc. All rights reserved.
-
Page 3: Table Of Contents
Table of Contents Introduction ............................1-1 Overview ............................1-2 Package Checklist ..........................1-2 Product Features ..........................1-2 Hardware ............................2-1 Function Block ............................ 2-2 Power Input and Relay Output Pinouts....................2-2 LED Indicators ............................ 2-2 Dimensions ............................2-3 Pin Assignments ..........................2-4 Mounting the Unit .......................... -
Page 4: Introduction
Introduction Welcome to the MGate 5101-PBM-MN line of PROFIBUS to Modbus TCP gateways. All models feature easy protocol conversion from PROFIBUS to Modbus TCP. This chapter is an introduction to the MGate 5101-PBM-MN and includes the following sections: Overview ... -
Page 4: Introduction
Introduction Welcome to the MGate 5101-PBM-MN line of PROFIBUS to Modbus TCP gateways. All models feature easy protocol conversion from PROFIBUS to Modbus TCP. This chapter is an introduction to the MGate 5101-PBM-MN and includes the following sections: Overview ... -
Page 5: Overview
PROFIBUS devices with remote maintenance capability. Windows utility for easy setup and traffic monitoring A Windows utility is provided to make configuration and operation of the MGate 5101-PBM-MN as easy as possible. The utility uses TCP/IP network to connect MGate 5101-PBM-MN unit. -
Page 6: Hardware
Hardware The following topics are covered in this chapter: Function Block Power Input and Relay Output Pinouts LED Indicators Dimensions Pin Assignments Mounting the Unit Specifications Reset Button www.ipc2u.ru www.moxa.pro... -
Page 6: Hardware
Hardware The following topics are covered in this chapter: Function Block Power Input and Relay Output Pinouts LED Indicators Dimensions Pin Assignments Mounting the Unit Specifications Reset Button... -
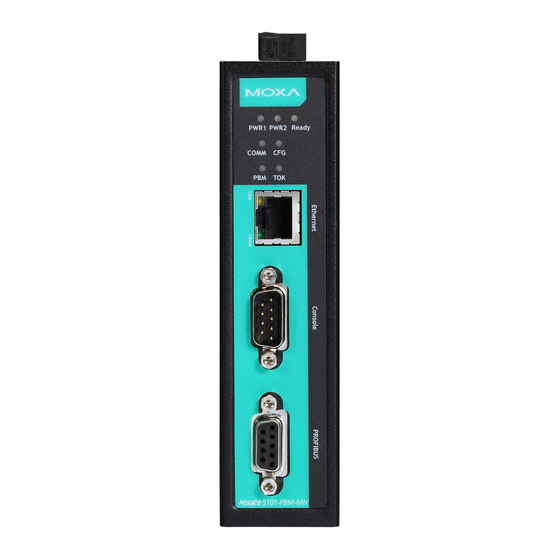
Page 7: Function Block
MGate 5101-PBM-MN UM Hardware Function Block Power Input and Relay Output Pinouts Shielded DC Power DC Power DC Power DC Power N.O. Common N.C. Ground Input 2 Input 2 Input 1 Input 1 LED Indicators Color Description Green Power is on. -
Page 7: Function Block
MGate 5101-PBM-MN UM Hardware Function Block Power Input and Relay Output Pinouts Shielded DC Power DC Power DC Power DC Power N.O. Common N.C. Ground Input 2 Input 2 Input 1 Input 1 LED Indicators Color Description Green Power is on. -
Page 8: Dimensions
MGate 5101-PBM-MN UM Hardware No data exchange Green Data exchange with all slaves COMM Green, flashing Data exchange with at least one slave (not all configured slaves can communicate with gateway) Bus control error No PROFIBUS configuration Green PROFIBUS configuration OK... -
Page 8: Dimensions
MGate 5101-PBM-MN UM Hardware No data exchange Green Data exchange with all slaves COMM Green, flashing Data exchange with at least one slave (not all configured slaves can communicate with gateway) Bus control error No PROFIBUS configuration Green PROFIBUS configuration OK... -
Page 9: Pin Assignments
Mounting the Unit The MGate 5101-PBM-MN series is designed to be attached to a DIN-Rail or mounted on a wall. For DIN-Rail mounting, push down the spring and properly attach it to the DIN-Rail until it “snaps” into place. For wall mounting, install the wall mount kit (optional) first, and then screw the device onto the wall. -
Page 10: Specifications
MGate 5101-PBM-MN UM Hardware Specifications Power Input Input Voltage 12 to 48 VDC Connector 8-pin terminal block (GND, V1+, V1-, Relay NO, Relay NC, V2+, V2-), screw mounting Ethernet Interface Number of Ports Speed 10/100 Mbps, auto MDI/MDIX Connector RJ45 Magnetic Isolation Protection 1.5 KV built-in... -
Page 11: Reset Button
MGate 5101-PBM-MN UM Hardware EN 61000-4-3 (RS) Level 3, EN 61000-4-4 (EFT) Level 4, EN 61000-4-5 (Surge) Level 3, EN 61000-4-6 (CS) Level 3, EN 61000-4-8, EN 61000-4-11, EN 61000-4-12 Shock IEC 60068-2-27 Freefall IEC 60068-2-32 Vibration IEC 60068-2-6 Reliability... -
Page 11: Reset Button
MGate 5101-PBM-MN UM Hardware EN 61000-4-3 (RS) Level 3, EN 61000-4-4 (EFT) Level 4, EN 61000-4-5 (Surge) Level 3, EN 61000-4-6 (CS) Level 3, EN 61000-4-8, EN 61000-4-11, EN 61000-4-12 Shock IEC 60068-2-27 Freefall IEC 60068-2-32 Vibration IEC 60068-2-6 Reliability... -
Page 12: Getting Started
Getting Started The following topics are covered in this chapter: Connecting Power Connecting PROFIBUS Devices Connecting to Network First Time MGate Configuration MGate Manager Windows Utility Network Settings Data Transfer PROFIBUS Network ... -
Page 12: Getting Started
Getting Started The following topics are covered in this chapter: Connecting Power Connecting PROFIBUS Devices Connecting to Network First Time MGate Configuration MGate Manager Windows Utility Network Settings Data Transfer PROFIBUS Network ... -
Page 13: Connecting Power
MGate Manager Utility The best way to configure the MGate 5101-PBM-MN is to use MGate Manager. In most cases, users may not know the IP address setting when they get the MGate. For this situation users can use Ethernet cable to connect the host and MGate directly. -
Page 13: Connecting Power
MGate Manager Utility The best way to configure the MGate 5101-PBM-MN is to use MGate Manager. In most cases, users may not know the IP address setting when they get the MGate. For this situation users can use Ethernet cable to connect the host and MGate directly. -
Page 14: Mgate Manager Windows Utility
Log Settings function is also another good way to check the communication issue. Configure the MGate MGate 5101-PBM-MN provides four ways to configure the MGate. 1. MGate Manager (Windows utility) Use MGate Manager to configure the MGate through Ethernet or check the MGate status. Please refer to chapter 4 Configuration for detail information. -
Page 14: Mgate Manager Windows Utility
Log Settings function is also another good way to check the communication issue. Configure the MGate MGate 5101-PBM-MN provides four ways to configure the MGate. 1. MGate Manager (Windows utility) Use MGate Manager to configure the MGate through Ethernet or check the MGate status. Please refer to... - Page 15 MGate 5101-PBM-MN UM Getting Started 2. Web console Use Web console to configure the MGate through Ethernet or verify the MGate status. User can use web browser such as Microsoft Internet Explorer or Google Chrome to connect to MGate with HTTP/HTTPS protocol.
- Page 15 MGate 5101-PBM-MN UM Getting Started 2. Web console Use Web console to configure the MGate through Ethernet or verify the MGate status. User can use web browser such as Microsoft Internet Explorer or Google Chrome to connect to MGate with HTTP/HTTPS protocol.
-
Page 16: Configuration (Mgate Manager)
Configuration (MGate Manager) The following topics are covered in this chapter: Installing the Software Starting MGate Manager Connecting to the Unit Modifying the Configuration Configure Device Network Settings PROFIBUS Settings Modbus Settings ... -
Page 16: Configuration (Mgate Manager)
Configuration (MGate Manager) The following topics are covered in this chapter: Installing the Software Starting MGate Manager Connecting to the Unit Modifying the Configuration Configure Device Network Settings PROFIBUS Settings Modbus Settings ... -
Page 17: Installing The Software
MGate 5101-PBM-MN UM Configuration (MGate Manager) Installing the Software The following instructions explain how to install MGate Manager, a utility for configuring and monitoring MGate 5101-PBM-MN units over the network. 1. Insert the Document and Software CD into the CD-ROM drive. Locate and run the following setup program to begin the installation process: MGM_Setup_[Version]_Build_[DateTime].exe... -
Page 17: Installing The Software
MGate 5101-PBM-MN UM Configuration (MGate Manager) Installing the Software The following instructions explain how to install MGate Manager, a utility for configuring and monitoring MGate 5101-PBM-MN units over the network. 1. Insert the Document and Software CD into the CD-ROM drive. Locate and run the following setup program to begin the installation process: MGM_Setup_[Version]_Build_[DateTime].exe... - Page 18 MGate 5101-PBM-MN UM Configuration (MGate Manager) 4. When the Select Additional Tasks window appears, click Next to continue. You may select Create a desktop icon if you would like a shortcut to MGate Manager on your desktop. 5. Click Next to start copying the software files.
- Page 18 MGate 5101-PBM-MN UM Configuration (MGate Manager) 4. When the Select Additional Tasks window appears, click Next to continue. You may select Create a desktop icon if you would like a shortcut to MGate Manager on your desktop. 5. Click Next to start copying the software files.
-
Page 19: Starting Mgate Manager
Starting MGate Manager MGate Manager is a Windows-based utility that is used to configure the MGate 5101-PBM-MN. Before running MGate Manager, make sure that the MGate 5101-PBM-MN is connected to your PC. Please refer to Chapter 2 for more details. -
Page 19: Starting Mgate Manager
Starting MGate Manager MGate Manager is a Windows-based utility that is used to configure the MGate 5101-PBM-MN. Before running MGate Manager, make sure that the MGate 5101-PBM-MN is connected to your PC. Please refer to Chapter 2 for more details. -
Page 20: Change Language Setting
MGate 5101-PBM-MN UM Configuration (MGate Manager) Change Language Setting If you want to run MGate Manager in a different language, you may click Language to change the language setting. A dialog box showing the available languages should appear as shown below. -
Page 20: Change Language Setting
MGate 5101-PBM-MN UM Configuration (MGate Manager) Change Language Setting If you want to run MGate Manager in a different language, you may click Language to change the language setting. A dialog box showing the available languages should appear as shown below. -
Page 21: Connecting To The Unit
MGate 5101-PBM-MN UM Configuration (MGate Manager) Connecting to the Unit Prior to configuration, MGate Manager must be connected to its unit. There are two methods to establish connection. Broadcast Search locates the MGate series on the LAN. Search by IP attempts to connect to a specific unit by IP address, which is useful if the unit is located outside the LAN or can only be accessed by going through a router. -
Page 22: Configure Device
You can enter a name to help you identify the unit location. Such as “Cabinet A001”. Time Settings MGate 5101-PBM-MN has a built-in Real-Time Clock for time calibration functions. Functions such as log function can add real-time information to the message. ATTENTION First time users should select the time zone first. -
Page 23: Network Settings
MGate 5101-PBM-MN UM Configuration (MGate Manager) Time Server IP or Domain address This optional field specifies your time server’s (E.g., 192.168.1.1 or time.stdtime.gov.tw) IP address or domain name, if a time server is used in your network. The module supports SNTP (RFC-1769) for automatic time calibration. -
Page 24: Profibus Settings
PROFIBUS Settings MGate 5101-PBM-MN PROFIBUS interface supports DPV1 master protocol and is compliant with IEC 61158. Before MGate can communicate with PROFIBUS slave devices, users have to input the PROFIBUS parameters for all connected devices such as slave address, I/O module. To configure the slave devices, please click the PROFIBUS Settings button. -
Page 24: Profibus Settings
PROFIBUS Settings MGate 5101-PBM-MN PROFIBUS interface supports DPV1 master protocol and is compliant with IEC 61158. Before MGate can communicate with PROFIBUS slave devices, users have to input the PROFIBUS parameters for all connected devices such as slave address, I/O module. To configure the slave devices, please click the... - Page 25 MGate 5101-PBM-MN UM Configuration (MGate Manager) In the PROFIBUS Settings window, user will see 3 areas. For left panel, it shows a tree list for recognized devices which the GSD file is already import into host computer through MGate Manager. If the target PROFIBUS slave devices which users want to connect to this MGate are not in the list, user have to import the GSD file first.
- Page 25 MGate 5101-PBM-MN UM Configuration (MGate Manager) In the PROFIBUS Settings window, user will see 3 areas. For left panel, it shows a tree list for recognized devices which the GSD file is already import into host computer through MGate Manager. If the target PROFIBUS slave devices which users want to connect to this MGate are not in the list, user have to import the GSD file first.
- Page 26 MGate 5101-PBM-MN UM Configuration (MGate Manager) Step1: Add new GSD file if necessary GSD (General Station Description) file is a standard device description file for PROFIBUS device. It includes all important device information and is provided by manufacturer. If users want to configure a PROFIBUS device into one PROFIBUS network, users have to get the GSD file and import into the PROFIBUS network configuration software.
- Page 26 MGate 5101-PBM-MN UM Configuration (MGate Manager) Step1: Add new GSD file if necessary GSD (General Station Description) file is a standard device description file for PROFIBUS device. It includes all important device information and is provided by manufacturer. If users want to configure a PROFIBUS device into one PROFIBUS network, users have to get the GSD file and import into the PROFIBUS network configuration software.
- Page 27 MGate 5101-PBM-MN UM Configuration (MGate Manager) To add the device into the PROFIBUS network in the right top panel, users can use mouse the drag the device into the right panel. And user will also see the device lists in the right bottom panel.
- Page 27 MGate 5101-PBM-MN UM Configuration (MGate Manager) To add the device into the PROFIBUS network in the right top panel, users can use mouse the drag the device into the right panel. And user will also see the device lists in the right bottom panel.
- Page 28 MGate 5101-PBM-MN UM Configuration (MGate Manager) Step 4: Configure the PROFIBUS device address and other parameters if necessary. User can click different device to see different parameter configuration window in the bottom panel. In the configuration window, user can click different tab to configure the detail parameter for each device, including the PROFIBUS master.
- Page 28 MGate 5101-PBM-MN UM Configuration (MGate Manager) Step 4: Configure the PROFIBUS device address and other parameters if necessary. User can click different device to see different parameter configuration window in the bottom panel. In the configuration window, user can click different tab to configure the detail parameter for each device, including the PROFIBUS master.
- Page 29 MGate 5101-PBM-MN UM Configuration (MGate Manager) Step 5: Configure the I/O module for the target PROFIBUS slave device which users want to access. To configure the PROFIBUS I/O modules for target slave device, user can click the device in the top panel and click the “I/O data”...
- Page 29 MGate 5101-PBM-MN UM Configuration (MGate Manager) Step 5: Configure the I/O module for the target PROFIBUS slave device which users want to access. To configure the PROFIBUS I/O modules for target slave device, user can click the device in the top panel and click the “I/O data”...
- Page 30 MGate 5101-PBM-MN UM Configuration (MGate Manager) Step 7: Save the configuration and exit the PROFIBUS Settings function. To save the PROFIBUS network configuration, users have to click the save button in the toolbar. Then all settings will be stored into the MGate device.
- Page 30 MGate 5101-PBM-MN UM Configuration (MGate Manager) Step 7: Save the configuration and exit the PROFIBUS Settings function. To save the PROFIBUS network configuration, users have to click the save button in the toolbar. Then all settings will be stored into the MGate device.
- Page 31 MGate 5101-PBM-MN UM Configuration (MGate Manager) Note: If you want PROFIBUS output to keep the last value when Modbus TCP has any problem, you can set this timeout value to zero. PROFIBUS Parameters For PROFIBUS interface, there are also several parameters can be configured manually. These parameters are showed at below configuration page.
- Page 31 MGate 5101-PBM-MN UM Configuration (MGate Manager) Note: If you want PROFIBUS output to keep the last value when Modbus TCP has any problem, you can set this timeout value to zero. PROFIBUS Parameters For PROFIBUS interface, there are also several parameters can be configured manually. These parameters are showed at below configuration page.
-
Page 32: Modbus Settings
Modbus Settings MGate 5101-PBM-MN support Modbus TCP function slave and master mode. For slave mode, MGate works as a server and waits for incoming connection from Modbus TCP master. And for master mode, MGate works as a client and will try to build a TCP connection with remote Modbus TCP device. -
Page 32: Modbus Settings
Modbus Settings MGate 5101-PBM-MN support Modbus TCP function slave and master mode. For slave mode, MGate works as a server and waits for incoming connection from Modbus TCP master. And for master mode, MGate works as a client and will try to build a TCP connection with remote Modbus TCP device. - Page 33 MGate 5101-PBM-MN UM Configuration (MGate Manager) Slave Mode Settings Parameters Value Description Slave Address 1 to 255 The Modbus address of this MGate. TCP Port 0 to 65535 The local TCP port for this MGate. Master Mode Settings Parameters Value...
- Page 33 MGate 5101-PBM-MN UM Configuration (MGate Manager) Slave Mode Settings Parameters Value Description Slave Address 1 to 255 The Modbus address of this MGate. TCP Port 0 to 65535 The local TCP port for this MGate. Master Mode Settings Parameters Value...
- Page 34 MGate 5101-PBM-MN UM Configuration (MGate Manager) When users click Add or Modify button, the following dialog will be displayed for configuration. Parameters Value Description Enable Disable/Cyclic/Data Change The Enable for the transaction: Disable: The transaction is never sent Cyclic: The transaction is sent cyclically at the interval specified in the “Poll Interval”...
- Page 34 MGate 5101-PBM-MN UM Configuration (MGate Manager) When users click Add or Modify button, the following dialog will be displayed for configuration. Parameters Value Description Enable Disable/Cyclic/Data Change The Enable for the transaction: Disable: The transaction is never sent Cyclic: The transaction is sent cyclically at the interval specified in the “Poll Interval”...
-
Page 35: Data Exchange Between Modbus Tcp And Profibus
PROFIBUS side to Modbus TCP. Output means opposite direction. Please see below picture. Internal Memory Address The MGate 5101-PBM-MN can support up to 1536 bytes input and 1536 bytes output data. Input addresses 1536-1553 are reserved for checking PROFIBUS Master or Slave status. Output addresses 1536-1537 are for changing the PROFIBUS Master status. -
Page 35: Data Exchange Between Modbus Tcp And Profibus
PROFIBUS side to Modbus TCP. Output means opposite direction. Please see below picture. Internal Memory Address The MGate 5101-PBM-MN can support up to 1536 bytes input and 1536 bytes output data. Input addresses 1536-1553 are reserved for checking PROFIBUS Master or Slave status. Output addresses 1536-1537 are for changing the PROFIBUS Master status. - Page 36 MGate 5101-PBM-MN UM Configuration (MGate Manager) Internal Memory Configuration for PROFIBUS I/O module For PROFIBUS, users will see the assigned internal memory address in MGate Manager PROFIBUS Settings window. The “Input addr.” means the offset address in internal memory for input direction. The “Output addr.”...
- Page 36 MGate 5101-PBM-MN UM Configuration (MGate Manager) Internal Memory Configuration for PROFIBUS I/O module For PROFIBUS, users will see the assigned internal memory address in MGate Manager PROFIBUS Settings window. The “Input addr.” means the offset address in internal memory for input direction. The “Output addr.”...
- Page 37 MGate 5101-PBM-MN UM Configuration (MGate Manager) In host/Modbus Master In host/Modbus Master. Internal Memory Configuration for Modbus TCP Slave Mode In slave mode, users don’t need to configure any Modbus command settings the MGate, but users have to know how to send the right Modbus TCP command to MGate. In Modbus, users can request the register data or bit data.
- Page 37 MGate 5101-PBM-MN UM Configuration (MGate Manager) In host/Modbus Master In host/Modbus Master. Internal Memory Configuration for Modbus TCP Slave Mode In slave mode, users don’t need to configure any Modbus command settings the MGate, but users have to know how to send the right Modbus TCP command to MGate. In Modbus, users can request the register data or bit data.
-
Page 38: System Settings
MGate 5101-PBM-MN UM Configuration (MGate Manager) System Settings This configuration tab includes several system level settings such as security, alarm and information log. Most of these settings are optional. Accessible IP Settings This settings is used this restrict access to the module by IP address. Only IP addresses on the list will be allowed access to the module. -
Page 38: System Settings
MGate 5101-PBM-MN UM Configuration (MGate Manager) System Settings This configuration tab includes several system level settings such as security, alarm and information log. Most of these settings are optional. Accessible IP Settings This settings is used this restrict access to the module by IP address. Only IP addresses on the list will be allowed access to the module. - Page 39 MGate 5101-PBM-MN UM Configuration (MGate Manager) Log Settings This setting will enable the MGate firmware to record the important event for future verification. The record information can only be displayed in web console. Please refer to chapter 5. The available information which can be record includes the following events:...
- Page 39 MGate 5101-PBM-MN UM Configuration (MGate Manager) Log Settings This setting will enable the MGate firmware to record the important event for future verification. The record information can only be displayed in web console. Please refer to chapter 5. The available information which can be record includes the following events:...
- Page 40 MGate 5101-PBM-MN UM Configuration (MGate Manager) Auto Warning (Relay Output) Auto Warning will be triggered in the event of a power failure or when Ethernet links are disconnected. When a checked trigger condition occurs, the MGate will open the circuit of the relay output and trigger the Fault LED to start blinking.
- Page 40 MGate 5101-PBM-MN UM Configuration (MGate Manager) Auto Warning (Relay Output) Auto Warning will be triggered in the event of a power failure or when Ethernet links are disconnected. When a checked trigger condition occurs, the MGate will open the circuit of the relay output and trigger the Fault LED to start blinking.
-
Page 41: Load Default
MGate 5101-PBM-MN UM Configuration (MGate Manager) Console Settings Parameters Value Description HTTP/HTTPS Enable/Disable This setting is to enable/disable the web console. For security issue, users can only enable the HTTPS or just disable all settings. But users only can access the configuration from telnet/ssh or utility. -
Page 42: Monitoring Modbus Activity
MGate 5101-PBM-MN UM Configuration (MGate Manager) After the MGate Manager resets completely, MGate Manager will automatically execute a Broadcast Search for all MGate units on the LAN. Your MGate should reappear in the list of units. ATTENTION Load Default will completely reset the configuration of the unit, and all of the parameters you have saved will be discarded. -
Page 43: Open Traffic Monitor Window
MGate 5101-PBM-MN UM Configuration (MGate Manager) Open Traffic Monitor Window Select the unit that you wish to monitor and click Monitor to open the Traffic Monitor window. In the Traffic Monitor window, click Start to begin live monitoring of the data passing through the selected MGate 5101-PBM-MN unit. -
Page 44: Diagnose
MGate 5101-PBM-MN UM Configuration (MGate Manager) Diagnose MGate also provides the statics information for troubleshooting, especially for PROFIBUS slave devices. In most applications, MGate will connect several PROFIBUS slaves at the same time. If some devices can’t work well, it is hard for users to know which one has the communication issue. -
Page 44: Diagnose
MGate 5101-PBM-MN UM Configuration (MGate Manager) Diagnose MGate also provides the statics information for troubleshooting, especially for PROFIBUS slave devices. In most applications, MGate will connect several PROFIBUS slaves at the same time. If some devices can’t work well, it is hard for users to know which one has the communication issue. - Page 45 MGate 5101-PBM-MN UM Configuration (MGate Manager) This information displays the PROFIBUS DP diag_data information. Octet 1 (Station_status_1): Value Description Bit 7 Diag.Master_Lock This bit is set if the slave is parameterized by other master. Bit 6 Diag.Prm_Fault This bit is set if master last request is invalid.
- Page 45 MGate 5101-PBM-MN UM Configuration (MGate Manager) This information displays the PROFIBUS DP diag_data information. Octet 1 (Station_status_1): Value Description Bit 7 Diag.Master_Lock This bit is set if the slave is parameterized by other master. Bit 6 Diag.Prm_Fault This bit is set if master last request is invalid.
-
Page 46: Create/Modify The Configuration File
MGate 5101-PBM-MN UM Configuration (MGate Manager) Octet 5~6: Ident_number, the manufacture identifier number of the slave device. This also can be listed in GSD file. Octet 7~32: Exg_Diag_data, this is diagnose data specified by slave device. Create/Modify the Configuration File Users can create or modify the configuration file manually through MGate Manager. -
Page 47: Upgrading Firmware
Firmware updates for the MGate 5101-PBM-MN are located at www.moxa.com. After you have downloaded the new firmware onto your PC, you can use MGate Manager to write it onto your MGate 5101-PBM-MN. Select the desired unit from the list in MGate Manager and click Upgrade Firmware to begin the process. -
Page 48: Import/Export
You can export the configuration as a file, and then import that configuration file onto other units at any time. The export function saves all the configuration settings and parameters of the MGate 5101-PBM-MN will be saved in an .ini file. To begin, click the Export button. -
Page 48: Import/Export
You can export the configuration as a file, and then import that configuration file onto other units at any time. The export function saves all the configuration settings and parameters of the MGate 5101-PBM-MN will be saved in an .ini file. To begin, click the Export button. - Page 49 MGate 5101-PBM-MN UM Configuration (MGate Manager) Select the file you want to import, then click the OK button Please be patient and wait as MGate Manager configures the target device. If you import the configuration file successfully, a confirmation message will pop up.
- Page 49 MGate 5101-PBM-MN UM Configuration (MGate Manager) Select the file you want to import, then click the OK button Please be patient and wait as MGate Manager configures the target device. If you import the configuration file successfully, a confirmation message will pop up.
-
Page 50: Configuration (Web Console)
Configuration (Web Console) MGate 5101-PBM-MN also provides the web console for configuration, but only for limited items. For example, the PRFOFIBUS and Modbus TCP settings are not included in web console and only available in MGate Manager. Users can use the browser such as Microsoft Internet Explorer or Google chrome to access web console. -
Page 51: Profibus Control (System Management - Maintenance - Profibus Control)
MGate 5101-PBM-MN UM Configuration (Web Console) System Management –Maintenance - Configuration Please refer to Import/Export section. Export System Management –Maintenance - Load Factory Default Please refer to Load Default section. PROFIBUS Control ( System Management – Maintenance - PROFIBUS Control Users can configure the PROFIBUS interface of MGate to different operation mode. -
Page 52: Profibus Live List
MGate 5101-PBM-MN UM Configuration (Web Console) PROFIBUS Live List This page will display the available PROFIBUS device on network. This function is the similar to the MGate Manager Diagnose function, but it can’t display the detail information. If the device is disconnected, it will not be displayed in the list even though it is configured in PROFIBUS network. -
Page 53: Configuration (Text Mode Console)
Configuration (Text Mode Console) MGate 5101-PBM-MN provides the text mode console with serial interface, telnet and SSH protocol. The user interface is the same in all text mode consoles. Please note the text mode console doesn’t provide all configuration items. For example, the PRFOFIBUS and Modbus TCP settings are not included in text mode console and only available in MGate Manager. -
Page 53: Configuration (Text Mode Console)
Configuration (Text Mode Console) MGate 5101-PBM-MN provides the text mode console with serial interface, telnet and SSH protocol. The user interface is the same in all text mode consoles. Please note the text mode console doesn’t provide all configuration items. For example, the PRFOFIBUS and Modbus TCP settings are not included in text mode console and only available in MGate Manager. - Page 54 MGate 5101-PBM-MN UM Configuration (Text Mode Console) The following functions are the same as MGate Manager utility and web console. Please refer to the relative sections. Function Note Basic Please refer to Configure Device section. Network Please refer to Network Settings section.
- Page 54 MGate 5101-PBM-MN UM Configuration (Text Mode Console) The following functions are the same as MGate Manager utility and web console. Please refer to the relative sections. Function Note Basic Please refer to Configure Device section. Network Please refer to Network Settings section.
Need help?
Do you have a question about the MGate 5101-PBM-MN and is the answer not in the manual?
Questions and answers