Table of Contents
Advertisement
Available languages
Available languages
Quick Links
Advertisement
Chapters
Table of Contents

Subscribe to Our Youtube Channel
Related Manuals for Flow Fitness Glinder DCT1000


Summary of Contents for Flow Fitness Glinder DCT1000
- Page 1 Gebruiksaanwijzing / Manual www.flowfitness.nl...
- Page 2 Flow Fitness B.V. All rights reserved. Nothing in this instruction manual may be used or reproduced in any form or way without the express written permission of Flow Fitness B.V.
-
Page 3: Table Of Contents
Inhoud 1. Belangrijke informatie 1.1 Gezondheid 1.2 Veiligheid 2. Introductie 2.1 Inhoud verpakking 2.2 Belangrijke onderdelen 2.3 Specificaties 3. Fitness 3.1 Trainen op hartslag 3.2 Warming up en cooling down 4. Gebruik 4.1 Montage 4.2 Gebruik computer 4.3 Onderhoud 5. Algemene informatie 5.1 Training schema’s 5.2 Exploded view 5.3 Probleemoplossen... -
Page 4: Belangrijke Informatie
1. Belangrijke informatie 1.1 Gezondheid Belangrijk: lees eerst deze handleiding en volg de instructies nauwkeurig op voordat u het product gaat gebruiken. - Raadpleeg een deskundige om het trainingsniveau te bepalen dat voor het best geschikt is. - Indien u tijdens het trainen last krijgt van duizeligheid, misselijkheid of ander lichamelijk ongemak, stop dan direct met trainen en raadpleeg een arts. - Page 5 Laat uw conditie controleren door een arts voordat u begint met trainen. Dit is extra belangrijk voor personen ouder dan 35 jaar of personen met gezondheidsproblemen. Lees alle instructies voor gebruik. Flow Fitness is niet verantwoordelijkheid voor persoonlijk letsel of schade aan bezittingen veroorzaakt door gebruik van dit product.
-
Page 6: Introductie
2. Introductie Dank u voor de aanschaf van de Flow Fitness Glider DCT1000 Crosstrainer. Met de Glider DCT1000 Crosstrainer heeft u een uniek trainingsapparaat in huis gehaald. Voor aanvang van de training kunt u verschillende training programma’s kiezen waaronder een hartslag gestuurd programma. U stelt hierbij in op welke hartslag per minuut u wilt trainen en de monitor zal dan tijdens de training de weerstand verzwaren of verlichten. - Page 7 2. Introductie Gebruiksaanwijzing Glider DCT1000 crosstrainer - 7...
-
Page 8: Belangrijke Onderdelen
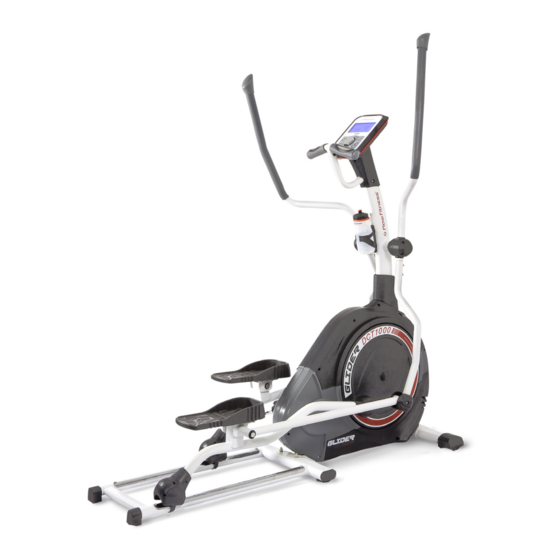
2. Introductie 2.2 Belangrijke onderdelen Bewegende handgrepen Computer Hartslag hand sensoren Vaste handgrepen Frame Pedaal Kappen Rails 2.3 Specificaties Lengte: 155 cm Hoogte: 174 cm Breedte: 47 cm Gewicht: 55.8 kg 8 - Gebruiksaanwijzing Glider DCT1000 crosstrainer... -
Page 9: Fitness
3. Fitness Wat is fitness? In het algemeen is een fitnessoefening te omschrijven als een activiteit die er voor zorgt dat uw hart meer zuurstof via het bloed van uw longen naar uw spieren pompt. Hoe zwaarder de training, hoe meer brandstof (zuurstof) de spieren nodig hebben en hoe harder het hart moet werken om zuurstofrijk bloed naar de spieren te pompen. - Page 10 3. Fitness Gewicht verliezen Conditie verbeteren (slagen per minuut) (slagen per minuut) Leeftijd 20 -24 120 - 118 170 -167 25 - 29 117 - 115 166 - 163 30 - 34 114 - 112 162 - 158 35 - 39 111 - 109 157 - 154 40 - 44...
-
Page 11: Warming Up En Cooling Down
3. Fitness 3.2 Warming up en cooling down Een goed trainingsprogramma begint met een warming up en eindigt met een cooling down. Hiermee kunnen spierpijn en blessures worden voorkomen. Hieronder vindt u een aantal geschikte oefeningen. Head Roll Kantel uw hoofd naar rechts. Hou dit één tel vast, zodat u de linkerkant van uw nek licht voelt trekken. -
Page 12: Gebruik
4. Gebruik 4.1 Montage Stap 1 1. Bevestig de framevoet voor (2) aan het hoofd frame (1) met behulp van de slotbouten (81), de veerringen (7), de platte ringen (8) en de moer (20) 2. Plaats de voetkappen (94) over uiteinden van het achter frame (3). 12 - Gebruiksaanwijzing Glider DCT1000 crosstrainer... - Page 13 4. Gebruik Stap 2 1. Bevestig het achter frame (3) aan het hoofdframe (1) met behulp van de bouten (9B), de gebogen ringen (6) en de veer ringen (7). Gebruiksaanwijzing Glider DCT1000 crosstrainer - 13...
- Page 14 4. Gebruik Stap 3 1. 1. Schuif de computerstang kap (49) over de computerstang (10) zoals in fig. A is weergegeven. 2. Sluit nu de computerkabel (29), die uit de computer stang (10) steekt, op de motor kabel (30), die uit het frame steekt, aan zoals weergegeven in figuur B. 3.
- Page 15 4. Gebruik Stap 4 1. Schuif de linker as kap (23L) over de as op de computerstang (10). Schuif vervolgens de gebogen ring (75), de handvatstang (52L) en vervolgens de ring (60) over de as. Zet het geheel vast met de bout (40). Herhaal deze stappen voor de rechterzijde van de crosstrainer met de onderdelen (23R), (75), (52R), (60) en (40).
- Page 16 4. Gebruik Stap 5 1. Bevestig de voetsteun draagstang (11L/11R) op de as (31) met behulp van de nylon moer (17), de platte ring (14) en de plastic ring (41) zoals weergegeven in fig. A. 2. Bevestig de boven as kap (74A) en de onder as kap (74B) op de voetsteun draagstang (11L/11R) met behulp van de schroef (63) zoals weergegeven in fig.B.
- Page 17 4. Gebruik Stap 6 1. Bevestig de voetsteun(21) op de voetsteun draagstang (11L/ 11R) met behulp van de bout (73) en moer (77). Gebruiksaanwijzing Glider DCT1000 crosstrainer - 17...
- Page 18 4. Gebruik Stap 7 1. Bevestig het wiel (38) op de voetsteun draagstang (11L) met de bout (110), de platte ring (60), de afstandsbus (108) en de plastic riem (109). Let op dat de montage van de plastic riem gebeurd zoals weergegeven de afbeelding hieronder. ( x4) ( x4) D25*D8.5*2.0T...
- Page 19 4. Gebruik Stap 8 1. Bevestig de scharnier kappen (104L/ 104R) aan de voetsteun buis (32L/ 32R) met behulp van de schroef (63) en schroef (107). 104R 104L Gebruiksaanwijzing Glider DCT1000 crosstrainer - 19...
- Page 20 4. Gebruik Stap 9 1. Sluit nu de computerkabel (29) en de handvat hartslag kabels (65) aan op de computer (64), zoals in figuur A is weergegeven. 2. Bevestig de computer (64) op de framekoker (10) met de daarvoor bijgeleverde schroeven.
- Page 21 4. Gebruik Stap 10 1. Bevestig de linker display kap (67) en de rechter display kap (68) op de computerstang (10) met de daarvoor bijgeleverde schroeven (63) en (107). 2. Sluit als laatste stap de adapter (78) aan. (x 2) ST4*15L (x 2) M5*15L...
-
Page 22: Gebruik Computer
4. Gebruik 4.2 Gebruik computer BODY FAT Analyse van STAR/STOP vetpercentage Starten of stoppen van training. RECOVERY Analyse van conditie aan de hand van hartslag RESET herstel. Resetten van huidige waarden en terugzetten van computer naar het MODE / ENTER trainings keuze 1. - Page 23 4. Gebruik Opstarten Plug de adapterkabel in het contact van het apparaat. Het systeem geeft een kort geluidssignaal en het display licht op. Gebruikersprofiel instellen U kunt 4 verschillende profielen instellen. Na het opstarten kunt u met de selectieknop kiezen tussen U1-U4. Maak uw keuze en bevestig met ENTER (selectieknop indrukken).
- Page 24 4. Gebruik Programma keuze Na het instellen van het gebruikersprofiel komt u in het workout menu. In het menu heeft u de volgende keuzes: manual handmatige training program 12 voorgeprogrammeerde programma’s HRC (Heart Rate Control) Hartslaggestuurde training User Gebruikersprogramma Watt constant Constant vermogen training Gebruik de selectie toets om een keuze te maken en bevestig met de ENTER knop.
- Page 25 4. Gebruik Voorgeprogrameerde training Kies in het workout menu het icoon voor een voorgeprogrammeerd programma. Er kan gekozen worden uit 12 verschillende trainingen. Als u een training heeft geselecteerd, wordt het weerstandsverloop van de training in het display zichtbaar. Een overzicht van de voorgeprogrammeerde trainingen staat op de volgende pagina. 1.
- Page 26 4. Gebruik 26 - Gebruiksaanwijzing Glider DCT1000 crosstrainer...
- Page 27 4. Gebruik Gebruikersprogramma Kies in het workout menu het icoon voor een eigen, op maat gemaakt programma. 1. Het programma is opgebouwd uit 8 segmenten. Van elk segment kan het weerstandsniveau (level) ingesteld worden. Schakel tussen de segmenten met de ENTER knop en verander de weerstand met de selectieknop.
- Page 28 4. Gebruik BODY FAT: Vetpercentage analyse Om uw vetpercentage te analyseren dient de computer in STOP stand te staan. Volg daarna onderstaande stappen op. 1. Druk op de BODY FAT knop en houdt de hand hartslagsensoren stevig vast. 2. Het symbool ----------verschijnt. Na 8 seconden verschijnt uw vetpercentage (F) en een bijbehorende symbool.
- Page 29 4. Gebruik Recovery: Hartslag herstel na een training Na een training is het mogelijk om uw conditie te meten. Druk op de RECOVERY knop en houdt de hartslag sensoren stevig vast, of zorg ervoor dat u een hartslag band draagt. Alle waarden verdwijnen uit beeld en alleen de tijd en de hartslag verschijnen nog.
-
Page 30: Onderhoud
4. Gebruik 4.3 Onderhoud Flow Fitness adviseert om eens in de zes weken de bouten en moeren van de scharnierpunten te controleren en indien nodig aan te draaien. Gebruik hiervoor het bij het product aangeleverde gereedschap. Veeg tevens na iedere training het eventuele zweet van alle onderdelen. Hiermee voorkomt u dat het zweet kringen of zelfs corrosie veroorzaakt. - Page 31 5. Algemene informatie Gebruiksaanwijzing Glider DCT1000 crosstrainer - 31...
-
Page 32: Algemene Informatie
5. Algemene informatie 5.1 Training schema’s Introductie trainingsschemas Trainingschema week 1 en 2 Trainingschema week 3 en 4 Train op 60% van uw maximale hartslag. Train op 60% van uw maximale hartslag. Maximaal 3 keer per week. Maximaal 4 keer per week. Warming up 5 - 10 minuten. - Page 33 5. Algemene informatie Trainingsschema om conditie te verbeteren (vervolg op introductie trainingsschema) Trainingschema week 7 en 8 Trainingschema week 9 en verder Train op 85% van uw maximale hartslag. Train op 85% van uw maximale hartslag. Maximaal 6 keer per week. Maximaal 6 keer per week.
-
Page 34: Exploded View
5. Algemene informatie 5.2 Exploded view 34 - Gebruiksaanwijzing Glider DCT1000 crosstrainer... - Page 35 5. Algemene informatie Onderdeel Aantal Onderdeel Aantal Gebruiksaanwijzing Glider DCT1000 crosstrainer - 35...
-
Page 36: Probleemoplossen
5. Algemene informatie 5.3 Probleemoplossen Probleem Tijdens het trainen piept of kraakt de crosstrainer. Oplossing Piepen of kraken wordt in veel gevallen veroorzaakt door dat een kunststof kap die tegen het metalen frame of stang schuurt. Om dit te verhelpen kunt u er WD40 olie op spuiten. -
Page 37: Garantie
6. Garantie 6.1 Garantie Flow Fitness verleent een garantie aan huis van 3 jaar op onderdelen, voorrijkosten en uurloon, te rekenen vanaf de datum van aankoop. De garantie heeft uitsluitend betrekking op materiaal- en/of productiefouten. Indien u optimaal gebruik wilt maken van deze garantie, vul dan het online garantie aanmeld formulier in en voeg daarbij een kopie van het aankoopsbewijs. - Page 38 Manual www.flowfitness.nl/en...
- Page 39 Content 1. Important information 1.1 Health 1.2 Safety 2. Introduction 2.1 Contents of package 2.2 Important parts 2.3 Specifications 3. Fitness 3.1 Training by heart rate 3.2 Warming up and cooling down 4. Use 4.1 Assembly 4.2 Use of the computer 4.3 Maintenance 5.
-
Page 40: Important Information
1. Important information 1.1 Health Important: read this instruction manual first and follow the instructions carefully before using the product. - Consult an expert to determine the training level that is most suitable for you. - If you experience any dizziness, nausea or any other physical discomfort while training, cease the training immediately and consult a physician. - Page 41 This is particularly important for persons over 35 years old or persons who have any problems with their health. Read all instructions before using the equipment. Flow Fitness is not responsible for any personal injury or damage to property caused by the use of this equipment.
-
Page 42: Introduction
2. Introduction Thank you for purchasing the Glider DCT1000. This Flow Fitness product can be purchased for several reasons. Whatever yours may be, improve stamina, lose weight, rehabilitation or just because you like to exercise, we are convinced this product will meet your requirements. - Page 43 2. Introduction Manual Glider DCT1000 crosstrainer - 43...
-
Page 44: Important Parts
2. Introduction 2.2 Important parts Movable handlebars Computer Hand heart rate sensors Fixed handlebar Frame Covers Rails 2.3 Specifications Length: 155 cm Height: 174 cm Width: 47 cm Weight: 55.8 kg 44 - Manual Glider DCT1000 crosstrainer... -
Page 45: Fitness
3. Fitness What is fitness? In general a fitness exercise can be described as an activity that makes your heart pump more oxygen from your lungs to your muscles by means of circulating the blood. The more strenuous the training, the more fuel (oxygen) the muscles need and the more work the heart has to do to pump oxygen rich blood to the muscles. - Page 46 3. Fitness Weight lost Improve stamina (beats per minute) (beats per minute) 20 -24 120 - 118 170 -167 25 - 29 117 - 115 166 - 163 30 - 34 114 - 112 162 - 158 35 - 39 111 - 109 157 - 154 40 - 44...
-
Page 47: Warming Up And Cooling Down
3. Fitness 3.2 Warming up and cooling down A good training schedule starts with a good warming up and ends with a cooling down of the muscles. This will prevent painful muscles and injury. Below you will find some suitable exercises. Head Roll Tilt your head to the right. -
Page 48: Use
4. Use 4.1 Assembly Step 1 1. Assemble the front stabilizer (2) onto the main frame (1) by fastening bolts (81), spring washers (7), flat washers (8) and nut (20). 2. Place the foot cap (94) to the sliding beam (3). 48 - Manual Glider DCT1000 crosstrainer... - Page 49 4. Use Step 2 1. Assemble the sliding beam (3) to the main frame (1) by fastening bolts (9B), curved washers (6) and spring washers (7). Manual Glider DCT1000 crosstrainer - 49...
- Page 50 4. Use Step 3 1. Slide the handlebar post cover (49) onto the handlebar post (10) as discribed in figure (A). 2. Connect the computer cables (29) and (30) as displayed in figure (B). 3. Assemble the handlebar post (10) to the main frame (1) by fastening bolts (9), curved washers (6), spring washers (7) and flat washers (8).
- Page 51 4. Use Step 4 1. Slide the upper cover left (23L) onto the left axle of the handlebar post (10). Then slide curved washer (75), left movable handlebar (52L) and washer (60) over the left axle. Fasten these parts with bolt (40). Repeat the same steps for the right side of the crosstrainer with parts (23R), (75), (52R), (60) and (40).
- Page 52 4. Use Step 5 1. Assemble the left and right pedal support tubes (11L/11R) onto the rolling axle (31). by fastening nylon nut (17), flat washer (14) and plastic flat washer (41) as displayed in figure A. 2. Assemble the upper axle cover (74A) and the lower axle cover (74B) onto the pedal supporting tube (11L/11R) by fastening screw (63) as displayed on figure B.
- Page 53 4. Use Step 6 1. Assemble the pedal (21) onto the pedal supporting tube (11L/11R) by fastening bolt (73) and nut (77). Manual Glider DCT1000 crosstrainer - 53...
- Page 54 4. Use Step 7 1. Assemble wheel (38) onto the pedal supporting tube (11L/11R) by fastening bolt (110), flat washer (60), spacer (108) and plastic belt (109). Important: Assemble the plastic belt as displayed on the image below. ( x4) ( x4) D25*D8.5*2.0T ( x4)
- Page 55 4. Use Step 8 1. Assemble the cover for joint (104L/104R) to the pedal bracket (32L/32R) by fastening screw (63) and screw (107). 104R 104L Manual Glider DCT1000 crosstrainer - 55...
- Page 56 4. Use Step 9 1. Connect the computer cable (29) and the hand pulse cables (65) to the computer (64) as displayed in figure A 2. Assemble the computer (64) to the handlebar post (10) by fastening the four screws in the back of the computer (64). 3.
- Page 57 4. Use Step 10 1. Assemble the left computer bracket (67) and the right computer bracket (68) to the handlebar post (10) by fastening screws (63) and (107). 2. Connect the adapter (78). (x 2) ST4*15L (x 2) M5*15L Manual Glider DCT1000 crosstrainer - 57...
-
Page 58: Use Of The Computer
4. Use 4.2 Use of the computer BODY FAT Analysis of STAR/STOP fat percentage Start or stop a training session RECOVERY Analysis of stamina by checking the heart RESET rate recovery Resets all values / Back to the workout menu. SELECTION &... - Page 59 4. Use Power up Connect the adapter to the crosstrainer and outlet for powering up the screen as displayed below. When powering up the computer will give a sound signal. Setup user profile Your able to setup for different user profiles. After powering up you can select between U1-U4 with the selection knob.
- Page 60 4. Use Chose program After selecting the user profile you will enter the workout menu. In this menu you have the following options. manual Manual workout program 12 preprogrammed workouts Heart Rate Controlled workout User User programmed workout Watt constant Constant WATT workout Rotate the selection knob to browse between workouts.
- Page 61 4. Use Preprogrammed workout Choose one of the 12 preprogrammed programs. A preview of the each program is shown on the next page. When you have selected a training the resistance path is displayed on the screen. 1. When you have selected the preferred workout press the selection knob to confirm the selection 2.
- Page 62 4. Use 62 - Manual Glider DCT1000 crosstrainer...
- Page 63 4. Use User programmed workout In the workout menu select the U icon for a user programmed workout. 1. The program is built on 8 segments. Of each segment the resistance (level) can be entered. Switch between segments by pressing the selection knob and adjust the level by rotating the selection knob.
- Page 64 4. Use Body Fat Analyses For analysing your body fat the computer needs to be STOP in the modus before following these steps: 1. Press the BODY FAT button and hold your hands firmly onto the hand sensors on the handlebar. 2.
- Page 65 4. Use RECOVERY (stamina test) After a workout it is possible to check your stamina. Press the RECOVERY button and firmly hold the hand heart rate sensors, or wear a chest belt. All values will disappear from the screen and a countdown from 60 to 0 will be visible. After the countdown a code will appear.
-
Page 66: Maintenance
However, make sure that all parts are completely dry before they are used again. Flow Fitness advises to fasten nuts and bolts, check and fasten pivot points once every six weeks. For fastening use the tool supplied with the product. - Page 67 5. General information Manual Glider DCT1000 crosstrainer - 67...
-
Page 68: General Information
5. General information 5.1 Training schedule Introduction schedule Schedule week 1 and 2 Schedule week 3 and 4 Train at 60% of your maximum heart rate. Train at 60% of your maximum heart rate. Max. 3 times a week. Max. 4 times a week. Warming up 5 - 10 minutes. - Page 69 5. General information Training schedule to improve stamina (follow-up to introduction training schedule) Schedule week 7 and 8 Schedule week 9 and beyond Train at 85% of your maximum heart rate. Train at 85% of your maximum heart rate. Max. 6 times a week. Max.
-
Page 70: Exploded View
5. General information 5.2 Exploded view 70 - Manual Glider DCT1000 crosstrainer... - Page 71 5. General information Description Description Main frame Cap 95.8*50.8 Front stabilizer Spring D3.5*D18*52L Sliding beam Bolt M6*1.0*15L Oval cap C-ring S-15 (1T) Left foot cap Waved washer D21*D16.2*0.3T Right foot cap Flat washer D25*D8.5*2.0T Curved washer D22*D8.5*1.5T Crank axle Spring washer D15.4*D8.2*2T Round magnet Flat washer D16*D8.5*1.2T Screw ST4*1.41*15L...
-
Page 72: Troubleshooting
5. General information 5.3 Troubleshooting Problem: During a training the crosstrainer makes squeaky noises Solution: Beeping or scratching noises are mostly caused by a plastic cover hitting the metal frame or post. You can easily solve this problem to spay WD40 oil onto these parts. Problem: The computer receives heart rate signal badly or not at all. -
Page 73: Warranty
6. Warranty 6.1 Warranty The warranty is provided by the Flow Fitness distributor of your country and the reseller where you have purchased your product. Please check http://www.flowfitness.nl/en/dealers/locations.php for contact information. Manual Glider DCT1000 crosstrainer - 73... - Page 74 Notities / Notes 74 - Glider DCT1000 crosstrainer...
- Page 75 Notities / Notes Glider DCT1000 crosstrainer - 75...
- Page 76 Glider DCT1000 crosstrainer www.flowfitness.nl...
Need help?
Do you have a question about the Glinder DCT1000 and is the answer not in the manual?
Questions and answers