
Related Manuals for Nonin Avant 4000


Summary of Contents for Nonin Avant 4000
- Page 1 Operator’s Manual vant 4000 ® Avant 4000 ® Avant 4000 Digital ® Pulse Oximetry System with Bluetooth ® Wireless Technology English 0123...
- Page 2 Nonin is a registered trademark of Nonin Medical, Inc. The Bluetooth word mark and logos are owned by the Bluetooth SIG, Inc. and any use of such marks by Nonin Medical, Inc. is under license. Other trademarks and trade names are those of their respective owners.
-
Page 3: Table Of Contents
Guide to Symbols ............1 Precautions for Use ............2 Using the Avant 4000 System ........5 Indications for Use ............5 General Information about Bluetooth Technology ...6 Installing the Battery Pack in the Display Unit ...7 Installing Batteries in the Patient Module ....8 Displays, Indicators, and Controls ......10... -
Page 4: Guide To Symbols
Guide to Symbols Detailed information for functional symbols can be found in “Using the Avant 4000 Digital Pulse Oximetry System.” Regulatory Symbols Attention: See Instructions for Use or related materials. Type BF Applied Part (Patient isolation from electrical shock). UL Mark for Canada and the United States... -
Page 5: Precautions For Use
DO NOT use the device without batteries when patient safety relies upon audible alarms. Use the Avant 4000 system only within its designated range (approximately 30 feet— spherical radius—from patient module to display). Moving outside this range may cause missing, lost, and/or inaccurate data. - Page 6 Batteries might leak or explode if used or disposed of improperly. Follow local governing ordinances and recycling instructions regarding disposal or recy- cling of the device and device components, including batteries. Use only NONIN- approved battery packs, and remove batteries if the system is not used within 30 days.
- Page 7 FCC RF exposure guidelines and should be avoided. The FCC requires the user to be notified that any changes or modifications to this device that are not expressly approved by Nonin Medical, Inc. may void the user’s authority to operate the equipment.
-
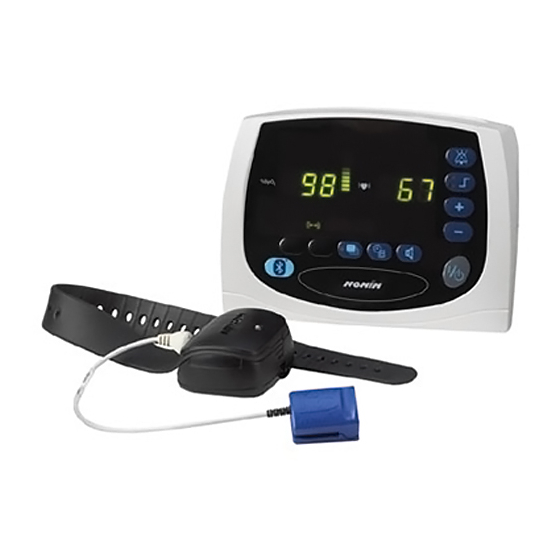
Page 8: Using The Avant 4000 System
(SpO ) and pulse rate of adult, pediatric, and infant patients. It is indicated for spot checking and/or continuous monitoring. ™ The Avant 4000 Digital Pulse Oximetry System: Display Unit and Patient Module. -
Page 9: General Information About Bluetooth Technology
Nonin’s patient module uses a class II Bluetooth radio with a battery life of about 120 hours and a range of about 30 feet (spherical radius). -
Page 10: Installing The Battery Pack In The Display Unit
DO NOT use the device without batteries when patient safety relies upon audible alarms. NOTE: Contact your distributor or NONIN to purchase or replace battery packs. NOTE: Reposition the back cover carefully, and tighten the screws... -
Page 11: Installing Batteries In The Patient Module
Using the Avant™ 4000 Digital Pulse Oximetry System Installing Batteries in the Patient Module... - Page 12 ™ Main Alarm LED Day LED Alarm Silence LED Year LED Numeric LEDs for %SpO2 data Pulse Volume LED Pulse Oximeter Sensor LED Alarm Volume LED Pulse Strength Bargraph LED Connection Status LED Pulse Quality LED Remote Battery Status LED Numeric LEDs for Pulse Rate data Bluetooth Control Button Alarm Silence Button...
-
Page 13: Displays, Indicators, And Controls
4000 display unit display blood oxygen saturation in percent. Pulse Rate Display The pulse rate display is located on the upper right-hand corner of the Avant 4000 display unit and is identified by the symbol. This display shows the pulse rate in beats per minute. - Page 14 Alarm Silence Button This button toggles the alarm between silenced and audible. Pressing the Alarm Silence button will silence the alarm for two minutes. Alarm Limits Button and Indicator This button displays the upper and lower limits for alarm indications for SpO and heart rate measurements.
- Page 15 Using the Avant™ 4000 Digital Pulse Oximetry System Indicators and Icons Main Alarm LED This LED indicates all alarm conditions. For high priority (patient) alarms, the indicator is displayed in red, blinking fast. For medium priority alarms, the indicator is displayed in amber, blinking slowly. Pulse Quality LED This LED blinks to indicate a poor pulse signal.
- Page 16 Alarm Volume LED This amber LED indicates that the Alarm Volume can be reviewed or adjusted using the Plus (+) and Minus (-) buttons. Connection Status LED This LED is lit green when a patient module is connected with the display unit.
-
Page 17: Setting Up The Avant 4000 System
Using the Avant™ 4000 Digital Pulse Oximetry System Setting Up the Avant 4000 Digital Pulse Oximetry System Use the following procedure to set up the Avant 4000 Digital Pulse Oximetry System. (Refer to the Avant 4100 Patient Module instruction insert for additional information about using that product.) - Page 18 Press the ON/STANDBY button to turn on the display unit. Verify operation of the display unit, and pair the display unit with the desired wrist-worn patient module. (See “Verifying System Operation” and “Device Pairing” for more information. Secure the wristband to the patient’s wrist. NOTE: If desired, any excess strap material may be trimmed and discarded.
-
Page 19: Verifying System Operation
Verify that all LEDs illuminate and the unit beeps three times during the first phase of the startup sequence. If any LED is not lit (except the AC Power Adapter LED), do not use the device. Contact your distributor or NONIN Customer Support for assistance. -
Page 20: Device Pairing
NOTE: To ensure proper pairing, disconnect and then reconnect the sensor from the patient module before beginning. NOTE: The Avant 4000 display unit must be OFF before pairing devices. Press and hold the Bluetooth Control button while turning on the display unit to begin the device pairing process. -
Page 21: Default Settings
Using the Avant™ 4000 Digital Pulse Oximetry System Default Settings The Avant 4000 display unit features Factory Default and User-Defined Default settings. WARNING: The battery pack must be installed at all times while the device is operating—even when operating on AC power. If it is necessary to operate the device without batteries, audible alarms and memory functions may not be available. -
Page 22: Accessing User Functions
Accessing User Functions This system includes Basic, Set, and Advanced Functions. Basic Functions Basic functions are generally easy to use and involve only a single button. The Avant 4000 display unit has several basic functions. Function Button Instruction Press the ON/STANDBY button Turn the display unit to turn on the display unit. - Page 23 Using the Avant™ 4000 Digital Pulse Oximetry System Set Functions Set functions are those that require multiple buttons to alter a measurement or device parameter for normal operation. Function Button Instruction Set alarm limits. Press the Alarm Limits button to step through the Limits menu.
-
Page 24: Advanced Functions
Previous User- ON/STANDBY buttons when turning on Defined Alarm the display unit. Limit Settings Enter Patient Press and hold the Memory button while Playback and turning on the display unit. This menu Memory Clear ® functions with NONIN’s nVISION Menu software. -
Page 25: Display Unit Dip Switches
Using the Avant™ 4000 Digital Pulse Oximetry System Display Unit DIP switches The Avant 4000 display unit contains eight DIP switches that are located behind the back cover of the unit. The UP position is toward the top of the unit, and the DOWN position is toward the bottom of the unit. -
Page 26: Care And Maintenance
Opening the case will damage the unit and void the warranty. If the system is not functioning properly, see “Troubleshooting.” Cleaning the Avant 4000 Digital Pulse Oximetry System Clean all system components with a soft cloth dampened with isopropyl alcohol. Do not pour or spray any liquids onto components, and do not allow any liquids to enter any openings in the device. -
Page 27: Alarms And Limits
Alarms and Limits Alarms and Limits This chapter describes alarms and limits for the Avant 4000 Digital Pulse Oximetry System. Alarms and Informational Tones The Avant 4000 display unit provides high and medium priority audible and visual alarms, as well as informational tones. -
Page 28: Alarm Summary
Alarm Summary If patient SpO or pulse readings are equal to or above the upper alarm limit, or if they are equal to or below the lower alarm limit, the display unit will signal an alarm. Factory High Priority Alarm Description Default Adjustment Range Step Value... -
Page 29: Adjusting Volume And Alarm Limits
Adjusting Volume and Alarm Limits Follow the instructions below to review, set, or adjust volumes and alarm limits while operating the Avant 4000 System. Do not use these instructions to store adjusted limits. For more information about permanently storing adjusted settings, refer to “Default Settings.”... -
Page 30: Error Codes
Error Codes The Avant 4000 display unit includes error codes that indicate problems with the unit. To correct error conditions, perform the following steps: Turn the unit off and then back on again to remove the error code. If the error persists, disconnect all power (AC and battery), and then reconnect the power and turn the unit back on. -
Page 31: Communication
The display unit can collect and store up to 33.5 hours of SpO and pulse rate information. ® Data may be played back with data retrieval software (NONIN’s nVISION software is recommended). If you wish to create your own software, contact NONIN for the data format. NOTE: Only SpO and pulse rate data are available for data retrieval. -
Page 32: Playing Back Memory Data
Playing Back Memory Data The Avant 4000 Digital Pulse Oximetry System has a Memory Playback feature, allowing stored data to be output through the RS232 serial connection. With the display unit off, connect the RS-232 connector port of the display unit to the back of your computer using a null modem cable. -
Page 33: Real-Time Patient Data Output
If there are no data from the oximeter, the formats will appear as follows: SPO2=--- HR=--- Nonin’s Avant 4000 Digital Pulse Oximetry System includes an event marker feature. Events are indicated by a single “*” whenever ON/STANDBY is pressed to enter Battery Capacity Display mode. (ON/STANDBY may be pressed again to exit, or Battery Capacity Display mode will time out after approximately 10 seconds.) -
Page 34: Printing Options
Printing Options The Avant 4000 Digital Pulse Oximetry System features printing capabilities that allow printing on demand or in real-time. These printing options are con- trolled by DIP switch 4, which is found under the battery cover at the back of the unit. -
Page 35: Specifications
120 hours of continuous operation with new batteries Storage Life 10 months Weight 4.4 ounces with batteries (125 grams) AVANT 4000 DISPLAY UNIT Displays Numeric Displays 3-digit LEDs, Tricolor (red, green, amber) Pulse Strength Tricolor LED segments Bargraph LED... - Page 36 Dimensions 5.5” H x 7.25” W x 4.5” D Weight 2.2 lbs with battery Memory 33.5 hours minimum AVANT 4000 DIGITAL PULSE OXIMETRY SYSTEM Temperature Operating 32° to +122°F (0° to +50°C) Storage/Transportation -22° to +122°F (-30° to +50°C) Operating Altitude...
-
Page 37: Parts And Accessories
Carrying case for Avant products Avant Printer Portable thermal printer For more information about NONIN parts and accessories, contact your distributor, or contact NONIN at (800) 356-8874 (USA and Canada) or +1 (763) 553-9968. This information is also available on NONIN’s website: www.nonin.com. -
Page 38: Service, Support, And Warranty
This warranty excludes cost of delivery to and from NONIN. All repaired units shall be received by the purchaser at NONIN's place of business. NONIN reserves the right to charge a fee for a warranty repair request on any Avant 4000 Digital Pulse Oximetry System that is found to be within specifications. -
Page 39: Troubleshooting
Plug in the AC Adapter to charged. charge the battery pack. The battery pack is Contact your distributor or inoperable. NONIN Customer Support for repair or replacement. You are unable to The patient pulse Reposition the digit or insert a obtain a green pulse... - Page 40 4100. insertion area. Check the 4100’s batteries. Check the sensor for any visible signs of deterioration. Contact your distributor or NONIN Customer Support. Frequent or steady There is excessive Shield the sensor from the pulse quality ambient light.
- Page 41 Verify that the Connection Status LED is green on both the display unit and the patient module. Contact your distributor or NONIN Customer Support. An error code appears The system encountered 1. Turn the unit off and then in the display area.
- Page 42 (See “Device Pairing” for more information.) If these solutions do not correct the problem, please contact your distributor, or contact NONIN Customer Support at (800) 356-8874 (USA and Canada) or +1 (763) 553-9968.
Need help?
Do you have a question about the Avant 4000 and is the answer not in the manual?
Questions and answers