
Related Manuals for Jensen JRV215N


Summary of Contents for Jensen JRV215N
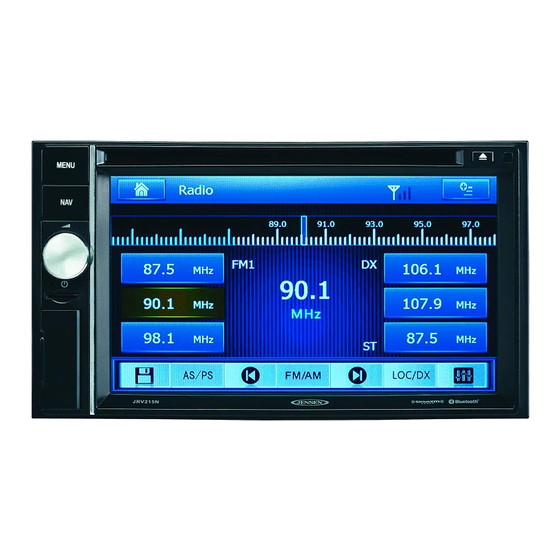
- Page 1 JRV215N TOUCH SCREEN MOBILE NAVIGATION, MULTIMEDIA, AND OBSERVATION SYSTEM Installation and Operation Manual...
-
Page 2: Table Of Contents
JRV215N CONTENTS Legal and Safety Notices ......................3 Warnings and Precautions ......................4 Safety Information ........................5 Installation ..........................7 Wiring ............................9 Basic Operation ........................11 System Menu ......................... 13 AM/FM/RBDS Controls ......................17 Weather Band Operation ......................18 DVD/VCD/CD/MP3 Operation.................... -
Page 3: Legal And Safety Notices
JRV215N LEGAL AND SAFETY NOTICES Safety Information Legal Notices When Driving Keep the volume level low enough to be aware of the road and traffic conditions. Copyrights and Trademarks Protect from Water iPhone, iPod, iPod classic, iPod Nano, iPod shuffle, and iPod touch are trademarks of Apple Inc., Do not expose the product to water, as this can cause electrical shorts, fire or other damage registered in the U.S. -
Page 4: Warnings And Precautions
JRV215N WARNINGS AND PRECAUTIONS map database to calculate and display travel directions. The system’s GPS antenna receives signals from a constellation of 24 satellites orbiting the earth and uses the strongest signals to WARNING! Please read and follow the following safety precautions. Failure to follow the determine your position to within meters. -
Page 5: Safety Information
JRV215N SAFETY INFORMATION Driver Safety Rules The following safety rules must be followed to prevent accidents that can result in injury or death User Agreement to yourself or others: The driver should operate the device only when the vehicle is stopped. Only a vehicle When the unit is first turned on, you will see the following message, warning you to operate your passenger should operate the device while the vehicle is moving. -
Page 6: Disc Notes
JRV215N DISC NOTES Depending on the recording status, conditions of the disc, and the equipment used for recording, some CD-Rs/CD-RWs may not play on this unit. For more reliable playback, please adhere to the following recommendations: Use CD-RWs with speed 1x to 4x and write with speed 1x to 2x. -
Page 7: Installation
JRV215N INSTALLATION Locate the series of bend tabs along the top, bottom and sides of the mounting sleeve. Before you Begin Disconnect Battery Before you begin, always disconnect the battery negative terminal. Remove Transport Screws and discard. Important Notes ... -
Page 8: Reconnect Battery
JRV215N Hardware Kit Contents CAUTION: The perforated rear support strap or rear rubber mounting bushing must be used in the installation of the radio. Installation without either may result in damage to the radio or the mounting surface and void the manufacturer’s warranty. -
Page 9: Wiring
JRV215N 31300152 WIRING SHOWN ON PIN VIEW PIN NO. DESCRIPTION GROUND ILLUM (PARKING LIGHT) P.CNTR AMP REMOTE RIGHT REAR SPEARKER (+) RIGHT REAR SPEARKER (-) LEFT REAR SPEARKER (+) LEFT REAR SPEARKER (-) LEFT FRONT SPEAKER (-) LEFT FRONT SPEAKER (+) - Page 10 JRV215N Recommended Camera Installation Configurations 3 Cameras Setup 1 Rear Camera Setup...
-
Page 11: Basic Operation
JRV215N BASIC OPERATION Mute Press the power VOL knob (3) to mute the audio output. “ ” will appear on the display. Press the power VOL knob again to restore the audio output to the previous level. Power On/Off ... -
Page 12: Auxiliary Input
JRV215N The current date and time is displayed on the bottom of the LCD display (9).To adjust the clock: Navigation Touch the “Settings” > “Time” > “Time setting” option on-screen (9). Swipe the on-screen button on the top right to select between 12-hour clock and 24-hour ... -
Page 13: System Menu
JRV215N General Sub-menu connection of ILLUM wire). To adjust display backlight intensity, touch the “Dimming Day” and “Dimming Night” level settings. The following general sub-menu options can be adjusted After Day & Night dimming levels have been set; toggle between them by pressing and holding the MENU (1) on the front panel. - Page 14 JRV215N Time Sub-menu Panel Sub-menu The following time sub-menu options can be adjusted: The following panel sub-menu options can be adjusted: Table 4: Time sub-menu Table 5: General sub-menu Settings Options Function Settings Options Function Time Setting 12HR/24HR Touch to select 12-hour clock and 24-hour clock.
- Page 15 JRV215N Audio Sub-menu Treble: -15 to +15 Touch to adjust the Treble level. (default 0) The following audio sub-menu options can be adjusted: Mid: -15 to +15 Touch to adjust the Middle level. (default 0) Bass: -15 to +15 Touch to adjust the Bass level.
- Page 16 JRV215N Weather Band Sub-menu Priority order 1-2-3 Touch to select the desired camera trigger 1-3-2 priority from 1 (highest) to 3 (lowest). The following weather band sub-menu options can be adjusted 2-1-3 2-3-1 3-1-2 3-2-1 Trigger delay 1 second Set delay time for displaying camera image after trigger signal is removed.
-
Page 17: Am/Fm/Rbds Controls
JRV215N AM/FM/RBDS CONTROLS Automatically Store / Preset Scan (AS/PS) Enter FM/AM Mode Automatic Store Select a band (if needed). Touch and hold the “AS/PS” button for more than 1.5 seconds to automatically select 6 Press the MENU button (1) on the front panel or touch the home icon on-screen to go to Home strong stations and store them in the current band. -
Page 18: Weather Band Operation
60 seconds, the unit will switch back to the last known function mode. location. If you live near the border between countries, you may want to receive alerts The JRV215N is equipped with a weather alert level (Alarm level) and weather alert power from more than one tower. - Page 19 JRV215N Your radio is capable of being programmed with up to 7 different FIPS location codes. The default code has been programmed at the factory - 000000 – to respond to all messages within your area.
-
Page 20: Dvd/Vcd/Cd/Mp3 Operation
JRV215N DVD/CD/MP3 OPERATION display. Enter the Direct Search menu, enter the chapter or Title Digital, touch OK that starts the function. Repeat chapter/title Touch the button on the control panel or the RPT button on the remote control multiple times during playback to select from the following repeat play options: ... - Page 21 JRV215N Random shuffle (RDM) Touch the button during disc play to play all tracks on a CD in random, shuffled order (RDM ON). Press again to stop random play (RDM OFF). List Touch the button to enter CD or MP3 list menu.
-
Page 22: Siriusxm ® Radio Operation
JRV215N SiriusXM RADIO OPERATION ® Visit www.siriusxm.com/activatenow Call SiriusXM Listener Care at 1-866-635-2349 For Canadian Subscriptions, please contact: Visit www.siriusxm.ca/activatexm Call XM customer Care at 1-877-438-9677 SiriusXM User Interface About SiriusXM Everything worth listening to is on SiriusXM, including the most commercial-free music, plus the best sports, news, talk and entertainment. - Page 23 JRV215N Search by Channel Touch the channel icon to select channel. Touch a channel to tune to that channel. Search by Category Example of music group category includes Pop, Rock, Country, etc. To search by category: Touch the Category icon to select Category.
- Page 24 If you forget your Parental Control lock code, use the following directions to reset the code to the default “0000”. Resetting the lock code will not affect the locked channels list. Turn on the JRV215N. Enter SiriusXM mode Press the Home icon, then enter Settings...
- Page 25 JRV215N Advisory Messages Reported by the SiriusXM Vehicle Tuner On-Screen Display Advisory Message Cause Explanation/Solution Verify that the antenna cable is connected to the SiriusXM Check Antenna Check Antenna The radio has detected a fault with the SiriusXM antenna. The antenna cable is either disconnected or damaged.
- Page 26 JRV215N On-Screen Display Advisory Message Cause Explanation/Solution Channel Locked Channel Locked The channel that you have requested is Locked by the radio See the section on Parental Control, page 18 for more information on Parental Control feature. the Parental Control feature and how to access locked channels.
-
Page 27: Iphone/Ipod/Usb Operation
JRV215N iPhone/iPod/USB OPERATION Selecting a Playlist This unit is equipped with an iPod® ready function that will allow you to control your iPod (if compatible) using the control panel buttons. This unit is made for the following iPod models: ... - Page 28 JRV215N Touch play again to resume playback Repeat Play Touch the during playback to repeat play the current file. Touch again for normal play. Shuffle Play Touch the during playback to play all files in random, shuffled order.
-
Page 29: Bluetooth Operation
Try to perform pairing within a few minutes of the mobile phone being turned on. NOTE: The following procedures are generic. Procedures for pairing mobile phones from Once the unit has been paired with the mobile phone, the unit's model number"JRV215N" different manufacturers may vary. will be displayed on the mobile phone. -
Page 30: Managing Incoming Calls
Touch the icon to and the following screen will appear: When connected to a Bluetooth enabled device and receiving an incoming call the JRV215N will mute audio output or pause CD playback, and change to the Bluetooth screen below. The incoming phone number or assigned name for that number will appear in the middle of the screen. - Page 31 JRV215N Dialed calls The unit can control a Bluetooth audio player via A2DP or AVRCP .Bluetooth audio players (or Touch the Dial icon to view the Dialed Calls list, The dialed calls list retrieves the list of dialed Bluetooth adapters) compatible with these profiles can be connected to this unit. Touch the...
- Page 32 JRV215N Settings Touch the icon to access Bluetooth settings menu. Pairing: Touch the pairing icon to begin pairing. Disconnect/connect: Touch to disconnect. Touch again to reconnect. Phonebook sync: Touch to sync the phonebook AutoConn: Touch to set the Auto Connect function on or off.
-
Page 33: Zone 2 Operation
JRV215N ZONE 2 OPERATION Zone 2 disc DVD/VCD Operation Insert a disc label-side up into the disc slot (12) and go to “Zone 2” > ”Disc”, the LCD display will show the screen below: The Zone 2 function allows the radio to operate two different modes concurrently, one for the driver, and one for the passengers. - Page 34 JRV215N Zone 2 AUX 1 AUX 2 Operation Connect an audio source to the AUX IN connector on the front panel (7) or to the AUX IN cables on the back of the radio. Video input is accessible for both the “AUX 1” and “AUX 2” mode through the VIDEO IN cable at the back of the unit.
-
Page 35: Camera Operation
JRV215N CAMERA OPERATION Camera Control Options Touch the lower part of the screen to make the camera controls appear. Touch the “CAM 1” button to view the Camera 1 video in full screen. Touch the “CAM 2” button to view the Camera 2 video in full screen. -
Page 36: Remote Control Operation
Enter AM/FM Tuner, Change AM/FM band in tuner mode (AM1, AM2, FM1, FM2, FM3) Included remote control can be used within line-of-sight of JRV215N head unit ZOOM Change the display size (1x, 2x, 3x, 4x, 1/2x, 1/3x, 1/4x) MENU... -
Page 37: Care And Maintenance
JRV215N CARE AND MAINTENANCE Keep the product dry. If it does get wet, wipe it dry immediately. Liquids might contain minerals that can corrode the electronic circuits. Keep the product away from dust and dirt, which can cause premature wear of parts. -
Page 38: Troubleshooting
JRV215N TROUBLESHOOTING Symptom Cause Solution No power The vehicle’s ignition is not on If the power supply is properly connected to the vehicle accessory terminal, switch the ignition key to “ACC”. The fuse is blown Replace the fuse. Disc cannot be loaded or Presence of disc inside the player Remove the disc in the player and insert the new one. -
Page 39: Specifications
JRV215N SPECIFICATIONS CD /DVD Signal to Noise Ratio ............> 60dB Channel Separation. - Page 40 ASA Electronics Corporation www.asaelectronics.com www.jensenrvdirect.com ©2014 ASA Electronics Corporation v.240614...
Need help?
Do you have a question about the JRV215N and is the answer not in the manual?
Questions and answers