
Related Manuals for King Industrial KC-914H


Summary of Contents for King Industrial KC-914H
-
Page 1: Instruction Manual
14” SELF-FEED VERTICAL METAL CUTTING BANDSAW INSTRUCTION MANUAL MODEL: KC-914H COPYRIGHT © 2004 ALL RIGHTS RESERVED BY KING CANADA TOOLS INC. - Page 2 IMPORTANT INFORMATION 2-YEAR KING CANADA TOOLS LIMITED WARRANTY OFFERS A 2-YEAR LIMITED WARANTY FOR INDUSTRIAL USE. FOR THIS METAL CUTTING BANDSAW PROOF OF PURCHASE Please keep your dated proof of purchase for warranty and servicing purposes. REPLACEMENT PARTS Replacement parts for this tool are available at our authorized KING CANADA service centers across Canada. For servicing, contact or return to the retailer where you purchased your product along with your proof of purchase.
-
Page 3: Specific Safety Instructions
GENERAL & SPECIFIC SAFETY INSTRUCTIONS VOLTAGE WARNING: Before connecting the tool to a power source (receptacle, outlet, etc.) be sure the voltage supplied is the same as that specified on the nameplate of the tool. A power source with voltage greater than that for the specified tool can result in SERIOUS INJURY to the user - as well as damage to the tool. -
Page 4: Electrical Information
ELECTRICAL INFORMATION WARNING! ALL ELECTRICAL CONNECTIONS MUST BE DONE BY A QUALIFIED ELECTRICIAN. FAILURE TO COMPLY MAY RESULT IN SERIOUS INJURY! ALL ADJUSTMENTS OR REPAIRS MUST BE DONE WITH THE BANDSAW DISCONNECTED FROM THE POWER SOURCE. FAILURE TO COMPLY MAY RESULT IN SERIOUS INJURY! POWER SUPPLY box in Fig.2. -
Page 5: 110V Wiring Diagram
WIRING DIAGRAMS & BANDSAW SPECIFICATIONS 110V Wiring Diagram 220V Wiring Diagram FIGURE 5 FIGURE 4 KC-914H Specifications MODEL KC-914H Height under guides 14” Throat capacity 8 1/2” Speeds (S.F.P.M) 4 (70, 140, 280, 580) Blade width (min. - max.) 1/8” - 1”... -
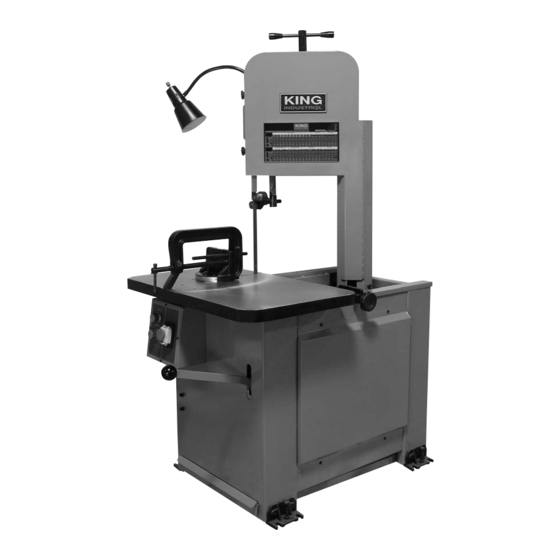
Page 6: Getting To Know Your Bandsaw
GETTING TO KNOW YOUR BANDSAW FIGURE 6 Getting to know your Bandsaw A-Blade Tension Handle. Used to set the correct blade tension. Also J-Depth Stop Knob. Locks the depth stop in position. used to remove and install the saw blade. K-Depth Stop. - Page 7 SET-UP, ADJUSTMENTS & OPERATION Set-up & Installation Caution! Do not install the machine in a damp, humid, dirty or badly lit environment. The bandsaw has been pre-adjusted at the factory. Place the bandsaw on the shop floor. This machine must be installed on a firm, level surface.
- Page 8 ADJUSTMENTS & OPERATION Blade Selection This bandsaw is equipped with a saw blade that is adequate for a variety of jobs on a variety of common materials. Refer to Fig. 8 below for the speeds recommended for various materials. These speeds, while appropriate for many common cutting needs, do not encompass the wide variety of special blade configurations (tooth pitch and set) and special alloys for cutting unusual or exotic materials.
- Page 9 ADJUSTMENTS & OPERATION Blade Break-In Procedures New blades are very sharp and, therefore, have a tooth geometry which is easily damaged if a careful break-in procedure is not followed. 1) Clamp a section of round stock in the vise. The stock should be two inches or larger in diameter. 2) Operate the bandsaw at low speed.
- Page 10 ADJUSTMENTS, OPERATION SERVICE & MAINTENANCE Setting the Blade Guide Bar Height The bandsaw has an adjustable blade guide bar (diagram# 31). The blade guide bar allows you to set the blade guide for varying heights of workpieces. To make accurate cuts and prolong blade life, the blade guide bar and blade guide assembly should be set one inch above the piece to be cut.
- Page 11 ADJUSTMENTS, OPERATION SERVICE & MAINTENANCE Blade Guide Bearing Adjustment Proper adjustment of the blade guide bearings is critical to efficient operation of the bandsaw. The blade guide bearings are adjusted at the factory. They should rarely require adjustment. When adjustment is required, readjust immediately. Failure to maintain proper blade adjustment may cause serious blade damage or inaccurate cuts.
-
Page 12: Service And Troubleshooting
SERVICE & TROUBLESHOOTING Chip Brush and Chip Scraper Replacement The purpose of the chip brush and chip scraper is to remove chips from the saw teeth, the saw blade and the lower blade wheel so an excessive amount of chips do not get into the wheel guard section of the saw. With extended use, this brush and/or scraper will become worn and will require replacement.
Need help?
Do you have a question about the KC-914H and is the answer not in the manual?
Questions and answers