Table of Contents
Advertisement
Advertisement
Table of Contents

Related Manuals for Vertex Standard VZ-88


Summary of Contents for Vertex Standard VZ-88
- Page 1 Operating Manual...
-
Page 2: Table Of Contents
Familiar with VZ-88 Radio ........16 CONTENTS LCD Icons ............. 17 Digit Keypad ............18 Product Safety and RF Energy Exposure Booklet for Basic Operations ........... 18 Power On/Off ............18 Portable Two-Way Radios ........... 3 Volume Adjustment ..........18 RF Energy Exposure Awareness, Control Frequency Display Mode (VFO) ........ - Page 3 BATSAV – Ba ery Saver ..........27 PL/DPL Frequency/Code Table .........32 BCLO - Busy Channel Lock Out ........27 Standard PL (CTCSS) Frequency (Hz) Table: ..32 BEEP – Key Tone Beep ..........27 Standard DPL (CDCSS) Code Table: ....33 BW - Band Width ............27 DW - Dual Watch ............
-
Page 4: Product Safety And Rf Energy Exposure Booklet For Portable Two-Way Radios
RF Energy Exposure Awareness, Product Safety and RF Control Information and Operational Energy Exposure Booklet Instructions for Occupational Use for Portable Two-Way NOTICE: This radio is intended for use in occupational/controlled conditions where users Radios have full knowledge of their exposure and can exercise control over their exposure to meet the occupational limits in FCC and International The information provided in this document supersedes... -
Page 5: Federal Communication Commission (Fcc) Regulations
Compliance with RF Exposure Standards operating instructions to users of two-way radios. Your Vertex Standard two-way radio is designed and These instructions are important because they inform tested to comply with a number of national and... -
Page 6: Rf Exposure Compliance And Control Guidelines And Operating Instructions
Guidelines and Operating Instructions When worn on the body, always place the radio in a To control your exposure and ensure compliance with Vertex Standard approved clip, The use of non- the occupational/controlled environment exposure Vertex Standard approved accessories may result limits, always adhere to the following procedures. -
Page 7: Approved Accessories
Medical Devices Approved Accessories Pacemakers Use only Vertex Standard approved supplied or replacement antennas, battery chargers and batteries. The Advanced Medical Technology Association Use of Non Vertex Standard approved antennas, (AdvaMed) recommends that a minimum separation of battery chargers and batteries may exceed the FCC 6 inches (15 centimeters) be maintained between a (IEEE) and ICNIRP RF exposure guidelines. -
Page 8: Use Of Communication Devices While Driving
If you use any other personal medical device, consult For Vehicle with Air Bags the manufacturer of your device to determine if it is adequately shielded from RF energy. Your physician Refer to vehicle manufacturer's manual WARNING may be able to assist you in obtaining this information. prior to installation of electronic equipment to avoid interference with air Use of Communication Devices While... -
Page 9: Operational Cautions
Blasting Caps and Blasting Areas Potentially Explosive Atmospheres To avoid possible interference with WARNING blasting operations, turn off your radio (Explosive atmospheres refer to hazard WARNING when you are near electrical blasting classified locations that may contain caps, in a blasting area, or in areas hazardous gas, vapors, or dusts.) posted: “Turn off two-way radio.”... -
Page 10: Intrinsically Safe Radio Information
Warnings for Radios Approved as Intrinsically Safe standards for specific types of hazardous classified locations. A portable radio that has been approved for Radios must ship from the Vertex Standard intrinsic safety will have Approval label attached to the manufacturing facility with the hazardous atmosphere... - Page 11 Approval rating of the unit. unit. Use of a radio that is not intrinsically Using a non Vertex Standard intrinsically safe battery safe in a hazardous atmosphere and/or accessory with the Vertex Standard approved could result in serious injury or radio unit will void the intrinsically safe approval of that death.
-
Page 12: Accessories Installation
Accessories Installation Detach Battery Battery Installation Battery Battery latch latch Rail slot a. Turn off radio a. Turn off radio b. Press down the latch until battery is removed from b. Turn the battery logon side up and plug the bottom radio. -
Page 13: Antenna Installation
Antenna Installation Detach Antenna a. Screw antenna clockwise to top of radio as a. Screw antenna in an anti-clockwise direction and indicated above. remove from the radio. -
Page 14: Belt Clip Installation
Belt Clip Installation Power Adaptor and Commonly Used Charger a. Push the belt clip in to the two holes on the back of a. The radio comes with a commonly used charger the battery. and a power adaptor. b. From the front side of the battery, fix the belt clip with 2 screws. -
Page 15: Battery And Charger
Battery Charging with Radio Battery and Charger When used for the first time, for adequate power and best performance, make sure the battery is fully-charged before using. To maintain best battery performance the battery should be regularly fully discharged before recharging. This will provide better performance than regularly recharging the battery after only 50% of use. -
Page 16: Battery Charging Only
Battery Charging Only Cleaning and Maintenance Use wet and soft cloth to clean the radio surface. Do not use alcohol or cleaning fluid. If radio is not in use, please ensure the earphone jack cover is in place. ... -
Page 17: General Description
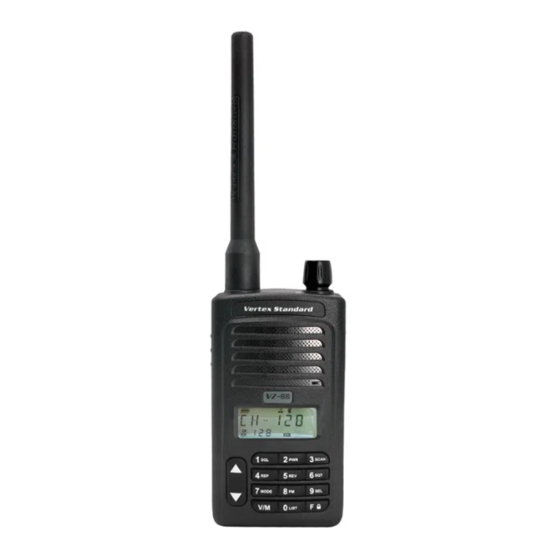
General Description Familiarizing with VZ-88 Radio Antenna Rubber antenna used to TX and RX. Power/volume knob Press to turn on/off PTT button LED indicator radio or adjust the Press PTT to TX, Turns red when TX at volume. release PTT to high Power get ready for RX. -
Page 18: Lcd Icons
LCD Icons Icon Function description On the LCD display, you will see different kinds of icons. The below chart shows the description of these battery indicator 4 bars icons: Auto power off Scan Key tone High power TX Repeater Display frequency, channel number or menu Monitor when FM enabled information in digits or letters. -
Page 19: Digit Keypad
Volume Adjustment Digit Keypad Rotate the “ON/OFF/VOL” knob to adjust the volume Channel number and Frequency can be input by digit levels. To increase volume level, turn the rotary knob keys directly. clockwise. To decrease volume level, turn the rotary knob counterclockwise. -
Page 20: Channel Display Mode (Mr)
Channel Display Mode (MR) FM Channel Display Mode (MR) The VZ-88 radio has 128 channels. The left bottom Press “V/M” key to switch the FM VFO/MR mode. In side of the LCD displays “CH” and the current channel MR mode the LCD (left bottom) displays the FM number. -
Page 21: Rx And Signal Strength Indica On
PTT, SB2 and SB1 together when turning on the radio until a chatter sound heard. For Default settings Hands Free / VOX please refer to VZ-88 CPS initial values. VZ-88 radio supports hands free (VOX) performance. It will be better if using compatible VOX accessories. -
Page 22: Led Indicator
LED Indicator Tones Tone type Radio mode LED indication Parameter(frequency _ duration) Key tone 900Hz_75ms Power on Red LED blinks 300ms Bad key tone 600Hz_75ms Power low Orange LED blinks 50ms every 2s, gives low power alarm every 15 mins. Confirm tone 1800Hz_150ms Red LED blinks (... -
Page 23: Short Cut Keys
save power, you may select low power TX. Short Cut Keys Press “F” + “3 ” key: To enter scan SCAN Pressing “F” then a digit key can reach below short-cut mode. Key functions quickly: In FM VFO mode, the radio scans from FM frequency “F”... - Page 24 the repeater function. PL(refer to coding form) If it is DPL normal code, press “▲/▼” key to select When at different TX/RX frequencies, the repeater can from 104 groups N DPL. be enabled. The icon “ ” is displayed as repeater is If it is DPL reverse code, press “▲/▼”...
- Page 25 frequency or channel name. Press “F” + “8 ” key: To turn On/Off FM radio mode. When turn on the FM radio mode, it will display “ ” icon. Press “F” + “9 ” key: To enter menu setting mode. Press“▲/▼”...
-
Page 26: Menu Setting
Menu Setting Menu List Items Display & Description Setting Content Default Setting ALIAS - Channel alias 6 characters channel name edition No name APO - Auto power off ON/OFF BANK n /NOBANK NO BANK BANK - 8 banks with 16 channels per bank BATSAV - Battery saver ON/OFF BCLO –... -
Page 27: Menu Operation
Menu Operation it displays 6 spaces. If the channel alias is empty, channel name is displayed as default “CH-nnn”. Press “F” key, the “ ”icon will blink in the screen, and then press “9” key to enter menu select mode . APO - Auto Power Off Press “▲/▼”... -
Page 28: Bclo - Busy Channel Lock Out
from the menu. Press “▲/▼” key to select 25K / 12.5K 001 to 128 corresponding channel. (Hz), press “F” or “PTT” key to exit the setting mode, When banking function is enabled, the radio channel press any other key to go back to idle mode. number turns to “bxx”, “xx”... -
Page 29: Opnmsg – Opening Display Message
ROGER Setting K+S: To lock keypad and “up” and ”down” buttons. Select “ROGER” menu to ON/OFF roger beep. PTT: To lock PTT button only for preventing un-proper TX or false transmitting. TOT (TX Time- out - timer) Setting KEY: To lock keypad only, for preventing unintentionally press of keypad. -
Page 30: Step – Vfo Frequency Step
Channel Information setting can amplify the RX signals and may cause TX. VZ-88 Radio has 128 channels, these channels can be programmed by CPS, below parameters of each OFFSET – VFO frequency offset channel can be set as well: When offset frequency equals VFO TX frequency ●... -
Page 31: Function Parameter Setting
Function parameter setting ● None Monitor ● scan On/Off Nuisance Delete ● ● User may set the following parameters by CPS: High/Low Power Talk-around/Repeater ● ● ● Squelch level TX time out timer ● ● Back Light On/Off Scan Dwell Time Reverse Burst ●... -
Page 32: Talk-Around/Repeater
Talk-around/Repeater Clone Function Enable the programmable side button REPEATER to You may use CPS read/write operation to clone change the current channel repeater status. When settings from one radio (master radio) to another enabled, it displays the icon “ ”. When the repeater (target radio). -
Page 33: Pl/Dpl Frequency/Code Table
PL/DPL Frequency/Code Table Standard PL (CTCSS) Frequency (Hz) Table: 67.0 94.8 131.8 171.3 203.5 69.3 97.4 136.5 173.8 206.5 71.9 100.0 141.3 177.3 210.7 74.4 103.5 146.2 179.9 218.1 77.0 107.2 151.4 183.5 225.7 79.7 110.9 156.7 186.2 229.1 82.5 114.8 159.8 189.9... -
Page 34: Standard Dpl (Cdcss) Code Table
Standard DPL (CDCSS) Code Table: 100 731 101 732 102 734 103 743 104 754... - Page 35 Copyright 2013 C Z U G 0 0 0 0 3 0...
Need help?
Do you have a question about the VZ-88 and is the answer not in the manual?
Questions and answers