Lawmate PV-1000 Touch User Manual
Hide thumbs
Also See for PV-1000 Touch:
- User manual (41 pages) ,
- User manual (41 pages) ,
- Operation manual (1 page)

Related Manuals for Lawmate PV-1000 Touch


Summary of Contents for Lawmate PV-1000 Touch
- Page 1 PV-1000Touch PV-1000Touch User Manual User Manual L a wM ate, in n o v at i o n ne ve r s to ps!
-
Page 2: Names And Parts
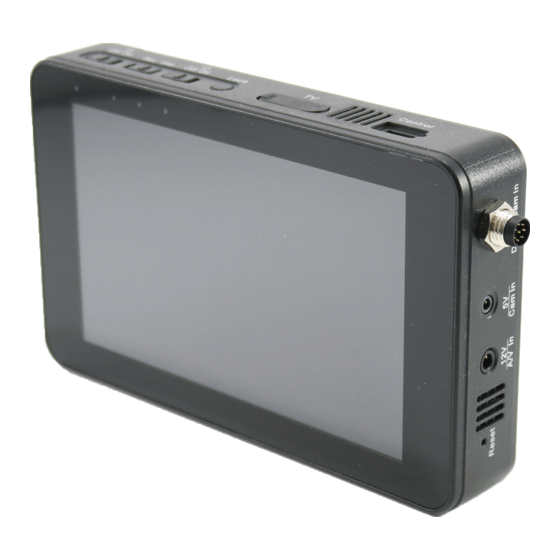
1. Names and Parts 1. Power Button 2. Stop/Rec Button 3. Screen Lock Power Stop Rec Lock HDMI-TV Control 4. HDMI Out 5. Control Port 6. Digital Cam In 7. Analog Cam In 8. Camera LED 9. A/V In 10. A/V Out 11. -
Page 3: Package Content
2. Package Content Earphone A/V In Cable European Standard USB Cable Adapter Head Infrared Remote A/V Out Cable Stylus Pick Battery Pack Controller 2013a 3.7V Li-ion BATTERY PACK Capacity 4400 mAh BA-4400slim CAUTION.. Do not crush, puncture, incinerable or short external contact CAUTION..Risk of electric shock dry location use only. -
Page 4: Basic Operation
3. Basic Operation A. Power On / Off Device Power On: Press Power On / Off button on the unit to turn on the device. Power Off: Press Power On / Off button on the unit to turn off the device. B. - Page 5 3. Basic Operation 2 D. Output to Monitor 1. Touch Settings on the Main Menu, enter “Display” and choose “TV” as input end. 2. Plug the RCA cable into AV-Out port and connect the other end to the monitor to output the image. E.
- Page 6 Stop Rec Lock HDMI-TV Control 1. Connect a 5V analogue camera to cam in port or a LawMate digital camera to digital cam in port 2. Power on the device by pressing 3. To start recording, switch to Rec. 4. Touch...
- Page 7 5. Introduction to all Setting Functions Enter Settings Page 1. Preview Select your preferable preview mode among the sections. Resolution ( 320x240 / 640x480 / 720x480 / 1024x768 / 1280x720 / 1280x960 ) Quality(High/Normal/Low) Frame Rate( 1 / 5/ 15 /20/30) ...
- Page 8 2. Pre-event Features As soon as the record function is triggered, the video automatically traces back 5 seconds or 15 seconds before the record button is pressed. Note: This function is activated after 15 seconds of recording. Resolution ( 320x240 / 640x480 / 720x480 / 1024x768 / 1280x720 / 1280x960 ) ...
- Page 9 3. Pre-Motion Features As soon as a movement is derected, recording starts. The video automatically traces back 5 or 15 seconds before the record button is pressed. Note: This function is activated after 15 seconds of recording. Resolution ( 320x240 / 640x480 / 720x480 / 1024x768 / 1280x720 / 1280x960 ) ...
- Page 10 4. Motion Detection Resolution ( 320x240 / 640x480 / 720x480 / 1024x768 / 1280x720 / 1280x960 ) Quality(High/Normal/Low) Frame Rate ( 1 / 5/ 15 /20/30) Audio (Enable/ Unable) Frame Counter Stamp (On/Off) Timestamp (On/Off) ...
-
Page 11: Date And Time Setting
5. Date and Time Setting Select the correct Year/Month/Date/Hour/Minute to set up date and time information 6. Date Format Select date format between YYYYMMDD / DDMMYYYY 7. Language Select the language among English /Simplified Chinese/ Traditional Chinese/Japanese/ French /Russian English/簡体中文/繁體中文/日本語 /Francais/Pyccкий... -
Page 12: Recording Mode
7 Recording Mode Set up desired recording mode from the sections. 8 Resume to Pre-set Duration Activate the recording after 15 sec/30 sec according to your selected recording mode. You could either switch the function off by selecting No. -
Page 13: Timer Recording
9 Timer Recording This function serves to activate/deactivate the recording regarding the preset date and time information. DVR must be powered off before the recording is started up. 1. Enter the file to edit timer recording settings 2. Video Line in REC Start Set up your recording schdules. -
Page 14: Daily Timer
10 Daily timer Preset your daily recording schedule by inserting time information. Enter recurrent to set days. - Page 15 11 Backlight Out Duration Set up back up duration 30 sec / 1min / 3min or choose “No” to turn it off 12 Digital Cam Low Lux Turn on/off the low lux function of the digital camera 13 Digital Cam NTSC/PAL Set up NTSC/PAL system...
-
Page 16: Storage Option
14 Storage Option Touch the screen to choose HDD or SD for storage. 15 Storage Information Click in to view the storage information. 16 Storage Capacity Icon Turn on the storage capacity icon to display storage... -
Page 17: Format Memory
17 Format memory Choose to format hard disk or SD card 18 TV Out Setting Choose TV Out video system NTSC or PAL 19 TV Out Adjustment Adjust TVout screen position. - Page 18 20 Display Touch the screen to choose the LCD/TV/HDMI for the display option. 21 Video Playback Touch the Screen to choose Playback mode ( Repeat All / All / One / Repeat One) 22 Video Thumbnail Set up to enable video image preview on the playback list.
-
Page 19: Start Slideshow
23 Image thumbnail Set up to enable snapshot image preview on the playlist. 24 Start Slideshow Set up if enable slideshow 25 Slideshow Duration Set up slideshow duration amont 3 / 5 / 7 / 10 seconds. -
Page 20: Firmware Upgrade
26 Firmware Upgrade Save the upgrade firmware file onto memory card and touch “firmware upgrade” button. After the system is updated, it will reboot automatically. If the message “Update Error” is shown, it means the upgrade is failed due to incomplete file or damaged memory card. -
Page 21: Set Power On Password
28 Power On Password Select On to activate PV-1000Touch password protection. Enter password each time you turn on PV-1000Touch. 29 Set Power On Password Enter the password 30 USB Connection Password Select On to activate USB connection password. Each time you connect PV-1000Touch to equipment by USB cable, it requests password to open the folder. -
Page 22: Touch Panel Calibration
Touch Panel Calibration Touch the screen for the calibration. Create Logs Record all log times for power on/off, USB plug-in/out and record and playback. Touch the screen to choose the Off/On. 34 View Log Touch the View log on the screen to show Log record. -
Page 23: Device Information
35 Save All Logs Touch the screen to choose if save the logs to HDD or SD. 36 Device Information Show information about PV-1000TOUCH... -
Page 24: Video Playback
6. Video Playback Operations on Main Menu Select “VIDEO” on the main menu to enter playback list. Touch the ESC on the screen to stop playing and return to the last page Fast Playback Double Speed Playback: Touch during normal playback, the video file will be played with a speed two times quicker;... - Page 25 4 Times Speed Playback: Touch twice on the screen during normal playback ,the video file will be played with a speed four times quicker; Touch resume to the normal playback speed. x 2 > and press to normal speed playing ...
- Page 26 1/4 Times Speed Playback: Touch twice after pausing the playback, the video file will be played in 1/4 slow motion; touch to resume the normal playback speed. On the remote control, you can press > x 2 > 1/8 times Speed Playback: press three times after pausing the playback,...
- Page 27 screen to resume the normal playback speed. X 1 > on the remote control Four times reverse playback: touch twice during normal playing, the video file will be played with a speed four times quicker; touch on the screen to resume the normal playback speed.
- Page 28 Stop > Touch on the screen to stop playing and turn to File List mode. or press on the remote control. Video Capture > Capture Image while the video is playing touch on the screen or press on the remote control to stop playing, and touch on the screen for a snapshot.
-
Page 29: Video Editing
7. Video Editing During Video Playback > Touch on the screen or Press on the remote control, the video will be paused, and the setting items will appear : Video Playback (Repeat All/All/One/Repeat One) Full screen (on/off) ... -
Page 30: Photo Browsing
MOVE (One/All) File Information In upper layer of the File List > Touch on the screen or Press the remote control, the setting items will appear : Video Playback (Repeat All//All/One/Repeat One) Video Thumbnail (on/off) ... - Page 31 On the Main Menu, touch IMAGE on the screen entering to the newest file , touch the file name on the screen to browse the selected photo. After browsing the photo, Touch on the screen to the upper level of the file, touch on the screen entering to the latest photo file, touch once again to...
-
Page 32: Photo Editing Mode
Zoom in by 4 times: press Press on the remote control twice (image is enlarged ,press ,to normal to move; Press once again size ) Slide Show to select “Start Slide In File list Mode or Image Browsing Mode, touch Show”... - Page 33 items appear: Start Slideshow Image Thumbnail ( On/Off) Delete (On/Off) Deletion Lock(On/Off) Copy(One/All) Move (One/All) Playback Slideshow(All/No) Slideshow Duration (3/5/7/10 sec) File Information During Photo Browsing:...
- Page 34 touch on the screen or press on the remote control, the setting items appear: Start Slideshow Playback Slideshow (All/No) Slide Show Duration (3 sec/ 5 sec/ 7 sec/10 sec) File Information touch on the screen or press to return the upper level.
-
Page 35: File Format
Slide show Duration (3 sec/ 5 sec/ 7 sec/10 sec) Delete Directory 10 File Format File Format Baseline Lower than 4032 * 4032 11 Record Connect a camera to the PV-1000Touch Touch RECORD on the main menu,or press on the remote control to choose the function : Preview/Pre-event/Pre-motion/Motion Detection. - Page 36 Touch to start recording or press button on the remote control Press button or the one on the remote controller to stop recording, and the screen will return to stand-by mode of Preview to prepare for recording. In Preview mode, touch on the screen or Press on the remote control, the setting items appear:...
- Page 37 Timestamp (On/Off) Device ID Stamp (On/Off) Microphone Sensitivity Overwrite(Disable (2) Pre-event Feature: As soon as the record function is triggered, the video automatically trace back 15 seconds before the record button is pressed. Touch Pre-event to enter Pre-event mode. ...
- Page 38 Frame Counter Stamp (On/Off) Timestamp (On/Off) Device ID Stamp (On/Off) Pre-event Duration (30 sec,15 sec) Microphone Sensitivity Over-write (Disable/Enable) (3) Pre-motion...
- Page 39 touch on the screen or press on remote control to start recording touch on the screen or Press on the remote control, the setting items appear: Resolution( 320x240 / 640x480 / 720x480 / 1024x768 / 1280x720 / 1280x960 ) ...
- Page 40 touch on the screen or Press on the remote control, the setting items appear: ( 320x240 / 640x480 / 720x480 / Resolution 1024x768 / 1280x720 / 1280x960 ) Quality(Good/Norma/ Low) Frame Rate ( 1 / 5/ 15 /20/25) ...
- Page 41 Video Capture > Capture Image while recording Touch on the screen, the captured pictures will be stored in the IMAGE file.
Need help?
Do you have a question about the PV-1000 Touch and is the answer not in the manual?
Questions and answers