Advertisement
Quick Links
A. Regarding the Device
B. Power
1) Power supplied from a common USB port with DC5V
C. Insert the SD Card
1) Place the SD Card into SD Card Slot, Press the SD Card
for take out the SD Card.
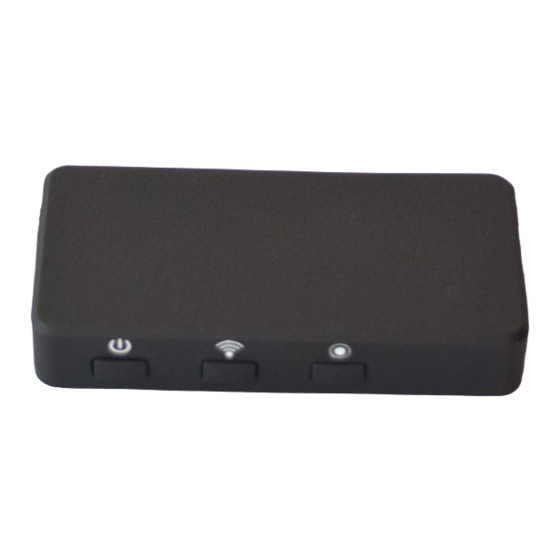
D. Button Function
1) Power On:Press button○
2) Power Off:Press button○
PV-400W
D1 WI-FI Lite DVR Cam Input
Quick Guide
the device is power on.
5
the device is power off.
5
1) Memory Card Slot
2) USB Charge
3) REC Button
4) WI-FI On/Off & WI-FI Reset
5) Power On/Off Button
6) CAM In Port
7) Power On LED
8) WI-FI & Client LED
9) REC & No SD Card LED
10) Microphone
Advertisement

Related Manuals for Lawmate PV-400W


Summary of Contents for Lawmate PV-400W
- Page 1 PV-400W D1 WI-FI Lite DVR Cam Input Quick Guide A. Regarding the Device 1) Memory Card Slot 2) USB Charge 3) REC Button 4) WI-FI On/Off & WI-FI Reset 5) Power On/Off Button 6) CAM In Port 7) Power On LED 8) WI-FI &...
- Page 2 3) WI-FI On/Off:Press button○ to turn on WI-FI or turn off WI-FI. (The WI-FI is on when the device is power on and it start recording.) 4) REC On/Off:Press button○ to turn on REC or stop REC. (The WI-FI is on when the device is power on and it start recording.) 5) Reset WI-FI Default:Hold the button○...
- Page 3 I. Establish WIFI connection (Android) 1) Start your smartphone APP. 1) Choosing the device’s WI-FI which you need to connect.
- Page 4 1) Enter the password. (The factory initial password is 123456878.) 1) WI-FI connection.
- Page 5 1) Enter WI-FI connection. * Establish WIFI connection (iOS) 1) Chose settings.
- Page 6 1) Chose Wi-Fi. 1) Choosing the host’s WI-FI which you need to connect.
- Page 7 1) Enter the password. (The factory initial password is 12345678) 1) Confirm WI-FI has been connected.
- Page 8 APP UI description 1) Push WI-FI Direct to enter into the preview mode 1) Back to WI-FI which you need to connect device list. 2) Cell phone video and Photo archive folder. 3) SD card video host and Photo archive folder. 4) Setting.
- Page 9 1) Host SD card red light constant lighting while recording 2) Smartphone recording red light blinking. Browsing Mobile Video and Photo Archive Information. 1) Film archives. 2) Photographic archives. 3) Film and photo all archive. 4) Mark archive what you need. 5) File name.
- Page 10 Play The Video File. 1) Video playback window. 2) Back to last page. 3) Pause button. Browsing the Host SD Card Video and Photo Archive Information. 1) Film archives. 2) Photographic archives. 3) Film and photo all archive. 4) Continuous video file named beginning with Rec. otion detection recording named beginning with MRec.
- Page 11 Setting 1) WI-FI setting. 2) Privacy setting. (After switch privacy setting, entry APP and enter password.) 3) Video setting. 4) Date and time setting. 5) System information. 6) Reset all setting. 7) Firmware upgrade. 8) Back to homepage. *Choose APP, In the WI-FI list which you need to connect choose 2 (does not need to connect to host WI- FI), you can view the last connected WI-FI mobile video host 1.
- Page 12 WI-FI Setting 1) WI-FI host name. 2) WI-FI password *You may change the default password to your preferred here to keep the WIFI connection more confedential 3) Way of encryption. 4) WI-FI SSID invisible or not. 5) Host WI-FI off. 6) Back to homepage.
- Page 13 1) Way of encryption. 2) Visible. 3) WEP encrypt(64bit):Original password 12345. 4) WPA/WPA2/PSK encrypt(128bit): Original password 12345678. 1) Unit power on, WI-FI is always off 2) Unit power on, WI-FI is always on 3) No connection established for 1 minute,WI-FI turn 4) No connection established for 3 minute,WI-FI turn 5) No connection established for 5 minute,WI-FI turn Once WIFI turn off it has to be switched on from the...
- Page 14 * After changing encryption, you need to entry WI-FI options of the device own and clear connection information of device, then connecting the host with APP again, that changing encryption is successful. (Different smartphone has different operation screen.) *The way of removing the host WI-FI connection information in Android.
- Page 16 *The way of removing the host WI-FI connection information in iOS.
- Page 18 1) Privacy setting. (After privacy on, enter password.) White doc on the left:Privacy off White doc on the right:Privacy on 2) Privacy password. (Only number, no word limit.) 3) Confirm password again. 4) Back to homepage. 5) Back to last page *Be aware the privacy function only lock on the running of this APP, all other functions in the phone remain normally.
- Page 19 Image Setting 1) Play parameters. 2) Resolution. (D1、720P) 3) Frame choice. (10、15、20、25) Image Setting 1) Recording model. (Continuous recording and Motion detecting video.) *When execute the motion record, after setting it up in the menu, it need to be pushed once for the either record button on the preview page to start to operate.
- Page 20 Date and Time Setting 1) Time display function: White dot on the left:Date display close. White dot on the right:Date display open. 2) Date format. 3) Time format. 4) Synchronization with device time. 5) Confirm the setting. System Information 1) Card Memory Capacity. 2) Card Memory Usage rate.
- Page 21 1) Reset all setting. 1) Hot key for the spy mode page...
- Page 22 1) Go out from spy mode page by sliding it from right to left 1) Quick setting. 2) Resolution setting. (D1、720P) 3) Brightness setting. 4) Contrast setting. 5) Flip Top to Bottom. 6) Mirror left-right model. 7) Mic volume when recording.