Table of Contents
Advertisement
Quick Links
Oil Field with Bubble Tubes
Owner's Manual
CAUTION!
absorbed through the skin. If swallowed, DO NOT INDUCE VOMITING. Give large quantities of water.
Remove to fresh air. In case of contact with skin or eyes, wash contact area with water for at least 15
minutes. Call a physician immediately. Keep out of the reach of children. In its enclosed state, this liquid
poses no risk.
Lionel
The bubble tube contains methylene chloride. Should the tube break, take care
to avoid inhaling or ingesting fumes or liquid. Harmful if swallowed, inhaled or
72-4112-250
8/03
Advertisement
Table of Contents

Subscribe to Our Youtube Channel
Related Manuals for Lionel 6-24112


Summary of Contents for Lionel 6-24112
- Page 1 72-4112-250 8/03 Lionel Oil Field with Bubble Tubes Owner’s Manual CAUTION! The bubble tube contains methylene chloride. Should the tube break, take care to avoid inhaling or ingesting fumes or liquid. Harmful if swallowed, inhaled or absorbed through the skin. If swallowed, DO NOT INDUCE VOMITING. Give large quantities of water.
-
Page 2: Table Of Contents
Controlling the accessory Controlling the accessory in the Command Control environment Replacing the lamps 10-11 Limited Warranty/Lionel Service The following Lionel marks may be used throughout this instruction manual and are protected under law. All rights reserved. Lionel ® , TrainMaster ®... -
Page 3: Powering The Accessory
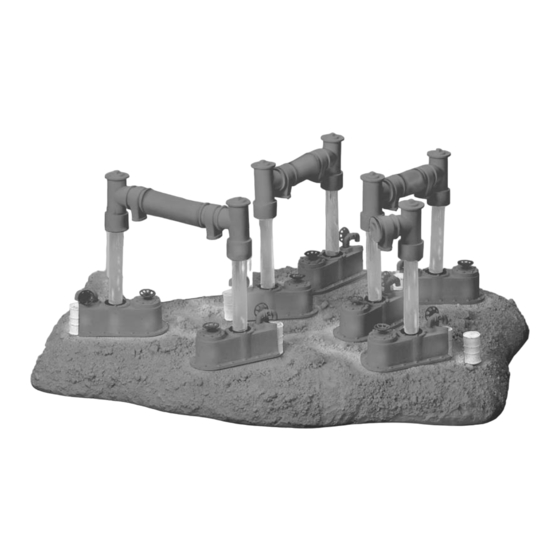
18 volts for the best results. You may choose to power the accessory with a separate accessory power supply, through a Lionel Lockon (available separately, 6-62900), or a FasTrack Accessory Power Wire (available separately, 6-12053). To make the proper connections, be sure that the ends of the wires are stripped back 1/8”... - Page 4 Installing the bubble tubes ach of the bubble tubes is packed separately with a pipefitting and grommet already attached at the top. As illustrated in Figure 2, the three pipe sections are inserted over the fittings to create three pairs of bubble tubes. Please note that the pipefitting on one of the bubble tubes will not receive a pipe section.
-
Page 5: Installing The Bubble Tubes
Installing the bubble tubes (continued) Once the pairs are created, position the bubble tubes as illustrated in Figure 3 below. The bubble tubes are inserted into grommets on the pump bases. Handle the bubble tubes carefully to avoid breaking the glass and releasing the Caution! fluid. -
Page 6: Controlling The Accessory
Controlling the accessory otate the oil drum to turn the bubble tubes on and off. Refer to Figure 4. The lamp inside the shack is on when the accessory is powered up. Give the bubble tubes a few minutes to warm up. You may need to increase the Hint! voltage to improve the bubbling. -
Page 7: Controlling The Accessory
Controlling the accessory in the Command Control environment or operation in the TrainMaster Command Control environment, you may choose to wire this accessory with an SC-2 Switch and Accessory Controller (available separately, 6-22980) or the Accessory Switch Controller (available separately, 6-14182). Refer to these manuals for additional information. -
Page 8: Controlling The Accessory In The Command Control Environment
Controlling the accessory in the Command Control environment (continued) SC-2 wiring and operation hree wires are needed to connect the accessory to the SC-2 Switch and Accessory Controller and a separate accessory transformer. Refer to Figure 5. 1. Attach one wire to the transformer Common/Ground/U terminal and connect it to the accessory COMM (common) position on the SC-2. -
Page 9: Controlling The Accessory In The Command Control Environment
Controlling the accessory in the Command Control environment (continued) Accessory Switch Controller wiring and operation hree wires are needed to connect the accessory to the Accessory Switch Controller (ASC) and a separate accessory transformer. Refer to Figure 6. 1. Attach one wire to the transformer Power/A terminal and connect it to the COMM terminal on the ASC. -
Page 10: Replacing The Lamps
Replacing the lamps he interior of the shack and the bubbles tubes are each illuminated by one lamp, Lionel part no. 640-9809-300. During the course of normal operations, you may find that the lamps require replacement. Replacement lamps are available at your authorized Lionel Service Center or from Lionel Service. -
Page 11: Replacing The Lamps
Replacing the lamps (continued) o replace a lamp under a bubble tube, carefully lift away the pump base and bubble tube. Refer to Figure 8. If the bubble tube is connected to another, we recommend that you remove both bubble tubes and pump bases. Gently unscrew the expired bulb, and install the replacement. -
Page 12: Limited Warranty/Lionel Service
Lionel L.L.C. or an authorized Lionel L.L.C. Service Center, together with proof of original purchase will, at the option of Lionel L.L.C., be repaired or replaced, without charge for parts or labor. In the event the defective product cannot be repaired, and a replacement is not available, a refund of the original purchase price will be granted.
Need help?
Do you have a question about the 6-24112 and is the answer not in the manual?
Questions and answers