
Related Manuals for Omega OM-93


Summary of Contents for Omega OM-93
- Page 1 Shop online at omega.com ® e-mail: info@omega.com For latest product manuals: www.omegamanual.info OM-93 ® ®...
- Page 2 For Other Locations Visit omega.com/worldwide The Bluetooth® word mark and logos are registered trademarks owned by Bluetooth SIG, Inc. and any use of such marks by Omega Engineering, Inc. is under license. Other trademarks and trade names are those of their respective owners.
-
Page 3: Table Of Contents
6.8. Viewing Logged Data from File ..................16 6.9. Configuration of a OM-93 Logger (Start at Specified Time) ..........18 6.10. Configuration of a OM-93 Logger (Start using Button Press) ..........19 ... -
Page 4: Document Overview
how to mount your OM-93 logger how to charge the battery within your OM-93 logger contact information should you have further technical questions Revision 1.0.3 Page 2... -
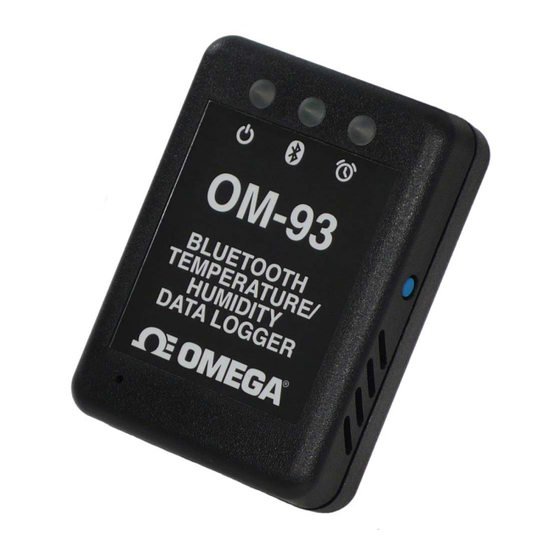
Page 5: Product Overview
Product Overview The OM-93 logger is a portable wireless logger from Omega. The OM-93 logger can be connected either ® ® via a USB cable to a Windows PC application or using Bluetooth wireless technology to your iPhone ® ®... - Page 6 By mounting a OM-93 logger inside the chamber then one can periodically come near to the ® chamber, connect to the logger from an iPhone , download the most recent data, email the recorded data and configure the logger to continue logging. This can happen wirelessly and without opening the chamber and affecting environmental conditions.
-
Page 7: Technical Specifications
Technical Specifications Temperature range C to +60 C (-4 F to 140 Temperature accuracy (limited range) +0.3 C (+5 C to +60 +0.5 F (41 F to 140 Temperature accuracy (-20 C to +60 see accuracy curve in figure 3 ... -
Page 8: Buttons And Led Indicators
Buttons and LED Indicators The OM-93 logger includes one button located on the side of the logger. It is possible by configuration in ® the PC or iPhone application to use this button as a way to start and stop logging. See sections 6.11 and 7.4 of this User Manual regarding configuring for button press start. -
Page 9: Packaging List
Packaging List Your Omega OM-93 logger comes standard with the following items. One OM-93 Logger unit Figure 6: OM-93 Logger Unit One USB cable – type A to micro-USB type B Figure 7: USB Cable Revision 1.0.3 Page 7... -
Page 10: Usb Operation
USB Operation The OM-93 logger can be configured, data downloaded and further analysed by connection to a PC or Mac using a USB cable and the OM-90 Series Data Logger Software. The process for this is described in this ®... -
Page 11: Front Page
6.2. Front Page When the OM-90 Series Data Logger Software is started the welcome screen appears and gives a brief introduction to the OM-90 Series loggers and what they can be used for. Click on the Configuration Wizard Button to start configuration of the logger. ... -
Page 12: Main Page
6.3. Main Page The main page of the application GUI consists of a configuration pane, a graphical pane and a spreadsheet pane. It is possible to have any of these enabled or disabled by the buttons located top left in the window. The panes will automatically start in an enabled or disabled view depending on the viewing mode select from the front page. -
Page 13: Configuration Of A Om-93 Logger (Start On Disconnection)
6.4. Configuration of a OM-93 Logger (Start on Disconnection) Configuration of the OM‐93 logger starts by specifying the device name. Up to 16 characters is allowed in the name. Figure 10: Configuration Step (Start on Disconnection) Next select the logger start to On Disconnection. There are other options (At Specified Time, Button Press and Real Time Logging) which will be discussed in later sections of this manual. Select the logging interval (this is the time between samples). For temperature logging then one needs to enable or disable the logging. In the case the temperature logging is enabled then one can also set alarm thresholds for which the alarm indication will signify that temperature limits have been exceeded. Revision 1.0.3 Page 11... - Page 14 Similarly for humidity one needs to enable or disable the logging and configure the alarm limits. Finally to save the configuration setup to the OM‐93 logger, press the Configure Button. Figure 11: Write Configuration to the Logger Once configured the PC application will show the logger time will be synchronized to the PC time. The logger firmware revision will also appear in the application. Once you disconnect the logger from the PC, logging will start automatically and at the configured logging interval. A green status LED will flash every 6 seconds to indicate that the unit is logging. The red alarm LED will flash also in the case that the temperature or humidity goes outside of the allowed limits and triggers the alarms. If the logger becomes full then all LEDs will stop flashing. Revision 1.0.3 Page 12...
-
Page 15: Saving A Configuration File
6.5. Saving a Configuration File Configurations can be saved to file so that you can use the configuration next time or if you have multiple devices with the same configuration. Saving a configuration file is just a matter of selecting the save icon and filling out the file name. If the logger contains no logged data then it will only save the configuration settings. -
Page 16: Loading A Configuration From File
This ensures a common configuration and saves time/effort when configuring multiple devices. Figure 13: Loading a Configuration from File Remember to press the configuration button if you want the configuration data held in the GUI to be written to your OM-93 logger. Revision 1.0.3 Page 14... -
Page 17: Retrieving Logged Data
6.7. Retrieving Logged Data Data can be retrieved from the logger by connecting to the logger and then pressing the read button at the bottom left of the GUI. Both the device configuration and logged data will immediately become uploaded and viewable in the configuration, graphical and spreadsheet views. -
Page 18: Viewing Logged Data From File
6.8. Viewing Logged Data from File It is a simple matter to read back data from file (CSV format) into the GUI and view previous logs graphically or using the spreadsheet views. Simply press the open icon and then select the file which you would like to view. - Page 19 Figure 16: Retrieving Logged Data from File (complete) Revision 1.0.3 Page 17...
-
Page 20: Configuration Of A Om-93 Logger (Start At Specified Time)
6.9. Configuration of a OM-93 Logger (Start at Specified Time) You can configure a device so that it starts at a specific time. Configure as per section 6.4 but select At Specified Time. Fill in the exact month, day, hour, minute and seconds when you want the logging to start. -
Page 21: Configuration Of A Om-93 Logger (Start Using Button Press)
6.10. Configuration of a OM-93 Logger (Start using Button Press) You can also configure the device so that it starts logging on a button press. Configure as per section 6.5 but select Button Press. Remember to write the setup to the logger by pressing the Configure Button. -
Page 22: Configuration Of A Om-93 Logger (Real Time Logging)
6.11. Configuration of a OM-93 Logger (Real Time Logging) You may also use your OM-93 Logger in Real Time Logging mode. Select the start logging to Real Time Logging with the appropriate logging interval. Next press start. You will then see the PC application take samples from the logger directly and display them on the table and graphs. -
Page 23: Opening Excel
6.12. Opening Excel ® When the GUI has data, it is possible to press the Excel button to show the data in Microsoft Excel. During this process the user needs to select if your version of Excel is expecting and "." or "," to represent the number decimal point. -
Page 24: Writing Pdf Reports
6.13. Writing PDF reports When the GUI has data, a simple one-page PDF report can be written to summarize the data in the logger by way of statistics and as a graph. The PDF can be written either in US Letter page size of A4 page size. - Page 25 Figure 23: A typical PDF report Revision 1.0.3 Page 23...
-
Page 26: Iphone ® Operation
® iPhone Operation The OM-93 logger can be configured; data can be downloaded and further analyzed through wireless ® ® ® ® connection from an iPhone , iPad or iPad mini using the OM-93 iPhone application. This process is described in this section. The logger can similarly be configured by a Windows PC as described in section ®... -
Page 27: Searching For Om-93 Loggers
7.3. Connecting to your logger After searching the application will provide a list of all OM-93 devices that can be connected from your mobile device. See figure 22. Select one of the devices within range. The first time the iPhone application discovers a OM-93 logger, it will mark it as "-undiscovered-". Upon connecting and thereafter it will use the logger name found when the application recovers it from the logger. - Page 28 Figure 22: OM‐93 iPhone App – Connecting to a device ® Upon successful connection the logger’s Bluetooth Connected LED turns blue. On the application the connected icon turns green. Also the application starts showing in real time the temperature and humidity from the logger. Figure 23: OM‐93 iPhone App – Logger Connected ...
-
Page 29: Configuring The Logger
7.4. Configuring the logger To configure a logger one needs to go to the Configure screen. Figure 24: OM‐93 iPhone App – Configuration Screen Next fill out all desired settings including: the name of the logger the logging start mode o on disconnection o by button press o at specified start time the logging interval enabling/disabling of temperature logging enabling/disabling of humidity logging temperature units (Fahrenheit or Celsius) temperature alarms levels (upper and lower) humidity alarms levels (upper and lower) Once all configuration is as required then press send to download all settings to the logger. -
Page 30: Downloading Data
7.5. Downloading data After connecting to a logger that has collected data then to download the data, select Download Logger from the Connected screen. The application then moves to the Data screen and all data appears as a list of all sample points collected. -
Page 31: Viewing Data Graphed
7.6. Viewing data graphed Once data is read into the application it is possible to view the data graphically from the Graph screen. Zooming is controlled by finger movement (Apple’s usual pinch out to zoom in and pinch in to zoom out). Figure 27: OM‐93 iPhone App – Graphing Data ... -
Page 32: Saving Data To The Iphone
7.7. Saving data to the iPhone Data can be saved to the iPhone from the Data screen. Select the option to the top of the application and then select Save to File. You will then be prompted for the file name. This saves data to the phone in case there is no Wifi or Cellular connection. -
Page 33: Opening Data From The Iphone
7.8. Opening data from the iPhone You can read data back from the iPhone to the application. Select the option to the top of the application and then select Open from File. Figure 29: OM‐93 iPhone App – Retrieving Data from the iPhone Revision 1.0.3 Page 31... - Page 34 To delete from the file list swipe left on the desired file. Figure 30: OM-93 iPhone App – Deleting a stored file Revision 1.0.3 Page 32...
-
Page 35: Emailing Data Files
7.9. Emailing data files ® You can email data contained within the iPhone application. Select the option to the top of the application and then select Send to e-mail. ® ® Please note that in order for the application to use the emailing function your iPhone or iPad will need to be setup with at least one email account. -
Page 36: 7.10. Disconnecting From The Logger
7.10. Disconnecting from the logger To disconnect from the logger either select Disconnect on the Connected screen or just close the application. The Blue LED will turn off indicating the logger disconnected state. Having the application sent to the background is also sufficient to close connection to the logger. Figure 32: OM‐93 iPhone App – Disconnection ... -
Page 37: Usb And Iphone ® App Connection/Disconnection Behaviour
® USB and iPhone App Connection/Disconnection Behaviour As a rule the OM-93 logger will stop logging when it is either connected to via USB or if it is connected to ® ® from the iPhone application. Upon disconnection of either the USB or iPhone connection the OM-93 logger will resume logging if it was previously logging at the time of the connection. - Page 38 Department will issue an Authorized Return (AR) number immediately upon phone or written request. Upon examination by OMEGA, if the unit is found to be defective, it will be repaired or replaced at no charge. OMEGA’s WARRANTY does not apply to defects resulting from any action of the purchaser, including but not limited to mishandling, improper interfacing, operation outside of design limits, improper repair, or unauthorized modification.
- Page 39 Where Do I Find Everything I Need for Process Measurement and Control? OMEGA…Of Course! Shop online at omega.com TEMPERATURE Thermocouple, RTD & Thermistor Probes, Connectors, Panels & Assemblies Wire: Thermocouple, RTD & Thermistor Calibrators & Ice Point References Recorders, Controllers & Process Monitors Infrared Pyrometers PRESSURE, STRAIN AND FORCE Transducers & Strain Gages...
Need help?
Do you have a question about the OM-93 and is the answer not in the manual?
Questions and answers