Table of Contents
Advertisement
OPERATING
MANUAL
Operating Manual
Wired Remote Controller
Bedienungsanleitung
Kabelfernbedienung
Télécommande reliée par fi l
Bedieningsaanwijzing
Niet-draadloze Afstandsbediening
Manual De Instrucciones
Control Remoto Con Cable
Manuale Di Funzionamento
Telecomando Cablato
Manual De Funcionamento
Controlo Remoto Com Fio
Руководство По Зксплуатации
Проводной пульт дистанционного
Przewodowe zdalne
urządzenie sterujące
Kullanım Kılavuzu
Kablolu Uzaktan Kumanda
1
English
Deutsch
Mode D'emploi
Français
Nederlands
Español
Italiano
Ελληνικά
Português
Pycckий
управления
Polski
Türkçe
Türkçe
Part No.:R08019033605
OM-5RTBR-0709(0)-DENV
Advertisement
Table of Contents

Related Manuals for Daikin OM-5RTBR-0709(0)-DENV


Summary of Contents for Daikin OM-5RTBR-0709(0)-DENV
- Page 1 Control Remoto Con Cable Manuale Di Funzionamento Italiano Telecomando Cablato Ελληνικά Manual De Funcionamento Português Controlo Remoto Com Fio Руководство По Зксплуатации Pycckий Проводной пульт дистанционного управления Przewodowe zdalne Polski urządzenie sterujące Kullanım Kılavuzu Türkçe Türkçe Kablolu Uzaktan Kumanda Part No.:R08019033605 OM-5RTBR-0709(0)-DENV...
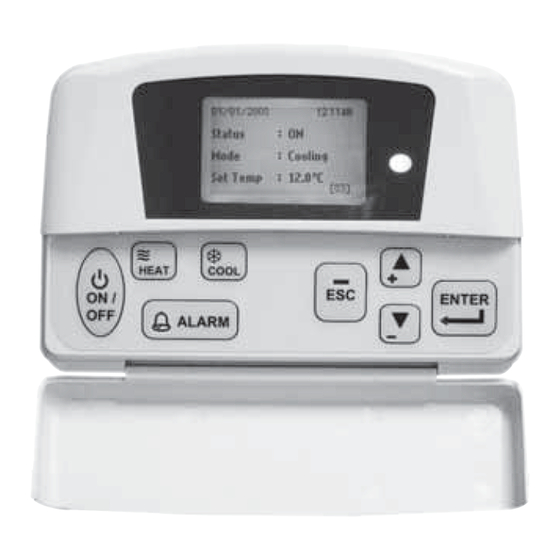
- Page 3 A. Operating Guide 1. Upon power up of the unit, the LCD displays the main display screen 2000/01/01 [Sat] 12:00am Status : OFF Mode : Heating Set Temp : 24°C ∞ 2. Press the ON/OFF button for 1 second to switch on the unit if the status shows OFF. The status will change to ON.
-
Page 4: How To Use The Main Menu
B. Main Menu 1. Changes can be made to the factory setting parameter. This is done in the Main Menu. Press ENTER button to go into the Main Menu. 2. The Main Menu consists of Operation Menu, Settings Menu, Timer Menu, Alarm Menu, Warning Menu and Display Menu. -
Page 5: Main Menu
Main Menu Press ENTER to go to this menu. MAIN MENU MAIN MENU Operation Menu Timer Menu Alarm Menu Settings Menu Warning Menu Timer Menu Display Menu Alarm Menu Warning Menu There are 6 sub menus in [Main Menu]. Press 5 or ∞ to select sub menus, ENTER to enter into the sub menu or press ESC to exit to main display screen. -
Page 6: Timer Menu
Timer Menu Select [Timer Menu] in [Main Menu] and press ENTER to go to this menu. TIMER MENU Clock Setting Date Setting Timer Schedule Timer : Enable All the timer/schedule settings are included in this menu. Press 5 or ∞ to select the required setting. Then, press ENTER to enter the setting mode. - Page 7 Alarm Menu/Warning Menu Select [Alarm Menu]/[Warning Menu] in [Main Menu] and press ENTER to go to this menu. ALARM MENU WARNING MENU Show Alarms Show Warnings Erase All Alarms Erase All Warnings This place keeps records for all previous occurred faults/alarms/warnings. User can view or clear these records.
-
Page 8: Installation
C. Installation When installing the LCD panel to the bracket, Push to fasten the LCD panel to the bracket Step 1 Step 2 Hook the LCD panel from the bottom fi rst When removing the LCD panel from the bracket, Remove the LCD panel Step 1 Step 2...
Need help?
Do you have a question about the OM-5RTBR-0709(0)-DENV and is the answer not in the manual?
Questions and answers