Advertisement
Table of Contents
- 1 Table of Contents
- 2 Operation Manual
- 3 Safety Precautions
- 4 Names and Functions of Parts
- 5 Setting the Current Time
- 6 Preparation before Operation
- 7 Automatic · DRY · Cooling · Heating Operation
- 8 Heating Operation
- 9 Adjusting Airflow Direction
- 10 Timer Operation
- 11 Cleaning the Remote Controller
- 12 Cleaning
- Download this manual
DAIKIN ROOM AIR CONDITIONER
Operation Manual
OPTIONAL SLENDER
REMOTE CONTROLLER
Use wisely, save power
Thank you very much for purchasing the Daikin room air
conditioner.
This manual contains precautions and economical use of
your air conditioner.
For correct use of your air conditioner, please read this
manual carefully before use and keep it at hand for easy
reference.
The warranty card should be stored in a safe place after
making sure that the date and place of purchase, etc. have
been filled in.
BRC944A2B
READ BEFORE OPERATION
Safety Precautions ........................2
Names of Functions of Parts ........4
Preparation before Operation .......5
OPERATION
Operation ......................................6
Adjusting Airflow Direction ............8
One time Timer ...........................10
Daily Timer ..................................12
CARE
Cleaning ......................................14
Advertisement
Table of Contents

Related Manuals for Daikin BRC944A2B


Summary of Contents for Daikin BRC944A2B
-
Page 1: Table Of Contents
Timer Operation One time Timer ......10 Daily Timer ........12 Use wisely, save power CARE Thank you very much for purchasing the Daikin room air conditioner. Cleaning ........14 This manual contains precautions and economical use of your air conditioner. For correct use of your air conditioner, please read this manual carefully before use and keep it at hand for easy reference. -
Page 2: Safety Precautions
Safety Precautions Read the following warnings and cautions carefully Failure to follow a warning is very likely WARNING before operating the system and use it correctly. to result in such grave consequences as death or serious injury. This manual classifies the precautions to the user Failure to follow a caution may result in serious into two categories on the right. - Page 3 CAUTION After a long use, Do not stand or sit on the outdoor Do not place under the indoor Do not wash the unit check the unit stand unit. Do not place any object on the or outdoor unit anything which with water.
-
Page 4: Names And Functions Of Parts
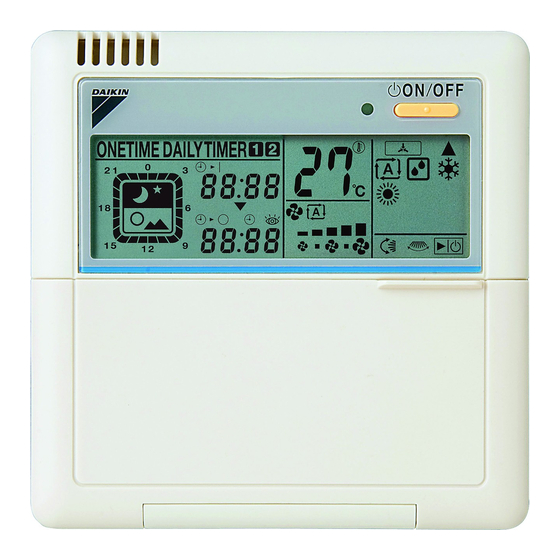
Names and Functions of Parts Run indicator lamp (green) ON/OFF button Display Press to start the system. Displays the operating Displays the operating Press again to stop the system. conditions. conditions. (All displayed here for your reference) Timer select button Mode select button Selects one of the following: One time timer ON... -
Page 5: Preparation Before Operation
Preparation before Operation Checking the power If nothing appears on the remote controller's display, turn on the circuit breaker. Setting the current time Press The current time starts blinking. lights up. 1 . 3 Press and set the current time. Keep pressing the button, and the time advances fast. -
Page 6: Automatic · Dry · Cooling · Heating Operation
Automatic · DRY · Cooling · Heating Operation Select your desired operation mode. Once preset, the system can get restarted in the same operation mode. Run indicator lamp (green) Press to select your desired operation mode. Each time the button is pressed, the mode changes as follows. -
Page 7: Heating Operation
To adjust the temperature and airflow rate: Operation Automatic Cooling Heating mode Setting to be adjusted Temperature is adjustable. Temperature Recommended temperature cannot be Cooling : 26°C-28°C adjusted. Heating : 20°C-22°C (Temperature) Five levels of airflow rate setting from " "... -
Page 8: Adjusting Airflow Direction
Adjusting Airflow Direction Adjust the airflow direction for maximum comfort. To adjust the Airflow Direction Press during operation . Each time the button is pressed, the airflow direction blades change their movement. Wall Mounted Types (without horizontal swing function) The horizontal airflow direction blades Swing move up and down. - Page 9 Wall Mounted Type (with horizontal swing function) The horizontal airflow direction blades Swing horizontally move up and down. The horizontal airflow direction blades Swing vertically stop just when the button is pressed. Then the vertical ones start moving right and left. Airflow direction The vertical airflow direction blades blades stop...
-
Page 10: Timer Operation
Timer Operation This function automatically turns off the operation when you fall asleep and turning it on when you wake up. Use the daily timer mode on weekdays, and the One time timer mode on weekends for your convenience. To select the One time timer mode: Press to select the One time... - Page 11 One time timer Once the timer has been activated and deactivated, it gets in the OFF state. The ON timer or OFF timer alone can also be programmed. Press to select the One time timer. Press blinks. ONE TIME light up. Press Press to make the OFF timer setting.
-
Page 12: Daily Timer
Timer Operation To select the daily timer mode: Timers Two pairs of ON and OFF time Press to select the daily timer mode. settings can be programmed. Each time the button is pressed, the modes change as follows. One time timer ON time 24-hour timer display Daily timer... - Page 13 Daily timer Once the timer has been programmed, the system starts and stops repeatedly at the preset times day after day. Two pairs of time settings can be programmed. (Example: 8:00 10:00, and 18:00 23:00) Daily timer indication appears. lights up. Press to select the daily timer.
-
Page 14: Cleaning
Cleaning Cleaning the remote controller Wipe it clean with soft, dry cloth. Do not use any water hotter than 40°C, volatile liquid such as benzine, gasoline and thinner, polishing powder, and anything hard such as scrub brush. When the unit is not used for a long time On a sunny day, keep the system running for half a day in the FAN mode to dry it up inside. - Page 15 MEMO...
- Page 16 Two-dimensional bar code is a code for manufacturing. 3P202922-1A M06B323A(0704)
Need help?
Do you have a question about the BRC944A2B and is the answer not in the manual?
Questions and answers