Table of Contents
Advertisement
Quick Links
Advertisement
Table of Contents

Related Manuals for Avaya H175


Summary of Contents for Avaya H175
- Page 1 Using Avaya H175 Video Collaboration Station Release 1.0.2 April 2016...
- Page 2 CHANNEL PARTNER (AS APPLICABLE) UNDER A COMMERCIAL AGREEMENT WITH AVAYA OR AN AVAYA CHANNEL PARTNER. Avaya is not responsible for the contents or reliability of any linked UNLESS OTHERWISE AGREED TO BY AVAYA IN WRITING, websites referenced within this site or documentation provided by AVAYA DOES NOT EXTEND THIS LICENSE IF THE SOFTWARE Avaya.
- Page 3 OR SHALL BE IMPLIED FOR ANY OTHER USE. ADDITIONAL written consent of Avaya can be a criminal, as well as a civil offense INFORMATION FOR H.264 (AVC) AND H.265 (HEVC) CODECS under the applicable law.
- Page 4 Handset Amplification Statement AC adapters shipped with the equipment or specified by Avaya to be used with the equipment. If you use any Enabling the amplified capability will result in the handset not being other equipment, it may cause failures, malfunctioning, compliant to all Australian S004 requirements, but will allow the or fire.
- Page 5 Documentation, Hosted Service(s), and product(s) provided The changes or modifications not expressly approved by the party by Avaya are the registered or unregistered Marks of Avaya, its responsible for compliance could void the user’s authority to operate affiliates, or other third parties. Users are not permitted to use such the equipment.
-
Page 6: Table Of Contents
Chapter 1: Introduction...................... 12 .......................... 12 Purpose ......................... 12 Intended audience ......................... 12 Related resources ........................ 12 Documentation .......................... 12 Support Chapter 2: Avaya H175 Video Collaboration Station overview.......... 13 ........................ 14 Specifications ................. 17 Physical system protection requirements ...................... 18 Product compatibility ........................ 18 Supported apps ......................... 19 Supported widgets ........................ 19... - Page 7 Putting and resuming a call on hold ........................ 80 Parking a call ..................... 81 Setting Auto Call Back .............. 81 Excluding others from bridging on to your call April 2016 Using Avaya H175 Video Collaboration Station Comments on this document? infodev@avaya.com...
- Page 8 .................. 100 Transferring a call to voice mail Chapter 5: Call forwarding.................... 101 ................... 101 Enabling and disabling call forwarding ................ 102 Activating and deactivating Send All Calls April 2016 Using Avaya H175 Video Collaboration Station Comments on this document? infodev@avaya.com...
- Page 9 ................... 128 Viewing communications history ................. 128 Changing communications history view ................ 129 Removing communications history entry .................. 129 Clearing communications history ................. 129 Configuring communications history settings April 2016 Using Avaya H175 Video Collaboration Station Comments on this document? infodev@avaya.com...
- Page 10 Turning Bluetooth on .................... 151 Pairing a Bluetooth device ................ 152 Renaming a paired Bluetooth device ...................... 152 Unpairing a device .................. 152 Changing a connection profile ........................ 153 Call settings April 2016 Using Avaya H175 Video Collaboration Station Comments on this document? infodev@avaya.com...
- Page 11 Changing to the 24–hour time format Chapter 16: Troubleshooting.................... 169 ...................... 169 Camera not working ................ 169 Video not showing on the external monitor .................... 169 The base of the device is hot April 2016 Using Avaya H175 Video Collaboration Station Comments on this document? infodev@avaya.com...
-
Page 12: Chapter 1: Introduction
Chapter 1: Introduction Purpose This document describes how to use the Avaya H175 Video Collaboration Station. Intended audience This document is intended for users of the Avaya H175 Video Collaboration Station. Related resources Documentation Title Use this document to: Audience... -
Page 13: Chapter 2: Avaya H175 Video Collaboration Station Overview
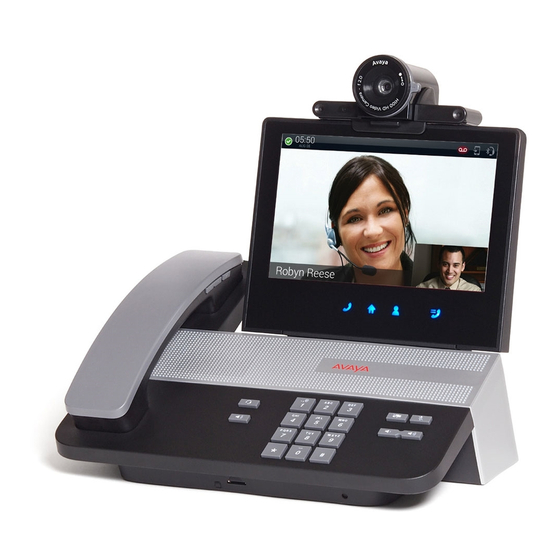
Chapter 2: Avaya H175 Video Collaboration Station overview The Avaya H175 Video Collaboration Station is SIP-based VoIP HD video deskphone that enterprises can use for audio, video, and conference communications. The Collaboration Station combines the functionality of a business telephone and an executive video conference system. -
Page 14: Specifications
Avaya H175 Video Collaboration Station overview Related links Specifications on page 14 Physical system protection requirements on page 17 Product compatibility on page 18 Supported apps on page 18 Supported widgets on page 19 Supported features on page 19 User Interface... - Page 15 Freescale i.Mx6 1.0 GHz quad-core ARM Cortex-A9 processor. Storage 4GB eMMC flash memory configured as SLC. Memory 2 GB of RAM. Ethernet Gigabit Ethernet. Connectivity Table continues… April 2016 Using Avaya H175 Video Collaboration Station Comments on this document? infodev@avaya.com...
- Page 16 ® • Publish and display presence status with Avaya Aura Presence Services integration. • Enhanced user interface shared with Avaya Communicator 2.0 optimized for touchscreen. • HTML 5 browser with built-in click-to-call support. • History, Calculator, and Alarm clock apps.
-
Page 17: Physical System Protection Requirements
• Supports SRTCP (authentication only). • User information, such as MS Exchange credentials, call logs, and browser history, is erased when a new user logs in. Related links Avaya H175 Video Collaboration Station overview on page 13 Physical system protection requirements Ensure that you: •... -
Page 18: Product Compatibility
Avaya H175 Video Collaboration Station overview Product compatibility For the latest compatibility information about the Avaya H175 Video Collaboration Station with: • Other products, see Compatibility Matrix. • Headsets, see DevConnect Portal. Related links Avaya H175 Video Collaboration Station overview... -
Page 19: Supported Widgets
Adds a shortcut for the configuration options present in the Settings application. Related links Avaya H175 Video Collaboration Station overview on page 13 Supported features ® Avaya H175 Video Collaboration Station supports the Avaya Aura and IP Office environments. ® Features Avaya Aura IP Office... -
Page 20: Navigation
Avaya H175 Video Collaboration Station overview ® Features Avaya Aura IP Office Block/Unblock Calling Party Info Whisper Page Enhanced Call Forward EC500 Supports Mobile Twinning through ® Avaya Aura Communication Manager Emergency call Call Transfer Auto Call Back Malicious Call Trace... -
Page 21: Button Layout
Speaker Dial pad Volume Down Volume Up Audio Mute Video Block Related links Avaya H175 Video Collaboration Station overview on page 13 Gestures Gesture Action Touch the screen lightly with your To open an app or select an option. fingertip. -
Page 22: User Interface
Avaya H175 Video Collaboration Station overview on page 13 User Interface ® The Collaboration Station can be configured with the Avaya Aura and IP Office environments. Depending on the environment, the Collaboration Station user interface can differ. Related links Avaya H175 Video Collaboration Station overview... -
Page 23: Lock And Logout Panel
Locks the Collaboration Station. Logout Logs you out from the Collaboration Station. Status Note Saves the status note that appears next to your presence status on a watcher’s Collaboration Station. This feature is only available in an Avaya ® Aura environment. April 2016 Using Avaya H175 Video Collaboration Station Comments on this document? infodev@avaya.com... -
Page 24: Home Screen
Avaya H175 Video Collaboration Station overview Related links User Interface on page 22 Logging in and logging out on page 51 Locking and unlocking on page 51 Home screen Number Name Description Top Bar Displays the available features such as time, date, notifications, and other supported icons. -
Page 25: Navigation Panel
Top Bar The Top Bar is a horizontal bar at the top of the screen that displays the time, date, and ® notifications. The presence information is displayed only in an Avaya Aura environment. Top Bar modes The Top Bar has the following modes: •... -
Page 26: Top Bar Icons And Notifications
Avaya H175 Video Collaboration Station overview • Expanded mode Swiping down the normal mode of the Top Bar displays the expanded mode and swiping up the expanded mode displays the normal mode of the Top Bar. Normal mode In the normal mode, the Top Bar displays maximum 13 notifications. If there are more than eight... - Page 27 Shared Indicates the shared control mode of the Collaboration Station with a Control Mode connected computer system. Table continues… April 2016 Using Avaya H175 Video Collaboration Station Comments on this document? infodev@avaya.com...
-
Page 28: All Apps Screen
Avaya H175 Video Collaboration Station overview Icon Name Notification Keyboard Indicates the current language that you selected for the connected Current keyboard. Language Related links User Interface on page 22 All Apps screen Related links User Interface on page 22... -
Page 29: Widgets Screen
Containers provide the following information: • List of participants. • Call states, such as active call or call on hold. • Controls for starting and managing calls. April 2016 Using Avaya H175 Video Collaboration Station Comments on this document? infodev@avaya.com... -
Page 30: Types Of Communication Containers
Avaya H175 Video Collaboration Station overview Parts of a container Number Name Description Header Displays an icon to indicate the call type. Header of an active call container displays the call state and media indicators, a label, call duration, call quality indicator, and optional icons for container management. - Page 31 Audio Call Starts an audio call. Video Call Starts a video call. ® Precall Features Displays the precall menu. This feature is only active in an Avaya Aura environment. Dial Pad Displays the soft dial pad. Contacts Displays the Contacts list.
- Page 32 Starts a video call. Add Participant Adds another contact to an active call. ® Mid Call Features Displays the mid-call menu. This feature is only active in an Avaya Aura environment. Transfer Transfers the active call. Hold Puts the active call on hold.
- Page 33 A ringing call container contains an ignored call and displays controls to answer or reject the call. The Collaboration Station displays a ringing call container in a closed state. Related links User Interface on page 22 Call management on page 64 April 2016 Using Avaya H175 Video Collaboration Station Comments on this document? infodev@avaya.com...
-
Page 34: Communication App Screens
Avaya H175 Video Collaboration Station overview Communication app screens ® Idle Communication screen in Avaya Aura Idle Communication screen in IP Office The idle Communication screen displays the Launch Panel that contains the following icons for quick access to basic functions and features of the Communication app. - Page 35 • Directory Search • Accounts • Settings • Help ® This feature is only available in an Avaya Aura environment. Note: The Calendar icon is displayed in an IP Office environment. Features Displays the Precall features menu. This feature is only available in an ®...
- Page 36 Audio Call Starts an audio call. Video Call Starts a video call or promotes an audio call to a video call. Precall Features Displays the Precall features menu. This feature is only active in an Avaya ® Aura environment. Dial Pad Displays the Input Panel.
- Page 37 • Most Frequent • Filter • Directory Search • Accounts • Settings • Help ® This feature is only available in an Avaya Aura environment. Mid-call Communication screen Number Name Description New Conversation Opens a new conversation container. Video Call Starts a video call or promotes an audio call to a video call.
- Page 38 Avaya H175 Video Collaboration Station overview Number Name Description Mid Call Features Displays the Mid-call Features menu. ® This feature is only active in an Avaya Aura environment. Transfer Transfers the call to the required number. Hold Puts the call on hold. End Call Ends the call.
-
Page 39: Contacts App Screen
Add or edit contacts from the following options: ® • Avaya Aura: Appears only in an Avaya Aura environment. Table continues… April 2016 Using Avaya H175 Video Collaboration Station Comments on this document? infodev@avaya.com... -
Page 40: Calendar App Screen
• Directory Search • Accounts • Settings • Help ® This feature is only available in an Avaya Aura environment. Search Searches a contact. When you tap the Search bar, the system displays an active cursor with a keyboard. Related links... -
Page 41: Icons
Indicates that the voice volume of the Collaboration Station is at zero level. The icon blinks in the Top Bar. Call Diversion Indicates that a redirection feature is active. ® This feature is only available in an Avaya Aura environment. EC500 Indicates that the EC500 feature is active. ®... - Page 42 Displays the Settings app. Calculator Displays the Calculator app. Presence ® This feature is only available in an Avaya Aura environment. Available Indicates that the user is available and can communicate. On a call Indicates that the user is on a call.
- Page 43 Outgoing video call Shows an outgoing video call. Bridged audio call Shows a bridged call. ® This feature is only available in an Avaya Aura environment. Forwarded call Shows a forwarded call. ® This feature is only available in an Avaya Aura environment.
-
Page 44: Using Help
Icon Name Description Ringing Indicates an incoming call on a monitored extension. ® This feature is only available in an Avaya Aura environment. Call quality Indicates that the wideband codec is used during the call. indicator Encrypted call Indicates that the call is encrypted. This icon is displayed only for a two-party call between SIP endpoints. -
Page 45: Chapter 3: Setting Up H175 Video Collaboration Station
Chapter 3: Setting up H175 Video Collaboration Station Hardware setup and login This section describes the components of the Collaboration Station and how to assemble the components and log in to the device. Related links Packaged components on page 45... -
Page 46: Physical Layout
Setting up H175 Video Collaboration Station Related links Hardware setup and login on page 45 Physical layout Number Name Wireless handset Headset Speaker Dial pad Volume Down Volume Up Audio Mute Video Block Navigation Panel Capacitive touch screen Message waiting indicator... -
Page 47: Connectors And Controls
As the port uses only the spare power, the charging speed may vary based on whether power supply is through AC, PoE, or SP-PoE USB camera connector Digital video display out connector Digital video display in connector Side panel April 2016 Using Avaya H175 Video Collaboration Station Comments on this document? infodev@avaya.com... -
Page 48: Front Panel
Setting up H175 Video Collaboration Station Number Name USB 2.0 connector USB 2.0 micro AB connector RJ9 analog headset connector RJ9 analog handset connector Front panel Number Name SD card slot that is currently not supported Related links Hardware setup and login... -
Page 49: Connecting The Collaboration Station To The Network
Collaboration Station with a wired handset, the charging pins are covered and you only need to connect the handset. You cannot use the wireless handset if you connect a wired handset. April 2016 Using Avaya H175 Video Collaboration Station Comments on this document? infodev@avaya.com... -
Page 50: Mounting And Connecting The Camera
Setting up H175 Video Collaboration Station Procedure 1. Perform the following steps only if you are replacing the wireless handset with the wired handset, else skip the steps. a. From the back of the device, remove the screw that is below the charging pins bushing. -
Page 51: Logging In And Logging Out
Logging in and logging out on page 51 Lock and Logout panel on page 23 Tilting the display Procedure 1. Press the screen lock button at the back of the display. April 2016 Using Avaya H175 Video Collaboration Station Comments on this document? infodev@avaya.com... -
Page 52: Virtual Keyboard
Setting up H175 Video Collaboration Station 2. While pressing the button, tilt the display at the required angle. 3. Release the screen lock button to lock the display in position. Related links Hardware setup and login on page 45 Virtual keyboard The Collaboration Station displays a virtual keyboard when you tap a text box to enter data. -
Page 53: Wireless Handset Layout
56 Charging the wireless handset battery on page 56 Enabling the wireless handset amplification on page 56 Wireless handset layout Number Name Mute Volume up Table continues… April 2016 Using Avaya H175 Video Collaboration Station Comments on this document? infodev@avaya.com... -
Page 54: Installing The Wireless Handset
Setting up H175 Video Collaboration Station Number Name Volume down Battery slot Charging pins Mute LED Call control Related links Wireless handset on page 52 Installing the wireless handset Before you begin Ensure that the administrator configured the country settings and enabled the DECT menu option for the wireless handset. -
Page 55: Pairing And Re-Pairing A Wireless Handset
The software upgrade progress information of the wireless handset in percentage. During a low signal strength when you are about to lose connectivity. Audio notifications During the low battery. Related links Wireless handset on page 52 April 2016 Using Avaya H175 Video Collaboration Station Comments on this document? infodev@avaya.com... -
Page 56: Answering And Ending A Call
Setting up H175 Video Collaboration Station Answering and ending a call Procedure • To answer a call, perform one of the following actions: - Press Call control if the handset is out of the cradle. - Lift up the handset if the handset is in the cradle. -
Page 57: External Monitor
External monitor External monitor The Avaya H175 Video Collaboration Station has a capability to display video calls on an external monitor. You can also you connect the Collaboration Station to your personal computer and external monitor in such a way that your computer desktop and video calls are projected on the external monitor. -
Page 58: Connecting The Collaboration Station To An External Monitor And A Computer
Setting up H175 Video Collaboration Station Resolution Aspect ratio Name 1600 x 900 16:9 1440 x 900 16:10 WXGA+ 1366 x 768 16:9 1280 x 1024 1280 x 800 16:10 1280 x 768 WXGA 1280 x 720 16:9 HD, 720p... -
Page 59: Viewing Video Windows On An External Monitor
• To change the location of video windows on an external monitor, tap External display. • To change the location of video windows in a conference call, tap Conference. 3. Tap the appropriate layout. April 2016 Using Avaya H175 Video Collaboration Station Comments on this document? infodev@avaya.com... -
Page 60: Viewing The Deskphone Screen On An External Monitor
Setting up H175 Video Collaboration Station Related links External monitor on page 57 Video call management on page 105 Video call container on page 106 Viewing the deskphone screen on an external monitor About this task Use the following procedure to view the screen of your Collaboration Station on an external monitor. -
Page 61: Camera Mount
• Integrated mount • External mount Integrated mount The camera is mounted on the Collaboration Station itself. The following image shows the camera mounted on the Collaboration Station. April 2016 Using Avaya H175 Video Collaboration Station Comments on this document? infodev@avaya.com... -
Page 62: Mounting And Connecting The Camera
Setting up H175 Video Collaboration Station External mount The camera can be mounted on an external monitor so that the user can view the video calls on the connected monitor. The following image shows the camera mounted on an external monitor. -
Page 63: Camera Led States
Indicates that an unsupported device is connected to the camera port. on the camera port Camera firmware Indicates that the camera software upgrade is required. required Related links Camera on page 60 April 2016 Using Avaya H175 Video Collaboration Station Comments on this document? infodev@avaya.com... -
Page 64: Chapter 4: Call Management
98 Speed dialing to a monitored station on page 99 Assigning a ringtone to a monitored station on page 99 Voice mail on page 100 April 2016 Using Avaya H175 Video Collaboration Station Comments on this document? infodev@avaya.com... -
Page 65: Navigating To The Communication Screen
Navigating to the Communication screen Navigating to the Communication screen Procedure Related links Call management on page 64 April 2016 Using Avaya H175 Video Collaboration Station Comments on this document? infodev@avaya.com... -
Page 66: Communication App Screens
Idle Communication screen in IP Office The idle Communication screen displays the Launch Panel that contains the following icons for quick access to basic functions and features of the Communication app. April 2016 Using Avaya H175 Video Collaboration Station Comments on this document? infodev@avaya.com... - Page 67 • Directory Search • Accounts • Settings • Help ® This feature is only available in an Avaya Aura environment. Note: The Calendar icon is displayed in an IP Office environment. Features Displays the Precall features menu. This feature is only available in an ®...
- Page 68 Audio Call Starts an audio call. Video Call Starts a video call or promotes an audio call to a video call. Precall Features Displays the Precall features menu. This feature is only active in an Avaya ® Aura environment. Dial Pad Displays the Input Panel.
- Page 69 • Most Frequent • Filter • Directory Search • Accounts • Settings • Help ® This feature is only available in an Avaya Aura environment. Mid-call Communication screen Number Name Description New Conversation Opens a new conversation container. Video Call Starts a video call or promotes an audio call to a video call.
-
Page 70: Communication Containers
Call management Number Name Description Mid Call Features Displays the Mid-call Features menu. ® This feature is only active in an Avaya Aura environment. Transfer Transfers the call to the required number. Hold Puts the call on hold. End Call Ends the call. - Page 71 A container can be in one of the following states: • Open: Displays the header and body. • Closed: Displays only the header. Related links User Interface on page 22 Call management on page 64 April 2016 Using Avaya H175 Video Collaboration Station Comments on this document? infodev@avaya.com...
-
Page 72: Types Of Communication Containers
Audio Call Starts an audio call. Video Call Starts a video call. ® Precall Features Displays the precall menu. This feature is only active in an Avaya Aura environment. Dial Pad Displays the soft dial pad. Contacts Displays the Contacts list. - Page 73 Starts a video call. Add Participant Adds another contact to an active call. ® Mid Call Features Displays the mid-call menu. This feature is only active in an Avaya Aura environment. Transfer Transfers the active call. Hold Puts the active call on hold.
- Page 74 A ringing call container contains an ignored call and displays controls to answer or reject the call. The Collaboration Station displays a ringing call container in a closed state. Related links User Interface on page 22 Call management on page 64 April 2016 Using Avaya H175 Video Collaboration Station Comments on this document? infodev@avaya.com...
-
Page 75: Making An Emergency Call
Related links Call management on page 64 Precall operations ® This feature is only active in an Avaya Aura environment. The Collaboration Station provides a menu of precall features that you can apply to outgoing calls: • Call Unpark • Exclusion •... -
Page 76: Whisper Page
5. Enter the number of the contact. 6. Tap Audio Call if you are in the manual dial mode, or wait for the Collaboration Station to start the call. April 2016 Using Avaya H175 Video Collaboration Station Comments on this document? infodev@avaya.com... -
Page 77: Blocking And Unblocking Your Caller Information
• To make a call to a specific person in an intercom group: 1. Go to the Communication screen. 2. Tap New Conversation. 3. Tap Precall Features. April 2016 Using Avaya H175 Video Collaboration Station Comments on this document? infodev@avaya.com... -
Page 78: Making A Priority Call
Use the following procedure to unpark a call that you parked on another Collaboration Station. Procedure 1. Go to the Communication screen. 2. Tap New Conversation. 3. Tap Precall Features. 4. Tap Unpark Call. April 2016 Using Avaya H175 Video Collaboration Station Comments on this document? infodev@avaya.com... -
Page 79: Mid-Call Operations
Precall operations on page 75 Mid-call operations ® This feature is only active in an Avaya Aura environment. The Collaboration Station provides a menu of mid-call features that you can apply to active calls: • Automatic Call Back • Call Park •... -
Page 80: Muting And Unmuting A Call
Collaboration Station. You can park only one call at one time. Procedure 1. During the call, tap Mid Call Features. 2. Tap Unpark Call. Related links Mid-call operations on page 79 April 2016 Using Avaya H175 Video Collaboration Station Comments on this document? infodev@avaya.com... -
Page 81: Setting Auto Call Back
• To drop a person who is bridged on to a call: 1. During the call, tap Mid Call Features. 2. Tap Exclusion. Related links Bridged Call Appearance on page 94 April 2016 Using Avaya H175 Video Collaboration Station Comments on this document? infodev@avaya.com... -
Page 82: Extending A Call To Your Mobile Phone
When recording is active, the active call container header displays a Record icon. One Touch Recording is unavailable for bridged calls. Procedure • To record a call: 1. During the call, tap Mid Call Features. April 2016 Using Avaya H175 Video Collaboration Station Comments on this document? infodev@avaya.com... -
Page 83: Transferring A Call
1. During the call, tap Mid Call Features. 2. Tap Transfer to Voice Mail. 3. In the confirmation dialog box, tap Transfer. The Collaboration Station transfers the call and displays a confirmation message. April 2016 Using Avaya H175 Video Collaboration Station Comments on this document? infodev@avaya.com... -
Page 84: Outgoing Call Management
Making a call while on another call on page 89 Dialing modes The Avaya H175 Video Collaboration Station supports two dialing modes: • Manual: After you enter a number, you must manually start the call by tapping or pressing the appropriate button. You can: - Edit the number that you enter. -
Page 85: Audio And Video Calls
In the automatic dial mode, the Audio Call and Video Call buttons become unavailable as soon as you enter a digit. You cannot select the call media. The Collaboration Station uses the media that is selected as the default outgoing mode. April 2016 Using Avaya H175 Video Collaboration Station Comments on this document? infodev@avaya.com... -
Page 86: Making An Audio Call
• To make a call from the Contacts list, Favorites list, or Recents list: 1. Go to the Communication screen. 2. In the Launch Panel, tap Contacts, Favorites, or History. April 2016 Using Avaya H175 Video Collaboration Station Comments on this document? infodev@avaya.com... -
Page 87: Making A Video Call
4. Tap Video Call if you are in the manual dial mode, or wait for the Collaboration Station to start the call. Related links Outgoing call management on page 84 Video call management on page 105 Making an audio call on page 86 April 2016 Using Avaya H175 Video Collaboration Station Comments on this document? infodev@avaya.com... -
Page 88: Redialing A Number
3. When the contact answers the call, tap Merge. The Collaboration Station merges the calls and starts a conference. Calling the alternate number of a contact Procedure 1. Go to the Contacts screen. April 2016 Using Avaya H175 Video Collaboration Station Comments on this document? infodev@avaya.com... -
Page 89: Making A Call While On Another Call
Answering a call on page 90 Ignoring a call on page 91 Rejecting a call on page 91 Answering a call while on another call on page 91 April 2016 Using Avaya H175 Video Collaboration Station Comments on this document? infodev@avaya.com... -
Page 90: Incoming Call Panel
• Press Headset to receive the call on the headset. • Press the Call control button of the wireless headset or the wireless handset. • Lift up the wired handset. April 2016 Using Avaya H175 Video Collaboration Station Comments on this document? infodev@avaya.com... -
Page 91: Ignoring A Call
Monitoring features ® This feature is only available in an Avaya Aura environment. Use the monitoring features to view the status of other Collaboration Stations and perform actions such as calling or answering calls for the monitored station. The Collaboration Station provides the following monitoring features: •... -
Page 92: Navigating To The Monitored Extensions Screen
Collaboration Station. The Monitor button flashes when there is any activity on the monitored extension. Related links Call management on page 64 Navigating to the Monitored Extensions screen Procedure Related links Call management on page 64 April 2016 Using Avaya H175 Video Collaboration Station Comments on this document? infodev@avaya.com... -
Page 93: Monitored Extensions Screens
Monitored Extensions screens Single bridged appearance Number Name Description Direct Call Places a call to the primary extension. Communicatio The Communication screen of the primary extension. n screen April 2016 Using Avaya H175 Video Collaboration Station Comments on this document? infodev@avaya.com... -
Page 94: Bridged Call Appearance
• View the status of any non-idle bridge appearance of the primary extension. • Answer calls for a bridged call appearance. • Join an in-progress call on a bridged call appearance. April 2016 Using Avaya H175 Video Collaboration Station Comments on this document? infodev@avaya.com... -
Page 95: Answering A Call On A Bridged Call Appearance
Making a call from a Bridged Call Appearance Procedure 1. Go to the Monitored Extensions screen. 2. Tap the bridged extension from which you want to make the call. April 2016 Using Avaya H175 Video Collaboration Station Comments on this document? infodev@avaya.com... -
Page 96: Joining A Call On A Bridged Call Appearance
2. Tap Precall Features. 3. Tap Exclusion. • To drop a person who is bridged on to a call: 1. During the call, tap Mid Call Features. 2. Tap Exclusion. April 2016 Using Avaya H175 Video Collaboration Station Comments on this document? infodev@avaya.com... -
Page 97: Team Button
2. Tap Pickup of the monitored extension that has an incoming call you want to answer. Busy Indicator Use the Busy Indicator feature to view the idle or the busy status of a monitored station and to call that station. April 2016 Using Avaya H175 Video Collaboration Station Comments on this document? infodev@avaya.com... -
Page 98: Calling A Monitored Extension Whose Busy Status Is Tracked
Group Pickup feature type. Each Group Pickup has a separate row and includes the following information: • An icon for the Group Pickup feature • Status of the group • Action button Related links Call management on page 64 April 2016 Using Avaya H175 Video Collaboration Station Comments on this document? infodev@avaya.com... -
Page 99: Answering A Group Pickup Call
The Collaboration Station displays the Contact Details screen. 3. Tap Called party ringtone. 4. Select a ringtone. 5. Tap OK. Related links Call management on page 64 April 2016 Using Avaya H175 Video Collaboration Station Comments on this document? infodev@avaya.com... -
Page 100: Voice Mail
3. In the confirmation dialog box, tap Transfer. The Collaboration Station transfers the call and displays a confirmation message. Related links Voice mail on page 100 Transferring a call on page 83 April 2016 Using Avaya H175 Video Collaboration Station Comments on this document? infodev@avaya.com... -
Page 101: Chapter 5: Call Forwarding
Administering Avaya IP Office Platform Voicemail Pro. You can forward incoming calls to another phone number or to your voicemail. Avaya H175 Video Collaboration Station supports the following call forward features: • Send All Calls: Forwards all incoming calls to a preconfigured number that your administrator configured. -
Page 102: Activating And Deactivating Send All Calls
Use this procedure to forward calls to a specified number called the coverage number. Procedure • To activate Forward All Calls: 1. Go to the Settings screen. 2. Tap FEATURES > Call Forwarding > Forward all calls. April 2016 Using Avaya H175 Video Collaboration Station Comments on this document? infodev@avaya.com... -
Page 103: Activating And Deactivating Forward All Calls When Busy/No Answer
Activating and deactivating Enhanced Call Forward About this task Use Enhanced Call Forward to forward incoming calls to various destination numbers based on the call type and call state. April 2016 Using Avaya H175 Video Collaboration Station Comments on this document? infodev@avaya.com... - Page 104 2. To deactivate Enhanced Call Forward: a. Go to the Settings screen. b. Tap FEATURES > Call Forwarding > Enhanced forwarding > OFF. Related links Call forwarding on page 101 April 2016 Using Avaya H175 Video Collaboration Station Comments on this document? infodev@avaya.com...
-
Page 105: Chapter 6: Video Call Management
Avaya Scopia ® In an IP Office environment, video conference is supported through Avaya Scopia In a video call, you can view one of the following video windows: • Self-view Pane: Shows your video. The pane automatically activates when there is a change in the call state. -
Page 106: Video Call Container
If the Self-view Pane is selected and the outgoing video is: • Blocked, the Self-view Pane displays a semitransparent overlay on your video and the Video Blocked icon. Table continues… April 2016 Using Avaya H175 Video Collaboration Station Comments on this document? infodev@avaya.com... -
Page 107: Making A Video Call
3. Tap One-touch Video Dial of the contact. • To dial a contact: 1. Go to the Communication screen. 2. In the Launch Panel, tap Dial. 3. Enter the number in the Input Panel. April 2016 Using Avaya H175 Video Collaboration Station Comments on this document? infodev@avaya.com... -
Page 108: Adding Video To An Audio Call
Adding video to an audio call on page 108 Viewing video windows on an external monitor Before you begin Ensure that your Collaboration Station is connected to an external monitor. April 2016 Using Avaya H175 Video Collaboration Station Comments on this document? infodev@avaya.com... -
Page 109: Changing The Size And Location Of A Video Window
• To change the location of video windows in a conference call, tap Conference. 3. Tap the appropriate layout. Related links External monitor on page 57 Video call management on page 105 Video call container on page 106 April 2016 Using Avaya H175 Video Collaboration Station Comments on this document? infodev@avaya.com... -
Page 110: Chapter 7: Conferencing
• Audio and video conference through Avaya Aura Conferencing with up to 720p resolution (active-speaker). ® In an IP Office environment, video conference is supported through Avaya Scopia ® ® • Only audio conference through Avaya Aura Communication Manager in an Avaya Aura environment. - Page 111 You can revert to a point to point call by dropping the third participant. The following image shows a local three-way audio conference in survivability mode. April 2016 Using Avaya H175 Video Collaboration Station Comments on this document? infodev@avaya.com...
-
Page 112: Setting Up And Starting A Conference
About this task ® ® You can set up an audio or a video conference call with Avaya Scopia and Avaya Aura Conferencing. If you start a conference call, you become the moderator of the conference. As a moderator, you can control the conference features, such as locking the conference and muting all participants. -
Page 113: Removing A Participant From The Conference Setup
As a moderator you can control an active conference. The Collaboration Station provides the following conference controls: • Lecture mode: Mutes or unmutes all participants except for the moderator and presenter. April 2016 Using Avaya H175 Video Collaboration Station Comments on this document? infodev@avaya.com... -
Page 114: Viewing The Conference Roster
• Continuation: Enables or disables the continuation of the conference when the moderator drops off the conference. • Video: Enables or disables the use of video in the conference. ® This feature is only available in an Avaya Aura environment. • Record: Start or stops the conference recording. ®... -
Page 115: Adding A Participant To An Active Conference
You can drop any participant from an active conference in an IP Office environment. Procedure ® • To drop the last participant from an Avaya Aura Communication Manager conference: 1. Tap and hold the conference window until the Collaboration Station displays the participant control menu. - Page 116 Conferencing ® ® • To drop a participant from an Avaya Aura Conferencing or Avaya Scopia conference: 1. Tap Conference. 2. Tap and hold the required contact card until the Collaboration Station displays the participant control menu. 3. Tap Drop.
-
Page 117: Chapter 8: Contacts
123 Assigning a ringtone to a contact on page 124 Configuring presence tracking of a contact on page 125 Deleting a contact on page 125 April 2016 Using Avaya H175 Video Collaboration Station Comments on this document? infodev@avaya.com... -
Page 118: Navigating To The Contacts List
Contacts Navigating to the Contacts list Procedure Related links Contacts on page 117 April 2016 Using Avaya H175 Video Collaboration Station Comments on this document? infodev@avaya.com... -
Page 119: Contacts App Screen
Add or edit contacts from the following options: ® • Avaya Aura: Appears only in an Avaya Aura environment. • one-X Portal: Appears only in an IP Office environment. Table continues…... -
Page 120: Adding A Contact
• Directory Search • Accounts • Settings • Help ® This feature is only available in an Avaya Aura environment. Search Searches a contact. When you tap the Search bar, the system displays an active cursor with a keyboard. Related links... -
Page 121: Contact Field Descriptions
Email The email address of the contact. Address The address of the contact. ® This feature is only available in an Avaya Aura environment. Notes The notes for the contact. ® This feature is only available in an Avaya Aura environment. -
Page 122: Searching For A Contact
Setting directory search on or off on page 159 Viewing account-specific contacts About this task ® You can view contacts of a single account, such as Avaya Aura or Microsoft Exchange Server, or aggregated contacts from all accounts. Procedure 1. Go to the Contacts screen. -
Page 123: Sorting The Contacts List
1. Go to the Contacts screen. 2. Tap the required contact. The Collaboration Station displays the Contact Details screen. 3. Tap Menu > Edit. 4. Change the required details. April 2016 Using Avaya H175 Video Collaboration Station Comments on this document? infodev@avaya.com... -
Page 124: Assigning A Ringtone To A Contact
5. Select a ringtone. 6. Tap OK. Related links Contacts on page 117 Editing contact details on page 123 Configuring presence tracking of a contact on page 125 April 2016 Using Avaya H175 Video Collaboration Station Comments on this document? infodev@avaya.com... -
Page 125: Configuring Presence Tracking Of A Contact
2. Tap the required contact. The Collaboration Station displays the Contact Details screen. 3. Tap Menu > Delete. 4. In the confirmation box, tap Delete. Related links Contacts on page 117 April 2016 Using Avaya H175 Video Collaboration Station Comments on this document? infodev@avaya.com... -
Page 126: Chapter 9: Communications History
Changing communications history view on page 128 Removing communications history entry on page 129 Clearing communications history on page 129 Configuring communications history settings on page 129 April 2016 Using Avaya H175 Video Collaboration Station Comments on this document? infodev@avaya.com... -
Page 127: Navigating To The Recents List
Incoming video call Shows an incoming video call. Outgoing video call Shows an outgoing video call. Bridged audio call Shows a bridged call. This feature is only available in an Avaya ® Aura environment. Forwarded call Shows a forwarded call. This feature is only available in an ®... -
Page 128: Viewing Communications History
Shows a transferred call. This feature is only available in an ® Avaya Aura environment. Priority call Shows a priority call. This feature is only available in an Avaya ® Aura environment. Auto callback call Shows an auto call back call. This feature is only available in an ®... -
Page 129: Removing Communications History Entry
The Collaboration Station displays the communication history. 2. Tap Menu > Settings. 3. Select or clear the Log calls and Log bridged calls check boxes as required. April 2016 Using Avaya H175 Video Collaboration Station Comments on this document? infodev@avaya.com... -
Page 130: April 2016 Using Avaya H175 Video Collaboration Station
Communications history Related links Communications history on page 126 April 2016 Using Avaya H175 Video Collaboration Station Comments on this document? infodev@avaya.com... -
Page 131: Chapter 10: Calendar
Configuring the calendar settings on page 136 Calendar settings field descriptions on page 136 Viewing a calendar notification on page 137 Calling through click-to-dial on page 137 April 2016 Using Avaya H175 Video Collaboration Station Comments on this document? infodev@avaya.com... -
Page 132: Navigating To The Calendar Screen
Calendar Navigating to the Calendar screen Procedure Related links Calendar on page 131 Calendar app screen April 2016 Using Avaya H175 Video Collaboration Station Comments on this document? infodev@avaya.com... -
Page 133: Viewing Event Details
The Collaboration Station displays the New event window. 3. Enter the event details. 4. Tap Done on the upper-right corner of the screen. Related links Calendar on page 131 April 2016 Using Avaya H175 Video Collaboration Station Comments on this document? infodev@avaya.com... -
Page 134: Event Field Descriptions
The Collaboration Station displays a window with the appointment details. 3. Tap Delete on the upper-right corner of the window. The Collaboration Station displays the confirmation dialog box. April 2016 Using Avaya H175 Video Collaboration Station Comments on this document? infodev@avaya.com... -
Page 135: Changing Event Details
2. On the top-left corner, tap the view menu. 3. Tap to select from the following options: • Day • Week • Month • Agenda Related links Calendar on page 131 April 2016 Using Avaya H175 Video Collaboration Station Comments on this document? infodev@avaya.com... -
Page 136: Configuring The Calendar Settings
Specifies if the Collaboration Station displays the pop-up notification for an incoming event. Default reminder time Specifies the default reminder time. Related links Calendar on page 131 April 2016 Using Avaya H175 Video Collaboration Station Comments on this document? infodev@avaya.com... -
Page 137: Viewing A Calendar Notification
2. Tap the event to view the details. 3. Tap Connect. The Collaboration Station displays the Communication app to make the call. Related links Calendar on page 131 April 2016 Using Avaya H175 Video Collaboration Station Comments on this document? infodev@avaya.com... -
Page 138: Chapter 11: Presence
Chapter 11: Presence ® This feature is only available in an Avaya Aura environment. If your administrator enabled the Presence feature for your Collaboration Station, you can view your presence information in the Top bar. With the Presence feature, you can: •... -
Page 139: Changing Your Presence Status
4. Select one of the following options: • Yes: To track contact presence. • No: To not track contact presence. Related links Contacts on page 117 Presence on page 138 April 2016 Using Avaya H175 Video Collaboration Station Comments on this document? infodev@avaya.com... -
Page 140: Checking The Contact Presence
Collaboration Station displays all pending requests in the Presence Pending-Watcher-Requests panel. You can select from the following options: • Accept: To accept the tracking request. • Reject: To reject the tracking request. April 2016 Using Avaya H175 Video Collaboration Station Comments on this document? infodev@avaya.com... - Page 141 1. In the Top Bar, tap the Presence pending-watcher notification. The Collaboration Station displays the Presence Pending-Watcher-Requests panel. 2. Tap the appropriate option for the request. Related links Presence on page 138 April 2016 Using Avaya H175 Video Collaboration Station Comments on this document? infodev@avaya.com...
-
Page 142: Chapter 12: Browser
• BMP • H.264 AVC • VP8 • MPEG 4 • WAV Related links Navigating to the Browser screen on page 143 Opening the browser on page 143 April 2016 Using Avaya H175 Video Collaboration Station Comments on this document? infodev@avaya.com... -
Page 143: Navigating To The Browser Screen
Navigating to the Browser screen Procedure Related links Browser on page 142 Opening the browser Procedure 1. Go to the Home screen. 2. Tap Browser. Related links Browser on page 142 April 2016 Using Avaya H175 Video Collaboration Station Comments on this document? infodev@avaya.com... -
Page 144: Chapter 13: Sip Telephony
- Adding a contact to an active call with Avaya one-X Communicator. ® • Use Dual Tone Multi-Frequency (DTMF) to avail conference features with Avaya one-X Communicator. Group paging Using the group paging feature, you can make a call to a group of users that your administrator sets up for you. -
Page 145: Chapter 14: Configuration
153 Contacts settings on page 158 Configuring call logging on page 160 Setting screen lock time on page 161 Restarting the phone on page 161 April 2016 Using Avaya H175 Video Collaboration Station Comments on this document? infodev@avaya.com... -
Page 146: Navigating To The Settings Screen
The Collaboration Station displays the Account Settings screen. 6. Select the appropriate account options and tap Next. The Collaboration Station displays the message Your account is set up!. April 2016 Using Avaya H175 Video Collaboration Station Comments on this document? infodev@avaya.com... -
Page 147: Media Settings
Configuring the Ethernet settings on page 148 Ethernet settings field descriptions on page 148 Wi-Fi network on page 150 Connecting to a Wi-Fi network on page 150 April 2016 Using Avaya H175 Video Collaboration Station Comments on this document? infodev@avaya.com... -
Page 148: Selecting An Ethernet Or A Wi-Fi Network
6. To save the updates, quit the Settings app. Related links Wi-Fi and network settings on page 147 Ethernet settings field descriptions Name Description Interfaces Table continues… April 2016 Using Avaya H175 Video Collaboration Station Comments on this document? infodev@avaya.com... - Page 149 Specifies the maximum power for the PoE. Static IP settings Name Description IP Address Specifies the IP address. Netmask Specifies the netmask. Default router Specifies the default router. April 2016 Using Avaya H175 Video Collaboration Station Comments on this document? infodev@avaya.com...
-
Page 150: Wi-Fi Network
2. Tap WIRELESS & NETWORKS > Network > Wi-Fi. 3. Tap Add network in the upper-right corner of the screen. 4. In the Network SSID field, enter the network SSID. April 2016 Using Avaya H175 Video Collaboration Station Comments on this document? infodev@avaya.com... -
Page 151: Bluetooth
2. Tap WIRELESS & NETWORKS > Bluetooth. 3. Tap SEARCH FOR DEVICES. The Collaboration Station displays a list of all available Bluetooth devices. 4. Tap the device that you want to pair. April 2016 Using Avaya H175 Video Collaboration Station Comments on this document? infodev@avaya.com... -
Page 152: Renaming A Paired Bluetooth Device
Changing a connection profile Procedure 1. Go to the Settings screen. 2. Tap WIRELESS & NETWORKS > Bluetooth. 3. In the PAIRED DEVICES list, tap Settings for the required device. April 2016 Using Avaya H175 Video Collaboration Station Comments on this document? infodev@avaya.com... -
Page 153: Call Settings
• Recents: To redial a number from a list of recently dialed numbers. • One number: To redial the last dialed number. Related links Call settings on page 153 April 2016 Using Avaya H175 Video Collaboration Station Comments on this document? infodev@avaya.com... -
Page 154: Setting The Audio Path
• Switching only: Disables incoming call alerts on the headset. You can activate or deactivate the Call control button on the headset by pressing the Headset button on the Collaboration Station. Related links Call settings on page 153 April 2016 Using Avaya H175 Video Collaboration Station Comments on this document? infodev@avaya.com... -
Page 155: Setting The Dial Mode
About this task Use the procedure to select the outgoing call mode. Procedure 1. Go to the Settings screen. 2. Tap Call settings > Outgoing call mode. April 2016 Using Avaya H175 Video Collaboration Station Comments on this document? infodev@avaya.com... -
Page 156: Setting Video Call Output Display Mode
• Visual only: Provides a visual alert by blinking the Monitor button on the Navigation Panel. • Audible and Visual: Provides both audio alert and visual alert. Related links Call settings on page 153 April 2016 Using Avaya H175 Video Collaboration Station Comments on this document? infodev@avaya.com... -
Page 157: Configuring Automatic Gain Control
Setting the screen when all calls end or after login About this task Use this procedure to set the screen to be presented when all calls end or after login. April 2016 Using Avaya H175 Video Collaboration Station Comments on this document? infodev@avaya.com... -
Page 158: Contacts Settings
1. Go to the Settings screen. 2. Tap Contacts settings > Default contacts store. 3. Select from the following options: ® • Aura: Available only in an Avaya Aura environment. • one-X Portal: Available only in an IP Office environment. April 2016 Using Avaya H175 Video Collaboration Station Comments on this document? infodev@avaya.com... -
Page 159: Setting Directory Search On Or Off
3. Select from the following options: • First name Last name • Last name followed by comma and first name Related links Contacts settings on page 158 April 2016 Using Avaya H175 Video Collaboration Station Comments on this document? infodev@avaya.com... -
Page 160: Setting The Default Search Directory
2. Tap Call history. 3. Select or clear the Log calls and Log bridged calls check boxes to activate or deactivate call logging. Related links Configuration on page 145 April 2016 Using Avaya H175 Video Collaboration Station Comments on this document? infodev@avaya.com... -
Page 161: Setting Screen Lock Time
About this task Use this procedure when you make configuration-related changes to the phone. Procedure 1. Go to the Settings screen. 2. Tap Device and data reset > Reboot. April 2016 Using Avaya H175 Video Collaboration Station Comments on this document? infodev@avaya.com... -
Page 162: Chapter 15: Personalization
• To add a widget, tap the WIDGETS tab and tap and hold the widget. 3. Drag and drop the app or widget to the required launch panel. Related links Personalization on page 162 April 2016 Using Avaya H175 Video Collaboration Station Comments on this document? infodev@avaya.com... -
Page 163: Adjusting The Volume Settings
The following panel appears when you use the Volume button on your Collaboration Station. • Tap the settings icon to expand the panel and control the media volume. The Collaboration Stationdisplays the following panel. April 2016 Using Avaya H175 Video Collaboration Station Comments on this document? infodev@avaya.com... -
Page 164: Personalizing Ringtones
162 Personalizing ringtones Use this procedure for personalizing ringtones in your device. ® This feature is only available in an Avaya Aura environment. Procedure 1. Go to the Settings screen. 2. Tap DEVICE > Sound > CALL RINGTONES > Personalized ringing. -
Page 165: Personalizing The Notification Sound
2. Tap DEVICE > Sound. 3. Select or clear the Button clicks check box to turn the sound on or off. Related links Personalization on page 162 April 2016 Using Avaya H175 Video Collaboration Station Comments on this document? infodev@avaya.com... -
Page 166: Turning The Touch Sound On Or Off
1. Go to the Settings screen. 2. Tap DEVICE > Display > Brightness. 3. Tap and drag the slider bar to assign the required brightness. Related links Personalization on page 162 April 2016 Using Avaya H175 Video Collaboration Station Comments on this document? infodev@avaya.com... -
Page 167: Changing The Wallpaper
Changing the font size Procedure 1. Go to the Settings screen. 2. Tap DEVICE > Display > Font size. 3. Select from the following options: • Normal • Large April 2016 Using Avaya H175 Video Collaboration Station Comments on this document? infodev@avaya.com... -
Page 168: Changing The Date Format
1. Go to the Settings screen. 2. Tap SYSTEM > Date and time. 3. Select the Use 24–hour format check box. Related links Personalization on page 162 April 2016 Using Avaya H175 Video Collaboration Station Comments on this document? infodev@avaya.com... -
Page 169: Chapter 16: Troubleshooting
The video starts transferring to the external monitor only when you tap Extend To Monitor. Solution While in the call, tap Extend To Monitor. The base of the device is hot Condition The base of the device is hot. April 2016 Using Avaya H175 Video Collaboration Station Comments on this document? infodev@avaya.com... - Page 170 Troubleshooting Cause Avaya H175 Video Collaboration Stations generate more heat than other deskphones. This behavior is expected and within product safety standards (IEC 60950-1). The heat from the deskphone dissipates from the lower plastic cover and finally through the space between the rubber foot pads.
- Page 171 ............84 disable ................ Automatic Gain Control ............157 enable .................101 Avaya H175 Video Collaboration Station overview ..... Enhanced Call Forward ..........Forward All Calls ............Forward All Calls When Busy/No answer ....101 Send All Calls ............. backlight switch off .............167...
- Page 172 ............. container types .............. 30, setup ................112 contextual menu ..............start ................112 create event ............... view information ............114 customization ..............162 conference roster ...............114 conference setup ............... April 2016 Using Avaya H175 Video Collaboration Station Comments on this document? infodev@avaya.com...
- Page 173 Lock and Logout panel ............Forward All Calls When Busy/No Answer ......103 lock the Collaboration Station ..........Forward All Calls When Busy/No Answer activation and log in ..................deactivation ................103 April 2016 Using Avaya H175 Video Collaboration Station Comments on this document? infodev@avaya.com...
- Page 174 Priority Call ..............navigate Unblock Calling Party Info ..........Brower screen ............Unpark Call ..............78 Calendar screen ............Whisper Page ............... Communication screen ..........65 precall operations ..............April 2016 Using Avaya H175 Video Collaboration Station Comments on this document? infodev@avaya.com...
- Page 175 ............. 81, select the alternate number of a contact ......113 turn the button click sound on or off ........165 self-view window location change ........59, April 2016 Using Avaya H175 Video Collaboration Station Comments on this document? infodev@avaya.com...
- Page 176 ............Wi-Fi nework ..............150 wireless handset ............52, answer and end a call ...........56 charge battery ...............56 pair and re-pair ............. wireless handset layout ............April 2016 Using Avaya H175 Video Collaboration Station Comments on this document? infodev@avaya.com...
Need help?
Do you have a question about the H175 and is the answer not in the manual?
Questions and answers