Beurer BM 45 Instructions For Use Manual
Hide thumbs
Also See for BM 45:
- User manual ,
- Instructions for use manual (250 pages) ,
- Instructions for use manual (112 pages)
Table of Contents
Advertisement
Available languages
Available languages
BM 45
D Blutdruckmessgerät
Gebrauchsanweisung ......................................2 – 14
G Blood pressure monitor
Instructions for use ........................................15 – 26
F Tensiométre
Mode d'emploi ...............................................27 – 39
E Tensiómetro
Manual de instrucciones ...............................40 – 52
I Misuratore di pressione
Istruzioni per l'uso .........................................53 – 65
T Bilgisayarli tansiyon ölçer
Kullanım kılavuzu ........................................... 66 – 77
r Прибор для измерения кровяного давления в
плечевой артерии
Инструкция по применению .......................78 – 91
Q Ciśnieniomierz
Instrukcja obsługi ........................................92 – 104
Electromagnetic Compatibility Information
....105 – 107
Advertisement
Chapters
Table of Contents

Related Manuals for Beurer BM 45


Summary of Contents for Beurer BM 45
- Page 1 BM 45 D Blutdruckmessgerät Gebrauchsanweisung ........2 – 14 G Blood pressure monitor Instructions for use ........15 – 26 F Tensiométre Mode d’emploi ..........27 – 39 E Tensiómetro Manual de instrucciones .......40 – 52 I Misuratore di pressione Istruzioni per l’uso .........53 – 65 T Bilgisayarli tansiyon ölçer...
-
Page 2: Table Of Contents
Typschild des Geräts und des Zubehörs werden folgende Sym- und beachten Sie die Hinweise. bole verwendet: Mit freundlicher Empfehlung Vorsicht Ihr Beurer-Team 1. Kennenlernen Hinweis Überprüfen Sie das Gerät auf äußere Unversehrtheit der Verpa- Hinweis auf wichtige Informationen ckung und auf die Vollständigkeit des Inhalts. - Page 3 • Wenn Sie mehrere Messungen an einer Person durchführen Anwendungsteil Typ BF möchten, warten Sie zwischen den einzelnen Messungen jeweils 5 Minuten. • Mindestens 30 Minuten vor der Messung sollten Sie nicht Gleichstrom essen, trinken, rauchen oder sich körperlich betätigen. Entsorgung gemäß...
-
Page 4: Gebrauchsanweisung
• Verwenden Sie das Gerät nur bei Personen mit dem für das • Die Abschaltautomatik schaltet das Blutdruckmessgerät zur Gerät angegebenen Umfangbereich des Oberarmes. Schonung der Batterien aus, wenn innerhalb 3 Minuten keine • Beachten Sie, dass es während des Aufpumpens zu einer Taste betätigt wird. -
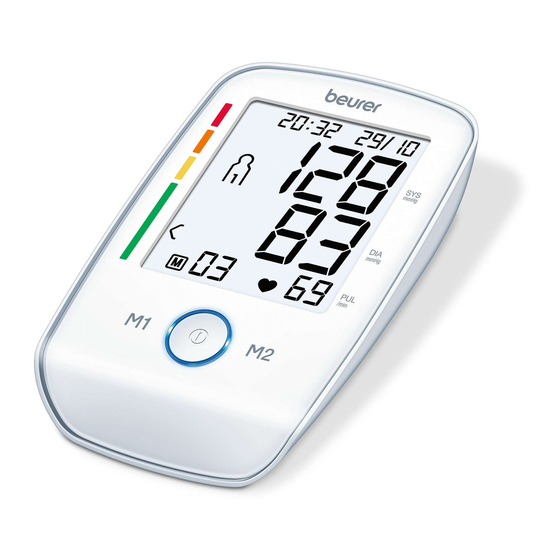
Page 5: Gerätebeschreibung
• Im Interesse des Umweltschutzes darf das Gerät am • Verschluckungsgefahr! Kleinkinder könnten Batterien Ende seiner Lebensdauer nicht mit dem Hausmüll verschlucken und daran ersticken. Daher Batterien für Klein- entfernt werden. Die Entsorgung kann über kinder unerreichbar aufbewahren! entsprechende Sammelstellen in Ihrem Land erfolgen. •... -
Page 6: Messung Vorbereiten
Anzeigen auf dem Display: Wenn das Symbol Batteriewechsel dauerhaft erscheint, ist keine Messung mehr möglich und Sie müssen alle Batterien 1. Datum / Uhrzeit erneuern. Sobald die Batterien aus dem Gerät entfernt werden, 2. Systolischer Druck müssen das Datum und die Uhrzeit neu eingestellt werden. Die 3. - Page 7 Im Display blinkt die Minutenzahl. • Halten Sie die START/STOPP-Taste für 5 Sekunden gedrückt. • Wählen Sie mit den Speichertasten M1/M2 Ihr gewünschte Minutenzahl und bestätigen • Wählen Sie mit den Speichertasten M1/ Sie mit der START/STOPP-Taste M2 Ihr gewünschtes Stundenformat und bestätigen Sie mit der START/STOPP- Betrieb mit dem Netzteil Taste...
-
Page 8: Blutdruck Messen
5. Blutdruck messen Wenn Sie die Messung am rechten Oberarm durchführen, befindet sich der Schlauch an der Innenseite Ihres Ellen- Bitte bringen Sie das Gerät vor der Messung auf Raum tem- bogens. Achten Sie darauf, dass Ihr Arm nicht auf dem pera tur. -
Page 9: Ergebnisse Beurteilen
• Sitzen Sie zur Blutdruckmessung bequem. Lehnen Sie Rü- • erscheint wenn die Messung nicht ord- cken und Arme an. Kreuzen Sie die Beine nicht. Stellen Sie nungsgemäß durchgeführt werden konnte. die Füße flach auf den Boden. Beachten Sie das Kapitel Fehlermeldung/ •... -
Page 10: Messwerte Abrufen Und Löschen
Dies kann ein Indikator für eine Arrhythmie sein. Arrhythmie ist normal und Diastole im Bereich Normal) dann zeigt Ihnen die eine Krankheit, bei der Herzrhythmus aufgrund von Fehlern im graphische Einteilung auf dem Gerät immer den höheren Be- bioelektrischen System, das den Herzschlag steuert, anormal reich an, im beschriebenen Beispiel „Hoch normal“. - Page 11 • Wählen Sie nach der Vollbildanzeige innerhalb 3 Se- • Drücken Sie die jeweilige Speichertaste (M1 oder M2). kunden mit der Speichertaste M1 oder M2 Ihren Im Display blinkt PM. gewünschten Benutzerspeicher ( Es wird der Durchschnittswert der letzten 7 Tage der Abend-Messungen angezeigt –...
-
Page 12: Gerät Und Manschette Reinigen Und Aufbewahren
Sie sich nicht bewegen oder sprechen. Setzen Sie gege- Alle Werte des gegenwärtigen Benutzerspei- benenfalls die Batterien neu ein oder ersetzen Sie diese. chers werden gelöscht. 10. Technische Angaben Modell-Nr. BM 45 M1501 8. Gerät und Manschette reinigen und Messmethode Oszillometrisch, nicht invasive Blut- aufbewahren... -
Page 13: Netzteil
100 – 240 V, 50 – 60 Hz Änderungen der technischen Angaben ohne Benachrichtigung Ausgang 6 V DC, 600 mA, nur in Verbindung mit sind aus Aktualisierungsgründen vorbehalten. Beurer Blutdruckmessgeräten • Dieses Gerät entspricht der europäischen Norm Hersteller Friwo Gerätebau GmbH EN60601-1-2 und unterliegt besonderen Vorsichtsmaßnah- Schutz Das Gerät ist doppelt schutzisoliert und... -
Page 14: Garantie
Garantie unberührt. Für Geltendmachung eines Garan- tiefalles innerhalb der Garantiezeit ist durch den Kunden der Nachweis des Kaufes zu führen. Die Garantie ist innerhalb eines Zeitraumes von 3 Jahren ab Kaufdatum gegenüber der Beurer GmbH, Ulm (Germany) geltend zu machen. -
Page 15: Getting To Know Your Instrument
Caution and observe the information they contain. Best regards, Note Your Beurer Team Note on important information 1. Getting to know your instrument Follow instructions for use Check that the device packaging has not been tampered with and make sure that all contents are present. - Page 16 • Repeat the measurement if you are unsure of the measured Disposal in accordance with EC Directive value. – WEEE (Waste Electrical and Electronic • The measurements taken by you are for your information Equipment). only – they are not a substitute for a medical examination! Manufacturer Discuss the measurements with your doctor, and never base any medical decisions on them (e.g.
- Page 17 • During the blood pressure measurement, blood circulation Storage and Care must not be stopped for an unnecessarily long time. If the • The blood pressure monitor is made up of precision electron- device malfunctions, remove the cuff from the arm. ic components.
-
Page 18: Device Description
3. Device description • If the device is not to be used for a long period, take the bat- teries out of the battery compartment. • Use identical or equivalent battery types only. • Always replace all batteries at the same time. •... -
Page 19: Preparing The Measurement
Information on the display: If the battery replacement symbol is permanently dis- played, you can no longer perform any measurements and 1. Date / time must replace all batteries. Once the batteries have been 2. Systolic pressure removed from the device, the date and time must be set again. 3. - Page 20 The minute flashes on the display. • Press and hold the Start/stop button 5 seconds. • Choose the desired minute with the M1/ M2 memory buttons and confirm with the • Choose the desired hour format with the Start/stop button M1/M2 memory buttons and confirm with the Start/stop button Operation with the mains part...
-
Page 21: Measuring Blood Pressure
5. Measuring blood pressure If the measurement is performed on the right upper arm, the line should be located on the inside of your elbow. En- Please ensure the device is at room temperature before meas- sure that your arm is not pressing on the line. uring. -
Page 22: Evaluating Results
• In order not to distort the result, it is important to keep still • Now select the desired user memory by pressing the during the measurement and not talk. M1 or M2 memory buttons. If you do not select a user memory, the measurement is stored in the most Performing the blood pressure measurement recently used user memory. -
Page 23: Displaying And Deleting Measurements
Repeat the measurement if the flashing icon is displayed Blood pressure Systole Diastole Action after the measurement. Please note that you should rest for value category (in mmHg) (in mmHg) 5 minutes between measurements and not talk or move dur- Setting 2: 160 –... -
Page 24: Cleaning And Storing The Device And Cuff
– To view the measurements for user memo- • When the relevant memory button (M1 or ry , press the M2 memory button. M2) is pressed again, the last individual measurement is displayed (in this example, Your last measurement will appear on the measurement 03). -
Page 25: Rectifying Faults
10. Specifications and/or pump pressure Accessories Instruction for use, 4 x 1.5 V AA batter- Model no. BM 45 ies, storage pouch Type M1501 Classification Internal supply, IPX0, no AP or APG, Measurement... -
Page 26: Mains Part
Precise instructions for checking accuracy may be requested from the service address. 11. Mains part Model no. FW 7575M/EU/6/06 Input 100 – 240 V, 50 – 60 Hz Output 6 V DC, 600 mA, only in connection with beurer blood pressure monitor. Supplier Friwo Gerätebau GmbH... -
Page 27: Premières Expériences
Avec nos sentiments dévoués Attention Beurer et son équipe 1. Premières expériences Remarque Vérifiez si l’emballage extérieur de l’appareil est intact et si tous Ce symbole indique des informations les éléments sont inclus. - Page 28 • Avant toute mesure, reposez-vous environ 5 minutes ! Appareil de type BF • Lorsque vous devez effectuer plusieurs mesures sur une personne, patientez à chaque fois 5 minutes entre chaque mesure. Courant continu • Évitez de manger, boire, fumer ou d’exercer des activités Élimination conformément à...
-
Page 29: Mode D'emploi
• Le tensiomètre ne doit pas être utilisé parallèlement à un • L’arrêt automatique permet de faire passer le tensiomètre en appareil chirurgical haute fréquence. mode économie d’énergie lorsqu’aucune touche n’est mani- • Utilisez uniquement l’appareil sur des personnes dont le pulée pendant un délai de 3 minutes. - Page 30 • Les réparations doivent être effectuées uniquement par le Remarques relatives aux piles service après-vente ou des revendeurs agréés. Cependant • Si du liquide de la cellule de pile entre en contact avec la avant de faire une réclamation, contrôlez d’abord les piles et peau ou les yeux, rincez la zone touchée avec de l’eau et changez-les, le cas échéant.
-
Page 31: Description De L'appareil
3. Description de l’appareil Données affichées à l’écran : 1. Date / heure 2. Pression systolique 3. Pression diastolique 4. Valeur du pouls mesurée mmHg 5. Symbole Pouls 6. Dégonflage (flèche) mmHg 7. Numéro de l’emplace- /min ment de sauvegarde/ valeur moyenne de l’affichage de la mémoire ( ), matin (... - Page 32 • Refermez soigneusement le couvercle du compartiment à • Maintenez la touche MARCHE/ARRÊT piles. enfoncée pendant 5 secondes. Si le symbole de changement des piles apparaît en • À l’aide des touches de mémoire M1/M2, continu, il n’est plus possible d’effectuer de mesure et vous sélectionnez le format d’heure que vous devez changer toutes les piles.
-
Page 33: Mesure De La Tension Artérielle
5.1 Mise en place du brassard Les minutes clignotent à l’écran Posez le brassard autour du bras • À l’aide des touches de mémoire M1/M2, gauche nu. L’irrigation sanguine du sélectionnez le nombre de minutes souhai- bras ne doit pas être entravée par des tées et confirmez avec la touche MARCHE/ vêtements trop serrés ou toute autre ARRÊT... - Page 34 La tension peut être différente entre le bras droit et le gauche, • Pour ne pas fausser le résultat de la mesure, il est important les valeurs de tension mesurées peuvent donc également être de rester calme pendant la mesure et de ne pas parler. différentes.
-
Page 35: Evaluation Des Résultats
Ce symbole peut indiquer une arythmie. L’arythmie est une • s’affiche lorsque la mesure n’a pas pathologie lors de laquelle, du fait de défauts dans le système pu être effectuée correctement. Lisez le bioélectrique commandant les battements du cœur, le rythme chapitre Message d’erreur/Résolution des cardiaque est anormal. -
Page 36: Récupérer Et Supprimer Les Valeurs De Mesure
et diastole en plage « normale »), la graduation graphique • Après l’affichage en plein écran, sélectionnez la mé- indique toujours la plage la plus haute sur l’appareil, à savoir moire utilisateur voulue dans un délai de 3 secondes « normale haute » dans le présent exemple. avec la touche mémoire M1 ou M2 ( Plage des valeurs Systole... -
Page 37: Nettoyage Et Rangement De L'appareil Et De La Manchette
• Appuyez sur la touche mémoire correspondante (M1 • Pour effacer tous les enregistrements d’une mémoire ou M2). utilisateur donnée, sélectionnez d’abord une mémoire utilisateur. PM clignote à l’écran. La valeur moyenne des mesures du soir des • Démarrez la consultation des mesures individuelles. 7 derniers jours est affichée (soir : 18h00 –... -
Page 38: Fiche Technique
1050 hPa admissibles 10. Fiche technique Alimentation 4 x 1,5 V piles AA N° du modèle BM 45 électrique Type M1501 Durée de vie des Environ 250 mesures, selon le niveau de Mode de mesure Mesure de la tension artérielle au bras, piles tension artérielle ainsi que la pression de... -
Page 39: Adaptateur
Entrée 100 – 240 V, 50 – 60 Hz Sortie 6 V DC, 600 mA, uniquement en associa- tion avec les lecteurs de tension artérielle Beurer. Fabricant Friwo Gerätebau GmbH Protection L’appareil dispose d’une isolation double et d’un protecteur thermique primaire mettant l’appareil hors tension en cas de défaut. -
Page 40: Conocer El Aparato
Les saluda cordialmente ¡Atención! Su equipo Beurer 1. Conocer el aparato Indicación Compruebe que el envoltorio del aparato esté intacto y que su Indicación de información importante contenido esté... - Page 41 • Si desea realizar más de una medición en una misma perso- Pieza de aplicación tipo BF na, espere entre medición y medición 5 minutos. • No coma, ni beba, ni fume, ni realice esfuerzos físicos durante un mínimo de 30 minutos antes de realizar la medición. Corriente continua •...
- Page 42 • Tenga en cuenta que durante el inflado puede sufrir cierta • Este aparato solo está diseñado para el fin descrito en estas limitación funcional en la extremidad en cuestión. instrucciones de uso. Por lo tanto, el fabricante declinará • La medición de la presión sanguínea no debe interrumpir la toda responsabilidad por los daños y perjuicios debidos a un circulación sanguínea más tiempo del necesario.
-
Page 43: Descripción Del Aparato
• Si se derrama el líquido de una pila, póngase guantes pro- aparatos eléctricos y electrónicos (RAEE). Para más tectores y limpie el compartimento de las pilas con un paño información, póngase en contacto con la autoridad seco. municipal competente en materia de eliminación de •... -
Page 44: Preparar La Medición
Indicaciones en la pantalla: • Vuelva a cerrar la tapa del compartimento para pilas con cuidado. 1. Fecha / hora 2. Presión sistólica Cuando el símbolo de cambio de pilas se muestra conti- 3. Presión diastólica nuamente, no se pueden seguir realizando mediciones y se de- 4. - Page 45 Si mantiene pulsada la tecla de memorización M1 o M2, El indicador de la hora parpadea en la podrá ajustar los valores con mayor rapidez. pantalla. • Mantenga pulsada la tecla de inicio/parada • Seleccione con las teclas de memorización durante 5 segundos.
-
Page 46: Medir La Presión Sanguínea
ción, el tensiómetro perderá la fecha y la hora. Sin embargo, Conecte el tubo del manguito a la los valores de medición almacenados se conservan. conexión respectiva en el aparato 5. Medir la presión sanguínea Espere a que el aparato esté a temperatura ambiente para realizar la medición. - Page 47 • Repose unos 5 minutos antes de iniciar la medición. De lo La presión de aire del brazalete disminuye lentamente. contrario, pueden producirse desviaciones. Cuando se detecta una tendencia a la tensión alta, se • Usted puede llevar a cabo la medición sentado o tendido. En vuelve a bombear aire y aumenta de nuevo la presión del todo caso es necesario observar que el brazalete se encuen- brazalete.
-
Page 48: Evaluar Los Resultados
Estos valores estándar sirven únicamente como referencia, • ¡Espere al menos 5 minutos para hacer dado que la presión arterial individual varía según la persona y una nueva medición! el grupo de edad. Es importante que consulte periódicamente a su médico, que le informará... -
Page 49: Consultar Y Borrar Los Valores Medidos
Rango de los Sístole Diástole Medida • Pulse la tecla de memorización correspondiente (M1 o valores de la (en mmHg) (en mmHg) M2). presión arterial Si ha seleccionado el registro de usuario1, deberá Normal 120 – 129 80 – 84 Haga un se- pulsar la tecla de memorización M1. -
Page 50: Limpiar Y Guardar La Unidad Y El Brazalete
• Mantenga pulsadas las dos teclas de memorización pilas o sustitúyalas. M1 & M2 durante 5 segundos. 10. Especificaciones técnicas Se borran todos los valores del registro de N.º de modelo BM 45 usuario actual. Tipo M1501 Método de me- Oscilométrico, medición no invasiva de la dición... -
Page 51: Manual De Instrucciones
Reservado el derecho a realizar modificaciones de los datos Precisión de la sistólica ± 3 mmHg, diastólica ± 3 mmHg, técnicos sin previo aviso por razones de actualización. indicación pulso ± 5 % del valor indicado • Este aparato cumple con la norma europea EN60601-1-2 y Inexactitud de la La desviación estándar máxima según ensa- está... -
Page 52: Adaptador
FW 7575M/EU/6/06 Entrada 100 – 240 V, 50 – 60 Hz Salida 6 V DC, 600 mA, solamente en combinación con los tensiómetros Beurer. Fabricante Friwo Gerätebau GmbH Protección El aparato está provisto de un doble aisla- miento de protección y de un termofusible en su cara principal, que desconecta el aparato de la red en caso de avería. -
Page 53: Note Introduttive
Attenzione Cordiali saluti Il Suo team Beurer Avvertenza 1. Note introduttive Indicazione di importanti informazioni Controllare l’integrità esterna della confezione e del contenuto. - Page 54 • Per effettuare più misurazioni su una stessa persona, atten- Parte applicativa tipo BF dere 5 minuti tra una misurazione e l’altra. • Evitare di mangiare, bere, fumare o praticare attività fisica almeno nei 30 minuti precedenti alla misurazione. Corrente continua •...
-
Page 55: Istruzioni Per L'uso
• Tenere conto che durante il pompaggio può verificarsi una • L’apparecchio è concepito solo per l’uso descritto nelle pre- riduzione delle funzioni dell’arto interessato. senti istruzioni per l’uso. Il produttore non risponde di danni • La misurazione delle pressione non deve impedire la circo- causati da un uso inappropriato o non conforme. -
Page 56: Descrizione Dell'apparecchio
6. Pulsanti per la memorizzazione M1/M2 • Le riparazioni devono essere eseguite esclusivamente dal 7. Pulsante START/STOP servizio assistenza di Beurer o da ri-venditori autorizzati. 8. Scala per la classificazione dei risultati di misurazione Prima di ogni reclamo verificare in primo luogo lo stato delle 9. -
Page 57: Preparazione Della Misurazione
Indicatori sul display: • Richiudere attentamente il coperchio del vano batterie. 1. Data / Ora Quando l’icona di sostituzione delle batterie è fissa, non 2. Pressione sistolica è più possibile effettuare alcuna misurazione ed è necessario 3. Pressione diastolica cambiare tutte le batterie. Quando le batterie vengono rimosse 4. - Page 58 • Tenere premuto il pulsante START/STOP Sul display lampeggia il numero dell'ora. per 5 secondi. • Con i pulsanti per la memorizzazione M1/ • Con i pulsanti per la memorizzazione M1/ M2 selezionare il numero dell'ora deside- M2 selezionare il formato dell'ora deside- rato e confermare con il pulsante START/ rato e confermare con il pulsante START/ STOP...
-
Page 59: Misurazione Della Pressione Sanguigna
5. Misurazione della pressione sanguigna Inserire quindi il flessibile del bracciale nell’attacco della spina del bracciale. Prima della misurazione portare l’apparecchio a temperatura ambiente. La misurazione può essere eseguita sul braccio destro o sinistro. Se si esegue la misurazione sul braccio destro, il tubo si 5.1 Applicare il bracciale trova all’interno del gomito. - Page 60 • La misurazione può essere eseguita da seduti o sdraiati. Ad • Vengono visualizzati i valori misurati per ogni modo controllare che il bracciale si trovi all’altezza del pressione sistolica e diastolica e battito cuore. L’avambraccio va appoggiato in modo che il bracciale cardiaco.
-
Page 61: Valutare I Risultati
6. Valutare i risultati Il grafico a barre sul display e la scala graduata sul misuratore di pressione indicano la classe nella quale rientra la pressione Aritmie cardiache: misurata. questo apparecchio è in grado di identificare disfunzioni ritmi- Nel caso in cui il valore sistolico e quello diastolico rientrino in che del battito cardiaco durante la misurazione ed, eventual- due classi diverse (ad es. -
Page 62: Ricerca E Cancellazione Dei Valori Misurati
7. Ricerca e cancellazione dei valori misurati • Premere il pulsante per la memorizzazione corrispon- dente (M1 o M2). Gli esiti di ogni misurazione corretta vengono memoriz- Sul display lampeggia l'indicazione AM. zati con data e ora. Quando i dati misurati superano le 60 Viene visualizzato il valore medio degli ultimi unità, vengono eliminati i dati più... -
Page 63: Pulizia E Conservazione Dell'apparecchio E Del Manicotto
In questi casi ripetere la misurazione. Verificare che il tubo del manicotto sia inserito correttamente, non muoversi e non par- lare. Se necessario reinserire le batterie o sostituirle. 10. Dati tecnici Codice BM 45 Tipo M1501 8. Pulizia e conservazione dell’apparecchio e Metodo di... -
Page 64: Adattatore
Ai fini dell’aggiornamento i dati tecnici sono soggetti a modifi- Uscita 6 V DC, 600 mA, solo in abbinamento che senza preavviso. con sfigmomanometri Beurer. • L’apparecchio è conforme alla norma europea EN60601-1-2 Produttore Friwo Gerätebau GmbH e necessita di precauzioni d’impiego particolari per quanto riguarda la compatibilità... - Page 65 Protezione L’apparecchio dispone di un doppio iso- lamento di protezione ed è equipaggiato di un fusibile termico sul lato primario che, in caso di guasto, separa l’apparec- chio dalla rete. Prima di utilizzare l’adattatore, assicurar- si che le batterie siano state rimosse dal loro vano.
-
Page 66: Tanıtım
Cihazın ve aksesuarların kullanım kılavuzunda, ambalajında ve model etiketinde aşağıdaki semboller kullanılır: Dostane tavsiyelerimizle Beurer Müessesesi Dikkat 1. Tanıtım Cihazı kontrol ederek karton ambalajın dıştan hasar görmemiş... - Page 67 • Bir kişide birden fazla ölçüm yapmak istiyorsanız, ölçümler Uygulama parçası tip BF arasında 5 dakika bekleyin. • Ölçüme en az 30 dakika kala yememeli, içmemeli, sigara kullanmamalı veya fiziksel egzersiz yapmamalısınız. Doğru akım • Ölçülen değerler ile ilgili şüpheniz varsa, ölçümü tekrarlayın. Elektrikli ve elektronik eski cihazlarla ilgili •...
- Page 68 • Kan dolaşımı, tansiyon ölçümü nedeniyle gereğinden uzun Muhafaza, bakım ve koruma ile ilgili bilgiler kısıtlanmamalıdır. Aletin hatalı çalışması durumunda, manşeti • Tansiyon cihazı, hassas ve elektronik ünitelerden oluşmak- koldan çıkarın. tadır. Ölçüm değerlerinin doğruluğunun ve hassaslığının yanı • Manşet hortumunun mekanik olarak sıkışmasını, ezilmesini sıra, cihazın ömrü...
-
Page 69: Cihaz Açıklaması
• Cihaz, kendiniz tarafından onarılmamalı veya kalibre edil- memeli, yani ayarlanmamalıdır. Aksi halde cihazın kusursuz çalışması garanti edilemez. • Onarımlar sadece Beurer yetkili servisi veya yetkili satıcılar ta- 1. Manşet rafından yapılmalıdır. Fakat her reklamasyondan önce, yine de 2. Manşet hortumu ilk olarak pilleri kontrol ediniz ve gerekirse bunları... -
Page 70: Ölçüme Hazırlık
4. Ölçüme hazırlık Ekrandaki göstergeler: 1. Tarih / Saat Pillerin takılması 2. Sistolik tansiyon • Cihazın arka tarafındaki pil böl- 3. Diyastolik tansiyon mesinin kapağını çıkarın. 4. Tespit edilen nabız • Dört adet tip 1,5 V AA (Alkaline değeri tip LR 06) pil yerleştirin. Pilleri 5. - Page 71 Saat formatı, tarihin ve saatin ayarlanması Saat formatı olarak 12h ayarlandığında gün ve ay Bu menüde aşağıdaki fonksiyonlar sırayla ayarlanabilir. göstergelerinin sırası değişir. Saat biçimi Tarih Saat ➔ ➔ Ekranda saat göstergesi yanıp söner. • Hafıza düğmeleri M1/M2 ile istediğiniz Tarihi ve saati mutlaka ayarlamalısınız.
-
Page 72: Tansiyonun Ölçülmesi
5. Tansiyonun ölçülmesi Sol ve sağ kol arasındaki tansiyon farklı olabilir, dolayısıyla ölçülen tansiyon değerleri de farklı olabilir. Ölçümü her zaman Lütfen cihazı ölçümden önce oda sıcaklığına getiriniz. aynı kolda yapın. Ölçümü sol veya sağ kolda yapabilirsiniz. İki kol arasındaki değerler çok farklıysa ölçümü hangi kolunuz- 5.1 Manşetin takılması... -
Page 73: Sonuçların Değerlendirilmesi
Tansiyon ölçümünü gerçekleştirme • Tansiyon ölçme cihazını BAŞLAT/DURDUR düğmesi kapatın. Böylece ölçüm sonucu, seçilmiş olan Manşeti yukarıda açıklandığı gibi takın ve ölçümü gerçek- kullanıcı hafızasına kaydedilmiş olur. leştirmek istediğiniz duruşa geçin. Cihazı kapatmayı unutursanız, cihaz yaklaşık 3 dakika • Tansiyon ölçüm cihazını çalıştırmak için sonra otomatik olarak kapanır. -
Page 74: Ölçüm Değerlerini Çağırma Ve Silme
göre kendi kendinizi diyagnoz etmeniz ve tedavi etmeniz tehli- Tansiyon Sistol Diyastol Önlem keli olabilir. Doktorunuzun talimatlarına kesinlikle uyunuz. değerlerinin aralığı (mmHg (mmHg olarak) olarak) Ölçüm sonuçları kademelendirmesi Normal 120 – 129 80 – 84 Kendi kendine Ölçümler aşağıdaki tabloda kademelendirilip değerlendirilebilir. kontrol Bu standart değerler yalnız genel kılavuz değer niteliğindedir, çünkü... -
Page 75: Cihazın Ve Manşetin Temizlenmesi Ve Saklanması
• İlgili hafıza düğmesine (M1 veya M2) basın. • İlgili hafıza düğmesine (M1 veya M2) tekrar basarsanız ölçtüğünüz münferit ölçüm değerlerine bakabilirsiniz. Kullanıcı hafızası 1'i seçtiyseniz M1 hafıza düğmesine basın. • Cihazı yeniden kapatmak için BAŞLAT/DURDUR düğ- Kullanıcı hafızası 2'yi seçtiyseniz M2 hafıza düğme- mesine basın. -
Page 76: Hata Giderilmesi
ğine veya şişirme basıncına göre 10. Teknik bilgiler Aksesuarlar Kullanım kılavuzu, 4 x 1,5 V AA pil, Saklama çantası Model no. BM 45 Sınıflandırma Dahili besleme, IPX0, AP veya APG yok, M1501 devamlı kullanım, uygulama parçası tip BF Ölçüm yöntemi Üst koldan, osilometrik, invazif olmayan... -
Page 77: Adaptör
11. Adaptör Model no. FW 7575M/EU/6/06 Giriş 100 – 240 V, 50 – 60 Hz Çıkış 6 V DC, 600 mA, sadece Beurer tansiyon ölçme cihazı ile birlikte kullanılır. Üretici Friwo Gerätebau GmbH Koruma Cihazın çift koruyucu izolasyonu vardır ve bir hata durumunda cihazın elektrik şebe-... -
Page 78: Ознакомление
ее прочитать и другим пользователям и строго следуйте Пояснения к символам приведенным в ней указаниям. В инструкции по применению, на упаковке и на типовой С дружескими пожеланиями сотрудники компании Beurer табличке прибора и принадлежностей используются следу- 1. Ознакомление ющие символы: Убедитесь... - Page 79 Соблюдайте инструкцию по применению Указания по применению • Для сравнительного анализа данных всегда измеряй- те свое артериальное давление только в определенные Аппликатор типа BF часы. • Отдыхайте в течение 5 минут перед каждым измерением! Постоянный ток • При проведении нескольких сеансов измерения у одного пользователя...
- Page 80 надзор или они получили инструкции по использованию • Во избежание дальнейших повреждений не кладите ман- прибора. Необходимо следить за детьми и не разрешать жету поверх ран. им играть с прибором. • Накладывайте манжету только на запястье. Не наклады- • Заболевания системы кровообращения могут привести вайте...
- Page 81 – Используйте только входящие в объем поставки или Указания по ремонту и утилизации оригинальные запасные манжеты. В противном случае • Батарейки запрещается выбрасывать в бытовой мусор. получаются неверные результаты измерений. Утилизируйте использованные батарейки через соответ- • Если Вы длительное время не пользуетесь прибором, ствующий...
-
Page 82: Описание Устройства
3. Описание устройства Индикация на дисплее: 1. Дата / время 2. Систолическое давление 3. Диастолическое давление mmHg 4. Измеренное значение пульса mmHg 5. Символ пульса /min 6. Выпуск воздуха (стрелка) 7. Номер ячейки памяти/индикация среднего значения из 1. Манжета сохраненных в памяти ( ), утром ( ), вечером... - Page 83 ной полярностью в соответствии с маркировкой. Не ис- В обязательном порядке необходимо установить дату пользуйте заряжаемые аккумуляторы. и время. Это позволит правильно сохранять в памяти • Снова тщательно закройте крышку отделения для бата- результаты измерения с их датой и временем, а затем вы- реек.
-
Page 84: Измерение Кровяного Давления
измерения артериального давления удаляются. Однако На дисплее замигают часы. сохраненные результаты измерения остаются в памяти • С помощью кнопок сохранения M1/M2 прибора. выберите нужное количество часов и 5. Измерение кровяного давления подтвердите выбор нажатием кнопки START/STOP Пожалуйста, перед измерением храните прибор при ком- натной... - Page 85 Наденьте теперь соединительную 5.2 Принять правильное положение трубку манжеты на штуцер манжеты. Если измерение выполняется на правом плече, шланг должен находиться на внутренней стороне локтя. Про- • Перед каждым измерением расслабляйтесь в течение следите за тем, чтобы рука не лежала на шланге. около...
-
Page 86: Оценка Результатов
Манжета накачивается автоматически. • Выключите прибор для измерения артериального давления, нажав кнопку START/STOP . Таким Измерение можно прервать в любое время нажа- образом в выбранной пользовательской памяти со- тием кнопки START/STOP хранится результат измерения. Давление воздуха в манжете медленно снижается. Если... - Page 87 боре всегда будет отображать более высокие пределы, как Повторите измерение, если пиктограмма появляется в описанном примере: «высокое в допустимых пределах». на дисплее после измерения. Учтите, что перед измерени- ем Вы должны 5 минут отдохнуть, а во время измерения Диапазон Систолическое Диастолическое Рекомендуемые значений...
-
Page 88: Просмотр И Удаление Результатов Измерения
7. Просмотр и удаление результатов • Нажмите соответствующую кнопку сохранения (M1 измерения или M2). Если выбрана пользовательская память1, нажми- Результаты каждого успешного измерения сохраня- те кнопку сохранения M1. ются с указанием даты и времени измерения. Когда Если выбрана пользовательская память2, нажми- количество... -
Page 89: Очистка И Хранение Прибора И Манжеты
8. Очистка и хранение прибора и манжеты • При повторном нажатии соответству- • Производите очистку прибора и манжеты с осторожно- ющей кнопки сохранения (M1 или M2) стью. Используйте только слегка увлажненную салфетку. на дисплее о отобразится результат • Не используйте чистящие средства или растворители. последнего... -
Page 90: Технические Данные
10. Технические данные Электропи- 4 x 1,5 В батарейки типа AA тание Модель № BM 45 Срок службы Для ок. 250 измерений, в зависимости от Тип M1501 батареек высоты кровяного давления или давления Метод Осциллометрическое, неинвазивное измере- накачивания измерения ние кровяного давления в плечевой артерии... -
Page 91: Гарантия
бования к электромеханическим системам измерения Фирма-изготовитель: Бойрер Гмбх, артериального давления) и IEC80601-2-30 (медицинские Софлингер штрассе 218, электрические приборы, часть 2 – 30: особые предписа- 89077-УЛМ, Германия ния по обеспечению безопасности, включая основные Фирма-импортер: OOO БОЙРЕР, 109451 г. Москва, особенности производительности автоматизированных ул. -
Page 92: Zapoznanie
W instrukcji obsługi, na opakowaniu i tabliczce znamionowej urządzenia oraz akcesoriów znajdują się następujące symbole: Z poważaniem, Zespół firmy Beurer Uwaga 1. Zapoznanie Urządzenie należy sprawdzić pod kątem zewnętrznych uszko- Wskazówka dzeń... - Page 93 • Przed każdym pomiarem odpocznij ok. 5 minut. Część aplikacyjna typ B F • Jeśli chcesz wykonać kilka pomiarów u jednej osoby, zacho- waj 5-minutowe przerwy między pomiarami. • Na co najmniej 30 minut przed wykonaniem pomiaru nie Prąd stały należy jeść, pić, palić...
- Page 94 • Podczas pompowania urządzenia może dojść do zaburzenia Wskazówki do przechowywania i pielęgnacji sprawności danej kończyny. • Aparat do mierzenia ciśnienia krwi składa się z podzespo- • Nie wolno zakłócać cyrkulacji krwi przez zbyt długi pomiar łów precyzyjnych i elektronicznych. Dokładność wartości ciśnienia.
-
Page 95: Opis Urządzenia
5. Wyświetlacz • Naprawy mogą być przeprowadzane jedynie przez serwis 6. Przyciski pamięci M1/M2 firmy Beurer lub autoryzowany serwis dystrybutora sprzętu. 7. Przycisk START/STOP Przed złożeniem reklamacji sprawdzić najpierw baterie i w 8. Skala klasyfikacji wyników pomiarów razie potrzeby wymienić... -
Page 96: Przygotowanie Do Pomiaru
Informacje na wyświetlaczu: Po wyświetleniu symbolu wymiany baterii nie będzie już można zmierzyć ciśnienia. Należy wymienić wszystkie baterie. Po 1. Data i godzina wyjęciu baterii z urządzenia konieczne jest ponowne ustawienie 2. Ciśnienie skurczowe daty i godziny. Zapisane wyniki pomiarów nie zostaną utracone. 3. - Page 97 • Przytrzymaj przyciśnięty przez 5 sekund Na wyświetlaczu zacznie migać wskazanie przycisk START/STOP godziny. • Za pomocą przycisków pamięci M1/M2 • Za pomocą przycisków pamięci M1/M2 wybierz żądany format godziny i potwierdź wybierz żądana liczbę godzin i potwierdź za pomocą przycisku START/STOP za pomocą...
-
Page 98: Pomiar Ciśnienia Krwi
5. Pomiar ciśnienia krwi W przypadku przeprowadzania pomiaru na prawym ramie- niu, wąż znajduje się po stronie wewnętrznej łokcia. Zwróć Przed rozpoczęciem pomiaru należy doprowadzić urządzenie uwagę, aby ramię nie znajdowało się na wężu. do temperatury pokojowej. Dzięki temu będzie można przeprowadzać pomiar na lewym Ciśnienie krwi może się... -
Page 99: Ocena Wyników
Pomiar ciśnienia tętniczego krwi • Następnie naciśnij przycisk pamięci M1 lub M2 i wybierz żądanego użytkownika. Jeżeli nie zostanie wy- Załóż mankiet zgodnie z powyższym opisem i przyjmij brana żadna pamięć, wynik pomiaru zostanie zapisany pozycję, w której ma być dokonany pomiar. w ostatnio użytej pamięci. -
Page 100: Odczyt I Usuwanie Wyników Pomiaru
rze, stresu lub braku snu. Arytmia może zostać zdiagnozowana Zakres Ciśnienie Ciśnienie ro- Rozwiązanie jedynie podczas badania przez lekarza. wartości skurczowe zkurczowe Powtórzyć pomiar, kiedy po jego wykonaniu na wyświetlaczu po- ciśnienia (w mmHg) (w mmHg) jawi się symbol . Należy pamiętać, aby odpocząć 5 minut i Poziom 3: ≥... - Page 101 • Po wyświetleniu pełnego ekranu wybierz w ciągu 3 se- Na wyświetlaczu będzie migać symbol AM. kund za pomocą przycisku M1 lub M2 żądaną pamięć Zostanie wyświetlona średnia wartość z użytkownika ( ostatnich 7 dni pomiarów porannych (rano: godz. 5.00–9.00). –...
-
Page 102: Czyszczenie I Dbałość O Urządzenie Oraz Mankiet
W razie potrzeby włóż ponownie baterie lub wymień je. 10. Dane techniczne Nr modelu BM 45 M1501 8. Czyszczenie i dbałość o urządzenie oraz Metoda pomiaru Oscylometryczny, nieinwazyjny pomiar mankiet ciśnienia na ramieniu... -
Page 103: Adapter
Producent zastrzega sobie prawo do zmiany danych technicz- Wyjście 6 V DC, 600 mA tylko w połączeniu z nych z powodu aktualizacji bez konieczności powiadamiania. ciśnieniomierzami firmy Beurer. • Urządzenie spełnia europejską normę EN60601-1-2 i wyma- Producent Friwo Gerätebau GmbH ga zachowania szczególnych środków ostrożności w zakre-... - Page 104 Biegunowość przyłącza napięcia stałego Posiada izolację ochronną / Klasa ochronna 2 Obudowa i pokry- Obudowa adaptera chroni przed kontak- wa ochronna tem z częściami, które przewodzą wzgl. mogłyby przewodzić prąd (palce, igły, hak testowy). Użytkownikowi nie wolno jednocześnie dotykać pacjenta i wtyczki wyjściowej adaptera AC.
-
Page 105: Electromagnetic Compatibility Information
Electromagnetic Compatibility Information Guidance and manufacture’s declaration – electromagnetic emissions – for all EQUIPMENT and SYSTEMS Guidance and manufacture’s declaration – electromagnetic emission The BM45 blood pressure monitor is intended for use in the electromagnetic environment specified below. The customer of the user of the BM45 blood pressure monitor should assure that it is used in such and environment. - Page 106 Guidance and manufacture’s declaration – electromagnetic immunity – for EQUIPMENT and SYSTEMS that are not LIFE-SUPPORTING Guidance and manufacture’s declaration – electromagnetic immunity The BM45 blood pressure monitor is intended for use in the electromagnetic environment specified below. The customer or the user of the BM45 blood pressure monitor should assure that it is used in such an environment.
- Page 107 Recommended separation distances between portable and mobile RF communications equipment and the EQUIPMENT or SYSTEM – for EQUIPMENT or SYSTEM that are not LIFE-SUPPORTING Recommended separation distances between portable and mobile RF communications equipment and the BM45 blood pressure monitor The BM45 blood pressure monitor is intended for use in an electromagnetic environment in which radiated RF disturbances are controlled.
- Page 108 BEURER GmbH • Söflinger Str. 218 • 89077 Ulm (Germany) • www.beurer.com www.beurer-gesundheitsratgeber.com • www.beurer-healthguide.com...