Table of Contents
Troubleshooting

Subscribe to Our Youtube Channel
Related Manuals for Javelin J320i


Summary of Contents for Javelin J320i
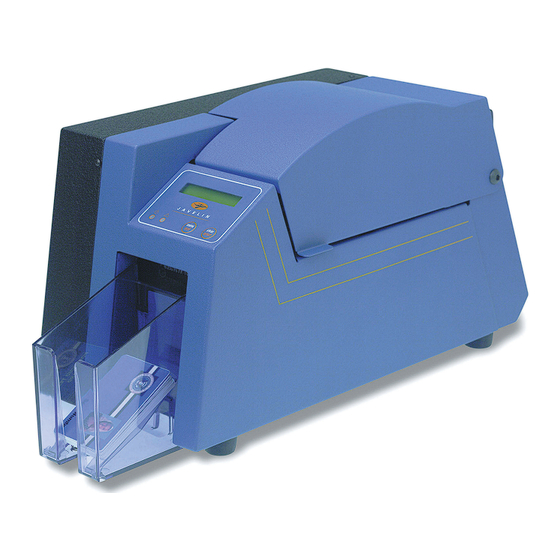
- Page 1 User's manual Quick Start J320i www.engenyus.com General General Information Information Getting Started Operation Starting to Print Cards Cleaning Trouble Shooting engenyus limited - August 2003 Technical Specifications Rev. 1.1...
- Page 2 Quick Start! Quick Start Before starting to work with your new JAVELIN card printer, please refer to this Quick Start guide. General General For more complete information regarding all aspects of your Information Information printer’s operation, please refer to the main chapters of the printer user’s manual.
- Page 3 Loading ribbon First, turn on the power to the printer and raise the Quick Start SUPPLY SPINDLE printhead. Ribbon loading involves the placement of the ribbon onto the supply and take-up spindles. As soon as the ribbon is installed and the printhead is locked down, the spindles will automatically rotate to take up any slack and to synchronize the ribbon to the correct panel.
- Page 4 Getting Started new card printer. J320i PRINTER MODELS Here is a quick review of the Javelin card printer series numbering and lettering Operation system to help you. The Javelin J320i plastic card printer employs dye sublimation and resin thermal transfer technologies. Model numbers include identifiers that specify options are...
- Page 5 ICONS Quick Start Throughout this manual, different icons highlight important information, as follows: General Information Important general information Mechanical hazard, such as one associated with Getting moving parts, capable of resulting in equipment Started damage or personal injury. Operation Electrical hazard, such as an exposed voltage point, capable of causing electrical shock and personal injury.
-
Page 6: Table Of Contents
TABLE OF CONTENTS GETTING STARTED ............1 TABLE OF CONTENTS Quick Start 1.1 Unpacking your card printer ............1 1.2 Indicators and controls ............... 3 GETTING STARTED ............1 1.3 Printer installation ..............4 1.1 Unpacking your card printer 1.2 Indicators and controls 1.3 Printer installation General OPERATION... - Page 7 APPENDIX A - Quick Start JAVELIN i SERIES INTELLIGENT PRINTING SYSTEM ......36 Frequently asked questions............36 APPENDIX B - General MAGNETIC CARD STRIPE ENCODER ...... 39 Information Introduction ................39 A- Media loading orientation ............... 40 B- Magnetic encoder cleaning ..............41...
-
Page 8: Quick Start
Getting started General Information 1.1 Unpacking your card printer Your J320i printer ships in a carton and protective anti-static bag. Getting Keep all packing material in case you need to move or re-ship the printer. Started While unpacking, inspect the carton to ensure that no damage occured during shipping. - Page 9 Quick Start Make sure the following items are included with your J320i printer: General Information CARD FEEDER CASSETTE CARD OUTPUT HOPPER Getting Started CLEANING KIT CLEANING CARTRIDGE Operation Starting to POWER CABLE INTERFACE CABLE Print Cards Cleaning USER MANUAL &...
-
Page 10: 1.2 Indicators And Controls
1.2 Indicators and Controls Your J320i printer has an LCD Display and and 2 Panel Buttons. Quick Start Quick Start LCD Display General General Information Information Power Clear/Select Button Alert LED Menu/Next Button Getting Getting Started Started LCD DISPLAY : The 16 character LCD Display is used for : ●... -
Page 11: Printer Installation
1.3 Printer Installation The following will guide you through the installation of your J320i printer. Quick Start CAUTION : Limit AC power supplied to the J320i Printer to 110 - 230 V AC, 60 - 50 Hz for an associated 680 mA - 310 mA. -
Page 12: Operation
Quick Start Operation 2.1 Printer Features General Information The following shows the features found on your J320i printer: Getting Started Operation Starting to Print Cards STANDARD FEATURES OPTIONAL FEATURES Cleaning 1. Printhead A. Magnetic Encoder Station 2. Printhead Unlock lever B. -
Page 13: Loading Ribbons
2.2 Loading Ribbons Quick Start The J320i printer requires approved ribbons (See Appendix A & D). The resin thermal transfer and dye sublimation ribbons are specifically designed for your J320i printer. For optimum performance and printer life (printhead), always General use approved ribbons. - Page 14 Quick Start SUPPLY SPINDLE 3. Load ribbon onto the supply spindle (under print head carriage) and empty core (with tape attached) onto the take-up spindle. Make sure the ribbon General comes off the top of the supply spindle and feeds to Information the top of the take-up spindle.
-
Page 15: Loading Cards
2.3 Loading Cards Quick Start To help you load, print, and collect cards, the J320i has the following item: A - CARD FEEDER CASSETTE General This item is used for loading cards. Information 1. Install card feeder cassette by hooking onto printer as shown and clicking down. - Page 16 Quick Start DO NOT bend cards or touch print surfaces as this can reduce print quality. The surface of the cards must remain clean and dust free. Always store cards in an enclosed container. Ideally, use cards as soon as possible. General If cards stick together, carefully shuffle them.
-
Page 17: B- Card Cleaning Cartridge
B - CARD CLEANING CARTRIDGE Quick Start This item is used to clean the cards entering the printer and must be fitted before using the printer. General Information 1. Remove card cleaning cartridge from packaging. Getting Started Operation 2. Remove the yellow reminder tape from the location for the cleaning cartridge. -
Page 18: C- Card Thickness Control Lever
C- CARD THICKNESS CONTROL LEVER Quick Start This item is operated by the user to prevent more than one card feeding into the printer at the same time and causing a jam. Open cover, and adjust lever to the General correct position for the card thickness you Information are using. -
Page 19: Feeding One Card At A Time
2.4 Feeding one card at a time Quick Start A manual feed slot is available on the rear of the card feeder cassette cover for feeding single cards. Cleaning cards are fed manually through this slot. The card feeder cassette must be empty for manual card feeding to General Information work properly. -
Page 20: Printing A Test Card
2.5 Printing a Test Card Quick Start With ribbon and cards loaded, your J320i printer is ready to print. To check the operation of the printer you should print a test card. General 1. Turn off printer. Information 2. While pressing clear button, switch printer back on. -
Page 21: Passcode Electronic Lock
2.6 Passcode Electronic Lock Quick Start The Javelin printer’s passcode system disables the printing and encoding of the printer except by authorised users in possession of the valid passcode. This user- selected Passcode gives you the choice of what is the best level of security for your application. -
Page 22: Printing A Test Card
Passcode Menu (starting from ‘Passcode Disabled’) Quick Start PASSCODE PASSCODE Select to toggle ENABLE/DISABLE MENU ENABLE PASSCODE Enter new press procedure ENTER NEW (see below) General Choose Passcode with Next & Select. PASSCODE..Information 1 23450 END Choose End & Select to complete Choose Passcode with Next &... -
Page 23: Starting To Print Cards
Getting printer interface. Started The J320i card printer can be used with any Windows 98, ME, 2000, XP or NT 4.0 operating system, using the drivers provided with the printer. Updated drivers can be downloaded from the engenyus website www.engenyus.com... -
Page 24: A- Install Driver On Windows 98, 2000/Nt Or Xp
If the CD does not launch itself, then open the CD in Explorer, go to Drivers and run setup.exe. This will launch the Setup Wizard. Starting to The Printer Wizard will copy the necessary files to the PC for you Print Cards and the J320i printer driver installation will be completed. Cleaning Trouble Shooting Technical Specifications... -
Page 25: Starting To Print Cards B- Set Printer Driver Options
B. SET PRINTER DRIVER OPTIONS. WINDOWS NT, 2000, XP Quick Start The printer settings can be accessed by selecting the J320i Plastic Card Printer driver from within Printers. Under Windows NT, 2000, XP the printer properties are separated into two distinct pages, Document Defaults and Printer Properties. -
Page 26: C- Truesecure Varnish Imaging Printing
C. TRUESECURE VARNISH IMAGING PRINTING Quick Start This is a driver enabled option to print a bitmap in your O (overlay varnish) panel of your ribbon resulting in a simulated “watermark” that produces a more “copy-proof” card. To enable this feature: On Windows 98, ME systems, click on the ribbon tab, or General General NT, 2000, XP systems choose document defaults/printing preferences, advanced,... -
Page 27: Cleaning
Other than the recommended cleaning procedures described in Started this manual, allow only engenyus authorised technicians to service the J320i printer. NEVER loosen, tighten, adjust, or bend, etc. a part or cable inside the printer. NEVER use a high pressure air compressor to remove Operation particles in the printer. -
Page 28: Cleaning System
4.1 Cleaning System Quick Start Your J320i printer includes a simple cleaning system using the pre-saturated cleaning cards provided. The regular use of these cards will clean and maintain important parts of your printer: including the printhead, and transport rollers. -
Page 29: Cleaning The Printhead
4.2 Cleaning the printhead Quick Start Cleaning the printer using the cleaning system with cards usually suffices. However, cleaning the printheads using swabs can remove more stubborn deposits when print anomalies persist. To avoid deposits, only use foam-tipped swabs. General Information Getting Started... -
Page 30: Card Cleaning Cartridge
4.3 Card Cleaning Cartridge Quick Start Your J320i printer also has a card cleaning cartridge. This item cleans the cards entering the printer. To ensure print quality, the adhesive cleaning roller requires periodic replacements. General Information CLEAN PRINTER WHEN TO MAINTAIN When LCD screen reports message, every 1,000 cards, or when roller is dirty. - Page 31 Quick Start 3.Remove the adhesive cleaning roller from cartridge General and discard. Information Getting 4.Install new cleaning roller into cartridge*. Started To avoid contamination, always hold the cleaning roller assembly by the ends. Operation 5.Carefully peel off wrapper from new cleaning roller while in cartridge.
-
Page 32: Cleaning The Printhead
Information This section offers solutions to potential problems you may experience with your J320i printer. The table below lists the screen messages that will be displayed on the printer's LCD, both during normal operation and to alert operator of any error conditions. There is also some additional information dealing with quality issues concerning printing onto cards. - Page 33 Quick Start SCREEN MESSAGE MEANING ACTION A monochrome panel is PRINTING BLACK being printed PRINTING VARNISH The overlay is printing General PRINT HOLOGRAM A hologram overlay is printing Information Carry out the cleaning The printer is prompting the procedure as detailed in CLEAN PRINTER operator maintenance section 4 of this manual...
- Page 34 Quick Start SCREEN MESSAGE MEANING ACTION ENCODING ERROR Data cannot be written or read Check that the cards are from the card's magnetic stripe loaded with the magnetic stripe in the correct orientation. Check whether high or low coercivity cards have been specified.
- Page 35 Magnetic Encoding Errors: Check that the cards are inserted correctly in the Quick Start printer. Ensure that the cards are low or high coercivity as required, and are set-up correctly in the printer driver. Cleaning Alert: The printer has counted the number of cards printed and has automatically flagged that a cleaning routine needs to be carried out.
-
Page 36: Print Quality Issues
5.2 Print Quality Issues This section will help you resolve print quality problems. The print quality is dependent on several factors. The two most important factors that will increase your print Quick Start quality are cleanliness and card stock. To diagnose and fix print quality problems, follow the troubleshooting procedure below: Small spots appear on the printed card with a non-printed area or a ●... - Page 37 Quick Start • Printing shows very pale or inconsistent results. Possible Cause A. Ribbon may have been stored improperly or is damaged. B. Cards may not meet specifications. C. Contrast and/or Intensity may be set to values General which are too high. Information D.
- Page 38 B1. Open cover and press down the printhead unlock lever to open Quick Start the printhead carriage. The printhead will move up. B2. Push down on the printhead Lock Lever until an audible click ‹‹ ›› signals the locked-down position. B3.
-
Page 39: 5.2 Print Quality Issues 6
Quick Start Technical General Specifications Information General ● High speed printing, over 144 cards/hour edge to edge in full colour (YMCKOi) throughput Getting ● Small footprint Started ● Windows Drivers for 98, NT 4.0, ME, 2000, XP . Colour Printing ●... - Page 40 CARD DIMENSIONS Quick Start ISO STANDARD DIMENSIONS FOR PLAIN CARD ± General 2.125 0.002 in ± (53.98 0.050mm Information ± 3.375 0.010 in ± (85.72 0.25mm) Radius Getting 0.125 in Started ± 0.009 0.034 in (3.18mm) ± (0.23 0.84mm ISO STANDARD DIMENSIONS FOR MAGNETIC STRIPE CARD Operation 0.623 in (15.82mm) 0,218 in (5.54mm) max...
- Page 41 Quick Start Ribbons* Monochrome: 1000 cards/roll ● black, red, blue, green, silver, gold, white, scratch-off. Monochrome: 1500 cards/roll (black only) ● K-resin + Oi: 500 cards/roll ● K-dye + Oi: 500 cards/roll ● YMCKOi: 200 or 330 cards/roll ● General Information Thermal transfer (Resin) ribbons offer more durability than dye sublimation, with greater resistance to...
-
Page 42: Technical Specifications
Quick Start Environmental Operating Temperature: 60 to 86°F (15 to 30°C) ● Operating Humidity: 20 to 65% non condensing ● Storage Temperature: -23 to 158°F (-5 to 70°C) ● Storage Humidity: 20 to 70% non condensing ● Ventilation: Free air ●... -
Page 43: Intelligent Printing System
Fequently Asked Questions Started 1 What is the Javelin i Series? The i Series is a new line of Javelin plastic card printers that incorporates an innovative, intelligent card printing system. Operation 2 What is the i Series Intelligent Printing System? - Page 44 - Automatic Driver Configuration: Printer detects the i Series ribbon type and the driver automatically configures the driver to select correct ribbon type. - Javelin Image Profile: A software tool for Windows 98 and 2000 environments that enhances colours, minimises whitewashing, and enhances Trouble colour contrasts.
- Page 45 - Non-i Series monochrome, single panel ribbons function on i Series printers. Cleaning 11 Where can I buy i series ribbons? Javelin i Series ribbons are available only from authorised Javelin card printer dealers. 12 Do I Series ribbons require any special care or handling? Trouble No.
-
Page 46: Magnetic Card Stripe Encoder
(See Chapter 2 for location.) Getting Started INTRODUCTION Operation and maintenance requirements for the J320i printer with the optional magnetic card stripe encoder. (See Chapter 2 for location). The magnetic encoder can be set for either high or low coercivity. (HICO or LOCO) Operation... -
Page 47: A- Media Loading Orientation
A. MEDIA LOADING ORIENTATION Quick Start The magnetic encoder is a factory installed item with the read/write head positioned below the card path, available General Information with HICO encoding or LOCO encoding . When loading cards into the card cartridge, please Getting Started ensure that the magnetic stripe is facing down and... -
Page 48: B- Magnetic Encoder Cleaning
ISO STANDARD ENCODING Track # Field Separato Track density Valid Characters # of characters Alphanumeric ‡ 210BPI* Quick Start ✝ (ASCII 20~95 Numeric ‡ 75BPI* (ASCII 48~62) Numeric ‡ 210BPI* (ASCII 48~62) General * Bit per inch Information ✝ Except the '?' character ‡... -
Page 49: Smart Card Contact Station
Operation The Javelin J320iE and J320iEM printers have a contact station to connect a serial interface to the smart card contacts. A suitable smart card coupler and associated software would be required external to the printer to communicate with the smart card. -
Page 50: A- Media Loading Orientation
A. MEDIA LOADING ORIENTATION Quick Start Position the cards with the smart card chip at the top of the card and towards the printer. General Information B. SMART CARD CONTACT STATION INTERFACE Getting Started When a command to the parallel printer interface sends a card to the smart card contact station, the printer connects the smart card contact station to the female DB-9 connector on the rear of the printer. -
Page 51: Appendix D - Accessories & Supplies
Quick Start Appendix D Accessories & supplies General Please contact your Javelin dealer to place an order for accessories and supplies. Information IMPORTANT NOTICE: Only TrueColours colour ribbons can be used in this printer Getting Started RIBBONS Intelligent Javelin Encoded Ribbons New rich colour formula - essential for intelligent J320i printers Intelligent TrueColours Two-panel Ribbons (Inc. -
Page 52: Cards
(350 cards) 6 11 32 702 Genuine Secure (350 cards) CARDS General The following plain white plastic cards are available for use in the J320i printers: Information engenyus Description Part Number 9 19 00 009 Cards with no magnetic stripe... -
Page 53: Accessories
Description Part Number General 2 33 11 001 Mifare (contactless) encoding kit to be fitted to a J320i or Information J320iM printer. Includes integrated Mifare encoder, software tools, RS232C interface and documentation 2 33 13 000 Smart Card (contact) encoding kit to be fitted to a Getting J320i or J320iEM printer. -
Page 54: Appendix E - Warranty Information
Appendix E General Warranty Information Information PRINTERS All JAVELIN ™ printers are warranted against defects in material or workmanship ENGENYUS JAVELIN™ printers (excluding printhead) are warranted against Getting defects in material or workmanship. Proof of purchase or shipment date is Started required to validate the warranty. - Page 55 ENGENYUS or its authorised dealer. ENGENYUS specifically disclaims the implied warranties of merchantability and fitness for a particular purpose. For full warranty terms, please contact the Javelin dealer from whom you Operation purchased your printer.
-
Page 56: Appendix F - Technical Support
Quick Start Appendix F General Technical Support Information If for any reason you require product technical support, please contact the distributor where you purchased your equipment. If they cannot help you, or at their direction, engenyus can be reached at : Getting ENGENYUS LIMITED Started... -
Page 57: Declaration Of Conformity
73/23/EEC modified Low voltage Directive EN 60950 Product Safety by 93/68/EEC Model: J320i conforms to the following specification: FCC Part 15, Subpart A, Section 15.107(a) and Section Operation 15.109(a) Class A digital device Supplemental Information: This device complies with Part 15 of the FCC rules. Operation is subject to the... -
Page 58: Trademarks
TRADEMARKS Quick Start JAVELIN and ENGENYUS are trademarks of engenyus limited. Windows and MS-DOS are registered trademarks of Microsoft Corp. All other marks are trademarks or registered trademarks of their respective holders. General COPYRIGHT NOTICE Information This document contains information proprietary to engenyus. This document and the information contained within is copyrighted by engenyus and may not be duplicated in full or in part by any person without written approval from engenyus.
Need help?
Do you have a question about the J320i and is the answer not in the manual?
Questions and answers