Table of Contents
Advertisement
Table of Contents
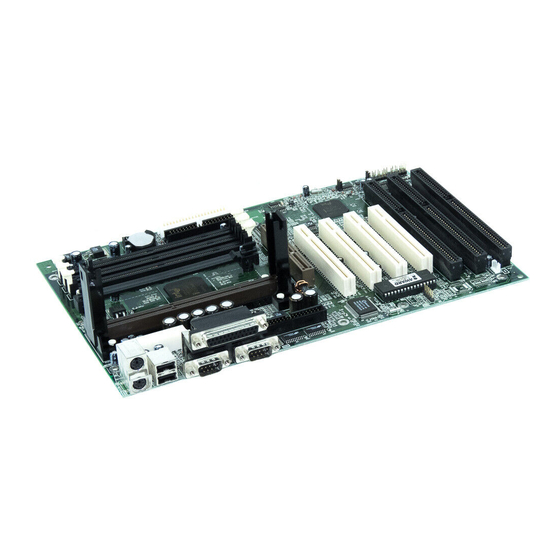
COMPONENT LOCATION DIAGRAM................................ A
INDEX ........................................................................................ 1
CHAPTER 1
1-1 System Features........................................................................... 3
1-2 Soft-OFF-Control......................................................................... 4
1-3 LDCM ( LANDesk Client Manager, option)................................ 5
1-4 SMM LED Operation (option)..................................................... 6
1-5 Thermister (option) ...................................................................... 7
1-6 Wake-On-LAN ............................................................................ 7
1-7 Check List of the Packaging......................................................... 8
CHAPTER 2
2-1 Installation Procedure ................................................................. 9
2-2 CPU Installation .......................................................................... 10
2-3 System Memory Installation......................................................... 16
2-4 Connectors Description................................................................ 17
2-5 IDE Driver Installation................................................................. 22
CHAPTER 3
3-1 Update BIOS Procedure .............................................................. 24
3-2 Award System BIOS Configuration Setup.................................... 26
Appendix A ................................................................................ 56
Introduction ................................................... 2
Installation ..................................................... 9
Award BIOS Setup........................................ 23
1
Advertisement
Table of Contents

Related Manuals for A-Trend ATC-6120


Summary of Contents for A-Trend ATC-6120
- Page 1 Table of Contents COMPONENT LOCATION DIAGRAM........ A INDEX ..................1 CHAPTER 1 Introduction ........... 2 1-1 System Features................3 1-2 Soft-OFF-Control................. 4 1-3 LDCM ( LANDesk Client Manager, option)........ 5 1-4 SMM LED Operation (option)............. 6 1-5 Thermister (option) ..............7 1-6 Wake-On-LAN ................
-
Page 2: Chapter 1 Introduction
CHAPTER 1 INTRODUCTION This manual describes how to configure the ATC-6120 mainboard for different environments. It's an overview of the layout and features of the mainboard, and also provides information for you to change the configuration or system environment. This manual is divided into Three parts :... -
Page 3: System Features
1-1 SYSTEM FEATURES : INTEL Pentium II CPU operating at 233MHz and 333MHz by using Single Edge Contact (S.E.C.) cartridge (or named Slot 1). : INTEL 82440LX PCIset. : Using three 168-pin DIMM sockets, provides three banks of 64-bit wide path up to 384MB SDRAM or 768MB EDO DRAM (with parity chip ECC support). -
Page 4: Software Power Off Control
1-2 SOFTWARE POWER OFF CONTROL The mainboard design supports Software Power Off Control feature through the SMM code in the BIOS under Windows 95, Windows 3.1x, and MS-DOS operation system environment. This is Intel ATX form factor feature and you should use ATX power supply. First, you should connect the power switch cable (provided by the ATX case supplier) to the connector “PS-ON”... - Page 5 ¡] LANDesk Client Manager ¡^ (option) 1-3 LDCM ATC-6120 built-in controller support Intel LDCM. LDCM can satisfy users who want manageable systems that can interact automatically with the user. Client manager is the answer, enabling both administrators and clients to manage systems. The features of LDCM are as following : ¡°...
-
Page 6: Smm Led Operation (Option)
1-4 SMM LED OPERATION (option) The mainboard supports SMM LED function to help users to easily recognized the system state, such as full on (working), APM (SMM function), Soft-off and mechanism-off (power cable remove). You can use jumper JP7 to switch one LED mode or two LED mode, please see the following table. -
Page 7: Wake-On-Lan
1-5 Thermister (option) This means that user can monitor the CPU temperature through thermister. When setting up the thermister, the Bios will load the CPU temperature automatically. There is a choice of the warning beep sound if the user set the option on. If the CPU temperature overheated, the user will get the notice from the thermister. -
Page 8: Check List Of The Packaging
The mainboard comes securely packed in a durable box and shipping carton. If any of the following items are missing or damaged, please contact your supplier. Each mainboard contains: Q'TY Description Mainboard : ATC-6120. Retention module (for Pentium II installation) : LDCM, IDE driver (option) Diskette : Enhanced IDE driver (option) -
Page 9: Chapter 2 Installation
CHAPTER 2 INSTALLATION 2-1 INSTALLATION PROCEDURE Before installing the computer, please prepare all components such as CPU, DRAM; peripherals such as hard drive, keyboard, CD-ROM; and accessories such as cables. Then, install the system as following: 1. Plug CPU/ heat sink (refer to Pentium II installation guide), and DRAM modules in the mainboard. -
Page 10: Cpu Installation
2-2 CPU INSTALLATION ATC-6120 supports INTEL Pentium II CPU cartridge. 2-2-1 CPU TYPE SELECTION (by BIOS) 1. Press the <Del> key when the system is booting up. 2. The following main menu will appear. ROM PCI/ISA BIOS (ATC-6120) CMOS SETUP UTILITY AWARD SOFTWARE, INC. - Page 11 BIOS screen. Or user can clear CMOS to reset the BIOS value. Also ATC-6120 supports keyboard power on or mouse power on function, (refer to ‘Integrated Peripherals’, page48,49). When you set ‘keyboard power on’, you can select set password or not.
- Page 12 5a. Intel Pentium II 233MHz (66 x 3.5) ROM PCI/ISA BIOS (ATC-6120) CHIPSET FEATURES SETUP AWARD SOFTWARE, INC. Auto Configuration : Enabled SDRAM CAS latency Time DRAM Speed Selection : 60 ns CPU Clock Ratio :3.5x MA Wait State : Slow...
- Page 13 5b. Intel Pentium II 266MHz (66 x 4.0) ROM PCI/ISA BIOS (ATC-6120) CHIPSET FEATURES SETUP AWARD SOFTWARE, INC. Auto Configuration : Enabled SDRAM CAS latency Time DRAM Speed Selection : 60 ns CPU Clock Ratio :4.0x MA Wait State : Slow...
- Page 14 5c. Intel Pentium II 300MHz (66 x 4.5) ROM PCI/ISA BIOS (ATC-6120) CHIPSET FEATURES SETUP AWARD SOFTWARE, INC. Auto Configuration : Enabled SDRAM CAS latency Time DRAM Speed Selection : 60 ns CPU Clock Ratio :4.5x MA Wait State : Slow...
- Page 15 5d. Intel Pentium II 333MHz (66 x 5.0) ROM PCI/ISA BIOS (ATC-6120) CHIPSET FEATURES SETUP AWARD SOFTWARE, INC. Auto Configuration : Enabled SDRAM CAS latency Time DRAM Speed Selection : 60 ns CPU Clock Ratio :5.0x MA Wait State : Slow...
-
Page 16: System Memory Installation
2-3 SYSTEM MEMORY INSTALLATION The ATC-6120 provides three 168-pin DIMM sockets for system memory expansion from 8MB to 384MB. These three DIMMs are arranged to three banks, please refer to page A. Each bank provides 64-bit wide data path. ¡° Samples of System Memory Combinations Options ¡°... -
Page 17: Connectors Description
2-4 CONNECTORS DESCRIPTION The locations of following connectors are indicated in page A. When you plug a cable into the following I/O connectors, you should have the pin 1 edge of the cable align with the pin 1 end of the connector. CONN1 : speaker, keyboard lock, reset, SMI, turbo LED, and IDE LED connectors. - Page 18 IDE-LED : IDE devices indicator LED connector. IDE-LED stays ON indicates on-board IDE devices in operation. If CPU FAN plug wire into wrong connector, color of LED will be lighter and the IDE dvices can still function properly. FAN : CPU cooling fan connector. Wire with PWR FAN Chassis FAN +12V voltage (most likely red wire) must be plugged into pin2, and GROUND wires...
-
Page 19: Signal Name
PW1 : ATX mode +3.3/5/12V power supply connector. 1 3.3V 11 3.3V 16 GND 2 3.3V 12 -12V 17 GND 3 GND PWRGD 13 GND 18 -5V 4 +5V 5VSB 14* PS_ON 19 +5V 5 GND 10 +12V 15 GND 20 +5V * PS_ON : Soft-Off power control COM1/COM2 : these two connectors are... - Page 20 LPT : this connector is used to connect parallel port cable. signal signal STROBE- ACK- Data Bit 0 BUSY Data Bit 1 Data Bit 2 SLCT Data Bit 3 Auto Feed- Data Bit 4 ERROR- Data Bit 5 INIT- Data Bit 6 SLCT IN- Data Bit 7 pin18 -- pin25 are ground...
- Page 21 IDE1/IDE2 : these two connectors are used to connect IDE devices through IDE cables, a total of 4 devices can be connected. signal signal Reset IDE DDRQ0(1) Host Data 7 I/O Write- Host Data 8 Host Data 6 I/O Read- Host Data 9 Host Data 5 IORDY...
-
Page 22: Ide Driver Installation
2-5 IDE DRIVER INSTALLATION The IDE driver installation procedure is as following : Setup for Windows 95 : 1. Starting Windows 95 2. Select “START”, “RUN”. 3. Install INF.EXE before you install IDE driver, please refer to readme file. 4. Type “A:\WIN95\SETUP.EXE”. 5. -
Page 23: Chapter 3 Award Bios Setup
Please refer to the next page for the update procedure. ATC-6120 uses Flash ROM to make the BIOS easily to be updated by the floppy disk- based program. and to meet Microsoft Windows 95 plug & play feature. After the BIOS is updated, you should clear the setup data stored in the CMOS. -
Page 24: Update Bios Procedure
3-1 UPDATE BIOS PROCEDURE If the BIOS needs to be updated, you can get a diskette with the updated BIOS from your system supplier. The BIOS diskette includes : “awdflash.exe” -- BIOS update utility program “awdflash.doc” “(update BIOS filename with version number).bin” The update procedure is as following: 1. - Page 25 3-1-2 UPDATE PENTIUM II MICROCODE API Intel also provides MICROCODE API(Applications Programming Interface) for Pentium II processor-based mainboard user to update data block in BIOS quickly and easily. (You can find this utility in the 3.5“ diskette in the package). The BIOS code on the Pentium II processor-based mainboards contains data that is specific to each silicon stepping of the processor.
-
Page 26: Award System Bios Configuration Setup
To do the SETUP procedure, press the <Del> key when the system is booting up. The following main menu will appear. Please select " STANDARD CMOS SETUP" to enter the next screen. ROM PCI/ISA BIOS (ATC-6120) CMOS SETUP UTILITY AWARD SOFTWARE, INC. - Page 27 This screen records some basic hardware information, and sets the system clock and error handling. These records can be lost or corrupted if the on-board battery has failed or is weak. ROM PCI/ISA BIOS (ATC-6120) CMOS SETUP UTILITY AWARD SOFTWARE, INC.
- Page 28 Date The date formate is <day>, <date><month><year>. Press<F3> to show the calendar. The day, from Sun to Sat,determined by the BIOS and is display-only date The date, from 1 to 31 month The month, Jan. through Dec. year The year, from 1900 to 2099 Time The time format is <hour><minute><second>.
- Page 29 Drive A This category identifies the types of floppy disk Drive B drive A or drive B that have been installed in the computer. None No floppy drive installed 360K, 5.25 in 5.25“ PC-type 360KB capacity 1.2M, 5.25 in 5.25“ AT-type 1.2MB capacity 720K, 3.5 in 3.5“...
- Page 30 Memory This category is display-only which is determined by POST (Power On Self Test) of the BIOS. Base Memory The POST will determine the amount of base (or conventional) memory installed in the system. The value of the base memory is typically 512K or 640K based on the memory installed on the mainboard.
- Page 31 This screen is a list of system configuration options. Some of them are defaults required by the mainboard's design, others depend on the features of your system. ROM PCI/ISA BIOS (ATC-6120) CMOS SETUP UTILITY AWARD SOFTWARE, INC. STANDARD CMOS SETUP...
- Page 32 Virus Warning When this item is enabled, the Award BIOS will monitor the boot sector and partition table of the hard disk drive for any attempt at modification. If an attempt is made, the BIOS will halt the system and the following error message will appear. Afterwards, if nessary, you will be able to run an antivirus program to locate and remove the problem before any damage is done.
- Page 33 Boot Sequence This category determines which drive to search first for the disk operating system (i.e., DOS). A, C, SCSI System will first search for floppy disk drive then hard disk drive, and the next is SCSI device. C, A, SCSI System will first search for hard disk drive then floppy disk drive, and the next is SCSI device.
- Page 34 Boot Up This allows you to determine the default state of NumLock Status the numeric keypad. By default, the system boots up with NumLock on. Keypad is number keys Keypad is arrow keys Boot Up System Selects the default system speed - the normal Speed operating speed at power up.
- Page 35 Typematic Delay When the typematic rate is enabled, this section (Msec) allows you select the delay between when the key was first depressed and when the acceleration begins. 250 msec 500 msec 750 msec 1000 1000 msec Security Option This category allows you to limit access to the system and Setup, or just to Setup System The system will not boot and access to...
- Page 36 OS Select for This item allows you to access the memory DRAM > 64MB that is over 64MB in OS/2 The choice : Non-OS2, OS2 Report No FDD Set this item to Yes BIOS will report FDD to Win95. For WIN 95 If in standard CMOS setup, set Drive A to none, and set this item to yes.
- Page 37 This screen controls the setting for the chipset on the mainboard. * these items require built-in hardware detected component, please confirm this with your vendor. If the FAN is not installed, the FAN speed will be shown 0RPM. ROM PCI/ISA BIOS (ATC-6120) CMOS SETUP UTILITY AWARD SOFTWARE, INC.
- Page 38 Auto The first chipset settings deal with CPU access to dynamic Configuration random access memory (DRAM). The default timings have been carefully chosen and should only be altered if data is being lost. Such a scenario might well occur if your system had mixed speed DRAM chips installed so that greater delays may be required to preserve the integrity of the data held in the slower memory chips.
- Page 39 System BIOS Select Enabled allows caching of the system BIOS ROM at Cacheable F0000h-FFFFFh, resulting in better system performance. However, if any program writes to this memory area, a system error may result. Video BIOS Select Enabled allows caching of the video BIOS ROM at Cacheable F0000h-FFFFFh, resulting in better system performance.
- Page 40 AGP Aperture Select the size of the AGP aperture. The aperture is a portion of Size (MB) the PCI memory address range dedicated for graphics memory address space. Host cycle that hit the aperture range are forwarded to the AGP without any translation. See for AGP information.
- Page 41 CPU Warning When this item is enabled, we can set the CPU warning Temperature. temperature . If the CPU temperature is higher than the setting temperature, the system will beep. Current System This field displays the current system temperature, if your Temperature computer contains a monitoring system.
- Page 42 This screen controls the 'green' features of this mainboard. ROM PCI/ISA BIOS (ATC-6120) CMOS SETUP UTILITY AWARD SOFTWARE, INC. STANDARD CMOS SETUP INTEGRATED PERIPHERALS BIOS FEATURES SETUP SUPERVISOR PASSWORD CHIPSET FEATURES SETUP USER PASSWORD POWER MANAGEMENT SETUP IDE HDD AUTO DETECTION PNP/PCI CONFIGURATION SAVE &...
- Page 43 Power This category allows you to select the type (or Management degree) of power saving and is directly related to the following modes : Doze; Standby; Suspend; HDD Power Down. Disabled No power management. Disables all 4 modes Min. Power Minimum power management.
- Page 44 Video off After When enabled, this feature allows the VGA adapter to operate in a power saving mode. Monitor will remain on during power saving modes. Suspend Monitor bLANked when the systems enters the Suspend mode. Standby Monitor bLANked when the system enters Standby mode. Doze Monitor bLANked when the system enters any power saving mode.
- Page 45 VGA Active When Enabled, any video active restarts the global Monitor timer for Standby mode. Soft-Off by Instant-off : When push the power button, the system power will PWR-BTTN be off immediately. Delay 4 sce : when push the power button, it will enter suspend mode.
- Page 46 This screen configures the PCI Bus slots. ROM PCI/ISA BIOS (ATC-6120) CMOS SETUP UTILITY AWARD SOFTWARE, INC. STANDARD CMOS SETUP INTEGRATED PERIPHERALS BIOS FEATURES SETUP SUPERVISOR PASSWORD CHIPSET FEATURES SETUP USER PASSWORD POWER MANAGEMENT SETUP IDE HDD AUTO DETECTION PNP/PCI CONFIGURATION SAVE &...
- Page 47 PNP OS Installed This item allows you to determine PnP OS or not. Choices are Yes or No. Resource The Award Plug and Play BIOS has the capability to Controlled by automatically configure all of the boot and Plug and Play compatible devices.
- Page 48 This section page includes all the items of IDE hard drive and Programmed Input/Output features. See also Section “Chipset Features Setup”. ROM PCI/ISA BIOS (ATC-6120) CMOS SETUP UTILITY AWARD SOFTWARE, INC. STANDARD CMOS SETUP INTEGRATED PERIPHERALS BIOS FEATURES SETUP SUPERVISOR PASSWORD...
- Page 49 IDE HDD Block This allows your HD controller to use the fast block Mode mode to transfer data to and from your HD drive Enabled IDE controller uses block mode Disabled IDE controller uses standard mode IDE Primary PIO - Programmed Input/Output, it allows the BIOS to Master/Slave PIO tell the controller what it wants and then let the controller IDE Secondary...
- Page 50 KBC input clock Let user change the keyboard working clock. On Board This item will enable or disable the floppy disk controller. FDC Controller On Board User can select serial port IRQ. If set to Auto, system will assign Serial Port 1 an IRQ for it.
- Page 51 ROM PCI/ISA BIOS (ATC-6120) CMOS SETUP UTILITY AWARD SOFTWARE, INC. STANDARD CMOS SETUP INTEGRATED PERIPHERALS BIOS FEATURES SETUP SUPERVISOR PASSWORD CHIPSET FEATURES SETUP USER PASSWORD POWER MANAGEMENT SETUP IDE HDD AUTO DETECTION PNP/PCI CONFIGURATION SAVE & EXIT SETUP LOAD BIOS DEFAULTS...
- Page 52 The last step is 'save and exit'. If you select this item and press 'Y', then these records will be saved in the CMOS memory on the mainboard. It will be checked every time you turn your computer on. ROM PCI/ISA BIOS (ATC-6120) CMOS SETUP UTILITY AWARD SOFTWARE, INC.
- Page 53 LOAD BIOS DEFAULTS When your mainboard has problems and needs to trouble shoot the system, you can use this function. The default values loaded only affect the BIOS Features Setup, Chipset Features Setup, Power Management Setup and PNP/PCI Configuration Setup. There is no effect on the Standard CMOS Setup.
- Page 54 CAUTION :If you forgot your password, you must disable the CMOS by turning power off and set JP10 to ‘close‘. And then open reload the system. IDE HDD AUTO DETECTION This allows you to detect the IDE hard disk drivers‘ parameters and enter them into ‘Standard CMOS Setup’...
- Page 55 ¡° Control Key Description ¡° ¡ô UP ARROW Move to previous item ¡õ DOWN ARROW Move to next item ¡ö LEFT ARROW Move to the item in the left hand ¡÷ RIGHT ARROW Move to the item in the right hand Esc KEY Main Menu : Quit and not save changes...
- Page 56 If the mainboard doesn't function properly, please complete the following information and return it to your system dealer. If the further information is needed, please attach it. Model No : ATC-6120 Date of Purchase : ______________ Serial No : ___________________...
Need help?
Do you have a question about the ATC-6120 and is the answer not in the manual?
Questions and answers