Table of Contents
Advertisement
Quick Links
Free-To-Air
Free-To-Air
share
USB
channels
channels
contents
recording
Hybrid HD Terrestrial Android Receiver
user Manual
bedienungsanleitung
Manuel d'utilisation
Manuale d'uso
návod k obsluze
Használati útmutató
Посібник користувача
video
picture
video
streaming
slide show
phone calls
user-friendly and
easy to handle
sRT 2220
Advertisement
Table of Contents

Related Manuals for Strong SRT 2220


Summary of Contents for Strong SRT 2220
-
Page 1: User Manual
Hybrid HD Terrestrial Android Receiver sRT 2220 user Manual bedienungsanleitung Manuel d’utilisation Manuale d’uso návod k obsluze Használati útmutató Посібник користувача Free-To-Air Free-To-Air share video picture video user-friendly and channels channels contents recording streaming slide show phone calls easy to handle... - Page 4 € 0,14/Min. deutsches Festnetz 801 702 017 € 0,42/Min. max. Mobilfunknetze support_pl@strong.tv +380(44)238 61 50 support_dk@strong.tv support_ua@strong.tv www.strong.tv Supplied by STRONG & Co, Japan Represented by STRONG Ges.m.b.H. Franz-Josefs-Kai 1 1010 Vienna Austria Email: support_at@strong.tv 06 Jul 2015 11:44...
-
Page 5: Part
Android and Google Wallet are trademarks of Google Inc. Skype is a trade mark of Skype and STRONG is not affiliated, sponsored, authorised or otherwise associated by/with the Skype group of companies. HDMI, the HDMI logo and High-Definition Multimedia Interface are trademarks or registered trademarks of HDMI Licensing LLC in the United States and other countries. -
Page 6: Table Of Contents
PART 1 TAbLe Of cOnTenTs 1.0 inTRODucTiOn 5.3 Picture gallery 1.1 Safety Instructions 5.4 Video player 1.2 Storage 5.5 Music library 1.3 Equipment Set-up 5.6 S link for streaming from other devices 12 1.4 Accessories 5.7 The Store 1.5 Usage of external USB devices 5.8 Applications 2.0 YOuR ReceiveR 5.9 Open all applications... -
Page 7: Introduction
PART 1 1.0 inTRODucTiOn Thank you for choosing the Android receiver by STRONG. It has been produced with the latest new technology and offers extensive entertainment and great versatility. We wish you many hours of new great experiences exploring the Android world and watching IP and terrestrial TV in High Definition quality! 1.1 safety instructions... -
Page 8: Equipment Set-Up
STRONG cannot guarantee compatibility with all types of USB devices such as web cams, „ „ keyboards, mouse devices, storage devices. STRONG cannot guarantee perfect operation when a HDD and a web cam are used at the same „ „ time. -
Page 9: Your Receiver
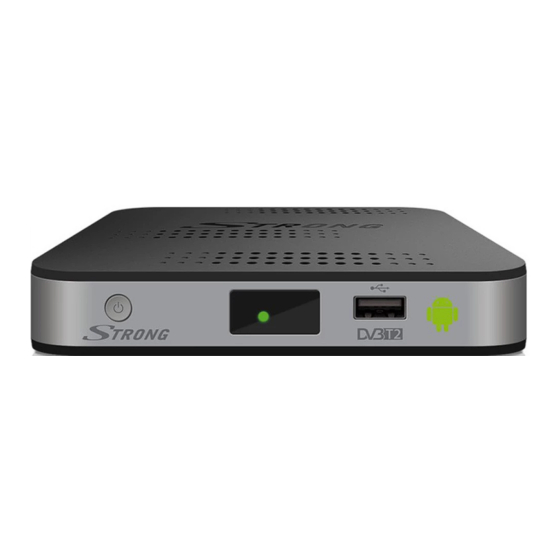
PART 1 2.0 YOuR ReceiveR 2.1 DefAuLT Pin: 1234 2.2 front Panel Fig. 1 1. Power switch To switch the receiver between ON/STANDBY modes. 2. status indicator: Indicates status of reception and ON or OFF modes. 3. iR sensor: Receives Standby/On signal from the remote control. 4. -
Page 10: Installing The Batteries
PART 1 13. vOL+/vOL- Increases/decreases the volume level 14. PG+/PG- Jumps 12 places up or down in channel list Switches to recently watched channels and apps Turns the air mouse function ON or OFF. 17. 0-9 Channel number and numeric value input Opens the information bar in the DTV mode 19. -
Page 11: Connections
PART 1 note: As this function uses more power as normal pressing of buttons we recommend using Alkaline batteries to ensure longer operation time of your remote control. When the batteries are almost empty the LED indication on the remote control will start blinking for 15 seconds after you press any button. -
Page 12: Connecting To Tv
PART 1 3.2 connecting to Tv Fig. 8 Connect one end of the included HDMI cable to the HDMI connector of your receiver and the other end to the HDMI input of your TV set. nOTe: After switching on the TV and receiver it is necessary to select the corresponding HDMI input on the TV. -
Page 13: Connection Of A Usb Web Camera
The webcam will be automatically recognised and you can start using it. *Not included in the packaging. note: Please check on our web site www.strong.tv for the supported webcam models. If you like to change the login name, camera model or if you don’t get the webcam running, enter “Settings –... -
Page 14: Setup Dtv First Installation
PART 1 through the next steps in the Installation Wizard. Select Finish if you want to install digital satellite channels at another time and directly to go to the Android menu. 4.1 setup DTv first installation step 1: This menu allows you to select your Country, Picture size, Zap modes and the preferred Subtitles. Country Settings: Select your region. -
Page 15: How To Use The Android Platform
PART 1 5.0 HOw TO use THe AnDROiD PLATfORM This chapter describes how to use the Android platform. After turning on your receiver, Home opens. The app icons you keep in the tray remain visible on every Home screen. All app icons in the centre are permanent. -
Page 16: Picture Gallery
PART 1 5.3 Picture gallery Click on the Gallery icon in the launcher or on the Home screen. The gallery presents pictures stored on your SD card or USB storage device including pictures which have been downloaded from the web or other locations or that are stored in web albums. You can also edit the pictures on your USB device and share them with friends. -
Page 17: The Store
5.8 Applications note: STRONG cannot warrant and cannot be hold responsible of the (mal-) function and working of third party apps. Some applications function only well in devices with GPS. 5.8.1 browse for applications You can browse for apps by category and sort them in different ways. -
Page 18: Open All Applications
6.2 bluetooth This menu allows you to switch the Bluetooth connection ON or OFF, to setup new connected devices and to change the name of the Android receiver Strong to another. 6.3 Display In this menu you can select your preferred HDMI output resolution which is supported by the... -
Page 19: Audio
PART 1 (so called ‘handshake’). Select Screen adjust if size of displayed screen is bit to large or too small for the connected screen. 6.4 Audio In this menu you can setup the correct audio output setting if you like to use Dolby® audio to connect to a digital amplifier or PCM for analogue amplifier. -
Page 20: More Settings
From time to time you can check if there is an improved software version available. This can be checked and downloaded from our website www.strong.tv. Enter the type number into the service support on our website. If there is an improved software version you can download the file and copy it to the root of a USB device. -
Page 21: Channel Manager
PART 1 7.1 channel Manager In the Channel manager following settings can be made: Delete Channel, Move Channel, Hide Channel, Lock/Unlock Channel and Rename Channel. By pressing the bLue button you can also use Multi Select to select more channels in one go for these functions. There is also the possibility to set up to16 favourite lists in the Channel Manager. -
Page 22: Osd Settings
PART 1 7.3.3 OsD settings Info Bar Select the duration time for displaying the info bar on screen 5, 10, 15, 20 seconds. Also you can select No timeout to keep the info bar continuously. Transparency Select the level of transparency of menus on top of the live screen. 7.3.4 Parental control Parental Rating Select the age rating for which the PIN code shall be entered before watching... -
Page 23: Recording Functions
PART 1 lists and settings from the DTV. The receiver will reboot and start with the First Installation menu of the DTV part. warning: A factory reset will permanently delete all your personal settings, timers and stored channels. The Android part is kept as it is. Please consider this before you perform a factory reset. -
Page 24: Troubleshooting
If the DTV part shows problems with reception, first check if all cables and connectors still are in good condition. - Page 25 Forgotten your PIN code Default PIN is 1234 Contact your local Service Hotline or send an email to our support via www.strong.tv The external USB HDD does The power consumption is Connect an extra power not start.
-
Page 26: Technical Specifications
PART 1 9.0 TecHnicAL sPecificATiOns Tuner Demodulator mode: DVB-T, DVB-T2 Frequency range: VHF 174~230 MHz UHF 470~862 MHz video decoder Aspect ratio: 16:9 Video resolution: 1080p, 1080i, 720p, 576i, 480p Audio decoder Audio decoding: Dolby® Digital/ Dolby® Digital Plus*, MPEG-1 layer1/2, MPEG-2 Layer II Audio mode: Mono, L/R, Stereo...
Need help?
Do you have a question about the SRT 2220 and is the answer not in the manual?
Questions and answers