Table of Contents
Advertisement
Quick Links
Table of Contents:
USER'S GUIDE
Introduction. . .....................................2
Overview............................................3
Precautions. . ......................................4
Installing.a.Battery. . ........................5
and.Turning.It.On........................5-7
Using.the.High-Pass.Filter...........8
Switch. . ................................................8
The.Windscreen. . .............................9
Troubleshooting. . .............................9
Specifications.................................10
Warranty. . ..........................................11
Advertisement
Table of Contents

Subscribe to Our Youtube Channel
Related Manuals for Senal SCS-98


Summary of Contents for Senal SCS-98
-
Page 1: Table Of Contents
Table of Contents: USER’S GUIDE Introduction........2 Overview..........3 Precautions........4 Installing.a.Battery......5 Mounting.the.SCS-98.. and.Turning.It.On......5-7 Using.the.High-Pass.Filter...8 Using.the.Three-Level.Gain. Switch..........8 The.Windscreen.......9 Troubleshooting.......9 Specifications.........10 Warranty..........11... -
Page 2: Introduction
Thank you for choosing Senal. The.Senal.SCS-98.DSLR.Stereo.Microphone.is.designed.for.recording.live.stereo.audio.directly.to. your.DSLR.or.portable.recorder..The.SCS-98’s.two.cardioid.capsules.are.arranged.in.an.XY.pattern. to.achieve.accurate,.natural.stereo.imaging..This.makes.it.ideal.for.location.recording,.broadcast. applications,.live.performances,.and.capturing.soundscapes.in.outdoor.environments..Compact.and. lightweight,.the.SCS-98.attaches.to.your.camera’s.shoe.mount.and.plugs.into.its.audio.input,.replacing. the.built-in.microphone.so.you.can.capture.pristine.audio.with.realistic.stereo.imaging.for.your.video. productions.. Among the benefits you’ll enjoy: ▪ High-pass.filter ▪ Three-level.gain.switch.(-10.dB,.0.dB,.+10.dB) ▪ Integrated.shock.mount ▪ Shoe-mount.adapter.with.1/4"-20.threaded.socket ▪ Power.LED Introduction ▪ ▪ ▪ ▪ ▪ ▪ ▪ ▪ ▪ ▪ ▪ ▪... -
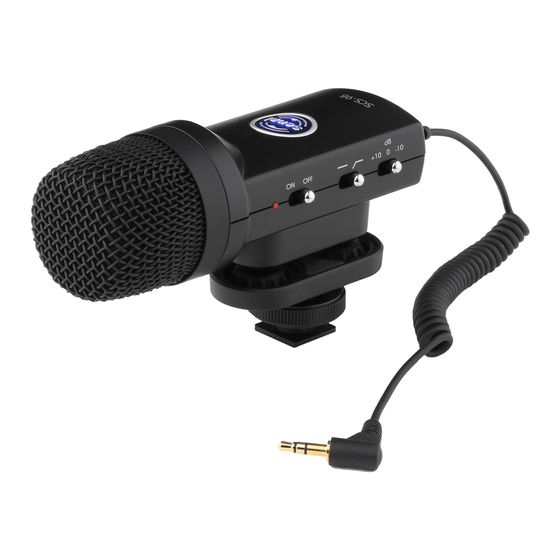
Page 3: Overview
Overview Power switch Power LED High-pass filter switch Battery compartment cover Three-level gain switch Grille Shock (-10.dB,.0.dB,. mount +10.dB) Locking 3.5 mm stereo wheel Shoe-mount audio connector adapter 1/4″-20 threaded Also Included: socket Foam.windscreen User.manual Overview ▪ ▪ ▪ ▪ ▪... -
Page 4: Precautions
Precautions ▪ Please.read.and.follow.these.instructions.and.keep.this.manual.in.a.safe.place. ▪ Keep.this.product.away.from.water.and.flammable.gases.or.liquids. ▪ Do.not.attempt.to.disassemble.or.repair.this.product.yourself. ▪ Handle.this.product.with.care. ▪ Clean.this.product.with.only.a.soft,.dry.cloth. ▪ Make.sure.that.this.product.is.intact.and.that.there.are.no.missing.parts. ▪ To.avoid.damaging.this.product,.remove.the.battery.before.long-term.storage.. ▪ All.photos.are.for.illustrative.purposes.only. Precautions ▪ ▪ ▪ ▪ ▪ ▪ ▪ ▪ ▪ ▪ ▪ ▪ ▪ ▪ ▪ ▪ ▪ ▪ ▪ ▪ ▪ ▪ ▪... -
Page 5: Installing.a.battery
1..Press.down.on.the.labeled.battery.compartment.and.push.it.in.the.direction.of.the.arrow.to.swing. it.open. 2..Insert.the.battery.in.the.orientation.indicated.by.the.illustration.inside.the.compartment. 3..Close.the.battery.compartment.cover.by.swinging.it.shut.in.the.opposite.direction.of.the.arrow.and. pressing.as.labeled.to.lock.the.cover.in.place. Mounting the SCS-98 and Turning It On The.SCS-98.attaches.to.your.camera.via.the.shoe-mount.adapter.under.the.shock.mount..To.attach.the. microphone.to.your.camera,.make.sure.the.SCS-98.is.turned.off.and.follow.these.steps: 1..Rotate.the.locking.wheel.counterclockwise.to.loosen.it. 2..Slide.the.shoe-mount.adapter.all.the.way.into.your.camera’s.shoe.mount. 3..Rotate.the.locking.wheel.clockwise.until.secure. Installing a Battery / Mounting the SCS-98 and Turning It On ▪ ▪ ▪ ▪ ▪ ▪ ▪ ▪ ▪ ▪ ▪... - Page 6 4..Insert.the.microphone’s.3.5.mm.audio.connector.into.your.camera’s.audio.input.jack. You.can.also.mount.the.SCS-98.onto.a.boom.pole.via.the.1/4"-20.threaded.socket.in.the.shoe-mount. adapter..To.mount.the.microphone.onto.a.boom.pole,.make.sure.the.SCS-98.is.turned.off.and.follow. these.steps: 1..Match.the.1/4"-20.threaded.post.on.the.end.of.the.boom.pole.with.the.threaded.socket.in.the..SCS-98’s.shoe-mount.adapter. 2..Screw.the.boom.pole.into.the.threaded.socket.until.secure. 3..Insert.the.microphone’s.3.5.mm.audio.connector.into.the.female.end.of.a.3.5.mm.stereo.extension. cable.(not.included). Note: .Make.sure.the.extension.cable.is.long.enough.to.reach.from.your.audio.recorder.to.the. microphone.at.the.end.of.the.boom.pole. 4..Insert.the.extension.cable’s.3.5.mm.male.audio.connector.into.the.audio.input.jack.of.your.audio. recorder. To.turn.on.the.microphone,.slide.the.power.switch.to.the.ON.position..The.power.LED.will.glow.red. momentarily.to.indicate.that.the.power.is.on,.and.then.will.turn.off.to.conserve.power. Mounting the SCS-98 and Turning It On \ ▪ ▪ ▪ ▪ ▪ ▪ ▪ ▪ ▪ ▪ ▪ ▪ ▪ ▪ ▪ ▪...
- Page 7 Camera setup Boom Pole setup Mounting the SCS-98 and Turning It On ▪ ▪ ▪ ▪ ▪ ▪ ▪ ▪ ▪ ▪ ▪ ▪ ▪ ▪ ▪ ▪ ▪ ▪ ▪ ▪ ▪ ▪ ▪ ▪ ▪ ▪ ▪ ▪...
-
Page 8: Using.the.high-Pass.filter
Using the High-Pass Filter The.high-pass.filter.is.set.to.eliminate.noise.and.ambience.below.80.Hz..This.helps.prevent.the. microphone.from.picking.up.low-frequency.noises.that.can.interfere.with.your.recording,.like.the. rumble.from.an.air.conditioner. To.turn.on.the.high-pass.filter,.slide.the.high-pass.filter.switch.so.it.rests.under.the. .marking..To.turn. off.the.high-pass.filter,.slide.the.switch.so.it.rests.under.the. .marking. Using the Three-Level Gain Switch The.three-level.gain.switch.provides.a.+10.dB.boost.or.-10.dB.pad..Boosting.the.microphone’s.gain.can. be.useful.for.picking.up.low-level.or.distant.sounds.in.a.quiet.environment..To.boost.the.microphone’s. gain.by.10.dB,.slide.the.three-level.gain.switch.so.it.rests.under.the.+10.dB.marking. The.-10.dB.pad.attenuates.the.microphone’s.gain.stage.by.10.dB..This.lowers.the.signal.output.to.help. prevent.distortion.when.recording.loud.sounds..To.turn.on.the.attenuation.pad,.slide.the.three-level. gain.switch.so.it.rests.under.the.-10.dB.marking. To.return.the.microphone’s.gain.to.normal,.slide.the.switch.so.it.rests.under.the.0.dB.marking. Using the High-Pass Filter / Using the Three-Level Gain Switch ▪ ▪ ▪ ▪ ▪ ▪ ▪ ▪... -
Page 9: The.windscreen
The Windscreen The.SCS-98.comes.with.a.foam.windscreen.that.helps.reduce.wind.noise..To.fit.the.windscreen.onto. the.microphone,.rotate.the.windscreen.while.gently.pushing.it.onto.the.microphone’s.grille..Make.sure. that.the.windscreen.covers.the.entire.grille. Troubleshooting Problem Solution The.microphone.is.stuck.in.the. Make.sure.the.locking.wheel.is.fully.loosened. camera’s.shoe.mount. The.microphone.will.not.turn.on. Make.sure.that.a.fresh.battery.is.installed.and.is.in.the. proper.orientation. The.sound.is.distorted. Make.sure.the.microphone’s.audio.connection.cable.is.fully. plugged.into.the.audio.input.jack.on.your.camera.or.audio. recorder. Turn.off.the.+10.dB.boost.on.the.microphone. The.sound.is.too.low. Turn.off.the.-10.dB.pad.on.the.microphone. The Windscreen / Troubleshooting ▪ ▪ ▪ ▪ ▪ ▪ ▪ ▪ ▪ ▪ ▪ ▪ ▪ ▪ ▪... -
Page 10: Specifications
Specifications Transducer type: Back.electret.condenser Pattern: XY.stereo.cardioid Frequency response: . 50.Hz.to.18.kHz Sensitivity: .-69.dB.±3.dB.(0.dB.=.1.V/microbar.at.1.kHz.indicated.by. open.circuit) SPL: 120.dB,.1.kHz.@.1%.THD Three-level gain switch: -10,.0,.+10.dB Output impedance: 200.Ω.±30%.(at.1.kHz) Connector Right-angle.3.5.mm.stereo.male Power requirement: One.AAA.battery.(not.included) Cable: Fixed,.7".(2".straight.+.3".coiled.+.2".straight);.. 17.8.cm.(5.1.cm.straight.+.7.6.cm.coiled.+.5.1.cm.straight) Dimensions: 5.0".×.1.8".×.2.8".(12.7.×.4.5.×.7.2.cm) Weight (with battery): 5.4.oz..(152.g) Specifications ▪ ▪ ▪ ▪... -
Page 11: Warranty
Ten-Year Limited Warranty This.Senal.product.is.warranted.to.the.original.purchaser.to.be.free.from.defects.in.materials.and.workmanship. under.normal.consumer.use.for.a.period.of.ten.(10).years.from.the.original.purchase.date.or.thirty.(30).days.after. replacement,.whichever.occurs.later..The.warranty.provider’s.responsibility.with.respect.to.this.limited.warranty. shall. be. limited. solely. to. repair. or. replacement,. at. the. provider’s. discretion,. of. any. product. that. fails. during. normal.use.of.this.product.in.its.intended.manner.and.in.its.intended.environment..Inoperability.of.the.product.or. part(s).shall.be.determined.by.the.warranty.provider..If.the.product.has.been.discontinued,.the.warranty.provider. reserves.the.right.to.replace.it.with.a.model.of.equivalent.quality.and.function. This.warranty.does.not.cover.damage.or.defect.caused.by.misuse,.neglect,.accident,.alteration,.abuse,.improper. installation.or.maintenance..EXCEPT.AS.PROVIDED.HEREIN,.THE.WARRANTY.PROVIDER.MAKES.NEITHER.ANY. EXPRESS. WARRANTIES. NOR. ANY. IMPLIED. WARRANTIES,. INCLUDING. BUT. NOT. LIMITED. TO. ANY. IMPLIED. - Page 12 www.senalsound.com...
Need help?
Do you have a question about the SCS-98 and is the answer not in the manual?
Questions and answers