Table of Contents
Advertisement
www.nordictrack.com
Model No. NTL14506.0
Serial No.
Write the serial number in the space
above for reference.
Serial Number Decal
QUESTIONS?
If you have questions, or if parts are
damaged or missing, DO NOT
CONTACT THE STORE; please
contact Customer Care.
IMPORTANT: You must note the
product model number and ser-
ial number (see the drawing
above) before contacting us:
1-888-825-2588
CALL TOLL-FREE:
Mon.–Fri. 6 a.m.–6 p.m. MT
Sat. 8 a.m.–4 p.m. MT
ON THE WEB:
www.nordictrackservice.com
CAUTION
Read all precautions and instruc-
tions in this manual before using
this equipment. Save this manual
for future reference.
USER'S MANUAL
Advertisement
Table of Contents

Related Manuals for NordicTrack Commercial 3600


Summary of Contents for NordicTrack Commercial 3600
- Page 1 USER'S MANUAL Model No. NTL14506.0 Serial No. Write the serial number in the space above for reference. Serial Number Decal QUESTIONS? If you have questions, or if parts are damaged or missing, DO NOT CONTACT THE STORE; please contact Customer Care.
-
Page 2: Table Of Contents
Apply the decal in the lo- cation shown. Note: The decals may not be shown at actual size. NordicTrack is a registered trademark of ICON IP, Inc. -
Page 3: Important Precautions
13. To purchase a surge suppressor, see 2. It is the responsibility of the owner to ensure your local NordicTrack dealer or call the tele- that all users of this treadmill are adequately phone number on the front cover of this man- informed of all warnings and precautions. - Page 4 19. Never leave the treadmill unattended while it authorized service representative. Servicing is running. Always remove the key, unplug the other than the procedures in this manual power cord, and switch the reset/off circuit should be performed by an authorized service breaker to the “off”...
- Page 5 Power Lines Service Entrance Conductors 75 Ohm Terminal Service Entrance Equipment Power Service Grounding Ground Electrode System (e.g. Clamps Interior Metal Water Pipe) SAVE THESE INSTRUCTIONS...
-
Page 6: Before You Begin
BEFORE YOU BEGIN Thank you for selecting the revolutionary NordicTrack reading this manual, please see the front cover of this ® COMMERCIAL 3600 treadmill. The COMMERCIAL manual. To help us assist you, note the product model 3600 treadmill offers an impressive selection of fea- number and serial number before contacting us. -
Page 7: Assembly
ASSEMBLY Assembly requires two persons. Set the treadmill in a cleared area and remove all packing materials. Do not dispose of the packing materials until assembly is completed. Note: The underside of the treadmill walking belt is coated with high-performance lubricant. During shipping, a small amount of lubricant may be transferred to the top of the walking belt or the shipping carton. -
Page 8: Left Upright Sleeve (95). Slide The Right Upright
2. Identify the Left Upright (73) and the Right Upright (74). Hold the Right Upright near the Right Base Cover (77) as shown. Insert the Upright Wire Harness (75) up through the rec- tangular hole in the bottom of the Right Upright and out of the top of the Right Upright. - Page 9 4. With the help of a second person, hold the con- sole assembly near the Uprights (73, 74). Console Assembly Connect the Upright Wire Harness (75) to the Console Wire Harness (71). Make sure to con- nect the connectors properly (see the inset drawing).
- Page 10 7. Slide the Right Upright Sleeve (96) up against the console assembly. Attach the Right Upright Sleeve with two 3/4" Screws (4). Attach the Left Upright Sleeve (not shown) to the Left Upright (73) as described above. 8. With the help of a second person, raise the front of the treadmill and insert the crossbar on the Base (83) into the cutout in the cardboard stand as shown.
- Page 11 Before operating the television, you must connect a 75 ohm CATV cable to the 75 ohm terminal on the treadmill, a VCR or DVD player to the audio/video input jack, or a personal audio player to the audio jack below the television on the console. Note: Use a CATV cable to connect to an external source such as a cable box, analog cable, satellite TV box, or VCR.
-
Page 12: How To Use The Chest Pulse Sensor
HOW TO USE THE CHEST PULSE SENSOR HOW TO PUT ON THE CHEST PULSE SENSOR • Store the chest pulse sensor in a warm, dry place. Do not store the chest pulse sensor in a plastic bag The chest pulse sensor consists of two components— or other container that may trap moisture. -
Page 13: Operation And Adjustment
Grounded Outlet Box the right). To purchase a surge suppressor, see Adapter your local NordicTrack dealer or call the telephone Surge Suppressor number on the front cover of this manual and order part number 146148, or see your local electronics store. - Page 14 CONSOLE DIAGRAM FEATURES OF THE CONSOLE tom programs and save them for future use. The console also offers four heart rate programs that The treadmill console offers an impressive array of control the speed and incline of the treadmill to help features designed to make your workouts more effec- you keep your heart rate near target heart rate set- tive and enjoyable.
- Page 15 HOW TO TURN ON THE POWER HOW TO USE THE MANUAL MODE IMPORTANT: If the treadmill has been exposed to 1. Insert the key into the console. cold temperatures, allow it to warm to room tem- perature before turning on the power. If you do not See HOW TO TURN ON THE POWER at the left.
- Page 16 5. Select a display mode and follow your progress 6. Measure your heart rate if desired. with the exercise information on the screen. You can measure your heart rate using either the As you walk or run on the treadmill, the screen can chest pulse sensor (see page 12) or the handgrip display the following exercise information: pulse sensor.
- Page 17 HOW TO USE AN EVENT TRAINING PROGRAM During an event training program, the screen will show the number of kilometers or miles still to be 1. Insert the key into the console. run. See HOW TO TURN ON THE POWER on page To stop the program at any time, press the Stop button.
- Page 18 HOW TO USE A PRESET PROGRAM same speed and/or incline setting may be pro- grammed for two or more consecutive segments. 1. Insert the key into the console. When only three seconds remain in the first seg- ment of the program, a series of tones will sound. If See HOW TO TURN ON THE POWER on page the speed and/or the incline of the treadmill is about to change, the new speed setting and/or in-...
- Page 19 HOW TO CREATE A CUSTOM PROGRAM When the first segment of the program ends, a se- ries of tones will sound and the current speed set- Insert the key into the console. ting and the current incline setting will be saved in memory.
- Page 20 HOW TO USE A CUSTOM PROGRAM If desired, you can redesign the program while using it. To change the speed setting or the in- 1. Insert the key into the console. cline setting for the current segment, simply press the Speed or Incline buttons. When the cur- See HOW TO TURN ON THE POWER on page rent segment ends, the new setting will be saved in memory.
- Page 21 HOW TO USE A HEART RATE PROGRAM will appear on the screen beside the words “Max Target BPM.” If desired, press the Rate/Wt. in- CAUTION: crease and decrease buttons to change the maxi- mum target heart rate setting (see EXERCISE IN- If you have heart prob- TENSITY on page 29).
- Page 22 3. Press the Channel buttons to select the desired To stop the program at any time, press the Stop cable channel. button. To restart the program, press the Start but- ton. The walking belt will begin to move at 1 mph. When the console compares your heart rate to the Note: Complete this step only if you are using ana- target heart rate setting for the current segment of...
- Page 23 HOW TO USE THE INFORMATION MODE Next, press the Channel (CHAN) buttons until the contrast, color, sharpness, or hue level indicator The console features an information mode that allows appears. Adjust the settings, if desired, by pressing you to view treadmill usage information, select a sys- the Volume buttons.
- Page 24 HOW TO ADJUST THE CUSHIONING SYSTEM The treadmill features a cushioning system that re- Platform duces the impact as you walk or run on the treadmill. Cushion To increase the firmness of the walking platform, step off the treadmill and slide the platform cushions toward Increase the front of the treadmill.
-
Page 25: How To Fold And Move The Treadmill
HOW TO FOLD AND MOVE THE TREADMILL HOW TO FOLD THE TREADMILL FOR STORAGE Before folding the treadmill, adjust the incline to the lowest position. If this is not done, the treadmill may be- come permanently damaged. Remove the key and unplug the power cord. -
Page 26: Troubleshooting
TROUBLESHOOTING Most treadmill problems can be solved by following the steps below. Find the symptom that applies, and follow the steps listed. If further assistance is needed, please see the front cover of this manual. PROBLEM: The power does not turn on SOLUTION: a. - Page 27 Next, locate the Reed Switch (20) and the Magnet (12) on the left side of the Pulley (11). Turn the Pulley View until the Magnet is aligned with the Reed Switch. Make sure that the gap between the Magnet and 1/8 in.
- Page 28 PROBLEM: The incline of the treadmill does not change correctly SOLUTION: a. With the key in the console, press one of the Incline buttons. While the incline is changing, re- move the key. After a few seconds, re-insert the key. The treadmill will automatically rise to the maximum incline level and then return to the minimum level.
-
Page 29: Exercise Guidelines
EXERCISE GUIDELINES WARNING: Burning Fat—To burn fat effectively, you must exer- cise at a low intensity level for a sustained period of Before beginning any time. During the first few minutes of exercise, your exercise program, consult your physician. body uses carbohydrate calories for energy. Only after This is especially important for persons over the first few minutes of exercise does your body begin the age of 35 or persons with pre-existing... -
Page 30: Part List
PART LIST—Model No. NTL14506.0 R0409A To locate the parts listed below, see the EXPLODED DRAWING attached in the center of this manual. Key No. Qty. Description Key No. Qty. Description Foot Rail Cover Right Rear Foot Foot Rail Rear Wheel Cushion Track Screw Motor Mount Bushing 3/4"... - Page 31 Key No. Qty. Description Key No. Qty. Description Latch Warning Decal Latch Knob AV Cable Nut Latch Endcap Filter Wire Left Grip Power Cord Grommet Right Grip Rear Roller Washer 4" Ground Wire Incline/Controller Wire Console TV Cable Incline Stop Bracket Speaker Cover Stop Bracket Spacer Speaker...
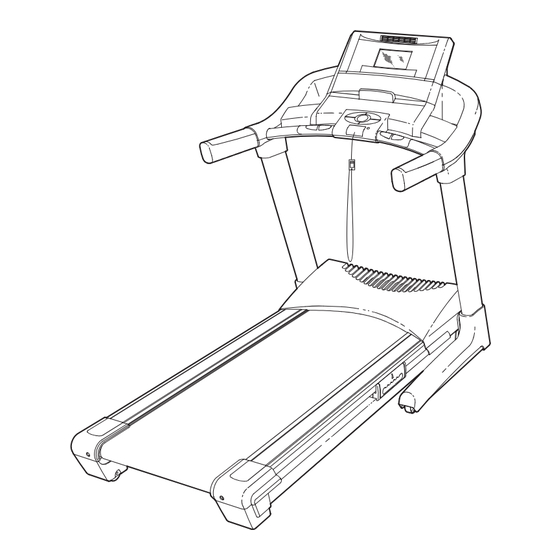
- Page 32 EXPLODED DRAWING—Model No. NTL14506.0 R0409A To identify the parts shown on this EXPLODED DRAWING, see the PART LIST near the end of this manual.
- Page 33 EXPLODED DRAWING—Model No. NTL14506.0 R0409A...
-
Page 34: Ordering Replacement Parts
ORDERING REPLACEMENT PARTS To order replacement parts, please see the front cover of this manual. To help us assist you, be prepared to pro- vide the following information when contacting us: • the model number and serial number of the product (see the front cover of this manual) •...
Need help?
Do you have a question about the Commercial 3600 and is the answer not in the manual?
Questions and answers