Table of Contents
Advertisement
Quick Links
Advertisement
Table of Contents

Subscribe to Our Youtube Channel
Related Manuals for Dan D'Agostino MLife


Summary of Contents for Dan D'Agostino MLife
- Page 1 MLife integrated amplifier Owner’s manual...
-
Page 2: Legal Notifications
D’Agostino MLife manual / page 2 Legal notifications Dan D’Agostino Master Audio Systems is a registered trademark of D’Agostino LLC. The information in this owner’s manual is subject to change without notice. Current Version 1.0 of this manual was produced by the Dan D’Agostino LLC engineering, sales and marketing departments. The information in this manual is the sole property of D’Agostino LLC. Any reproduction in whole or part without the expressed written permission of D’Agostino LLC is prohibited. No material herein may be transmitted in any way including either electronic or mechanical methods for any purpose without expressed written permission of D’Agostino LLC. CAUTION: NO USER SERVICEABLE PARTS INSIDE. Do not open the amplifier’s chassis or remove any of its screws. Contact D’Agostino LLC or your dealer if you have service needs. WARNING: Do not expose this amplifier to moisture or excessive humidity, and do not use it outdoors. Fire hazard may result. The lightning flash with arrowhead, within an equilateral triangle, is intended to alert the user to the presence of uninsulated “dangerous voltage” within the product’s enclosure that may be of sufficient magnitude to constitute a risk of electrical shock to persons. - Page 3 D’Agostino MLife manual / page 3 The exclamation point within an equilateral triangle is intended to alert the user to the presence of important operating maintenanc e (servicing) instructions in the literature accompanyi ng the appliance. MLife limited warranty D’Agostino LLC warrants the MLife against manufacturing defects and defects in materials for five years from the date of purchase from an authorized Dan D’Agostino Master Audio Systems dealer, subject to the conditions listed below: 1) The warranty covers only new products purchased from an authorized D’Agostino LLC dealer. 2) The warranty is nontransferable and is valid only for the original purchaser. 3) The warranty is valid only if the product has been used according to the instructions in the owner's manual. Damage due to accidents or owner abuse or neglect is not covered under this warranty. 4) All service must be performed by an authorized Dan D’Agostino Master Audio Systems dealer. Damage resulting from service by other parties is not covered under this warranty. 5) All products returned for service must be packaged in the original container and must include a photocopy of the original purchase receipt. If the original container has been lost or discarded, contact D’Agostino LLC for a replacement.
- Page 4 D’Agostino MLife manual / page 4 6) If the product must be shipped back to D’Agostino LLC for warranty service, the customer shall pay shipping costs. D’Agostino LLC will pay for return shipping. 7) Before shipping the product to D’Agostino LLC for service, the customer must first obtain a Return Authorization (RA) number by calling D’Agostino LLC. The RA number must be marked clearly on the side of the package. 8) This warranty covers only defects in products made by D’Agostino LLC. It does not cover incidental or consequential damages, or damages to other products resulting from defects in D’Agostino LLC products. 9) U.S. residents: Depending on which state you live in, you may have other rights not elaborated in this document. For further information, contact D’Agostino LLC. 10) Residents of other countries: Your authorized importer or dealer bears the direct responsibility for warranty coverage of your amplifier. Please contact your importer or dealer with requests for service under warranty. D’Agostino LLC will work with your importer or dealer to assure that the terms of the warranty are fulfilled. For questions on warranty and service matters, contact D’Agostino LLC at: +1.480.5753069 or +1.2036448743, or email service@dagostinoinc.com.
- Page 5 D’Agostino MLife manual / page 5 A note from Dan D’Agostino Founder, CEO, and Chief Designer of Dan D’Agostino Master Audio Systems Thank you very much for purchasing the Momentum MLife. I’m especially excited about this component, because it fulfills a dream I’ve had for the last decade: to combine the uncompromised sound quality I demand with the incredible convenience and unlimited listening options provided by networking, the Internet and smartphones. The MLife is pure Momentum, right down to the core analog preamp and power amp circuits, which are essentially the same as the ones in the Momentum integrated amplifier. It has the same musicality—and the same effortless power—that all my amplifiers are known for. With this amp, you can truly achieve the maximum performance your speakers are capable of, no matter what speakers you use. I have to admit I’ve always loved the convenience that massmarket wireless audio products offer. I haven’t been satisfied with their sound, but I knew it was possible to do better. The MLife is proof. For the first time, Momentumquality audio circuitry and build quality are combined with the features found in the best wireless audio products. The listening options are endless. You can listen to fullquality, lossless audio streamed through AirPlay or from USB drives and sticks. You can stream Internet services such as Rhapsody, SiriusXM and TuneIn Radio. You can even stream from your phone or tablet via Bluetooth. And of course, you still have five analog audio inputs—feeding a pure analog, fully balanced signal path—to get the best sound you’ve ever heard from your turntable, music server, or the front left and right channels of your home theater. The analog circuits in the MLife use throughhole construction, in which the contact legs of the components go all the way through the circuit board and are soldered from underneath. This technique was the norm decades ago, but it was mostly abandoned when lessexpensive surfacemount construction was invented. We assemble the MLife by hand in our Arizona factory, literally about 20 feet from my desk. The unit you’ve purchased has been fully tested to ensure it works perfectly and achieves the performance I demand. I hope you enjoy using the MLife to find great new music—and to enjoy your old favorites more than ever before! Sincerely,...
-
Page 6: Package Contents
D’Agostino MLife manual / page 6 Package contents If any of the following items are missing, please contact your dealer: 1 MLife encased in protective static cling vinyl 1 owner’s manual 1 pair of white lifting gloves 1 microfiber cleaning cloth 1 AC power cord 1 DC cable (power supply to main unit) 1 Ethernet cable 1 WiFi router 1 Apple iPod touch preloaded with Momentum app Unpacking the MLife from the Pelican case While the integrated amplifier is still in its case, please move it to a location near the place where it will be installed. Remove all jewelry including watches, rings and belts from your person to avoid damage to the exterior of the integrated amplifier during the removal and installation. We recommend that two people lift the MLife. Because it is machined from solid aluminum, it is much heavier than it looks. The finish of the MLife is extremely delicate. To its pristine surface, we strongly suggest wearing the supplied white lifting gloves when handling to avoid abrasion, fingerprints caused by oils from skin, etc. See Operation: Maintenance for instructions on cleaning. Installation requirements This amplifier’s dense metal chassis makes it much heavier than most other integrated amps, so make sure the surface that will support this component can safely hold its weight. Adequate ventilation must be provided for the amplifier. There should be at least 3 inches of clearance on each side and 3 inches of clearance at the top. The bottom vents must not be obstructed by thick carpet, dust, etc. We recommend that the integrated amp be installed in an open equipment rack to assure proper ventilation. The amp may be installed in a closed cabinet or in an equipment closet, but the cabinet or closet must be designed with substantial ventilation at top and bottom; active ventilation (i.e., powered fans) is preferred. Do not place the integrated amp directly on a carpeted floor. Do not plug the MLife or any other Dan D’Agostino Master Audio Systems product into a power strip or power conditioner. - Page 7 D’Agostino MLife manual / page 7 The MLife is designed with special cone feet that screw into the bottom of the main chassis and match up with indentations on the top of the power supply. The bottom of the power supply has soft feet designed to isolate the main chassis assembly from vibration. (These feet will not stain or mar the surface underneath them.) To attach the cone feet, first remove the vinyl wrap that covers the amplifier and protect the finish. (Save the vinyl wrap in the box to use again if you ever need to ship the amplifier.) Use two people to turn the integrated amplifier chassis upside down and place it on a soft but secure surface—a few towels draped over a sturdy table, for example—and place the vinyl wrap atop the towels for extra protection. Screw the feet all the way into the threaded holes on the bottom of the chassis. Now place the power supply in the place where you want to install the MLife. Use two people to turn the integrated amp back over again. Place it carefully atop the power supply chassis, lining up the points of the cone feet with the indentations on the top of the power supply. If you need to return the amplifier for service If you should need to send the MLife back to us for service, be sure to use the original box and materials for shipment. Before you ship the amplifier, unplug it from the wall and let it cool down for 6 hours. To protect the finish during shipping, rewrap the amplifier in the vinyl covering it came in. Make sure the amp is completely cool and has not been plugged in for 6 hours before you do this. Wrapping the amplifier when it is warm will cause the vinyl to leech into the amplifier’s surface and will permanently damage the finish.
-
Page 8: Front Panel
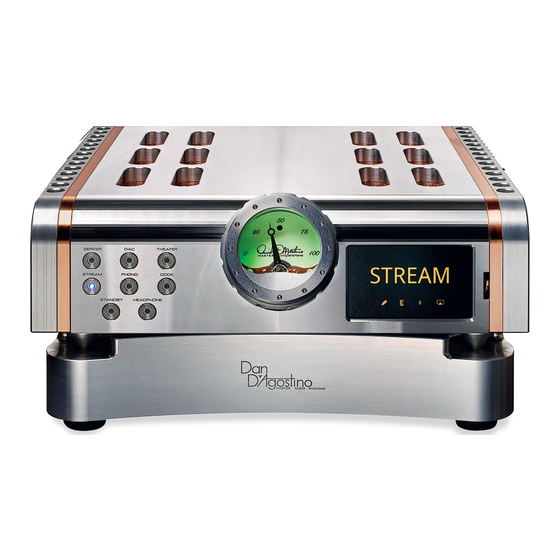
D’Agostino MLife manual / page 8 Front panel 1. Source selector buttons 2. Volume setting indicator 3. Volume control knob 4. LCD screen 5. Bluetooth antenna 6. Standby/Power On button 7. Headphone button... - Page 9 D’Agostino MLife manual / page 9 Rear panel 1. Amplifier DC input (from power supply) 2. Rightchannel speaker output 3. Toslink optical digital audio input 4. USB digital audio input 5. XLR analog audio input jacks 6. Leftchannel speaker output 7. Headphone jack 8. RJ45 Ethernet jack 9. Power supply DC output (to amplifier) 10. IEC power cord connector and fuse holder 11. RS232 control input 12. 3.5mm IR control input...
- Page 10 D’Agostino MLife manual / page 10 Typical MLife configuration This drawing shows a typical MLife installation, using the wireless router included with the MLife. An existing wireless router may be used instead of the supplied router. For best performance, connect all digital file sources (NAS drive, computer, etc.) to the same router that the MLife is connected to. Wired connections are preferred, especially if you are streaming highresolution audio files from a networked source to the MLife. Specific requirements and suggestions for each of the above connections are discussed on the following pages.
- Page 11 D’Agostino MLife manual / page 11 Making connections to the MLife Speaker cables Install the speaker cables first. We recommend the use of highquality cables terminated with spade or ring lugs that will fit the Momentum’s binding posts. We advise against the use of pin connectors, banana plugs or barewire connections. Note that the positive (+) binding post has a red ring and the negative () binding post has a black ring. Double check to confirm that you are connecting your speaker cable’s conductors to the appropriate binding posts—red to positive, black to negative. If your cables are marked to show desired signal flow, orient the cable so that the installation conforms to the cable manufacturer’s instructions. To install speaker cables tipped with spade lugs or rings, use a binding post wrench to carefully loosen each speaker binding post. Turn counterclockwise to loosen. If using spade lugs, insert each spade lug so that its two tines straddle the binding post, then tighten the binding post nut with the binding post wrench. If using rings, remove the binding post nut entirely, place the ring on the binding post, then replace the nut and tighten it securely. A firm connection, tight enough that the spade lug or ring cannot move, is all that’s needed. Too much torque could damage the binding posts. Do not use a conventional wrench to tighten the binding posts. Analog interconnect cables We recommend the use of highquality balanced XLR audio interconnect cables with the MLife. If you have a source device that does not offer XLR connections, please contact your D’Agostino Master Audio Systems dealer to acquire the proper adapters. First connect the source devices (phono, server, etc.) to the appropriate inputs. Connect each XLR cable (or XLRtoRCA adapter) to the appropriate XLR jack by pushing the plug into the jack. To release the plug, push on the small tab atop the jack and gently detach the plug. Never grasp interconnect cables by the cable itself—you could damage the cable. Be sure to connect left channel to left input, right channel to right input. Note that the MLife does not incorporate a phono stage; you will have to add an external phono stage in order to use the MLife with a turntable. We recommend using the Dan D’Agostino Master Audio Systems Momentum phono stage. Digital audio and Ethernet cables The MLife has an input for a Toslink optical digital audio cable, a USB cable and an Ethernet cable. The Toslink and USB cables are frictionfit—just push them in and pull them out. Be sure to grasp the cable by the connector and not by the cable itself, otherwise you could damage the cable. The Ethernet cable pushes into the connector on the MLife and locks. To remove the cable, press the tab on the underside of the connector and gently pull the cable out.
- Page 12 D’Agostino MLife manual / page 12 DC cable for power supply The MLife is supplied with a special multiconductor DC cable that interfaces the power supply with the main chassis. To connect the cable, simply align the connector in the jack on the back panel and push it into place. Be sure to hook up the DC cable before you connect the power supply to the AC outlet, and disconnect the AC before you remove the DC cable. AC cord The power supply is supplied with a highquality AC cord tipped with a 15amp IEC connector at the MLife end and a threeconductor AC plug at the other end. You may use a different power cord with the Momentum if you wish, as long as it is tipped with a 15amp IEC connector and a threeconductor AC plug. After the speaker, interconnect cables, and power supply connector cable are connected, push the IEC connector on the power cord into the IEC jack on the MLife. Do not plug the MLife or any other Dan D’Agostino Master Audio Systems product into a power strip or power conditioner. Headphone jack This 1/4inch jack allows connection of headphones to the MLife. Headphones with a 1/8inch plug may be connected using a 1/8inch to 1/4inch adapter. To activate this output, press the Headphone button on the front panel or the MLife app. This will mute the speakers. To restore sound to the speakers, press the Headphone button again. IR control input This is an IC5type 3.5mm input for a remote control signal. It can be used with third party automation and IR repeater systems. To activate this input, plug in the cable from the thirdparty system. Now plug the power cord back into the power supply and push the Standby button on front of the MLife. The unit will now receive commands from the home automation system. RS232 input This DB9type input allows the MLife to be controlled by home automation systems that use RS232. Consult your D’Agostino dealer for more information.
- Page 13 D’Agostino MLife manual / page 13 Basic setup for appbased control While you can use the MLife on its own, without a portable device to control it, you can get much more functionality out of it if you control it from the included iPod touch, or from a portable device such as an iOS or Android smartphone or tablet. If you wish to use a different device from the iPod touch, download the free app from the Play Store on Android devices or the Apple Store on iOS devices. Simply click on the Play Store or Apple Store and download the app as you would any other. Once the app is installed, you can launch it from the phone or tablet by tapping on the Dan D’Agostino icon. We recommend you keep this icon on your phone’s home screen for easy access. Connecting the router A WiFi router is included with the MLife. Using this router is the easiest way to set up the unit. It will give you basic control through the Momentum app, and if you connect it to an Internet modem, it will allow the MLife to stream directly from the Internet. You may also use your existing router if you wish. If a wired connection from the MLife to the router is not possible, you can purchase a WiFi access point to connect either directly to the MLife or to the supplied router. Simply connect the included Ethernet cable from the RJ45 Ethernet jack on the back of the MLife to one of the outputs of the router (or the access point if you are using one). Now on the iPod touch (or another portable device), select Settings, then WiFi. Flick the ...
- Page 14 D’Agostino MLife manual / page 14 onscreen WiFi switch to the On position. A list of networks will come up. Select the router connected to the MLife. The app on the device should now control the MLife.
- Page 15 D’Agostino MLife manual / page 15 Mating with Bluetooth The MLife’s builtin Bluetooth receiver lets you stream music directly from any smartphone, tablet or Bluetooth equipped computer. To mate your portable device with the MLife, select Stream from the Momentum app, then select Bluetooth from the Stream menu screen. Bluetooth mating processes vary with different portable devices. In general, you should go to the Settings screen on your portable device, select Bluetooth, and scan for available devices. You should see “Momentum MLife” appear as one of the devices. Select it and the two devices will pair. After pairing once, most portable devices will automatically pair with the MLife if its Bluetooth input is selected. With some, you may need to go back into the Settings menu on the device to pair it again. Setting up with AirPlay Apple AirPlay allows the MLife to stream from any passwordprotected, you computer (Mac or Windows) running iTunes, or from any will be prompted to enter iOS device, such as the included iPod touch or an iPhone the password. or iPad. These devices must be connected to the same network as the MLife. Once the MLife is connected, you will see To connect via AirPlay, press the Stream button in the app, the AirPlay logo appear then press the Settings button, then press AirPlay menu in the bottom corner of item. If you are using your home network and it is the playback screen on ...
- Page 16 D’Agostino MLife manual / page 16 the iPod touch or other iOS device, or in your iTunes playback menu. Press the AirPlay icon and select “Momentum MLife” to connect the MLive through AirPlay. ...
- Page 17 D’Agostino MLife manual / page 17 Operating the MLife through the app The MLife app allows control of all of the basic and advanced functions of the unit. Power screen When you enter the Momentum app, if the MLife is not turned on already you will see the Power screen. To power up the MLife, simply press the button on the Power screen. You will then see the Source screen. Source screen The Source screen lets you access the most frequently used controls on the MLife. Source selection: Press one of the six buttons (Server, DAC, Theater, Stream, Phono or Dock) to select these sources. The Stream button accesses many networkbased and wireless sources, such as AirPlay and Bluetooth. Mute: Flick the onscreen switch in the middle of the right side of the screen to the left to mute the audio from the MLife. To restore the audio, flick the switch to the right. The Mute function does not work when using headphones. Volume: To adjust the MLife’s volume, touch the ring around the onscreen meter. Now move your finger clockwise around the meter to raise the volume, or counterclockwise to lower the volume.
- Page 18 D’Agostino MLife manual / page 18 Standby: This button turns the power for the MLife main chassis off and on. Headphones: Press this to activate the headphone output and mute the speakers. Stream screen The Stream screen accesses the various Internetbased and wireless sources that the MLife can access. Airplay: This button activates the MLife’s AirPlay connection. To use AirPlay, you will need an iOS device (such as the included iPod touch), a Mac computer, or a Windows computer with iTunes installed. See the “Setting up with AirPlay” section earlier in this manual. Bluetooth: Any smartphone, tablet or Bluetoothcapable computer can connect wirelessly to the MLife. For instructions on how to connect your device through Bluetooth, see the “Mating with Bluetooth” section earlier in this manual. Media Server: This button allows you to connect networked computers and hard drives through DLNA. For more information, please contact your dealer. USB: This button lets you access audio files stored on a USB stick or drive connected to the MLife’s rear USB jack. Pressing the button will bring up a menu in the app that ...
- Page 19 D’Agostino MLife manual / page 19 shows the music stored on the USB device, if the device is connected. It may take a few moments for the MLife to scan through all the music on the USB device, depending on how much music is stored on the device. Optical In: Press this to use the Toslink optical digital input on the back of the MLife. Recently Played: This button brings you back to the most recently played streaming source. Settings: This button accesses networking configuration and other advanced adjustments such as firmware upgrade, language, factory reset, etc.
- Page 20 D’Agostino MLife manual / page 20 Other Settings screen The Other Settings screen lets you access less frequently needed controls. Phase: Press the Normal or Inverted button to flip the system’s absolute phase. There’s no “right” setting; it varies from recording to recording. Just use whichever sounds best on the recording you’re listening to at the moment. Gain: The Increased button boosts gain by 6 dB. Use this if your source device signal level is low (this happens often with phono preamps) or if the digital stream you’re playing requires you to turn the MLife’s volume up to or close to full. Use the Normal button to go back to default gain. Dark Mode: These buttons turn the MLife’s front LCD screen and the backlight for the front meter on and off, for listeners who prefer a dark environment. Balance: To adjust the MLife’s lefttoright channel balance, touch the ring around the onscreen meter. Now move your finger clockwise around the meter to shift the balance to the right, or counterclockwise to shift the balance to the left. The onscreen needle on the meter will show you the balance setting. ...
- Page 21 D’Agostino MLife manual / page 21...
- Page 22 D’Agostino MLife manual / page 22 Basic operation from the front panel Initial powerup of the MLife To powerup the MLife, press the Standby button located on the front panel (or the one on the Momentum app). After power is switched on, the MLife requires approximately 30 minutes to reach optimal operating temperature. Although the amp will sound excellent upon initial listening, the sound quality will improve as it warms up, much as the flavor of a fine red wine improves if it is allowed to breathe for a few minutes. Basic operation Operation from the front panel is simple but here’s a brief description if you need it. Standby: The Standby button is located on the front panel of the MLife. When the unit is in standby (off) mode, the LED in the middle of the button will be lit. Push the button to turn the unit on. When power is on, the LED in the middle of the button will go off and the volume indicator will illuminate. Push the button once more to turn the unit off. The light for the volume indicator will go out and the LED in the middle of the Standby button will light up. Volume: Turn the ring around the volume indicator clockwise to raise the volume and counterclockwise to lower it, or use the Volume +/ buttons on the remote. The needle indicator will move toward the right as you increase the volume and to the left as you decrease it. We recommend you turn the volume down when you initially power up the system, and raise it only when you are assured that all components in the system are operating properly. You can also adjust volume through the Momentum app. Source selection: Simply push the frontpanel button or remote button that corresponds with the source you want to hear. The LED in the middle of the frontpanel button for the currently active source will light up. To access different streaming options, press the Stream button on the Momentum app to access the Stream page. Theater: By using the Theater input, you can interface the MLife with a multichannel home theater audio system. To use it, connect the left and rightchannel outputs of your surroundsound processor to the MLife’s Theater input. This input bypasses the volume control; use your surroundsound processor’s volume control instead. Push the Theater button on the front panel or remote when you want to listen to surround sound. Push any other source button to return the system to stereo mode. Headphone: Press this to activate the headphone output and mute the speakers. Press it again to restore sound to the speakers. The Mute button in the app will not function when headphones are used.
-
Page 23: Advanced Operations
D’Agostino MLife manual / page 23 Advanced operations The Momentum app offers several adjustments that allow finetuning of setup and operation. Settings screen The Settings screen, available from a button on the Stream screen, lets you adjust many aspects of the MLife’s operation. Network Wizard: Press this button to walk through connecting the MLife to your home network. Consult your dealer for more information. Under most circumstances, the MLife will connect automatically. Network Info: This button brings up info and status of your network connection. Language: This button brings up a menu that allows you to select the language used for the app. Current options are English and Deutsch (German). Skin: To change the appearance of the app, press this button. Current options are Default (the skin you see here) and Alternative A. ... - Page 24 D’Agostino MLife manual / page 24 Firmware Update: Used to update the MLife’s firmware. Do not use this unless instructed to by your dealer or Dan D’Agostino Master Audio Systems. Version: Pressing this button will show you the firmware version currently running. Accounts: This button allows you to access the signon settings for the Internet streaming services available through the MLife. Factory Reset: Restores the original factory settings. CAUTION: Choosing this option will require reentering all network and other settings. AirPlay: This button access setup for Apple AirPlay network streaming. See the “Setting up with AirPlay” section earlier in this manual. Display: Press this to bring up a submenu that allows adjustment of the LCD screen on the front of the MLife. Display setup screen This screen, accessed by pushing Display on the Settings screen, allows you to adjust the operation of the LCD on the front of the MLife. Display Intensity: Use this option to adjust the brightness of the screen. Press the Display Intensity label and you will have four brightness options: Off, Low, Med and High. Press the option you want. Display Timeout: You can set the display to shut off automatically after you have made an adjustment or changed the music source. Press the Display Timeout button and you will have four options: Off (display always on), 5 sec., 10 sec., 20 sec. and 30 sec. Press the option you want. . ...
-
Page 25: Maintenance
D’Agostino MLife manual / page 25 Maintenance The MLife requires no user maintenance other than to keep it clean and ensure that the vents remain unobstructed. Like a piece of fine furniture, the MLife has a fine, highly polished finish that can be easily damaged. Do not rub or polish the finish, and do not allow objects to come in contact with it. To clean the integrated amp, spray a small amount of distilled water onto the supplied microfiber cloth and gently wipe the integrated amp’s surface along the direction of the metal grain, with light pressure only. Never use a circular motion or heavy pressure, as this can permanently scratch the machined surfaces. Do not rub the surface with the cloth, and do not spray any liquid directly onto the integrated amp. If dust or other contaminants or objects collect around the vents at the top and bottom of the integrated amp, remove small objects by hand and use a shop vacuum or hand vacuum to remove the dust. Use a brush attachment on the vacuum to avoid scratching the integrated amp’s surface. If you should need to transport or ship the integrated amp, be sure to use the original packing materials. Allow the integrated amp to cool down for at least one hour before you wrap or package it. -
Page 26: Troubleshooting
D’Agostino MLife manual / page 26 Troubleshooting MLife will not power up If the front meter does not illuminate when you press the Standby button on the front panel or in the app, follow the procedure outlined below. If one step succeeds in activating the power, stop there and ignore the other steps. 1. If the LED in the middle of the Standby button on the front of the integrated amp is lit, push the button to turn the MLife on. 2. If the LED in the middle of the Standby button is not lit, check to make sure the AC cord is plugged into the wall outlet. 3. Check at the back of the power supply to make sure the 15amp IEC connector is pushed all the way into the jack on the back of the power supply. 4. Check to make sure the power supply connector cable is firmly connected to the power supply and the MLife. 5. Pull out the fuse connector at the back of the power supply, below the 15amp IEC power cord connector. Check to see if the fuse is blown. (The conductor inside the fuse will be severed and you may see burn marks on the fuse.) Be sure to replace the fuse with one of the proper value and type. Consult your dealer or D’Agostino LLC. 6. Check your household electrical box to make sure the circuit breaker has not been tripped. If it has, flip the breaker back on. 7. If the breaker trips again, check the speaker cable connection on the MLife and the speaker to make sure that the terminals are not shorted, and check the entire length of the cable to ensure there has been no damage to it. 8. If all of these steps fail to return power to the MLife, consult your dealer for service. Front indicator is illuminated but you hear no sound Follow these steps in order. If one step succeeds in restoring the sound, stop there and ignore the other steps. 1. If you’re listening to speakers, make sure the LED in the middle of the Headphone button on the front panel is off. If you’re listening to headphones, make sure the LED in the middle of the Headphone button is on, and that the headphones are firmly plugged into the back of the MLife. 2. Check your source device to make sure it is turned on. 3. Check the source device to make sure it is playing, i.e., if it’s a record player, make sure it’s spinning and the tonearm is lowered, or if it’s from a phone, tablet or computer, make sure the music is playing (usually there will be an onscreen time counter that will count down or up as the tune plays). 4. Make sure the MLife is not muted and that the desired source is selected. 5. If you’re using an analog source, check the linelevel connections between the source device and the MLife. Reconnect any cables that may have become disconnected. - Page 27 D’Agostino MLife manual / page 27 6. Check the cables between the MLife and the speakers to make sure they are properly connected and that the cables have not become damaged. 7. If you’re using an analog source and you have a spare pair of interconnect cables (even cheap ones will work temporarily), try using them instead of the interconnect cables between the source device and the MLife. If this restores sound, replace the defective cables. 8. If all of these steps fail to restore sound, consult your dealer for service. Sound comes from only one channel Follow the below steps in order. If one of these steps succeeds in restoring the sound, stop there and ignore the other steps. 1. Bring up the Other Settings screen in the app to see what the balance setting is. If the needle on the dial is moved to one side or the other, adjust the balance according to the steps on page 14. 2. If you’re using an analog source, check the interconnect connections between the source device and the MLife to make sure all cables (and XLRtoRCA adapters, if you’re using them) are securely connected. 3. Check speaker cable connections for the malfunctioning channel. Reconnect any cables that may have become disconnected. Inspect the cable to make sure it has not been damaged. If it has been damaged, replace it. 4. If you’re using an analog source, swap the leftchannel interconnect cable from the source device to the integrated amp with the rightchannel interconnect cable. If the malfunctioning channel now works but the other channel does not, replace the defective interconnect cable with one of the exact same type. You may have to replace both right and left cables to make sure they match. 5. If you’re using a turntable and a phono preamp, check to make sure the connections between them are functioning properly. 6. Try using a different source device. If the alternate source device delivers sound in both channels, it is likely the original source device is defective. Consult the manufacturer of that source device or your dealer for further information. 7. Try switching the cables between the two speakers. If sound still doesn’t come from the channel that wasn’t working—i.e., if one of the speakers remains silent whether it’s connected to the left or rightchannel output of the MLife, and the other speaker works either way—it is likely the speaker is malfunctioning. Consult the manufacturer of the speaker or your dealer for further information. 8. If all of these steps fail to restore proper sound, consult your dealer for service.
- Page 28 D’Agostino MLife manual / page 28 iPod touch or other device will not control MLife Follow the below steps in order. If one of these steps succeeds in restoring control, stop there and ignore the other steps. 1. Make sure the MLife is receiving power from the power supply. If neither the LED light on the Standby button nor the backlight behind the volume dial is lit, follow the troubleshooting steps under “MLife will not power up.” 2. Make sure the iPod touch or other portable device is connected to the same network as the MLife. Touch the Settings button on the device to see if the WiFi connection is active and make sure it is connected to the correct network. 3. Make sure the router connected to the MLife (and the access point, if applicable) is turned on. 4. Check to make sure the Ethernet cable between the MLife and the router or access point is connected. If the connection looks good and both plugs are firmly inserted, try substituting a different cable. 5. If none of these steps restores control, please contact your dealer for assistance. ...
-
Page 29: Specifications
D’Agostino MLife manual / page 29 Specifications Power output 8Ω 200 watts per channel 4Ω 400 watts per channel 2Ω 800 watts per channel Frequency response 0.1 Hz to 1 MHz, 1 dB 20Hz to 20 kHz, ±0 dB Distortion <0.1%, 20 Hz to 20 kHz Signaltonoise ratio 95 dB, unweighted Power consumption at standby 20 watts Inputs 5 balanced XLR stereo, USB digital audio, Toslink digital audio, RJ45 Ethernet Outputs 5way binding posts Supported Digital Formats Lossless: DSD, WAV, FLAC, AIFF and PCM up to 24/192 resolution Lossy: AAC, MP3, Ogg Vorbis and WMA Weight 120 lbs / 54.4 kg with power supply Dimensions (integrated amp) 4.3 x 18 x 16 inches (hwd) 10.9 x 45.7 x 40.6 cm (hwd) Dimensions (power supply/base) 4 x 18 x 16 inches (hwd) 10.2 x 45.7 x 40.6 cm (hwd) - Page 30 D’Agostino MLife manual / page 30 For more information about Dan D’Agostino Master Audio Systems, please visit: www.dagostinoinc.com...
Need help?
Do you have a question about the MLife and is the answer not in the manual?
Questions and answers